background image

1   G e t t i n g   s t a r t e d

Preparing to use your Acer n30

  9

you can use your handheld for 8 straight hours of operation (backlight inactive) 
before you need to recharge the battery.

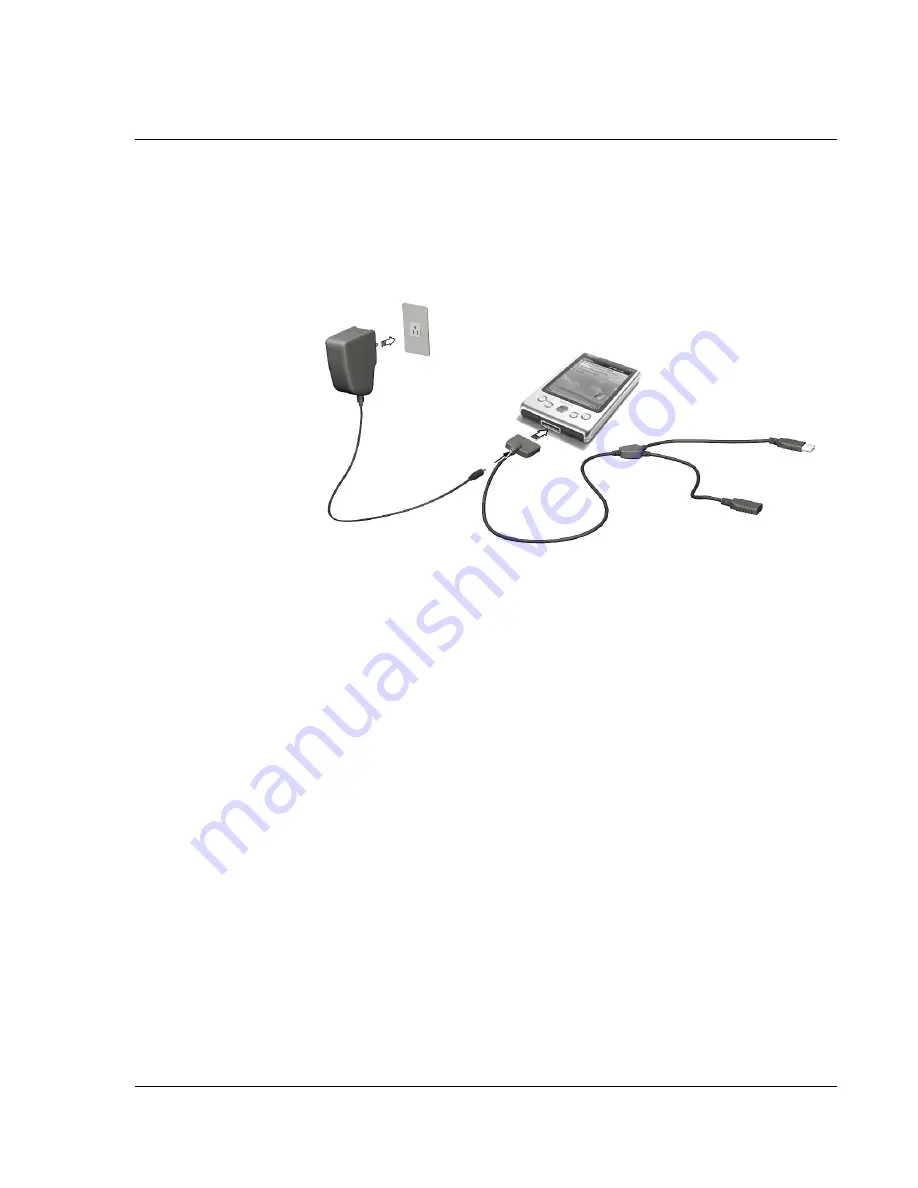
To charge your Acer n30

Connect the AC adapter connector to the handheld, then plug the other end of the 
AC adapter into any AC outlet.

Power LED status during charging:

• Charging - LED indicator flashes green

• Charging complete - LED indicator steady green

If the battery level becomes low in the course of normal use, a status icon appears on 
the handheld screen indicating low or very low battery status. Perform an ActiveSync 
operation to back up your data; then recharge the battery.

If your handheld shuts down (i.e., battery is competely drained out) you have about 
72 hours (3 days) to recharge the battery before you lose all data on your handheld’s 
internal memory.

Setting up your Acer n30

After you have initially charged your handheld for three hours, you can now set it up. 
Refer to the instructions below. 

Summary of Contents for n30

Page 1: ...Manual for Acer n30 Handheld ...

Page 2: ...ry documents and publications No part of this publication may be reproduced stored in a retrieval system or transmitted in any form or by any means electronic mechanical photocopy recording or otherwise without the prior written permission of Acer Inc DISCLAIMER AND LIMITATION OF LIABILITY Acer and its subsidiaries makes no representations or warranties either expressed or implied with respect to ...

Page 3: ... the Acer n30 system Setup and maintenance procedures Viewing and entering data Using the application programs bundled with you handheld Taking advantage of your handheld s expansion features Synchronising data between your handheld and your computer Connecting your handheld to a computer a network or the Internet Personalising your handheld with your own preference settings This Manual introduces...

Page 4: ...About this Manual iv ...

Page 5: ...nected to the Internet with the Microsoft Pocket Internet Explorer Create an on the go backup file Expand your handheld s capabilities using either the built in SD MMC slot Exchange information between devices that have Bluetooth capabilities Beam information to another IR enabled device Customise your handheld based on your personal requirements and preferences Your guides To help you use your Ac...

Page 6: ...creens Never use an actual pen or pencil or other sharp object on the screen surface 2 Your handheld is not waterproof and should not be exposed to rain or moisture Under extreme conditions water may enter the circuitry through the front panel buttons or expansion slots In general treat your handheld as you would a pocket calculator or other small electronic device 3 Take care not to drop your han...

Page 7: ...stened with diluted window cleaning solution Resetting your Acer n30 You may have to perform a reset if your handheld no longer responds to the buttons on the screen Performing a soft reset A soft reset allows your handheld to get a fresh start similar to rebooting a computer All records and entries are retained after a soft reset To perform a soft reset Using the tip of your stylus lightly press ...

Page 8: ... Your handheld is not just a financial investment but a wealthy source of personal information some of which may be confidential so it is only logical to protect it from any unauthorized access The security setting of your handheld gives you the option of assigning a lock password that will be required for access after a set period of inactivity To assign a password 1 Tap Settings 2 On the Persona...

Page 9: ...r n30 tour 3 Front view 3 Left view 4 Top view 5 Bottom view 6 Preparing to use your Acer n30 6 Installing the Microsoft ActiveSync software 7 Connecting the computer 8 Charging your Acer n30 8 Setting up your Acer n30 9 Performing the first synchronisation process 10 Command interface 11 Handheld buttons and the stylus 11 Today screen 12 Start menu 13 Command bar 13 Pop up menus 13 2 Entering dat...

Page 10: ...cts 33 Creating a contact 33 Finding a contact 34 Tasks 35 Creating a task 35 Notes 37 Creating a note 37 Inbox 38 Synchronising email messages 38 Connecting directly to an email server 38 Using the Message list 39 Composing a message 39 Managing email messages and folders 40 5 Managing Microsoft Pocket PC 2003 companion programs 41 Pocket Word 41 To create a new file 41 To use the Pocket Word fil...

Page 11: ... 65 Transferring items using infrared or Bluetooth 65 To send information via infrared 65 Connecting to the Internet 67 To create a modem connection to an ISP 67 To create a connection to an ISP over Bluetooth 67 To create a wireless Ethernet connection to an ISP 68 Connecting to a network 69 To create a modem connection to a network 69 To create a wireless Ethernet connection to a network 69 To c...

Page 12: ...ding programs 75 Removing programs 77 Appendix Exchanging and updating data using Bluetooth Utility only for n30 B 79 Bluetooth Utility 79 Bluetooth Settings 80 Bluetooth Manager 80 Bluetooth Browser 81 Remote Device Services 81 Index 85 ...

Page 13: ...nimum system and program requirements Intel Pentium processor minimum 233 MHz 64 MB RAM 120 MB disk space CD ROM drive USB port or Infrared port SVGA or compatible graphics card supporting 256 colours Microsoft Windows XP 2000 ME or 98SE Microsoft Internet Explorer 4 01 Features summary Performance Samsung S3C2410 Application Processor 266 MHz System memory 64 MB SDRAM for application storage 32 M...

Page 14: ...when backlight is inactive NOTE Length of battery operation will depend on power consumption which is based on system resource use For example constantly using the backlight or using power demanding applications will shorten battery life between charges 3 hour charging time from empty to full capacity Design and ergonomics Stylish light and thin design User friendly navigation features Scroll whee...

Page 15: ...ED indi cator Bluetooth LED indicator for n30 B only status description Flashing blue Bluetooth is on 3 LCD touchscreen Displays the applications and data stored in your handheld It is touch sensitive and responds to the stylus or your finger 4 Quick button for Today Displays the Today screen For more information on this screen refer to page 12 5 Quick button for Calendar Activates the Calendar pr...

Page 16: ...Contacts Activates the Contacts program For more information on this program refer to page 33 8 Quick button for Inbox Activates the inbox program For more information on this program refer to page 38 No Component Description No Label Description 1 Power button Press to turn on your handheld on power LED lights up green if it is off and returns to the last screen that was displayed and off if it i...

Page 17: ...Secure Digital or MultiMedia Card allowing you to add more memory install add on applications or use audio or text files stored on it with internal applications You can also use expansion cards to back up data from your handheld 3 Dummy SD card Use this to protect the SD connector when no card is installed 4 Microphone Inputs audio into your handheld 5 Stylus holder Secures the stylus to your hand...

Page 18: ...ync operation No Label Description 1 Soft reset switch A soft reset allows your handheld to get a fresh start similar to rebooting a computer All records and entries are retained after a soft reset 2 Proprietary 26 pin I O connector Connects your handheld to a portable or desktop computer and DC power supply to an AC wall outlet to charge the battery USB Host USB Client Serial DC power in 3 Hard r...

Page 19: ... install Outlook 2002 from this CD before installing ActiveSync Do not copy the ActiveSync files to your computer s hard disk You must use the Acer n30 Handheld Companion CD to place the files in their proper locations and to decompress the files To install the Microsoft ActiveSync software 1 Exit any open programs including those that run at startup and disable any virus scanning software 2 Inser...

Page 20: ...echnology NOTE Don t plug the USB host into USB client To connect the computer Plug the 3 in one sync cable into the 26 pin I O connector on the bottom of your handheld and plug the USB client connector into an available USB port on your computer Charging your Acer n30 For initial use you need to charge your handheld for three hours After that you can charge it for a few minutes each day to rechar...

Page 21: ...complete LED indicator steady green If the battery level becomes low in the course of normal use a status icon appears on the handheld screen indicating low or very low battery status Perform an ActiveSync operation to back up your data then recharge the battery If your handheld shuts down i e battery is competely drained out you have about 72 hours 3 days to recharge the battery before you lose a...

Page 22: ...eft side See Left view on page 4 for the location of the power button 2 Follow the onscreen instructions to set up your handheld Performing the first synchronisation process After completing the setup procedures you can now perform the first ActiveSync operation with the help of the New Partnership setup wizard This wizard will help you ...

Page 23: ...process will automatically begin when you finish using the wizard After your first synchronisation take a look at Calendar Contacts and Tasks on your handheld You ll notice that information you ve stored in Microsoft Outlook on your computer has been copied to your handheld and you didn t have to type a word Disconnect your handheld from your computer and you re ready to go Once you have set up Ac...

Page 24: ...p menu that appears tap the action you want to perform Today screen The center of the Today screen provides at a glance information that you need for the day Tap an item to view or edit details At the top to the screen are status icons Tap an icon to view details or change options These icons appear at the top of every screen on your handheld device not just the Today screen When you turn on your ...

Page 25: ...mand bar You can use its menus and buttons to perform tasks in programs Depending upon which program you are using the buttons may vary from those depicted below To create a new item in the current program tap New To see the name of a button tap and hold the stylus on the button Drag the stylus off the button so that the command is not carried out Pop up menus You can use pop up menus to quickly s...

Page 26: ...1 Getting started Command interface 14 ...

Page 27: ...tiveSync Using the input panel Use the input panel to enter information in any program on your handheld You can either type using the soft keyboard or write using Letter Recognizer Block Recognizer or Transcriber In either case the characters appear as typed text on the screen NOTE Transcriber is available only for the English and European Acer n30 models To show or hide the input panel 1 Tap the ...

Page 28: ... soft keyboard 1 Tap the arrow next to the Input Panel button then Keyboard 2 On the soft keyboard that is displayed tap the keys with your stylus To use Letter Recognizer With Letter Recognizer you can write letters using the stylus just as you would on paper 1 Tap the arrow next to the Input Panel button then Letter Recognizer 2 Write a letter in the box When you write a letter it is converted t...

Page 29: ...nce or more of information Then pause and let Transcriber change the written characters to typed characters 1 Tap the arrow next to the Input Panel button and then Transcriber 2 Write anywhere on the screen NOTE For specific instructions on using Transcriber with the Transcriber Input Panel open tap the question mark in the lower right hand corner of the screen To select and edit typed text If you...

Page 30: ...at written text you must select it first 1 Tap and hold the stylus next to the text you want to select until the insertion point appears 2 Without lifting drag the stylus across the text you want to select If you accidentally write on the screen tap Tools then Undo and try again or You can also select text by tapping the Pen button to deselect it and then dragging the stylus across the screen 3 Yo...

Page 31: ...eturn to the original writing To do so 1 Tap and hold the incorrect word tap one word at a time 2 On the pop up menu tap Alternates A menu with a list of alternate words appears 3 Do either of the following a Tap the word you want to use b Tap the writing at the top of the menu to return to the original writing NOTE Hyphenated words foreign words that use special characters such as accents and som...

Page 32: ...level to 300 using the Tools menu Write the letters of a word closely and leave big gaps between words so that your handheld can easily tell where words begin and end Drawing on the screen You can draw on the screen in the same way that you write on the screen The difference between writing and drawing on the screen is how you select items and how they can be edited For example selected drawings c...

Page 33: ...vel To select a drawing If you want to edit or format a drawing you must select it first Tap and hold the stylus on the drawing until the selection handle appears To select multiple drawings deselect the Pen button and then drag to select the drawings you want To edit a drawing To cut copy and paste selected drawings Tap and hold the selected drawing Tap an editing command on the pop up menu or ta...

Page 34: ...ote If you want to include the recording in a note open the note first In Inbox you can add a recording to an email message To create a recording 1 Hold your handheld s microphone near your mouth or other source of sound NOTE Refer to Top view on page 5 for the location of your handheld s microphone 2 Start recording by tapping the Record button on the Recording toolbar 3 Make your recording 4 To ...

Page 35: ...y used messages into the text entry area To insert a My Text message 1 Tap My Text on the screen s command bar 2 Tap a message NOTE You can add text after inserting a My Text message before sending it To edit a My Text message 1 In the Tools menu tap Edit and then tap My Text Messages 2 Select the message you wish to edit and make desired changes ...

Page 36: ...2 Entering data in your Acer n30 Using My Text 24 ...

Page 37: ...n the front panel of your handheld The icons on the buttons identify the programs Switching between applications Choose from the following options to switch between applications Select another program from the menu Press any of the Quick buttons on the front panel of your handheld NOTE Some program names have been abbreviated in check boxes and drop down menus To see the full spelling of an abbrev...

Page 38: ...load new programs and files from the Internet Notes Create handwritten or typed notes drawings and recordings Tasks Keep track of your tasks Pocket Excel Create new workbooks or view and edit Excel workbooks created on your computer MSN Messenger Send and receive instant messages with your MSN Messenger contacts Pocket Word Create new documents or view and edit Word documents created on your compu...

Page 39: ... and manage your files easily To use Find The Find function on your handheld helps you quickly locate information 1 On the menu tap Find 2 Enter the text you want to find then select a data type TIP To quickly find information that is taking up storage space on your handheld select Larger than 64 KB in Type 3 Tap Go to start the search Tap here to start search Type text you want to find ...

Page 40: ...tions and information Finding and organising information 28 To use File Explorer Use File Explorer to locate files on your handheld and to organise these files into folders On the menu tap Programs and then File Explorer ...

Page 41: ...t Notes create textual or recorded notes of your thoughts and ideas Inbox write edit and view your emails on the road You can use these programs individually or together For example email addresses stored in Contacts can be used to address e mail messages in Inbox Calendar Calendar enables you to conveniently manage your schedules and appointments or any other activities associated with a time and...

Page 42: ...ndar 30 To open Calendar Press the Calendar Quick button on the front panel of your handheld Calendar will open to today s schedule NOTE You can customise the Calendar display such as changing the first day of the week by tapping Options on the Tools menu ...

Page 43: ...ge them 5 Enter other desired information You will need to hide the input panel to see all available fields 6 To add notes tap the Notes tab You can enter text draw or create a recording For more information on creating notes see Notes later in this chapter 7 After entering the desired information tap OK TIP If you select Remind me in an appointment your handheld will remind you according to the o...

Page 44: ...g requests sent by tapping Tools and then Options If you send and receive email messages through ActiveSync select ActiveSync To schedule a meeting 1 Create an appointment 2 In the appointment details hide the input panel and then tap Attendees 3 From the list of email addresses you ve entered in Contacts select the meeting attendees The meeting notice is created automatically and placed in the Ou...

Page 45: ... open to the Contacts list NOTE To change the way information is displayed in the list tap Tools and then Options Creating a contact 1 Tap New 2 Using the input panel enter a name and other contact information You will need to scroll down to see all available fields 3 To assign the contact to a category scroll to and tap Categories and select a category from the list In the contact list you can di...

Page 46: ...beled All Contacts by default and select the type of contact that you want displayed To show all contacts again select All Contacts To view a contact not assigned to a category select None To view the names of companies your contacts work for in the contact list tap View By Company The number of contacts that work for that company will be displayed to the right of the company name Tap Find enter t...

Page 47: ...ng a task 1 Tap New 2 Using the input panel enter a description 3 You can enter a start date and due date or enter other information by first tapping the field If the input panel is open you will need to hide it to see all available fields 4 To assign the task to a category tap Categories and select a category from the list In the task list you can display tasks by category 5 To add notes tap the ...

Page 48: ...ap OK to return to the task list TIP To quickly create a task with only a subject tap Entry Bar on the Tools menu Then tap Tap Here to add a new task and enter your task information Using the summary screen When you tap a task in the task list a summary screen is displayed To change the task tap Edit ...

Page 49: ...hen you create the recording it will be included in the note as an icon If the note list is displayed it will be created as a stand alone recording To open Notes Tap then Notes Notes will open to the Notes list Creating a note 1 Tap New 2 Create a note by writing drawing typing or recording NOTE For more information about using the input panel writing and drawing on the screen and creating recordi...

Page 50: ... Outbox folder on your handheld are transferred to Exchange or Outlook and then sent from those programs Email messages in subfolders must be selected in ActiveSync on your computer in order to be transferred TIP You can also synchronise email messages with your computer from a remote location For more information see the ActiveSync Help menu in your computer Connecting directly to an email server...

Page 51: ...ou want to retrieve in full during your next synchronisation or email server connection Follow the steps below 1 In the message list tap and hold the message you want to retrieve 2 On the pop up menu tap Mark for Download The icons in the Inbox message list give you visual indications of message status Specify your downloading preferences when you set up the service or select your synchronisation ...

Page 52: ...e folders you create and the messages you move will then be mirrored on the server For example if you move two messages from the Inbox folder to a folder named Family and you have designated Family for synchronisation the server creates a copy of the Family folder and copies the messages into that folder You can then read the messages while away from your computer If you use POP3 and you move emai...

Page 53: ...give you easy access to copies of your documents You can Create new documents on your handheld such as letters meeting minutes and trip reports or you can copy documents from your computer to your handheld Synchronise documents between your computer and your handheld so that you have the most up to date content in both locations To create a new file Tap Programs Pocket Word and then New A blank do...

Page 54: ...e pop up menu To enter information You can enter information in Pocket Word in one of four modes typing writing drawing and recording which are displayed on the View menu Each mode has its own toolbar which you can show and hide by tapping the Show Hide Toolbar button on the command bar If you re opening a Word document created on a computer select Wrap to Window on the View menu so that you can s...

Page 55: ...t to find text by tapping Edit and then Find Replace Writing mode In writing mode use your stylus to write directly on the screen Ruled lines are displayed as a guide and the zoom magnification is greater than in typing mode to allow you to write more easily For more information on writing and selecting writing see Writing on the screen on page 17 If you cross three ruled lines in a single stylus ...

Page 56: ...ing the drawing box becomes part of the drawing For more information on drawing and selecting drawings see Drawing on the screen on page 20 Recording mode In recording mode embed a recording into your document Recordings are saved as wav files For more information on recording see Recording a message on page 22 For more information on using Pocket Word tap Programs Pocket Word then tap Help from t...

Page 57: ... and formatting already provided You can open only one workbook at a time when you open a second workbook you ll be asked to save the first You can save a workbook you create or edit in a variety of formats including Pocket Excel pxl Excel xls NOTE When you choose to create a new document you will be prompted to save any already open document To create a Pocket Excel file list Pocket Excel contain...

Page 58: ...Excel View in full screen mode to see as much of your worksheet as possible Tap View and then Full Screen To exit full screen mode tap Restore Show and hide window elements Tap View and then tap the elements you want to show or hide You might want to freeze the top and left most panes in a worksheet to keep row and column labels visible as you scroll through a sheet a Select the cell where you wan...

Page 59: ...N Messenger Service If you have a Hotmail or MSN account you already have a Passport Once you have obtained either a Microsoft Passport or a Microsoft Exchange account you are ready to set up your account TIP Sign up for a Microsoft Passport account at http www passport com Get a free Microsoft Hotmail email address at http www hotmail com Setting up Before you can connect you must enter Passport ...

Page 60: ... seen in the Tools menu tap My Status and select Appear Offline If you block a contact you will appear offline but will remain on the blocked contact s list To unblock a contact tap and hold the contact then tap Unblock on the pop up menu Chatting with contacts 1 Tap a contact name to open a chat window 2 Enter your message in the text entry area at the bottom of the screen or tap My Text to enter...

Page 61: ...on whom you were chatting with To know if the contact you are chatting with is responding look for the message under the text entry area For more information on using MSN Messenger tap Programs MSN Messenger then tap Help from the menu Microsoft Windows Media Player for Pocket PC Use Microsoft Windows Media Player for Pocket PC to play digital audio and video files Windows Media and MP3 files that...

Page 62: ...der command bar or On a book page tap and hold on the book title and then tap Help on the pop up menu Getting books on your Acer n30 You can download book files from the Web Just visit your favorite eBook retailer and follow the instructions to download the book files Sample books and a dictionary are also included in the MSReader folder in the Extras folder on the Acer n30 Handheld Companion CD U...

Page 63: ...book title Navigation options are listed in the bottom portion of the cover page Page through the book by Using the Scroll wheel on your handheld Tapping the page number on each page The first time you open a book you ll probably want to go to the first page or to the table of contents if there is one Subsequently whenever you open the book you ll be automatically taken to the last page read Tap t...

Page 64: ... 2 Enter the word you want to search for 3 Tap the desired Find option Reader highlights found text on the page To close Find tap outside the box To return to your original page tap the title and then tap Return on the pop up menu Copy text You can copy text from books that support this feature into any program that accepts text 1 On a book page select the text you want to copy 2 Tap Copy Text on ...

Page 65: ... book To use highlights When you highlight text it appears with a colored background To use notes When you attach a note to text you enter the text in a note pad that appears on top of the book page A Note icon will display in the left margin To show or hide the note tap the icon To add drawings When you add a drawing a Drawing icon appears in the bottom left corner of the page and drawing tools a...

Page 66: ...5 Managing Microsoft Pocket PC 2003 companion programs Microsoft Reader for Pocket PC 54 ...

Page 67: ...tiMedia Card USB thumb drive ROM storage ROM storage is for PIM data backup and restore operations only During a backup or restore operation the power button serves as a pause resume button to control the pace of the operation There are three tabs from left to right in the program window corresponding to the three functions of Backup and Restore Backup AutoBackup Restore To launch Backup Restore 1...

Page 68: ...m the Backup to pull down menu 4 Define the backup scope default PIM only from Option pull down menu NOTE ROM storage is a valid backup destination only if PIM Only is defined as backup scope 5 Check the password box and enter a password if you want to secure the backup file 6 Tap Start to proceed with the backup process During the backup process a progress screen will appear displaying backup sta...

Page 69: ... AutoBackup is activated and the specified storage device is not attached to your handheld when 30 of battery level is reached then no backup procedure will be performed NOTE MyAutoBackup is the default file name of the backup file generated by the AutoBackup operation Restore function You can only restore backup files that are generated by Backup Restore file format is abk Acer backup To perform ...

Page 70: ...en the selected abk file was created Backup option file size Main memory free size free space in your handheld s main storage memory This should be bigger than the file size of the selected abk file for the restore process to continue 4 Tap Start again to proceed with the restore process 5 During the restore process a progress screen will appear displaying restore status 6 When the restore process...

Page 71: ...6 Backup and restore data 59 4 Tap Delete to remove the file ...

Page 72: ...6 Backup and restore data 60 ...

Page 73: ...applications Increase storage capacity Perform backup procedures NOTE When using any peripheral device with your handheld please refer to the documentation accompanying each device for information on how to install and operate it Using an SD MMC card On the top side of your handheld is an SD MMC slot This allows you to expand your handheld memory and perform data backup Refer to Top view on page 5...

Page 74: ...n audible system sound and a click will signal that the card has been released 3 Gently remove the card from the slot b Using an USB thumb drive Your Acer n30 supports USB host expansion Via 3 in one sync cable you can access a USB thumb drive directly on your n30 Inserting an USB thumb drive 1 Get the 3 in one sync cable and attach its 26 pin connector to the handheld 2 Insert the USB thumb drive...

Page 75: ...r computer NOTE By default ActiveSync does not automatically synchronise all types of information Use ActiveSync options to turn synchronisation on and off for specific information types With ActiveSync you can also Back up and restore your handheld data Copy rather than synchronise files between your handheld and computer Control when synchronisation occurs by selecting a synchronisation mode For...

Page 76: ...8 Exchanging and updating data using ActiveSync Using ActiveSync 64 For information about using ActiveSync on your computer start ActiveSync on your computer and then see ActiveSync Help ...

Page 77: ...rer and synchronise with your computer Connect to your computer to synchronise remotely Once connected you can synchronise information such as your Pocket Outlook information NOTE Bluetooth is available only for n30 B Transferring items using infrared or Bluetooth Using infrared IR or Bluetooth you can send and receive information such as contacts and appointments to from other IR enabled or Bluet...

Page 78: ...nding device transmit the information to you Your handheld will automatically receive it To send information via Bluetooth 1 Switch to the program where you created the item you want to send and locate the item in the list 2 Tap and hold on the item and from the pop up menu tap send via Bluetooth 3 On the Select a Bluetooth device screen tap the name of the destination device and then tap OK To re...

Page 79: ...e modem card 6 You should not need to change any settings in Advanced Most ISPs now use a dynamically assigned address If the ISP you are connecting to does not use a dynamically assigned address tap Advanced and then the TCP IP tab and enter the address When finished tap OK and then Next 7 Enter the ISP phone number and tap Next 8 Enter your username password and domain if any and tap Finish to c...

Page 80: ...instructions on inserting and using the Ethernet card see the documentation that came with the card 2 The first time you insert the card a notification will appear asking you whether the installed network card should be used to connect to The Internet or Work Where possible the Service Set Identifier SSID will be determined automatically Select The Internet then either accept all default settings ...

Page 81: ...you can send email messages view Intranet pages synchronise your handheld and access the Internet You can connect to a network in one of three ways Create a modem connection by using an RAS account Use an wireless Ethernet card and a net tap to connect to the network If this is the method you want to use see To create an wireless Ethernet connection to a network on page 69 Your n30 handheld suppor...

Page 82: ...e connection NOTE Bluetooth is available only for n30 B Get help on connecting More information on the procedures described here as well as information on additional procedures can be found in the following locations The section on Inbox on page 38 Online Help of your handheld Tap and then Help Tap View All Installed Help and then Inbox or Connections ActiveSync Help on the your computer In Active...

Page 83: ...nstalled ActiveSync Favorite links During synchronisation the list of favorite links in the Mobile Favorites folder on your computer is synchronised with Pocket Internet Explorer on your handheld Both locations are updated with changes made to either list each time you synchronise Unless you mark the favorite link as a mobile favorite only the link will be downloaded to your handheld and you will ...

Page 84: ...erve handheld memory go only one level deep 3 Synchronise your handheld and computer Mobile favorites that are stored in the Mobile Favorites folder in Internet Explorer are downloaded to your handheld To save handheld memory Mobile favorites take up storage memory on your handheld To minimise the amount of memory used observe the following In the settings for the Favorites information type in Act...

Page 85: ...w the page To browse the Internet 1 Set up a connection to your ISP or corporate network as described in 9 Getting connected on page 65 2 To connect and start browsing do one of the following Tap the Favorites button and then tap the favorite you want to view Tap View and then Address Bar In the address bar that appears at the top of the screen enter the Web address you want to visit and then tap ...

Page 86: ...10 Using Microsoft Pocket Internet Explorer Using Pocket Internet Explorer 74 ...

Page 87: ...ns on these pages access the page then tap then Help Adding and removing programs Programs bundled with your handheld at the factory are stored in ROM read only memory You cannot remove these programs and you ll never accidentally lose ROM contents ROM programs can be updated using special installation programs All other programs and data files installed to your handheld after factory installation...

Page 88: ...s on the screen Once the software has been installed on your computer the installer will automatically transfer the software to your handheld If the file is not an installer you will see an error message stating that the program is valid but it is designed for a different type of computer You will need to move this file to your handheld If you cannot find any installation instructions for the prog...

Page 89: ...ice to see a list of all folders on your handheld b Tap and hold the program and tap Cut on the pop up menu c Open the Start Menu folder located in the Windows folder tap and hold a blank area of the window d Tap Paste on the pop up menu The program will now appear on the menu For more information on using File Explorer see To use File Explorer on page 28 Using ActiveSync on your computer a Use th...

Page 90: ...11 Customising your handheld Adding and removing programs 78 ...

Page 91: ...s offer discovery Connect to use and disconnect from those services Enable disable individual services Security features on a service by service basis including Authentication Authorization Encryption Bluetooth Icon The Bluetooth icon in the lower right corner of the Today screen provides quick access to the Bluetooth Manager and Bluetooth Settings It also provides visual feedback about the state ...

Page 92: ...ransfer set the highest level directory on this handheld that remote devices will be able to access Information Exchange Set the default business card Pocket Outlook contact entry Serial Port Bluetooth serial port information Dial up Networking configure the COM port baud rate and flow control Personal Network Server configure the service availability About there are no configurable options on thi...

Page 93: ... it to select it and return to the previous screen Remote Device Services This section provides overview instructions for using services provided by other devices Series Port The use of a Bluetooth wireless serial port connection is identical to the use of a physical cable serial port connection between two devices As with a physical connection the application that will use the connection must be ...

Page 94: ... structure of the remote device View files and folders on the remote device Create new folders on the remote device Send files to and get files from the remote device Delete files on the remote device NOTE File operations on the remote device are limited to the remote device s configured FTP root directory and its sub directories Bluetooth File Explorer also allows you to set the folder on your ha...

Page 95: ...he handheld closes the connection If the phone number was modified a dialog box appears with the option to save or discard the modification After the cell phone completes the dialing process the phone can be used in the normal way Bluetooth Personal Area Network A Bluetooth personal area network is a private temporary ad hoc network of up to eight devices A Bluetooth personal area network makes it...

Page 96: ...Appendix Exchanging and updating data using Bluetooth Utility only for n30 B Remote Device Services 84 ...

Page 97: ...Recognizer 16 soft keyboard 16 Transcriber 17 using My Text 23 writing on the screen 17 convert to text 19 expansion features 61 Acer versatile connector 61 attaching expansion sleeve inserting CompactFlash card 61 removing CompactFlash card 62 H handheld guides v maintenance vi package contents vi resetting vii handheld features 1 audio 2 battery pack 2 install 8 connectivity 2 display 1 ergonomi...

Page 98: ... 48 requirements 47 set up 47 work with contacts 47 Pocket Excel 44 create new file 45 File list 45 protect workbook 46 Pocket Word 41 create new file 41 enter data 42 drawing mode 44 recording mode 44 typing mode 43 writing mode 43 File list 42 Windows Media Player for Pocket PC 49 Microsoft Pocket PC 2003 41 companion programs 41 Microsoft Reader get book 50 read book 51 Microsoft Reader 50 Guid...

Reviews: