


10
Chapter 1
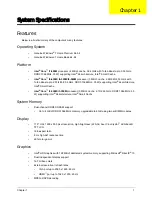
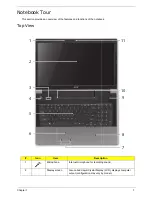
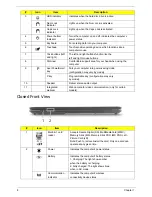
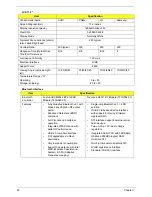
Base View
#
Icon
Item
Description
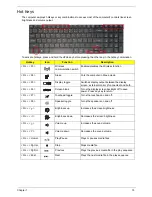
1
USB 2.0 port
Connects to USB 2.0 devices (e.g., USB mouse, USB
camera).
2
Optical drive
Internal optical drive; accepts CDs or DVDs.
3
Optical disk
access indicator
Lights up when the optical drive is active.
4
Optical drive
eject
button
Ejects the optical disc from the drive.
5
Emergency eject
hole
Ejects the optical drive tray when the computer is turned
off.
Note: Insert a paper clip to the emergency eject hole to
eject the optical drive tray when the computer is off.
6
Ethernet (RJ-45)
port
Connects to an Ethernet 10/100/1000-
based network.
7
DC-in jack
Connects to an AC adapter.
#
Icon
Item
Description
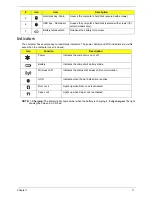
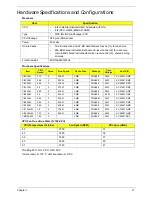
1
Battery bay
Houses the computer’s battery pack..
2
Battery lock
Locks the battery in position
3
Sub Woofer
Emits low frequency sound output.
4
Memory compartment
Houses the computer’s main memory.
1
2
3
4
5
7
6
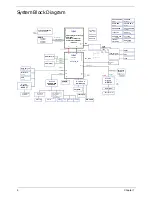
Summary of Contents for ASPIRE 7745
Page 6: ...VI ...
Page 10: ...X Table of Contents ...
Page 40: ...30 Chapter 1 ...
Page 56: ...46 Chapter 2 ...
Page 68: ...58 Chapter 3 5 Pull the WLAN module out and away ...
Page 73: ...Chapter 3 63 5 Remove the ODD bracket 6 Pry the ODD bezel off of the ODD module ...
Page 83: ...Chapter 3 73 5 Detach the Bluetooth module cable from the module ...
Page 91: ...Chapter 3 81 4 Lift the thermal module away from the main board ...
Page 96: ...86 Chapter 3 4 Unlock and disconnect the switch board FFC ...
Page 101: ...Chapter 3 91 4 Remove the bezel from the LCD module ...
Page 108: ...98 Chapter 3 5 Pry the right antenna from the casing ...
Page 111: ...Chapter 3 101 3 Lay the cables around the module edge ...
Page 115: ...Chapter 3 105 10 Place the LVDS cable into cable guides ...
Page 118: ...108 Chapter 3 4 Replace the two 2 bezel screws ...
Page 129: ...Chapter 3 119 4 Connect the Bluetooth module cable to the main board ...
Page 136: ...126 Chapter 3 6 Connect and lock the Power board FFC ...
Page 143: ...Chapter 3 133 4 Grasp the tab and slide the HDD firmly into the docking connector ...
Page 145: ...Chapter 3 135 4 Push the ODD completely into the bay until flush with the lower cover ...
Page 148: ...138 Chapter 3 ...
Page 166: ...156 Chapter 4 ...
Page 288: ...278 Appendix B ...
Page 290: ...280 ...


