


22
Chapter 1
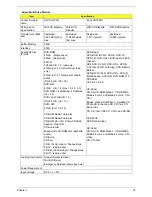
Card Reader
Item
Specification
Part Name
RealTek RT5160
Package
5-in-1 card reader
General Features
•
Push-push type, with dummy card
•
Built-in 250mA Power MOS for memory card
•
Over Current Protection and Over Temperature Protection
•
Power saving
•
Power Down when no memory card is inserted
•
Power Idle (Selective Suspend)
•
USB2.0 Interface
•
Support both High-Speed (480 Mbps) and Full-Speed (12 Mbps)
Data Transfer
•
Embedded High Speed/Full Speed Transceiver
•
Secure Digital/Multimedia Card Interface
•
Compliant with SD Memory Card Specification Version 2.0
•
Compliant with Multimedia Card Specification Version 4.2
•
Support High Speed SD 4-bit Data Transfer Mode (Up to 32 GB)
•
Support High Speed MMC 8-bit Data Transfer Mode (Up to 32
GB)
•
Support Write Protection Switch
•
Memory Stick Interface
•
Compliant with Memory Stick PRO Format Specification Version
1.x
•
Compliant with Memory Stick PRO-HG Duo Format Specification
Version 1.x
•
Support 4-bit and 8-bit Parallel Data Transfer Mode
•
xD- Picture Card Interface
•
Compliant with xD-Picture Card Specification Version 1.2
(support multi-plane)
•
Support Hardware ECC (1-bit correction and 2-bits detection)
Generation
•
Embedded Program memory and Data SRAM
•
Miscellaneous Functions
•
Realtek Driver
•
Windows 2000, Windows XP, Windows Vista Linux
Summary of Contents for ASPIRE 5251
Page 6: ...VI...
Page 10: ...X Table of Contents...
Page 34: ...24 Chapter 1...
Page 52: ...42 Chapter 2...
Page 76: ...66 Chapter 3 5 Lift the Speaker clear of the Upper Cover...
Page 78: ...68 Chapter 3 5 Lift the Right Speaker Module clear of the device...
Page 84: ...74 Chapter 3 5 Lift the USB board clear of the device...
Page 90: ...80 Chapter 3 11 Disconnect the Bluetooth to mainboard cable...
Page 92: ...82 Chapter 3 4 Carefully lift the Thermal Module clear of the Mainboard...
Page 103: ...Chapter 3 93 7 Disconnect the LVDS cable from the panel...
Page 105: ...Chapter 3 95 5 Lift the microphone set and cable clear of the LCD cover...
Page 121: ...Chapter 3 111 5 Connect the fan cable...
Page 124: ...114 Chapter 3 6 Connect the LVDS cable to the mainboard 7 Connect the microphone cable...
Page 127: ...Chapter 3 117 4 Connect the USB cable to the mainboard and lock the connector...
Page 130: ...120 Chapter 3 4 Replace the FFC and press down as indicated to secure it to the Upper Cover...
Page 146: ...136 Chapter 3...
Page 175: ...Chapter 6 165 Aspire 5251 5551G 5551 FRU List...
Page 176: ...166 Chapter 6 Screw List...
Page 177: ...Chapter 6 167...
Page 206: ...196 Appendix C...
Page 210: ...200...


