


175
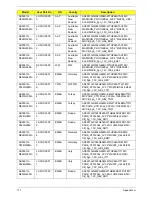
Appendix A
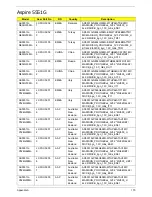
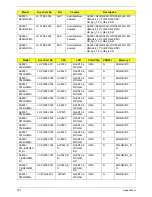
AS5551G-
N832G32Mn
LX.PUU01.003
N
N
N
N320GB5.4
KS
N
AS5551G-
N834G32Mi
LX.PUU01.001
SO2GBIII10
N
N
N320GB5.4
KS
N
AS5551G-
N832G50Mn
LX.PUU01.002
N
N
N
N500GB5.4
KS
N
AS5551G-
N834G50Mn
LX.PUU02.019
SO2GBIII10
N
N
N500GB5.4
KS
N
AS5551G-
P524G64Mn
LX.PUU02.018
SO2GBIII10
N
N
N640GB5.4
KS
N
AS5551G-
P324G32Mn
LX.PUU02.017
SO2GBIII10
N
N
N320GB5.4
KS
N
AS5551G-
P324G50Mn
LX.PUU02.016
SO2GBIII10
N
N
N500GB5.4
KS
N
AS5551G-
P324G32Mn
LX.PUU02.015
SO2GBIII10
N
N
N320GB5.4
KS
N
AS5551G-
P324G50Mn
LX.PUU02.012
SO2GBIII10
N
N
N500GB5.4
KS
N
AS5551G-
P324G32Mn
LX.PUU02.010
SO2GBIII10
N
N
N320GB5.4
KS
N
AS5551G-
P524G64Mn
LX.PUU02.009
SO2GBIII10
N
N
N640GB5.4
KS
N
AS5551G-
P524G50Mn
LX.PUU02.008
SO2GBIII10
N
N
N500GB5.4
KS
N
AS5551G-
P524G64Mn
LX.PUU02.007
SO2GBIII10
N
N
N640GB5.4
KS
N
AS5551G-
P524G50Mn
LX.PUU02.006
SO2GBIII10
N
N
N500GB5.4
KS
N
AS5551G-
N534G50Mn
LX.PUU02.005
SO2GBIII10
N
N
N500GB5.4
KS
N
AS5551G-
N534G50Mn
LX.PUU02.004
SO2GBIII10
N
N
N500GB5.4
KS
N
AS5551G-
N534G32Mn
LX.PUU02.003
SO2GBIII10
N
N
N320GB5.4
KS
N
AS5551G-
N334G32Mn
LX.PUU02.002
SO2GBIII10
N
N
N320GB5.4
KS
N
AS5551G-
N334G50Mn
LX.PUU02.001
SO2GBIII10
N
N
N500GB5.4
KS
N
AS5551G-
N534G64Bn
S2.PUU02.001
SO2GBIII10
N
N
N640GB5.4
KS
N
AS5551G-
N834G64Mn
LX.PUS02.010
SO2GBIII10
N
N
N640GB5.4
KS
N
AS5551G-
P522G25Mn
LX.PUS02.016
N
N
N
N250GB5.4
KS
N
AS5551G-
N833G32Mn
LX.PUS01.004
SO1GBIII10
N
N
N320GB5.4
KS
N
AS5551G-
N833G32Mn
LX.PUS02.015
SO1GBIII10
N
N
N320GB5.4
KS
N
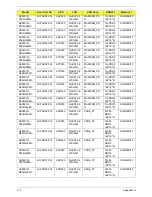
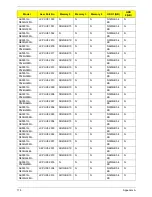
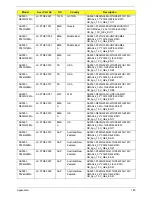
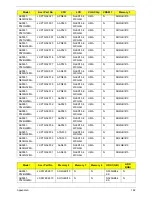
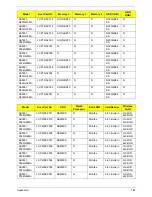
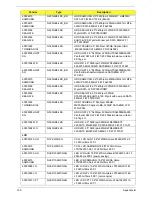
Model
Acer Part No
Memory 2
Memory 3
Memory 4
HDD 1(GB)
HDD
2(GB)
Summary of Contents for ASPIRE 5251
Page 6: ...VI...
Page 10: ...X Table of Contents...
Page 34: ...24 Chapter 1...
Page 52: ...42 Chapter 2...
Page 76: ...66 Chapter 3 5 Lift the Speaker clear of the Upper Cover...
Page 78: ...68 Chapter 3 5 Lift the Right Speaker Module clear of the device...
Page 84: ...74 Chapter 3 5 Lift the USB board clear of the device...
Page 90: ...80 Chapter 3 11 Disconnect the Bluetooth to mainboard cable...
Page 92: ...82 Chapter 3 4 Carefully lift the Thermal Module clear of the Mainboard...
Page 103: ...Chapter 3 93 7 Disconnect the LVDS cable from the panel...
Page 105: ...Chapter 3 95 5 Lift the microphone set and cable clear of the LCD cover...
Page 121: ...Chapter 3 111 5 Connect the fan cable...
Page 124: ...114 Chapter 3 6 Connect the LVDS cable to the mainboard 7 Connect the microphone cable...
Page 127: ...Chapter 3 117 4 Connect the USB cable to the mainboard and lock the connector...
Page 130: ...120 Chapter 3 4 Replace the FFC and press down as indicated to secure it to the Upper Cover...
Page 146: ...136 Chapter 3...
Page 175: ...Chapter 6 165 Aspire 5251 5551G 5551 FRU List...
Page 176: ...166 Chapter 6 Screw List...
Page 177: ...Chapter 6 167...
Page 206: ...196 Appendix C...
Page 210: ...200...


