


4.5
Impella
®
RP with the Automated Impella
®
Controller
AUTOMATED IMPELLA
®
CONTROLLER DISPLAY
The Automated Impella
®
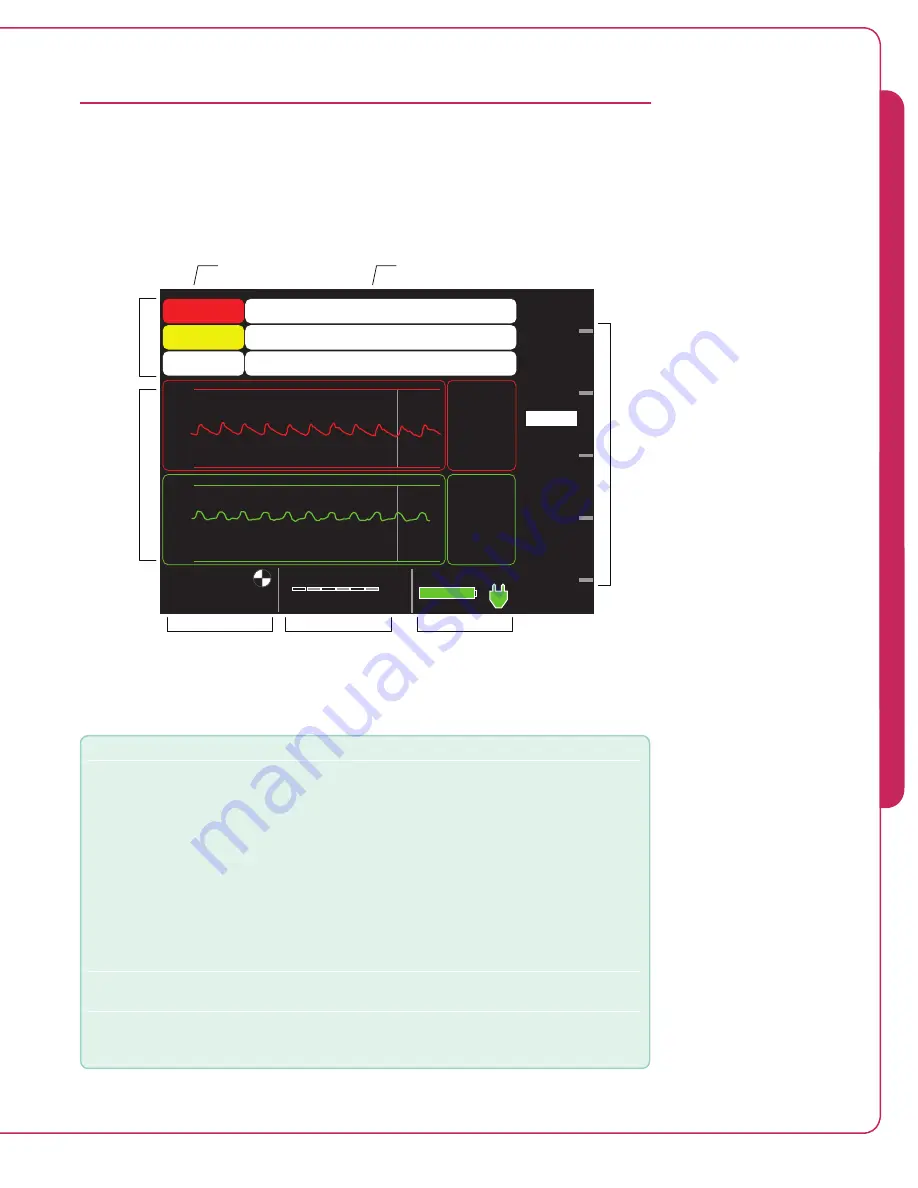
Controller screens have several common display elements. Each
element is shown in Figure 4.3 and described in Table 4.3.
Impella Flow
4.0
Purge System
Purge Flow: 1.0 ml/hr
System Power
MUTE
ALARM
0.0
DISPLAY
0.0
MENU
PURGE
SYSTEM
Impella RP S/N: 123456
30 - 06 - 2011 05:30
100%
CONTROL
FLOW
P-9
L/min
4.1 Max
________________________
3.9 Min
Motor
Current
600/550
(575)
(mA)
10 sec.
Placement
Signal
(mmHg)
42/20
(31)
10 sec.
60
-20
1000
0
1.
1. Check purge system tubing for kinks.
2. Decrease concentration of dextrose in the purge solution.
Purge Flow Low
Suction
1. Check volume status.
2. Check Impella position.
3. Reduce flow or performance level.
Purge Volume Low
Open the Purge System menu and select Change Purge Fluid.
2. Follow the instructions to change the purge fluid.
System Date
and Time
Alarm
Window
Catheter
Serial Number
Soft
Button
Labels
Purge System Area
Flow Area
System Power Area
Central
Display
Area
Figure 4.3 Automated Impella
®
Controller Display Elements
Table 4.3 Automated Impella
®
Controller Display Elements
Display Element
Description
Alarm window
The alarm window displays up to 3 alarms simultaneously, in order of
priority from top to bottom.
For each alarm, the alarm window displays:
• Alarm header – displayed in the left column; window is color-coded
red for critical alarms, yellow for serious alarms, white for advisory
notifications, gray for resolved alarms
• Alarm subhead (if applicable) – further describes the alarm condition
• Detailed text – up to 3 lines of instructions for resolving the alarm
condition are displayed in the right column of the alarm window next
to the alarm header and subhead information
(See section 6 of this manual for further discussion of alarms.)
Catheter serial number Displayed in the upper left of the display screen if a catheter is connected
to the controller.
System date and time
The current date (DD-MM-YYYY) and time (24-hour format; HH:MM) are
displayed in the upper center of the screen display. (In this example it is
June 30, 2011 at 5:30am.)
4
U
S
IN
G T
H
E A
U
TO
M
A
TE
D I
M
P
E
LL
A
®
C
O
N
TRO
LL
E
R


