Page 50
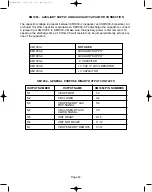
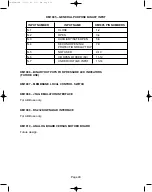
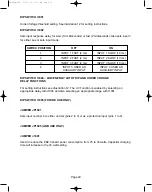
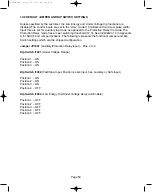
10.0 DEFAULT JUMPER AND DIP SWITCH SETTINGS
Unless specified by the customer, the Low Energy and Under Voltage trip functions are
disabled. The control inputs are set to the “slow” mode (10 millisecond minimum pulse width).
Input three is set for Auxiliary trip mode as opposed to the Protection Relay trip mode. The
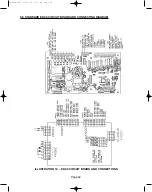
Protection Relay mode has a lower switching threshold (12 V). See Illustration 13 in Appendix
A for Switch and Jumper locations. The following represents the functional Jumper and Dip
Switch settings which are the shipped configuration.
Jumper JP1001 (Auxiliary/Protection Relay Input) – Pins 2 to 3.
Dip Switch I1001 (Under Voltage Range)
Position 1 – ON
Position 2 – ON
Position 3 – ON
Dip Switch I1002 (Fast/Slow Input. Position 4 sets Input 3 as Auxiliary or Safe input)
Position 1 – ON
Position 2 – ON
Position 3 – ON
Position 4 – OFF
Dip Switch I1004 (Low Energy Trip/Under Voltage Delay and Enable)
Position 1 – OFF
Position 2 – OFF
Position 3 – OFF
Position 4 – OFF
Position 5 – OFF
38-929M-15A 10/15/02 1:11 PM Page 54
Summary of Contents for R-MAG Series
Page 2: ...38 929M 15A 10 15 02 1 11 PM Page 2 ...
Page 4: ...38 929M 15A 10 15 02 1 11 PM Page 4 ...
Page 15: ...Page 11 Figure 3 Interrupter Assembly 1200 A 38 929M 15A 10 15 02 1 11 PM Page 15 ...
Page 16: ...Page 12 Figure 4 Interrupter Assembly 2000 A 38 929M 15A 10 15 02 1 11 PM Page 16 ...
Page 17: ...Page 13 Figure 5 Interrupter Assembly 3000 A 38 929M 15A 10 15 02 1 11 PM Page 17 ...
Page 20: ...Figure 8 Trip Handle Page 16 38 929M 15A 10 15 02 1 11 PM Page 20 ...
Page 21: ...Figure 9 High Voltage Cabinet Layout Page 17 38 929M 15A 10 15 02 1 11 PM Page 21 ...
Page 22: ...Figure 10 Typical Schematic Diagram Page 18 38 929M 15A 10 15 02 1 11 PM Page 22 ...
Page 23: ...Figure 11 Typical Connecting Diagram Page 19 38 929M 15A 10 15 02 1 11 PM Page 23 ...
Page 24: ...Figure 12 Typical Outline 1200 A Page 20 38 929M 15A 10 15 02 1 11 PM Page 24 ...
Page 25: ...Figure 13 Typical Outline 2000 3000 A Page 21 38 929M 15A 10 15 02 1 11 PM Page 25 ...
Page 30: ...Page 26 38 929M 15A 10 15 02 1 11 PM Page 30 ...
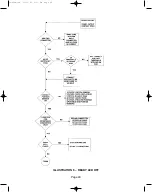
Page 44: ...Page 40 ILLUSTRATION 8 READY LED OFF 38 929M 15A 10 15 02 1 11 PM Page 44 ...
Page 45: ...Page 41 ILLUSTRATION 9 CB WILL EITHER NOT OPEN OR CLOSE 38 929M 15A 10 15 02 1 11 PM Page 45 ...


