background image


C

HAPTER 

1– I

NTRODUCTION


3Dlabs Graphics Accelerator Card User's Guide


Summary of Contents for P Class 450/500/550/600/650/700/750

Page 1: ...3Dlabs Inc Wildcat III 6210 and Wildcat III 6110 Graphics Accelerator Card User s Guide 3Dlabs Inc 480 Potrero Avenue Sunnyvale CA 94086 408 530 4700 www 3dlabs com ...

Page 2: ...ause harmful interference to radio or television reception which can be determined by turning the equipment off and on the user is encouraged to try to correct the interference by one or more of the following measures 1 Re orient or relocate the receiving antenna 2 Increase the separation between the equipment and receiver 3 Connect the equipment to an outlet on a circuit different from that to wh...

Page 3: ...under Windows 2000 15 Removing an existing driver under Windows XP 15 Installing your Wildcat III 6210 or Wildcat III 6110 driver 16 Heidi Drivers for AutoDesk Applications 16 Verify the Default Video Display Driver 16 Verifying under Windows NT 17 Verifying under Windows 2000 17 Verifying under Windows XP 17 Verify the System Startup Version 17 Verifying under Windows NT 17 Verifying under Window...

Page 4: ...30 Diagnostics 30 Obtaining a Usable Video Resolution 31 Using the Last Known Good option in Windows NT 31 Booting into Safe Mode 31 Determining a defective unit 31 Reinstalling the Video Driver 32 Removing the existing driver under Windows NT 32 Removing an existing driver under Windows 2000 32 Removing an existing driver under Windows XP 32 Reinstalling the video driver 33 Online Information 33 ...

Page 5: ...3Dlabs Graphics Accelerator Card User s Guide v ...

Page 6: ......

Page 7: ...CHAPTER 1 INTRODUCTION 3Dlabs Graphics Accelerator Card User s Guide ...

Page 8: ...nterface DVI I compliant digital display device 3 MB of free space on the computer s primary system disk for the video display driver software NOTE If you purchased your Wildcat III 6210 or Wildcat III 6110 Graphics Accelerator Card as part of a system it was preconfigured to operate in your system prior to shipment No other modifications are necessary Also your system s video drivers were install...

Page 9: ...LE OR DUAL MONITORS SEE Appendix A Specifications FOR A LIST OF SUPPORTED RESOLUTIONS AND REFRESH RATES TO DISPLAY AT A SPECIFIC RESOLUTION WITH THE DESIRED REFRESH RATE BOTH THE VIDEO CARD AND MONITOR MUST SUPPORT THAT REFRESH RATE REFER TO THE DOCUMENTATION THAT CAME WITH YOUR MONITOR FOR A LIST OF SUPPORTED VIDEO RESOLUTIONS Power Management Support Display Power Management Signaling DPMS Advan...

Page 10: ...tensions Fog function Fog offset Occlusion culling Texture Extensions 3D textures edge border and LOD clamps Mipmap generation Color table Color masking LOD 4D Video Extensions Interlace Interlace read 422 pixels Swap Control Extensions Swap control Swap frame lock Swap usage Pixel texture and 3D texturing Pbuffer Image buffer Gamma Stencil operation wrap Separate specular Post texturing specular ...

Page 11: ...polate dot3 Stencil Operations Dithering Rich set of blending operations Depth buffering 24 and 32 bit Additional Features SuperScene full scene multisampled anti aliasing Point sampled with sixteen samples Sample location jittering Dynamic sample allocation Dynamic sample backoff Two video look up tables Eight stencil planes Eight double buffered overlay planes 32 bit Z buffer High performance DA...

Page 12: ...INTRODUCTION 3Dlabs Graphics Accelerator Card User s Guide 6 ...

Page 13: ...CHAPTER 2 SETUP 3Dlabs Graphics Accelerator Card User s Guide ...

Page 14: ...her than carpet Touch the metal chassis of the computer to drain off any static electricity before touching the card Do not wear wool or polyester clothing Work in an area with a relative humidity of at least 50 percent Keep the card in the anti static bag until you are ready to install it Handle the card as little as possible and only by the edges NOTE Be sure to register your new card using one ...

Page 15: ...nstalling your Wildcat III 6210 or Wildcat III 6110 Graphics Accelerator Card using a Phillips head screwdriver 6 If an anti static wrist strap was included in your box attach it to your wrist and attach the other end to a bare metal as opposed to painted or sticker covered surface on your system s chassis 7 Remove your Wildcat III 6210 or Wildcat III 6110 Graphics Accelerator Card from its anti s...

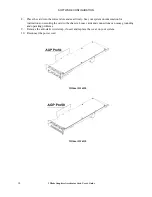
Page 16: ... instructions on securing the card to the chassis Loose cards and connections can cause grounding and operating problems 9 Remove the anti static wrist strap if used and replace the cover on your system 10 Reconnect the power cord Wildcat III 6210 Wildcat III 6110 3Dlabs Graphics Accelerator Card User s Guide 10 ...

Page 17: ...ructions 3 Install the Wildcat III 6210 or Wildcat III 6110 Graphics Accelerator Card driver software see Installing the Driver Software later in this chapter Connecting the Monitor The Wildcat III 6210 supports six standard external connectors 1 Primary and Secondary DVI I output ports also support analog monitors with additional adapter 2 One Genlock In connector 3 One 3 Pin MiniDIN Stereo Sync ...

Page 18: ... this chapter 3 Connect the workstation monitor s video cable to the primary DVI I port on the Wildcat III video card This connector is labeled 1 in the picture above and on the I O panel of your card 4 Turn on power to the workstation If the monitor s Power On LED does not illuminate or the monitor does not display the startup sequence consult Chapter 4 Troubleshooting CAUTION If you are connecti...

Page 19: ...s Wildcat III 6210 or Wildcat III 6110 video card NOTE If you are connecting both a VGA and digital flat panel monitor you must connect the VGA monitor to the primary DVI I port labeled 1 3 Turn on power to the workstation If the monitor s Power On LED does not illuminate or the monitor does not display the startup sequence consult Chapter 4 Troubleshooting NOTE If your monitor does not have a bui...

Page 20: ...10 or Wildcat III 6110 as an upgrade are reinstalling the driver or are updating the operating system Make sure your computer is ready Make sure your workstation has the following before installing Wildcat III 6210 or Wildcat III 6110 driver software Microsoft Windows NT Service Pack 5 or greater Windows 2000 or Windows XP 32 or 64 bit operating system software installed 3 MB of free space on the ...

Page 21: ...tor privileges 2 From the Start menu go to Settings Control Panel and click Add Remove Programs 3 Under Change or Remove Programs highlight the current Display Driver and click Change Remove 4 Click Yes when prompted to confirm the driver removal and follow the prompts to complete the driver removal 5 Click OK when notified that the driver removal is complete and reboot your system before installi...

Page 22: ...the Wildcat III 6210 or Wildcat III 6110 through the use of OpenGL To install the Heidi driver and to activate full screen multisampling consult the README TXT located under the Heidi directory of the Wildcat III 6210 or Wildcat III 6110 delivery media The SETUP EXE file under the same directory will initiate the install program NOTE If setup is not able to find your AutoDesk application in the sy...

Page 23: ...ties dialog box Verifying under Windows XP 1 From the Windows Start menu go to Control Panel Performance and Maintenance System Hardware Device Manager 2 Under Display Adapters verify that two Wildcat devices are listed This indicates that the appropriate driver is installed NOTE If only one Wildcat III 6210 device is listed you may not have completed installation Refer to Installing the Driver So...

Page 24: ...ify that Microsoft Windows XP Professional is the listed as the Default operating system It is IMPORTANT that your operating system matches the driver you installed Click OK 4 Click OK again to close the System Properties dialog box Registering Your 3Dlabs Graphics Accelerator Card When you register your 3Dlabs Graphics Accelerator Card you Activate your warranty Receive notification of software u...

Page 25: ...CHAPTER 3 SOFTWARE CONFIGURATION 3Dlabs Graphics Accelerator Card User s Guide ...

Page 26: ...s if necessary 2 Close any open applications 3 Right click on the Windows desktop or left click if you ve altered the default mouse setup and choose Properties from the menu Click the Settings tab then click Advanced 4 Click the Wildcat Configuration tab if it is not already displayed On the Wildcat Configuration tab Click Hardware Info to view the current hardware settings Click View Config to vi...

Page 27: ...SOFTWARE CONFIGURATION 3Dlabs Graphics Accelerator Card User s Guide 21 ...

Page 28: ...perties dialog box 2 Click Color Calibration to modify the color settings Make modifications to the Color Calibration dialog box then check the Apply Gamma Color Calibration to 3D Windows Only box if you don t want the desktop affected Click OK to accept the changes and dismiss the Color Calibration dialog box or click Cancel to close the Color Calibration dialog box without making any changes You...

Page 29: ...gs You are returned to the Wildcat Monitor Display Properties dialog box 4 Click OK on the Display Properties dialog box to accept the changes Reboot the workstation if you are prompted to do so Most changes will take effect without rebooting NOTE See Appendix A Specifications for a list of available monitor resolutions See Enabling Stereo Display in this chapter for instructions on changing the D...

Page 30: ...ode when you no longer wish to view in stereo Follow the steps above and select Monoscopic Display under Display Mode to disable stereo mode Enabling Multiview and Genlock on the Wildcat III 6210 The Wildcat III 6210 comes with Multiview support for frame locking and rate locking of multiple workstations Genlock support allows video timing to be synchronized to an external timing source NOTE Your ...

Page 31: ...mbled video wait 10 seconds and your previous settings will be restored 7 Click OK then Yes to accept changes You are returned to the Wildcat Monitor tab 8 Click Multiview 9 Choose the signal source from the Source pull down menu 10 Select the Signal Edge Response Signal Lock Rate and Pixel Align Offset appropriate for your application and hardware setup 11 Click the Enable check box then Apply If...

Page 32: ...n LED does not illuminate or if the primary monitor does not display the startup sequence consult Chapter 4 Troubleshooting 6 Start Windows and log on using an account with administrative privileges 7 Right click on the Windows desktop or left click if you ve altered the default mouse setup and choose Properties from the menu 8 On the Display Properties dialog box click the Settings tab The monito...

Page 33: ... continue 3 If your application supports optimized configurations select the configuration for your application from the Configuration pulldown menu and click Next to view a summary of the application specific configuration 4 Click Finish to save your configuration and dismiss the Wizard or click Cancel to close the Wizard without accepting any changes NOTE You cannot alter the application manufac...

Page 34: ...ration Wizard Click Next to continue 3 Select New Configuration on the pulldown menu then click Next 4 Enter a name for the new configuration then select the configuration you want to use as a model for your customized configuration 5 The Wizard will step you through driver optimization When you are finished click Finish to view the Configuration Summary 6 Click Finish to save your configuration o...

Page 35: ...CHAPTER 4 TROUBLESHOOTING 3Dlabs Graphics Accelerator Card User s Guide ...

Page 36: ...Usable Video Resolution later in this chapter for instructions Solution Reboot into VGA Safe Mode to verify the display properties are configured correctly for the monitor type If the software setup is correct use a similar type monitor if available and functioning properly to determine if the workstation is defective See Obtaining a Usable Video Resolution in this chapter for instructions on dete...

Page 37: ... Mode Press CTRL ALT DEL but do not log on to the Windows 2000 or Windows XP operating system Instead shut down then boot into Safe Mode to choose another resolution or reinstall the video driver 1 Restart the system 2 At the boot screen hit F8 to enter the advanced options menu 3 Choose Safe Mode then hit ENTER to return to the boot screen NOTE If this option fails to correct the video display pr...

Page 38: ...Windows 2000 1 Log on to Windows 2000 using an account that has administrative privileges Please consult your system administrator or Microsoft Windows 2000 User s Manual for more information on Administrator privileges 2 From the Start menu go to Settings Control Panel and click Add Remove Programs 3 Under Change or Remove Programs highlight the current Wildcat Display Driver and click Change Rem...

Page 39: ...Next 8 Under Locate Driver Files make sure the appropriate search location is selected and that Disk 1 of the driver media is loaded in the appropriate drive then click Next The Wizard locates the driver installation files 9 Under Driver Files Search Results click Next to start the installation 10 Insert Disk 2 when prompted then click OK to continue with the installation 11 Once the driver succes...

Page 40: ...APPENDIX A SPECIFICATIONS 3Dlabs Graphics Accelerator Card User s Guide ...

Page 41: ...0 or Wildcat III 6110 DMA channels AGP 4X or 2X Video memory Wildcat III 6210 Frame Buffer 128 MB Texture Buffer 256 MB DirectBurst 32MB Wildcat III 6110 Frame Buffer 64 MB Texture Buffer 128 MB DirectBurst 16 MB 3D Performance NOTE PERFORMANCE NUMBERS REFLECT MAXIMUM HARDWARE RATE NUMBERS MAY VARY DEPENDING ON APPLICATION 3D Gourad shaded triangles Z buffered 33 M Tri Sec Trilinear textured pixel...

Page 42: ...tion Max Refresh Rate Hz SuperScene Antialiasing Supported Stereo Available At Hz 2048 x 1152 1920 x 1440 1920 x 1200 1920 x 1080 1856 x 1392 1824 x 1368 1824 x 1128 1792 x 1344 1792 x 1120 1600 x 1200 1600 x 1024 1600 x 900 1520 x 856 1440 x 900 1360 x 766 1280 x 1024 1280 x 960 1280 x 800 1280 x 720 1152 x 864 1024 x 768 856 x 480 800 x 600 640 x 480 75 75 76 85 80 75 75 75 75 90 76 85 90 90 90 ...

Page 43: ...olution Max Refresh Rate Hz SuperScene Antialiasing Supported Stereo Available At Hz 2048 x 1152 1920 x 1440 1920 x 1200 1920 x 1080 1856 x 1392 1824 x 1368 1824 x 1128 1792 x 1344 1792 x 1120 1600 x 1200 1600 x 1024 1600 x 900 1520 x 856 1440 x 900 1360 x 766 1280 x 1024 1280 x 960 1280 x 800 1280 x 720 1152 x 864 1024 x 768 856 x 480 800 x 600 640 x 480 75 75 76 85 80 75 75 75 75 90 76 85 90 90 ...

Page 44: ...SPECIFICATIONS 3Dlabs Graphics Accelerator Card User s Guide 38 ...

Page 45: ...APPENDIX B SOFTWARE LICENSE 3Dlabs Graphics Accelerator Card User s Guide ...

Page 46: ...l intellectual property rights therein No title to the SOFTWARE FEATURES any copies thereof or any intellectual property rights therein are transferred to you You are hereby granted for your own internal use only a nontransferable nonexclusive perpetual revocable license to use one 1 copy of the SOFTWARE and FEATURES on the computer on which the SOFTWARE was originally mounted or installed Except ...

Page 47: ...LABS INC ITS LICENSORS OR SUPPLIERS LIABILITY ARISING UNDER THIS LICENSE EXCEED THE AMOUNT PAID BY YOU FOR THE PRODUCT OR SOFTWARE GIVING RISE TO SUCH LIABILITY THIS LIMITATION IS INTENDED TO LIMIT THE LIABILITY OF 3DLABS INC ITS LICENSORS OR ITS SUPPLIERS AND SHALL APPLY NOTWITHSTANDING ANY FAILURE OF ESSENTIAL PURPOSE OF ANY LIMITED REMEDY SOME STATES OR COUNTRIES MAY NOT ALLOW THE FOREGOING LIM...

Page 48: ...ction finds any provision of this AGREEMENT or portion thereof to be unenforceable that provision of the AGREEMENT shall be enforced to the maximum extent permissible so as to effect the intent of the parties and the remainder of this AGREEMENT shall continue in full force and effect Should you have any questions concerning this AGREEMENT please write to 3Dlabs Inc 480 Potrero Avenue Sunnyvale Cal...

Page 49: ...APPENDIX C REGULATORY STATEMENTS Error Not a valid link 3Dlabs Graphics Accelerator Card User s Guide ...

Page 50: ......

Page 51: ...APPENDIX D TERMS AND DEFINITIONS 3Dlabs Graphics Accelerator Card User s Guide ...

Page 52: ...ram into device commands that are specific to the screen s display controller the graphics board Atmospheric Effects The effect derived from adding one or more layers around an object Bilinear Sampling The process whereby texture mapping is done through filtering Bit Depth Bit depth is another way of expressing the numbers of colors available A color bit depth of 8 is equivalent to 256 colors a bi...

Page 53: ...graphics peripheral and the operating system EVGA Extended Video Graphics Array EVGA runs at 1024 x 768 Flat Shading The simplest method of shading Each triangle is assigned one single color resulting in a faceted appearance of the surface Frame Buffer A 24 bit true color frame buffer provides 8 bits for each red green and blue primary display color This results in 16 8 million color combinations ...

Page 54: ... The smallest addressable element of a cathode ray tube display More simply put the individual dots that make up the screen image Point Sampling The basic method of adding texture to an object Point sampling does not include any filtering of textures RAMDAC The final component in the graphics subsystem that translates a digital image into an analog representation Rasterization A method to fill in ...

Page 55: ...ed by a set of triangles Texture Mapping A technique that enables 2D graphic images to be wrapped around or pasted on to a 3D primitive Perspective correction and lighting calculations allow for added realism Transformation The change in rotation size position and perspective of an object in 3D space Transparency A function that refers to the rendering of transparent non opaque objects Transparenc...

Page 56: ...TERMS AND DEFINITIONS 3Dlabs Graphics Accelerator Card User s Guide 52 ...

Page 57: ...INDEX 3Dlabs Graphics Accelerator Card User s Guide ...

Page 58: ...ations 20 27 specifications 35 Enabling Multiview and Genlock 24 Stereoscopic display 24 Enabling stereo display 24 System Requirements 2 Features 3 Terms and definitions 48 Gamma 49 textures 50 Glossary 48 Textures 50 Heidi drivers Troubleshooting 30 Installing 16 Determining a defective unit 31 Installation Diagnostics 30 Software 14 Last Known Good option 31 Installation monitors and display re...

Page 59: ...INDEX Safe mode 31 3Dlabs Graphics Accelerator Card User s Guide 55 ...

Reviews: