PREPARING FILE FOR USE
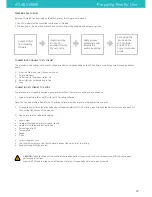
Before a 3D model can be printed on the ATLAS printer, two things must be done.
1. The CAD model must be converted to either an .stl file, and;
2. The resulting .stl file must be processed and sliced in 3D printing software and output as .gcode.
CONVERTING 3D MODELS TO .STL FORMAT
This procedure is based upon the use of Solidworks and may vary depending on the CAD software used, but generally, these guidelines
apply.
1. From the File menu, select Save As or Export
2.
Enter a file name
3. Under the File Type menu, select .stl
4. Select Options, set Resolution to Fine
5. Save
CONVERTING .STL FORMAT TO .GCODE
This procedure is intended to provide a general process flow. Other process settings may be needed.
1.
Load or Import the .stl or .obj file into your 3D printing software.
Note: You can load multiple files into the 3D printing software in order to print multiple objects in one print.
2.
Arrange the object(s) on the print bed and orient appropriately for FFF 3D printing—see Orienting the Part for Success on page 25 in
the Printing Tips section of this manual.
3. Apply process (slice settings), including:
•
Layer height
•
Number of outside perimeters (vertical shells)
•
Number of solid top and bottom layers
•
Percentage of infill
•
Temperature
•
Speed
•
Z-hop
4. Select Prepare or Slice
5. Use the Preview by Layer function to visually inspect the object prior to printing.
6. Save, selecting File Type .gcode
CAUTION:
To avoid collision of the nozzle with wrapped parts of the print set the Z-hop value which will lift the nozzle when
performing retractions.
Especially PLA tend to wrap up small features that are not supported and/or not properly cooled.
ATLAS SERIES
Preparing files for Use
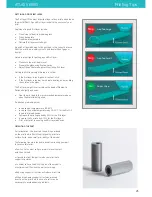
Output .stl from
CAD modelling
software.
Import resulting
.stl into 3D
printing software
of your choice.
Apply process
parameters and
slice the file,
saving as .gcode.
Print, using the
.gcode via the
LCD Controller
and SD Card,
or your computer.
gcode.
22


