background image

5.9.1 Configure the IGMP............................................................................... 5-25
5.9.2 Configure the MLD.................................................................................5-26

6 Configure the Local Network...................................................................6-1

6.1 Check the Local Network Status.......................................................................... 6-1
6.2 Configure the WLAN.............................................................................................6-2

6.2.1 Configure the Basic Parameters of the WLAN........................................ 6-2
6.2.2 Configure the Advanced Parameters of the WLAN................................. 6-5

6.3 Configure the LAN................................................................................................ 6-7

6.3.1 Configure the LAN (IPv4).........................................................................6-7
6.3.2 Configure the LAN (IPv6).......................................................................6-10

6.4 Configure the Route............................................................................................6-15

6.4.1 Configure the Routing(IPv4)...................................................................6-15
6.4.2 Configure the Routing(IPv6)...................................................................6-18

6.5 Configure the FTP Server Feature..................................................................... 6-20
6.6 Configure the UPnP............................................................................................6-21
6.7 Configure the DMS/DLNA...................................................................................6-21
6.8 Configure the Samba Service.............................................................................6-23
6.9 Configure the DNS..............................................................................................6-24
6.10 Configure the NetSphere.................................................................................. 6-25

7 Configure the Management and Diagnosis............................................ 7-1

7.1 Check the Device Status...................................................................................... 7-1
7.2 Configure the Account Management.................................................................... 7-2
7.3 Configure the Login Timeout................................................................................ 7-3
7.4 Configure the System Management..................................................................... 7-4

7.4.1 Configure the Device Management......................................................... 7-4
7.4.2 Upgrade Software.................................................................................... 7-5
7.4.3 Manage the User Configuration...............................................................7-5

7.5 Configure the Mirror function................................................................................ 7-6
7.6 Configure the TR069 function...............................................................................7-7
7.7 Manage the Log..................................................................................................7-10
7.8 Network Diagnosis.............................................................................................. 7-13
7.9 Check the ARP Table......................................................................................... 7-15
7.10 Check the MAC Table.......................................................................................7-15
7.11 Configure the IPv6 Switch.................................................................................7-16

8 Troubleshooting........................................................................................ 8-1

II

Содержание ZXHN H3601

Страница 1: ...601 Home Gateway Maintenance Management Guide Version V1 0 ZTE CORPORATION No 55 Hi tech Road South ShenZhen P R China Postcode 518057 Tel 86 755 26771900 URL http support zte com cn E mail support zte com cn ...

Страница 2: ...or a particular purpose title or non infringement ZTE CORPORATION and its licensors shall not be liable for damages resulting from the use of or reliance on the information contained herein ZTE CORPORATION or its licensors may have current or pending intellectual property rights or applications covering the subject matter of this document Except as expressly provided in any written license between...

Страница 3: ... 2 Configure the WAN 5 3 5 2 1 Configure the Ethernet Connection 5 3 5 2 2 Configure the 3G 4G 5 6 5 3 Configure the QoS 5 9 5 3 1 Configure the QoS Global Parameters 5 9 5 3 2 Configure the QoS Classification 5 9 5 4 Configure the Security 5 11 5 4 1 Configure the Firewall Level 5 11 5 4 2 Configure the Filter Criteria 5 13 5 4 3 Configure the Local Service Control 5 16 5 4 4 Configure the ALG 5 ...

Страница 4: ...0 6 6 Configure the UPnP 6 21 6 7 Configure the DMS DLNA 6 21 6 8 Configure the Samba Service 6 23 6 9 Configure the DNS 6 24 6 10 Configure the NetSphere 6 25 7 Configure the Management and Diagnosis 7 1 7 1 Check the Device Status 7 1 7 2 Configure the Account Management 7 2 7 3 Configure the Login Timeout 7 3 7 4 Configure the System Management 7 4 7 4 1 Configure the Device Management 7 4 7 4 ...

Страница 5: ...y risk of electric shock or other dangers Disconnect all the cables during a lightning storm to prevent the device from damage Power off and unplug the power plug when the device is not in use for a long time Do not attempt to open the covers of the device It is dangerous to do so when the device is powered ON Power off and stop using the device under the conditions such as abnormal sound smoke an...

Страница 6: ... Estonia EE Ireland IE Greece EL Spain ES France FR Croatia HR Italy IT Cyprus CY Latvia LV Lithuania LT Luxembourg LU Hungary HU Malta MT Netherlands NL Austria AT Poland PL Portugal PT Romania RO Slovenia SI Slovakia SK Finland FI Sweden SE the United Kingdom UK Turkey TR Norway NO Switzerland CH Iceland IS and Liechtenstein LI The WLAN function for this device is restricted to indoor use only w...

Страница 7: ...that you reuse or recycle your end of life equipment by using an accredited electronics take back system The symbols below indicate that this product should be reused or recycled and not simply discarded Please locate and use an appropriate reuse and recycling site If you need more information on collection reuse and recycling systems contact your local or regional waste administration You may als...

Страница 8: ...ZXHN H3601 Maintenance Management Guide 1 4 SJ 20200429083356 004 2020 07 23 R1 0 ...

Страница 9: ...nual One Note The list is only for reference The actual contents may vary from the list If any item is found to be wrong missing or damaged contact your service provider Keep the package and all the items in good condition if you want to replace the product 2 2 Product Specifications Technical Specifications Dimension 128 mm 79 mm 180mm Width Depth Height Certification CE Certification and Wi Fi C...

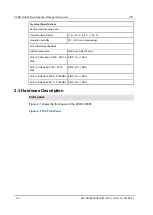
Страница 10: ...ifications Radio Frequencies Maximum Output Power Wi Fi 2 4 GHz band 2400 2483 5 MHz EIRP 19 1 dBm Wi Fi 5 GHz band 5150 5250 MHz EIRP 22 1 dBm Wi Fi 5 GHz band 5250 5350MHz EIRP 19 1 dBm Wi Fi 5 GHz band 5470 5725MHz EIRP 26 1 dBm 2 3 Hardware Description Front panel Figure 2 1 shows the front panel of the ZXHN H3601 Figure 2 1 The Front Panel 2 2 SJ 20200429083356 004 2020 07 23 R1 0 ...

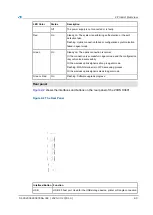
Страница 11: ...uccessful in agent mode and the configuration is synchronized successfully Or the wireless uplink signal is strong in agent mode Flashing WLAN terminal is in WPS accessing process Or the wireless uplink signal is weak in agent mode Green Red On Flashing Software upgrade progress Rear panel Figure 2 2 shows the interfaces and buttons on the rear panel of the ZXHN H3601 Figure 2 2 The Rear Panel Int...

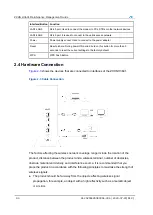
Страница 12: ...gure 2 3 shows the devices that are connected to interfaces of the ZXHN H3601 Figure 2 3 Cable Connection The factors affecting the wireless network coverage range include the location of the product distance between the product and a wireless terminal number of obstacles obstacle material and density and interference source It is recommended that you place the product in accordance with the follo...

Страница 13: ...should be installed on the same floor as the applied area Do not put other objects on the product Try to reduce the number of obstacles between the product and a wireless terminal Horizontally place the product in the middle of the applied area and do not put it in a corner Do not place the product at a high position while it is placed horizontally The recommended height is 1 2 to 1 5 meters SJ 20...

Страница 14: ...ZXHN H3601 Maintenance Management Guide 2 6 SJ 20200429083356 004 2020 07 23 R1 0 ...

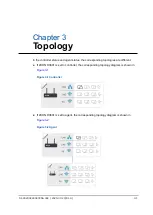
Страница 15: ...ologies are different If ZXHN H3601 is set to controller the corresponding topology diagram is shown in Figure 3 1 Figure 3 1 Controller If ZXHN H3601 is set to agent the corresponding topology diagram is shown in Figure 3 2 Figure 3 2 Agent SJ 20200429083356 004 2020 07 23 R1 0 3 1 ...

Страница 16: ...ZXHN H3601 Maintenance Management Guide 3 2 SJ 20200429083356 004 2020 07 23 R1 0 ...

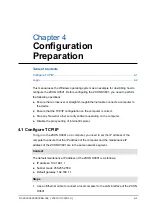
Страница 17: ... firewall or other security software operating on the computer Disable the proxy setting of Internet Explorer 4 1 Configure TCP IP To log in to the ZXHN H3601 on a computer you need to set the IP address of the computer to ensure that the IP address of the computer and the maintenance IP address of the ZXHN H3601 are in the same network segment Context The default maintenance IP address of the ZXH...

Страница 18: ...2 168 1 1 If the ping operation is successful it indicates that the TCP IP configuration is correct and the computer is properly connected to the ZXHN H3601 4 2 Login The ZXHN H3601 provides a Web based configuration and management system You can enter a specified IP address in the address bar of Internet explorer to access the system Prerequisite A computer is directly connected to the ZXHN H3601...

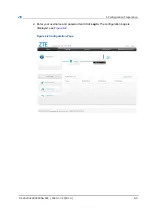
Страница 19: ...4 Configuration Preparation 2 Enter your username and password and click Login The configuration page is displayed see Figure 4 2 Figure 4 2 Configuration Page SJ 20200429083356 004 2020 07 23 R1 0 4 3 ...

Страница 20: ...ZXHN H3601 Maintenance Management Guide 4 4 SJ 20200429083356 004 2020 07 23 R1 0 ...

Страница 21: ...onfigure the Port Binding 5 25 Configure the Mulitcast 5 25 5 1 Check the Status 5 1 1 Check the Ethernet Interface Information The section describes how to check the Ethernet interface status Steps 1 On the main page of the ZXHN H3601 select Internet Status Ethernet Interface Information to the Ethernet Interface Information page see Figure 5 1 Figure 5 1 Ethernet Interface Information SJ 2020042...

Страница 22: ...on to the Ethernet Connection Information page see Figure 5 2 Figure 5 2 Ethernet Connection Information 2 Click Refresh to refresh the information 5 1 3 Check the 3G 4G Status The section describes the 3G 4G status Steps Check the mobile network information 1 On the main page of the ZXHN H3601 select Internet Status 3G 4G Mobile Network to go to the Mobile Network page The signal strength can ver...

Страница 23: ...us page see Figure 5 4 Figure 5 4 3G 4G Connection Status 4 Click Refresh to refresh the information 5 2 Configure the WAN 5 2 1 Configure the Ethernet Connection This procedure describes how to configure the Ethernet on the network side so that user services can be connected to the external network The ZXHN H3601 supports Route based and Bridge based WAN connections Routing connection Bridge base...

Страница 24: ... connection type includes Routing and Bridge Connection In this case Routing is selected Service List Options INTERNET TR069 IPTV This parameter must be consistent with service configuration For example if INTERNET is selected it indicates that the WAN connection supports the Internet access service only If TR069 is selected it indicates that the WAN connection supports remote management MTU Defin...

Страница 25: ...hese IP addresses are provided by the ISP NAT Enable or disable the NAT function IPv6 IPv6 Info Acquire Mode Specifies how to acquire IPv6 information for the WAN connection It is valid only if the WAN connection supports IPv6 The options are Manual You need to set the global address gateway and DNS acquisition modes Auto The global address gateway and DNS acquisition modes are automatically confi...

Страница 26: ... ensure normal service operation the VLAN ID must be the same as that set in upper layer MDU DSLAM configuration 2 Click Apply button to apply the changes 5 2 2 Configure the 3G 4G A Dongle device can be connected to ZXHN H3601 through a USB interface If the Dongle has a 3G 4G SIM card inserted the ZXHN H3601 can access the Internet through the Dongle device This page provides the parameters of th...

Страница 27: ... page The signal strength can verify the network card is plugged see Figure 5 6 Figure 5 6 Mobile Network 3 Click Refresh to refresh the information 4 On the main page of the ZXHN H3601 select Internet WAN 3G 4G to the 3G 4G Connection page Table 5 3 lists the New Item parameter After the setup is complete you can see the page see Figure 5 7 Table 5 3 New 3G 4G Connection parameters Parameter Desc...

Страница 28: ...tion Type There are three authentication types Auto PAP CHAP Connection Mode There are two connection modes Always On On Demand Auto disconnected without traffic Setting this parameter when Connection Mode is On Demand NAT Switch Select on off NAT switch function Figure 5 7 New 3G 4G Connection 5 Click Apply button to apply the changes 6 On the main page of the ZXHN H3601 select Internet Status 3G...

Страница 29: ...es will be processed according to the default policy showed in this page Steps 1 On the main page of the ZXHN H3601 select Internet QoS QoS Global Configuration to the QoS Global Configuration page see Figure 5 9 Figure 5 9 QoS Global Configuration page 2 Set radiobox On to enable QoS function 3 Click Apply button to apply the changes 5 3 2 Configure the QoS Classification This page provides the p...

Страница 30: ... 5 10 New QoS Classification Page Table 5 4 lists the QoS classification configuration parameters Table 5 4 Parameter Descriptions for the QoS Classification Parameter Description On Off Set radiobox On to enable the function of classification Name To create a QoS classification enter the name of the classification Classification Priority It can be modified by ISP 5 10 SJ 20200429083356 004 2020 0...

Страница 31: ...ol The level 2 protocol includes Unconcerned IPv4 IPv6 ARP and PPPoE Source IP Source host IP address Destination IP Destination host IP address DSCP DSCP value Level 3 Protocol The Level 3 Protocol includes Unconcerned TCP UDP and ICMP Source Port Source port number of the matching packets Destination Port Destination port number of the matching packets TCP ACK Set radiobox On to enable the funct...

Страница 32: ... check box Firewall Level High allows legal access from the WAN but forbids Internet devices from sending ping packets to the WAN interface of the ZXHN H3601 Middle Recommended allows legal access from the WAN and blocks dangerous data from the Internet Low allows legal access from the WAN and allows Internet devices to send ping packets to the WAN interface of the ZXHN H3601 3 Click Apply button ...

Страница 33: ...ide to CPE itself every 3 seconds 3 Click Apply button to apply the changes 5 4 2 Configure the Filter Criteria The section describes how to configure filter criteria Steps Filter Switch and Mode Configuration 1 On the main page of the ZXHN H3601 select Internet Security Filter Criteria to the Filter Criteria page 2 Click Filter Switch and Mode Configuration to the configuration page see Figure 5 ...

Страница 34: ...hite List Only addresses in the URL Filter list can be accessed 4 Click Apply button to apply the changes URL Filter 1 Click URL Filter to open URL Filter page see Figure 5 14 Figure 5 14 URL Filter Page 2 Table 5 8 lists the URL filter parameters Table 5 8 Parameter Descriptions for the URL Filter Parameter Description Name The name of the URL filter URL The URL address 3 Click Apply button to ap...

Страница 35: ...modify the service priority IP Version The IP version includes Any IPv4 IPv6 Source IP Destination IP Source Destination destination IP address Protocol Select the protocol that needs to filter packets By default it is Any Ingress Specify the data traffic direction The Ingress option and egress option cannot be the same If the ingress is LAN the egress should be a WAN or 3G connection The data tra...

Страница 36: ... the IP header of each packet to indicate the priority Range 0 63 3 Click Apply button to apply the changes 5 4 3 Configure the Local Service Control The section describes how to configure local service control Steps Service Control IPv4 1 On the main page of the ZXHN H3601 select Internet Security Local Service Control to the Local Service Control page 2 Click Service Control IPv4 to open Service...

Страница 37: ...N the LAN side can access ZXHN H3601 IP Range The IP address segment that needs to be filtered When the IP segment is null it refers to all the IP addresses Service Type Specify the service that is permitted or denied to access 4 Click Apply button to apply the changes Service Control IPv6 1 Click Service Control IPv6 to open Service Control IPv6 page see Figure 5 17 Figure 5 17 Service Control IP...

Страница 38: ...ermitted or denied to access 3 Click Apply button to apply the changes Remote Service Port Control IPv4 1 Click Remote Service Port Control IPv4 to open Remote Service Port Control IPv4 page see Figure 5 18 Figure 5 18 Remote Service Port Control IPv4 Page 2 Configure the remote service port control IPv4 parameters Table 5 12 lists the remote service port control IPv4 parameters Table 5 12 Paramet...

Страница 39: ... ALG page see Figure 5 19 Figure 5 19 ALG Configuration Page 2 Select the ALG services 3 Click Apply button to apply the changes Note Click All On to select all ALG services Click All Off to cancel all ALG services 5 4 5 Configure the DMZ The section describes how to configure DMZ DMZ provides the parameters of DMZ configuration features Steps 1 On the main page of the ZXHN H3601 select Internet S...

Страница 40: ...atures If you have local servers for different services and you want to make them publicly accessible you need to specify the port forwarding policy With NAT applied it translates the internal IP addresses of these servers to a single IP address that is unique on the Internet To the Internet users all virtual servers on your LAN have the same IP Address This IP Address is allocated by your ISP Thi...

Страница 41: ... name including TCP UDP TCP AND UDP The default protocol is TCP WAN Host IP Address IP address segment of the WAN side hosts LAN Host IP address of the LAN side host WAN Port Port segment of the WAN side hosts LAN Host Port Port number range of the LAN side host Range 1 65535 3 Click Apply button to apply the changes 5 5 Configure the Parental Controls The section describes how to configure parent...

Страница 42: ... according to the IP address or MAC address If the All user option is selected all the users that use the ZXHN H3601 device are included Days Specify the days when the parent control settings are applied Duration Specify the time when the parent control settings are applied Action The device supports Ban Internet Access URL Black List URL White List 3 Click Apply button to apply the changes 5 6 Co...

Страница 43: ...nfigured DDNS DDNS Switch Click On to enable the DDNS function Provider URL The URL of provider If the DynDNS HTTP is used the URL is http www dyndns com If the DtDNS HTTP is used the URL is http www dtdns org If the No IP HTTP is used the URL is http www no ip com If the easyDNS HTTP is used the URL is http www easydns com If the freedns HTTP is used the URL is http freedns afraid org If the TZO ...

Страница 44: ...parameters Table 5 17 Parameter Descriptions for the SNTP Parameter Description Time Zone Time zone NTP Server1 NTP Server5 IP address of the primary secondary third fourth fifth NTP server Poll Interval Interval of time synchronization Unit second Automatically Adjust Clock For Daylight Enable or disable the automatically adjust clock for daylight function DSCP To ensure the QoS of communication ...

Страница 45: ...ters of Port Binding configuration features Steps 1 On the main page of the ZXHN H3601 select Internet Port Binding to the Port Binding page see Figure 5 25 Figure 5 25 Port Binding Configuration Page 2 Click Refresh button to get the information 5 9 Configure the Mulitcast 5 9 1 Configure the IGMP The section describes how to configure IGMP IGMP provides the parameters of IGMP configuration featu...

Страница 46: ...re the MLD The section describes how to configure MLD MLD provides the parameters of MLD configuration features Steps 1 On the main page of the ZXHN H3601 select Internet Multicast MLD to the MLD page see Figure 5 27 Figure 5 27 MLD Configuration Page 2 Enable the MLD functions see Table 5 19 Table 5 19 Parameter Descriptions for the MLD Parameter Description IGMP Proxy The system serves as a prox...

Страница 47: ...S 6 24 Configure the NetSphere 6 25 6 1 Check the Local Network Status The section describes how to check the status of Local Network The relevant information of Local Network status includes LAN Status WLAN Status WLAN Client Status LAN Client Status and USB Storage Status The relevant information of Local Network status is shown as below Steps 1 On the main page of the ZXHN H3601 select Local Ne...

Страница 48: ...s WLAN On Off Configuration 1 On the main page of the ZXHN H3601 select Local Network WLAN WLAN Basic to the WLAN Basic page see Figure 6 2 Figure 6 2 WLAN On Off Configuration 2 Table 6 1 lists the WLAN on off configuration parameters Table 6 1 WLAN On Off Configuration parameters Parameter Description WLAN 2 4GHz Click On to enable the 2 4GHz wireless function Click Off to disable the 2 4GHz wir...

Страница 49: ...6 3 WLAN Global Configuration Page 2 Table 6 2 lists the WLAN global configuration parameters Table 6 2 Parameter Descriptions for WLAN Global Configuration Parameter Description Channel Channel of the wireless network A proper channel can be selected in accordance with the country code Options Auto 1 13 default 13 Specifies the channel used for communication between the AP and the wireless site d...

Страница 50: ...Power Level of radio signal transmitting power A larger value indicates wider coverage Options 100 80 60 40 20 3 Click Apply button to apply the changes Note WLAN global configuration 5GHz refers to WLAN global configuration 2 4GHz Private WLAN SSID Configuration 1 Click Private WLAN SSID Configuration to the configuration page see Figure 6 4 Figure 6 4 Private WLAN SSID Configuration Page 2 Table...

Страница 51: ...vate WLAN SSID Configuration 5GHz refers to Private WLAN SSID Configuration 2 4GHz Guest WLAN SSID Configuration refers to Private WLAN SSID Configuration 6 2 2 Configure the Advanced Parameters of the WLAN WLAN Advanced provides the parameters of WLAN Advanced configuration features Steps Access Control Mode Settings 1 On the main page of the ZXHN H3601 select Local Network WLAN WLAN Advanced to ...

Страница 52: ...ion to the configuration page see Figure 6 6 Figure 6 6 Access Control Rule Settings 2 Configure the access control rule configuration parameters Table 6 5 lists the access control rule configuration parameters Table 6 5 Access Control Rule Configuration parameters Parameter Description Name The name of Access Control Item SSID SSID name corresponding to the wireless network that the rule is appli...

Страница 53: ...ted Address DHCP DHCP Server DHCP Binding and Port Control Steps Allocated Address DHCP 1 On the main page of the ZXHN H3601 select Local Network LAN IPv4 to the IPv4 page 2 Click Allocated Address DHCP to the configuration see Figure 6 7 Figure 6 7 Allocated Address DHCP Page 3 Click Refresh to refresh the informations DHCP Server 1 Click DHCP Server to the configuration see Figure 6 8 SJ 2020042...

Страница 54: ...P Address The start IP address of the DHCP address pool DHCP End IP Address The end IP address of the DHCP address pool ISP DNS Select the On check box to let the Assign IspDNS work Primary DNS IP address of the DNS server provided by ISP Secondary DNS IP address of the DNS server2 provided by the ISP Lease Time Mode The mode of Lease Time Custom Lease Time The time during which the client PCs use...

Страница 55: ...DHCP binding parameters Table 6 7 Parameter Descriptions for the DHCP Binding Parameter Description Name The name of the DHCP Binding MAC Address The MAC address of the DHCP Binding IP Address IP address of the DHCP Binding 3 Click Apply button to apply the changes Port Control 1 Click DHCP Binding to the configuration see Figure 6 10 SJ 20200429083356 004 2020 07 23 R1 0 6 9 ...

Страница 56: ...vant information of Internet status includes Allocated Address DHCPv6 LAN Address Management DHCPv6 Server Static Prefix Port Control and RA Service Prerequisite Before configuring the prefix delegation make sure that the prefix delegation is enabled for the specified IPv6 WAN connection Steps Check the allocated address DHCPv6 1 On the main page of the ZXHN H3601 device select Local Network LAN I...

Страница 57: ... LAN Address Management Page 2 Configure the LAN address parameters Table 6 8 describes the LAN address parameters Table 6 8 Description of the LAN Address Parameters Parameter Description LAN IPv6 Address The IPv6 address of LAN 3 Click Apply button to apply the changes Configure the static prefix 1 Click Static Prefix to open the Static Prefix page see Figure 6 13 Figure 6 13 Static Prefix Page ...

Страница 58: ...rameters Table 6 10 describes the static routing parameters Table 6 10 Description of the DHCP Server Parameters Parameter Description DHCPv6 Server Select On to let the device work as a DHCP server and assign IP addresses to the client PCs or wireless devices DNS Delegate Type DNS Delegate Type Auto One DNS selected automatically from all the available DNS will be delegated Manual One or more DNS...

Страница 59: ...15 Figure 6 15 RA Service Page 2 Configure the RA service parameters Table 6 11 describes the RA service parameters Table 6 11 Description of the RA Service Parameters Parameter Description RA Service Select On to enable the RA service Select Off to disable the RA service Specify MTU If On button is selected enter the MTU value Preference By default the preference is Middle MTU Define the maximum ...

Страница 60: ...ss information DHCPv6 is used only for acquiring network parameter settings except the IP address M 1 and O 0 DHCPv6 is used only for acquiring the address information Prefix Delegate Type Prefix Delegate Type AutoSense One prefix selected automatically from all the available prefixes will be delegated Manual One or more prefixes selected manually from all the static prefixes configured before wil...

Страница 61: ...ing IPv4 which provides the parameters of route IPv4 configuration features The relevant information of Internet status includes Routing Table Static Routing and Policy Routing Prerequisite Before configuring routing IPv4 make sure that the IPv4 WAN connection is created Steps Routing Table 1 On the main page of the ZXHN H3601 select Local Network Routing IPv4 to the Routing IPv4 page 2 Click Rout...

Страница 62: ...ns for the Static Routing Parameter Description Name The name of static routing entry Egress WAN connection for static routing Network Address IPv4 address of the destination network Subnet Mask Subnet mask of the destination network Gateway The next hop IPv4 address to the destination network 3 Click Apply button to apply the changes Policy Routing 1 Click Policy Routing to the configuration page...

Страница 63: ... matching packets Source Mask Source mask of the matching packets Destination IP Address Destination IPv4 address of the matching packets Destination Mask Destination mask of the matching packets Protocol Matching IPv4 protocol The ANY option means any IPv4 protocol Source Port Source port number of the matching packets Destination Port Destination port number of the matching packets Source MAC Ad...

Страница 64: ...IPv6 make sure that the IPv6 WAN connection is created Steps Routing Table 1 On the main page of the ZXHN H3601 select Local Network Routing IPv6 to the Routing IPv6 page 2 Click Routing Table to the configuration page see Figure 6 20 Figure 6 20 Routing Table Page 3 Click Refresh to refresh the information Static Routing 1 Click Static Routing to the configuration page see Figure 6 21 Figure 6 21...

Страница 65: ...xt hop IP address to the destination network 3 Click Apply button to apply the changes Policy Routing 1 Click Policy Routing to the configuration page see Figure 6 22 Figure 6 22 Policy Routing IPv6 Page 2 Configure the policy routing parameters Table 6 15 lists the policy routing parameters Table 6 15 Parameter Descriptions for the Policy Routing Parameter Description Name The name of Policy rout...

Страница 66: ...scribes how to enable the FTP feature of the ZXHN H3601 by configuring FTP parameters including the username and password Steps 1 In the left navigation tree click Local Network FTP The FTP Application page is displayed see Figure 6 23 Figure 6 23 FTP Page 2 Set the parameters For a description of the parameters refer to Table 6 16 Table 6 16 FTP Server Parameter Descriptions Parameter Description...

Страница 67: ...the UPnP function 2 Click Apply button to apply the changes UPnP Portmap Table 1 Click UPnP Portmap Table to the information page see Figure 6 25 Figure 6 25 UPnP Portmap Table Page 2 Click Refresh button to refresh the information 6 7 Configure the DMS DLNA The section describes how to configure DMS DMS provides the parameters of DMS configuration features DMS is a multimedia server defined in DL...

Страница 68: ...Manager must be installed Prerequisite The USB device is connected to open the ZXHN H3601 device Steps 1 On the main page of the ZXHN H3601 select Local Network DMS DLNA to open the DMS DLNA page see Figure 6 26 Figure 6 26 DMS DLNA 2 Enable the DMS DLNA function and specify the path storing the media files For a description of the parameters refer to Table 6 18 Table 6 18 Parameter Descriptions f...

Страница 69: ...ps 1 On the main page of the ZXHN H3601 select Local Network Samba Service to open the Samba Service page see Figure 6 27 Figure 6 27 Samba Service Table 6 19 lists the samba service parameters Table 6 19 Samba Service parameters Parameter Description Samba Service Click On to enable the samba service function manually Click Off to disable the samba service function Click Auto On After Detecting U...

Страница 70: ...n the main page of the ZXHN H3601 select Local Network DNS to the Domain Name page see Figure 6 28 Figure 6 28 Domain Name Page 2 Type the Domain name 3 Click Apply button to apply the changes Host Name 4 Click Host name to the page see Figure 6 29 Figure 6 29 Host Name Page 5 Type the host name in the Host Name text box and the IP Address in the IP Address text box 6 Click Apply button to apply t...

Страница 71: ...e 6 20 Parameter Descriptions for the NetSphere Parameter Description Enable Click On button to enable the multi AP networking function Click Off button the device is used as a common wireless router Mode Setting the Device Role in the mesh Network Controller set the device as the main control AP in the mesh network and connects the LAN interface of the optical cat Agent set the device as subordin...

Страница 72: ...ZXHN H3601 Maintenance Management Guide 6 26 SJ 20200429083356 004 2020 07 23 R1 0 ...

Страница 73: ...irror function 7 6 Configure the TR069 function 7 7 Manage the Log 7 10 Network Diagnosis 7 13 Check the ARP Table 7 15 Check the MAC Table 7 15 Configure the IPv6 Switch 7 16 7 1 Check the Device Status The relevant information of device status is shown as below Steps 1 On the main page of the ZXHN H3601 select Management Diagnosis Status to the Status page see Figure 7 1 SJ 20200429083356 004 20...

Страница 74: ...Account Management page see Figure 7 2 Figure 7 2 Admin Account Management Page 2 Configure the administrator account management parameters Table 7 1 lists the administrator account management parameters Table 7 1 Parameter Descriptions for the Administrator Account Management Parameter Description Username The user name for the administrator privilege The default user name of the administrator pr...

Страница 75: ... the user account management parameters Table 7 2 Parameter Descriptions for the User Account Management Parameter Description Username The user name for the administrator privilege The default user name of the administrator privilege is vulladmin which can be modified New Password Specify the new password Confirmed Password Confirm the new password 3 Click Apply button to apply the changes 7 3 Co...

Страница 76: ...ure introduces how to reboot the device or restore the factory default settings Steps 1 On the main page of the ZXHN H3601 select Management Diagnosis System Management Device Management to the Device Management page see Figure 7 5 Figure 7 5 Device Management Page 2 On this page you can perform the following operations Click Reboot to reboot the ZXHN H3601 device Click Factory Reset to restore th...

Страница 77: ...progress During the upgrade process do not cut off the power supply Otherwise the device may be damaged Generally the software is upgraded by the ZTE CORPORATION engineers If the user wants to upgrade the Firmware contact the local office of ZTE CORPORATION to obtain the latest Firmware version 7 4 3 Manage the User Configuration This procedure introduces how to import or export the user configura...

Страница 78: ...tore Configuration Management Page 2 Click Browse to select the user configuration file and then click Restore Configuration to restore the device to the user configuration 7 5 Configure the Mirror function This procedure introduces how to perform the mirror configuration If the mirror configuration is performed the packets at the WAN side will be copied to the specified LAN interface and it can b...

Страница 79: ...urce Network side WAN interface Destination User side LAN interface 3 Click Apply button to apply the changes 7 6 Configure the TR069 function The section describes how to configure the TR 069 TR 069 provides the parameters of the TR 069 configuration features The relevant TR 069 includes Basic Configuration and Certificate Management Steps 1 On the main page of the ZXHN H3601 select Management Di...

Страница 80: ...rated by the system Connection Request Username Connection Request Password User name and password for the TR 069 connection authentication that the automatic configuration server provides when it logs in to the ZXHN H3601 device Periodic Inform Enable the periodic inform function Periodic Inform Interval Periodic inform interval of the device unit second Authenticating ACS Enable the TR 069 authe...

Страница 81: ...T or multiple NAT can find their public network addresses and determine the type of NAT and the Internet port bound to the local port These information is used to create UDP communication between two hosts after the NAT router Server Address The address of the server 3 Click Apply button to apply the changes Certificate Management 1 Click Certificate Management to the certificate management page s...

Страница 82: ...ement Page 3 Configure the log management parameters Table 7 6 lists the Log Management parameters Table 7 6 Parameter Descriptions for the Log Level Management Parameter Description Log Level Options ranked from low to high Debug Informational Notice Warning Error Critical Alert Emergency The system stores only the logs of the selected level and above levels 4 Click Apply button to apply the chan...

Страница 83: ... Parameter Description Save Log Click On to enable the system log function 3 Click Apply button to apply the changes 4 Optional Click Refresh button to get the latest information 5 Optional Click Clear to clear the logs 6 Optional Click Download Log to download the log file from the log server Security Log Management 1 Click Security Log Management to the security log management page see Figure 7 ...

Страница 84: ...enable the security log function 3 Click Apply button to apply the changes 4 Optional Click Refresh button to get the latest information 5 Optional Click Download Log to download the log file from the log server Remote Log Management 1 Click Remote Log Management to the remote log management page see Figure 7 16 Figure 7 16 Remote Log Management Page 2 Configure the remote log management parameter...

Страница 85: ...s provides the parameters of the Diagnosis configuration features The relevant information includes ping diagnosis trace route diagnosis DSL line diagnosis and simulation Steps Ping Diagnosis 1 On the main page of the ZXHN H3601 select Management Diagnosis Diagnosis to the Diagnosis page 2 Click to open Ping Diagnosis page see Figure 7 17 Figure 7 17 Ping Diagnosis Page 3 Set the parameters For a ...

Страница 86: ...esults are displayed in the bottom box Trace Route Diagnosis 1 Click to open Trace Route Diagnosis page see Figure 7 18 Figure 7 18 Trace Route Diagnosis Page 2 Set the parameters For the description of the parameters refer to Table 7 11 Table 7 11 Parameter Descriptions for Trace Route Diagnosis Parameter Description IP Address Host Name Destination IP address or host name for the Trace Route ope...

Страница 87: ...he current diagnosis is still running the device will only respond to the new diagnosis and the current diagnostic result will not be saved 7 9 Check the ARP Table The relevant information of ARP table is shown as below Steps 1 On the main page of the ZXHN H3601 select Management Diagnosis ARP Table to the ARP Table page see Figure 7 19 Figure 7 19 ARP Table Page 2 Click Refresh button to refresh ...

Страница 88: ...nable or disable IPv6 support for the ZXHN H3601 Steps 1 On the main page of the ZXHN H3601 select Management Diagnosis IPv6 Switch to the IPv6 Switch page see Figure 7 21 Figure 7 21 IPv6 Switch Page 2 To disable IPv6 support set IPv6 Function to Off and click Apply Note The configuration takes effective after the device is restarted 7 16 SJ 20200429083356 004 2020 07 23 R1 0 ...
Страница 89: ...network Check that the Ethernet cable is correctly connected to the WAN interface and the Ethernet cable is correctly connected to the LAN interface Check that the WAN indicator on the front panel is on and the Internet indicator on the front panel is solid green or flashing green Restore the factory default settings After the power is on use a needle to press the button for over 5 seconds to rest...

Отзывы: