background image

L9000 Fingerprint Lock User Manual


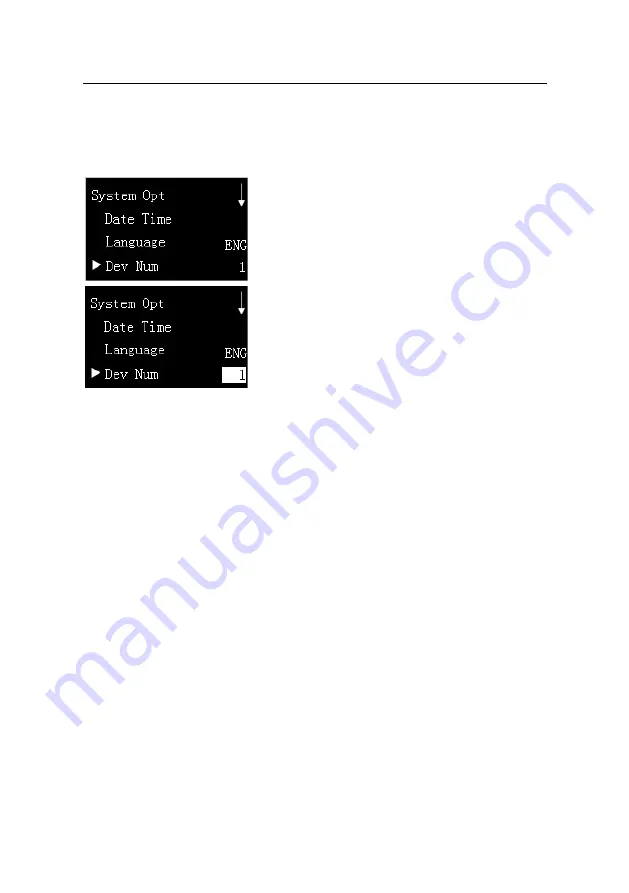
3.2.2 Set Device Number 


1.

 Select "Options" 

¼


"System Opt." 

¼

 "Dev 

Num" from the 

Menu 

interface, as shown in figure 

1 on the left. 


2

. Press 

0k 

key to enter setting interface, and then 

press 

S

/

T

 key to select device number, as shown 

in figure 2 on the left. The range of device number 

is 1-255. 

3.

 Press 

OK

 key to confirming the selected device 

number, and then press 

ESC

 key to quit 

System Opt

. The system will prompts you 

to save. The operation is same as 

2.1.1 Set Language

, here is no longer to 

restatement. 

 Note: 

When the user uses the USB flash disk to export the device records, the 

name of the exported file contains the device number in order to differentiate the 

data recorded by different devices. Therefore, the user shall set different device 

numbers for different fingerprint locks to avoid confusion, if the records are 

downloaded simultaneously from multiple devices. 


Reserve the rights of modification and explanation 

30

Содержание L9000

Страница 1: ...User Manual Version 1 0 Date 2011 10 About This Manual This manual introduces the fingerprint lock interface and menu operations about L9000 For the fingerprint lock installation browse the animated installation instructions ...

Страница 2: ...are which copyrights are shared by the licensors including ZK Technology Inc Except for the permission of the relevant holder any person can t copy distribute revise modify extract decompile disassemble decrypt reverse engineering leasing transfer sub license the software other acts of copyright infringement but the limitations applied to the law is excluded Due to the constant renewal of products...

Страница 3: ...t and Verification 14 2 1 Enroll an Administrator 14 2 1 1 Enroll a Fingerprint 15 2 1 2 Enroll a Password 17 2 2 Enroll an Ordinary User 20 2 3 Backup Enrollment 21 2 4 User Verification and Set Normal Open Status 22 2 5 Delete User Data 24 3 Lock Function Information and Settings 27 3 1 Operate Option 27 3 2 System Options 29 3 2 1 Set Language 29 3 2 2 Set Device Number 30 3 2 3 Advance Option ...

Страница 4: ...Other Functions 40 4 1 Routine Operation Indications 40 4 2 Administrator Loss Prevention 40 4 3 Automatic Program Exit and System Power off 40 4 4 Use Description of External Power 42 4 5 Unlock With an Emergency Mechanical Key 43 4 6 Alarm of Malicious Detection 44 4 7 Battery Low Voltage Protection 44 Appendix 45 Appendix 1 Introduction of Verification Mode 2 45 Appendix 2 Technical Specificati...

Страница 5: ...nstructions for once 3 Support setting of classified privileges for super administrators administrators and ordinary users 4 Support deletion of all or the specified registration data 5 Support Multi language firmware upgrade and uploading downloading of user information and access records through a USB disk 6 Fingerprint verification module and password registration 1 N is used for the password a...

Страница 6: ...t properly closed for a period of time then the screen will remind the user to close the door and the buzzer will give a brief alarm 16 Electrical auto locking function after the user is verified successfully the unlocking is executed i e the handle is twisted the electrical auto locking will be initiated that is one comparison is only useful for one unlocking to prevent the user from being tailed...

Страница 7: ...L9000 Fingerprint Lock User Manual 1 2 List of Installation Accessories Reserve the rights of modification and explanation 3 ...

Страница 8: ...cylinder 1 Set With the lock cylinder screw 06 Waterproof washer 2 PCS 07 Lock body 1 Set 08 Rear hold down plate 1 PCS 09 Screw 5 PCS 10 Installation disk 1 PCS 11 Battery cover Screw 1 PCS 12 Battery cover 1 PCS 13 Batteries 4 PCS Four pieces of alkaline AA batteries 14 Rear panel assembly 1 Set 15 Wood grain screws 2 PCS 16 Hole drilling template 1 PCS Reserve the rights of modification and exp...

Страница 9: ...k body s outside and inside can t be set contrary Assume you are standing outside and facing a door and then there are four door opening directions Left inward left outward right inward and right outward Left inward outward means the door swings inward outward with hinges on the left right inward outward means the door swings inward outward with hinges on the right as shown in the following figure...

Страница 10: ...Manual Recommended Tools You may need the following tools while following the instructions to install fingerprint locks A ruler A marker pen A drilling tool A cross screwdriver Reserve the rights of modification and explanation 6 ...

Страница 11: ...ear Views Front view ESC key number key 1 T key number key 3 Start key Status indicator OK key Menu key Number key 4 S key number key 2 Fingerprint collector Keyhole Handle Emergency power interface Reserve the rights of modification and explanation 7 ...

Страница 12: ...SC key mean quit the current operation the second function is used as the number key 1 Hold this key to power off the fingerprint lock S Key The first function is increase key when held this key will rapidly increase display values or menu item the second function is used as the number key 2 Reserve the rights of modification and explanation 8 ...

Страница 13: ...You can awake the fingerprint lock in dormant state by pressing the Start key The green LED indicator blinks when the fingerprint lock operates properly and the red LED indicator is on for three seconds if an error occurs The green LED indicator is on for three seconds when an operation succeeds OLED display The black and white OLED display features white graphics or text against a black backgroun...

Страница 14: ...nstalling the fingerprint lock You must enroll at least one administrator before enrolling ordinary users 2 Do not remove batteries when matching enrolling or deleting fingerprints because the sudden power down may result in data loss of fingerprint locks Prior to removing batteries make sure the fingerprint lock is not in working state 3 It is recommended to replace the fingerprint lock batteries...

Страница 15: ...ccess to all system functions and modify all system settings Administrator Refer to users who have access to all operations except performing advanced settings and enrolling super administrators Ordinary user Refer to all users other than the super administrators and administrators Ordinary users only have access to the fingerprint matching and unlocking functions Reserve the rights of modificatio...

Страница 16: ...al interface the display alternates between date and time every 5 seconds 2 Press and hold the Menu key for five seconds to access the Menu interface Press T key to select Options menu item and press OK key to display the setting interface As shown in the figure 2 on the left 3 Press T key to select System Opt menu item on the Options interface as shown in the figure 3 on the left And then press O...

Страница 17: ...e Press OK key to save The interface shows Working As shown in figure 1 on the left After the completion automatically return to the System Opt interface Note You can set the date between January 1st 2003 and December 31st 2032 To set the date beyond this range you need to consult our commercial representatives or pre sales technical support engineers Reserve the rights of modification and explana...

Страница 18: ...ssing the Start key to display the initial interface As shown in figure 1 on the left Press and hold the Menu key to display the Menu interface As shown in figure 2 on the left 2 Press S T key to move the cursor before the User Manage menu item and then press OK key to display the User Manage interface as shown in figure 3 on the left 3 Press T key to select Enroll Admin menu item and then press O...

Страница 19: ...Enroll interface as shown in figure 3 on the left The default User ID is 00001 that is the first User ID You also can press S T key to select the unused User ID press ESC key can give up operation and then return to the Enroll Admin interface 7 Press OK key to start enroll According to the interface prompts Place Finger Remove Finger Second Press Remove Finger Third Press Remove Finger and press t...

Страница 20: ...gure 3 on the left Prompt Continue on the interface choose whether to continue enroll 10 Press OK key to continue enroll administrator or press ESC key to enter backup User ID selection interface you can press S T key to choose User ID As shown in figure 4 on the left 11 Press OK key to enter the Backup Enroll interface as shown in figure 5 on the left or press ESC key to return User Manage interf...

Страница 21: ...hen return to Enroll Admin interface 6 Press OK key on the Enroll PWD interface to enter new enroll user ID selection interface As shown in figure 4 on the left 1 The default new enroll user ID is from 00001 begin incrementing the unused ID you also can press S T key to select unused ID Because of the 2 1 1 Enroll a fingerprint has added a user ID as 00001 so the new enroll interface display the u...

Страница 22: ...same as the password input at step 2 then press OK key to input again 4 Press ESC key to give up operation and return New Enroll interface as shown in figure 3 on the left If you need to continue enroll and then repeat step 1 to 3 or press ESC key to quit and then return to the Enroll Admin interface On the interface as shown in figure 2 on the left press OK key to save the enroll information and ...

Страница 23: ...te The super administrator Supervisor has the purview of backup password for itself all administrators non supervisor and all ordinary users The administrator Admin has the purview of backup password for itself and all ordinary users 2 After select user ID press OK key to start backup If you don t have the backup purview of the user ID you chose the interface will prompts Access Deny as shown in f...

Страница 24: ...rator password or put finger on the Fingerprint Collector to verify Skip to step 4 if verification succeeds otherwise proceed to step 3 3 If the interface prompts Error Pwd as shown in figure 3 on the left or prompts Please Try Agn as shown in figure 4 on the left then return to the Admin Affirm interface to verify again till verification succeeds The Menu interface is displayed upon successful ve...

Страница 25: ...2 3 Backup Enrollment On the New Enroll interface if you press ESC to cancel new enrollment then the Backup Enroll interface will be displayed as shown in the figure 3 on the left The steps about Backup enroll are same as New enroll The different is the interface display Backup Enroll but not New Enroll In the preceding chapters have described here is no longer to restatement Note 1 It is a wise c...

Страница 26: ...nlocking sound Rotate the handle of the fingerprint lock within 5 seconds to open the door If the Normal Open function is set to YES See 3 1 Operate Option the prompts as shown in step 4 and step 5 will be displayed upon successful verification otherwise no prompt will be displayed 4 The screen will prompt whether set Normal Open as shown in figure 3 on the left If press ESC key the fingerprint lo...

Страница 27: ... The parameters Illegal Times and Operate Alarm are set by the administrator The system will generate an alarm after the illegal operations reach the specified value For details see 3 1 Operate Option Note For example set the value of the parameter Illegal Times as 6 The system will automatically power off if you fail to verify your fingerprint or password 6 consecutive times Power on again the bu...

Страница 28: ... Admin Affirm interface Enter the Menu interface after verification succeeds as shown in figure 1 on the left The steps about admin affirm please see step 2 4 in 2 2 Enroll an Ordinary User 3 The cursor is before the User Manage menu item As shown in figure 1 on the left Press OK key to enter User Manage interface as shown in figure 2 on the left 4 Press S T key to move the cursor before the Delet...

Страница 29: ...ed the system will directly enter Step 9 namely enter the Del user screen 7 Press S T key to choose user ID as 00003 Press OK key to enter the confirm interface of figure 1 on the left Press OK key to delete the interface will prompt Working as shown in figure 2 on the left It will enter Del Password interface after delete successful as shown in figure 3 on the left Delete Password as shown in Pre...

Страница 30: ...user and admin but admin only can deleted fingerprints and password again to check whether the user data is deleted for sure Note Th delete ordinary To delete a Supervisor User ID you need to select Options System Opt Adv Option Clr Admin Pri and then select User Manage Delete User to delete the ID Reserve the rights of modification and explanation 26 ...

Страница 31: ...ry alignment generated mistaken opening Illegal Times This parameter is used to set the consecutive operation failure count An invalid operation alarm will be generated when the consecutive failure count exceeds the threshold Value range 3 99 Default value 10 Note The failure count is cumulated when the fingerprint lock is started next time If the number of cumulative failures exceeds the threshol...

Страница 32: ...tor can open the lock by successfully matching his her fingerprint or password only once but an ordinary user has to pass the verification in any two matching modes by using the same ID For detail please see Appendix 1 Introduction about Verify Mode 2 Normal Open Press OK key to display the Normal Open setting interface and press S T key to select Y Yes or N No If you select Y a prompt will be dis...

Страница 33: ...ge 1 Select Options System Opt Language from the Menu interface as shown in figure 1 on the left 2 Press OK key to enter setting interface and then press ST key to select language as shown in figure 2 on the left 3 Select the language type you want Press OK key to confirm and then press ESC key to quit system options the system will prompt you to save as shown in figure 3 on the left Press OK key ...

Страница 34: ... then press ESC key to quit System Opt The system will prompts you to save The operation is same as 2 1 1 Set Language here is no longer to restatement Note When the user uses the USB flash disk to export the device records the name of the exported file contains the device number in order to differentiate the data recorded by different devices Therefore the user shall set different device numbers ...

Страница 35: ... and return to the Adv Option interface or press ESC to quit current interface without performing any Adv Option interface operation and then return to the eset Opts This parameter is used to restore the fingerprint lock to factory This parameter is used to delete all the verification records from a This parameter is used to delete all the enrolled fingerprint images rameter is used to change an a...

Страница 36: ...Move the Band Switch back lo to enter the query interface of PenDrive Mng as shown in figure 2 on the left 3 Press ESC key to cancel re then the screen will prompts Working as shown in figure 3 on the left The Fingerprint Collector will show green light and then enter PenDrive Mng interface as shown in figure 4 and figure 5 on the left Note When the batt ca green indicator light for Fingerprint co...

Страница 37: ...nagement the band switch must at the middle position Otherwise the lock can not detect the U disk d DwnL fi UpLoad User Upload user information and fingerprint lock from U disk to the fingerprint lock Upd Firmware Upgrade the firmware of the fingerprint lock through the upgrade files in the U disk Note If you n engine Tip Please do not perform invalid operations fo insert upload download on the US...

Страница 38: ... figure 2 on the left 3 Open the Battery Cover behind the fingerprint lock and Interface Press OK key to confirm the screen will prompt Copying Data as shown in figure 3 on the left 4 The screen will prompt Copy Data Suc after success copying as shown in figure 4 on the left and then return to the PenDrive Mng interface as shown in figure 1 on the left 5 Pu stores the file 1_attlog dat attendance ...

Страница 39: ...ock The method of operation is similar to 3 3 1 Download Logs here is no longer to restatement T key on the PenDrive Mng interface to move the cursor before the Upd Firmware menu item and then press OK key to start upgrade firmware Upgrade the firmware of the fingerprint lock through the upgrade files in the U disk The milar to 3 3 1 Download Logs here is no longer to restatement concurrently down...

Страница 40: ...ft The number sho the device the Fingerprint Lock the number 2 means had enrolled 2 fingerprints in the device 3 Press T key to move show the Log Admin Cnt and Pwd Usr menu as shown in figure 3 on the left The number 4 shows on the screen means there have 4 unlock logs in the device the number 2 means had enrolled 2 administrators in the device the num 1 means had enrolled 1 password in the device...

Страница 41: ...ure 1 on the left interface as shown in figure 2 on the left figure 3 on the ft It shows the User ID total of unlock logs the The number 4 shows in figure 3 means the 2 Press OK key to enter the Browse AttLogs 3 Press S T key to select User ID For example select the User ID as 00001 then press OK key to browse logs the result shown in le date of unlock log and so on 4 total of unlock logs the numb...

Страница 42: ... on the Sys Info interface to move the cursor before the Free Space Info menu item as shown in figure 1 on the left 2 Press OK key to enter the Free Space Info the current free space of FP Cnt Log and S Logs They are 498 29996 and 4095 Free Space Information interface as shown in figure 2 on the left The interface shows Reserve the rights of modification and explanation 38 ...

Страница 43: ... in figure 2 on the left The interface show the FPCnt is 500 Log is 30 000 S Logs is 4095 shown the Manu Time Serial Num and Vendor Press S T key to move the cursor before the menu item and press OK key and th the corresponding information 4 Press T key to move the cursor down in order to shown the Device Name Alg Version and Firmware Ver as shown in figure 4 on the left Press S T key to move the ...

Страница 44: ...he menu operation failure as a result of loss of administrator you may take the following measures Press and hold the Menu key for 5 seconds to display the Admin Affirm interface and then use the key to open the door namely enter the Menu as Supervisor and carry through the management operation 4 3 Automatic Program Exit and System Power off The Fingerprint Lock powers off automatically upon succe...

Страница 45: ...owers off automatically when the supply voltage is atically if there is no keystroke within 10 seconds on the initial interface operations exceeds the threshold The Fingerprint automatically when an alarm is generated for 30 seconds lower than level 3 detection voltage The Fingerprint Lock powers off autom Reserve the rights of modification and explanation 41 ...

Страница 46: ...e use of xternal power the lock cylinder will not automatically return to its original position hat is the Fingerprint Lock remains in NO state To solve this problem you can place the battery and then open the lock once to have the lock cylinder in position The Fingerprint Lock supports temporary use of external DC power for fingerprint and unlocking but when connected the fingerprint lock cannot ...

Страница 47: ...rt the tip of the screwdriver or the rigid flake into the opening on the lock cover turn the tate 90º to unlock Note The key shown in the figure is not a real object please use the key provided with the device screwdriver or the rigid flake counterclockwise to open the unlocking cover Insert the emergency key into the keyhole and ro Screwdriver Insert the key into the lock hole then rotating 90 DE...

Страница 48: ...ry meter stays at one bar and the user verification the system y Low as shown in figure 3 on the left The battery icon starts flashing In this case you press Menu key and hold on for 5 seconds can t enter the Men re also inaccessib l power so as to prevent data loss caused by power instability When tomatically You must replace the battery for work normally detection of the password When the count ...

Страница 49: ...ver for an ordinary user only after both comparisons fingerprint fingerprint fingerprint password or password fingerprint are successful for the same enrollment number be unlo the door can cked Take the verification mode of fingerprint password as an example the specific operation and screens are as follows by the finger whose fingerprint is enroll Please Try Agn as shown in figure 2 on the left y...

Страница 50: ...fications p password matching and fingerpr e Record capacity 30 000 f Communication mode USB g Resolution 500 DPI h Identification speed 2 sec i False acceptance rate 0 00 j False rejection rate 1 k Power Four AA batteries w l Locking count 4000 time m Temperature 0 45 C n Humidity 10 80 the second verifica a Screen OLED display b Collector Support 7131 has fingerprint film and 0303 without finger...

Отзывы: