ZiiPa Piana Gaz Скачать руководство пользователя страница 9

17

16

Legal notices and safety instructions

Legal notices and safety instructions

I.

EN

EN

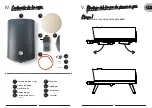
When lighting, never look directly at the flame or the 

inside of the oven.

LEGAL NOTICES OF SECURITY AND LIMITATION OF LIABILITY:

MUST BE READ IN ITS ENTIRETY BEFORE USE.

Please read this legal disclaimer carefully before assembling,

to install and use or maintain your Piana Gas pizza oven. Failure to comply with the provisions of this legal 

disclaimer could result in property damage, serious bodily injury, death or fire.

• The Piana Gas oven must always be used outdoors. Do not use it in strong winds or bad weather.

• We recommend the use of propane for outdoor use.

• The Piana Gas oven is intended for domestic use only.

• The combustion products generated contain carbon and carbon monoxide from the flue gases. 

Inhalation of these substances inside a room or in an enclosed space is known to be a possible cause of 

death by asphixia or carbon monoxide poisoning.

• BEFORE ANY USE, check the tightness of the device and the connections. Never attempt to check for 

leaks with an open flame. Always use soapy water or a gas leak detector spray. Do this tightness test 

each time a new gas cylinder is connected or after a long period of non-use of Piana Gas.

• When the device is not used for a certain period of time, it must be placed inside its clean and dry 

packaging or in a cover. You can find it from your supplier.

• Always close the tap on the gas cylinder and turn the knob to the «off position» when the Piana Gas 

oven is not in use.

• If you smell gas, turn off the gas supply, extinguish any flame. Pay attention to other surrounding 

heat sources. If the smell persists, move away from the Piana Gas oven and immediately call the fire 

department or the gas company.

• If a gas leak is detected at any time, STOP using the appliance immediately and call the fire department 

and the gas company.

• If you cannot stop the gas leak, immediately close the gas cylinder valve and call the gas company and 

the fire department.

• If the Piana Gas oven does not ignite after many attempts during the start-up process, turn the knob to 

the «off position». Wait 5 minutes and try again. Always close the valve of the gas bottle during these 5 

minutes of waiting. Be extremely vigilant. If gas were to escape, it would diffuse and could accidentally 

ignite, causing the risk of injury.

• If a leak should ignite before you can close the cylinder valve, use a damp cloth to close the cylinder 

valve.

• Never use the Piana gas oven for any function other than cooking pizzas.

• In the event of a presumed fault, contact the supplier but never attempt to repair or modify the hose, 

the regulator or any other component of the Piana Gas oven.

• Do not make any modifications to the device, this violates our conditions, invalidates any warranty and 

may pose a danger to you and others.

• Parts sealed by the manufacturer or representative must not be manipulated by the user.

• Make sure that the legs of the Piana Gas pizza oven are fully extended before use.

• Make sure that the edges of each leg of the oven are a sufficient distance from the edges of the table.

• Place the Piana Gas oven on a stone or stainless steel surface. Avoid placing your oven on a glass or 

plastic table.

• Never operate the oven in any other position or under any other conditions.

• Young children and pets should be kept away.

• Do not leave the oven unattended when it is on.

• Stand to the side when lighting. Never look directly at the flame or the interior of the oven.

• Attention ! During use, the Piana Gas oven and the external parts such as the shell can be very hot.

• Always wear protective gloves when handling.

• The device must be kept away from all other flammable materials during use.

• Do not move the device during use.

• Cut off the gas supply at the gas cylinder after use and put the button in the «off position».

• Caution: Any cleaning or maintenance must be carried out when the oven is cold and the gas supply is 

turned off at the gas cylinder and disconnected.

SAFETY INSTRUCTIONS RELATING TO GAS

• The Piana Gas oven must be connected and used exclusively with LPG (propane) packaged in a cylinder 

fitted with a manually shut-off valve. You can use gas bottle with a capacity of 4 to 13 kg.

• The size of the LPG cylinder must be 350 mm in maximum diameter and 400 mm in maximum height.

• Never operate this appliance within 19.7in (0.5 m) of any structure, combustible material or other gas 

cylinder.

• Never operate this appliance within 19.7in (0.5 m) of any flammable liquid.

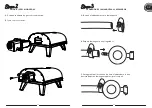
• When using the Piana Gas oven, ensure that the gas bottle is kept at a distance of at least 1 meter from 

the oven to avoid any risk of fire.

• The gas bottle must always be placed in an upright position.

• When changing the gas bottle, check that the button of the Piana Gas oven is on.

“position off”. Disconnect the regulator from the gas cylinder and remove the cylinder.

• Never store the gas cylinder indoors or in an enclosed space.

• Under no circumstances should the gas cylinder be stored near the Piana gas oven or any other 

appliance.

• Place the Piana Gas oven on a clean, stable, flat and non-flammable surface.

• The regulator must be protected from rain or bad weather.

• If you need to check or replace the regulator, make sure the oven is off, cold and the gas cylinder is 

tightly closed. This operation must be carried out away from fire and any source of heat.

• Use an appropriate regulator certified to EN 16129 and a flexible hose certified to EN 16436.

• The hose and regulator assembly parts must comply to CE gas standards.

• The length of the hose must not exceed 1.5 meters. Be careful when you connect the gas bottle to the 

Piana Gas oven or when using the oven, the hose must not be obstructed, bent, tangled or in contact with 

any part of the oven other than its connection.

• The hose must be replaced at least every two years and checked periodically. If the hose is worn or 

damaged, it must be replaced.

• Check the hose replacement requirements in your country.

Содержание Piana Gaz

Страница 1: ...PIANA GAZ FOUR PIZZA Manuel Manuel d utilisation d utilisation User manual Istruzioni per l uso Manual de usuario Benutzerhandbuch Gebruiksaanwijzing...

Страница 2: ...4 16 28 40 52 64 IT EN FR DE SP NL www ziipa fr...

Страница 3: ...our vous et pour d autres personnes Les pi ces scell es par le fabricant ou le repr sentant ne doivent pas tre manipul es par l utilisateur Assurez vous que les pieds du four pizza Piana Gaz soient co...

Страница 4: ...de fuites sur le flexible 4 V rifiez que la bombonne de gaz et que le flexible est fermement attach au bloc gaz 5 Une rotation trop rapide du bouton du bloc gaz peut emp cher l allumage La flamme est...

Страница 5: ...rapizzaaugaz V D PLIEZ LES QUATRE PIEDS DU FOUR Etape1 Etape1 Contenudelaboite Contenudelaboite IV Four Piana Gaz Pierre ronde en cordi rite Bloc gaz Coupe flamme D j install Flexible D tendeur Bague...

Страница 6: ...omme indiqu B Fixez le avec les vis MONTAGE DU FLEXIBLE SUR LE D TENDEUR Etape3 Etape3 A Glissez la bague sur le flexible FR B Enfoncez le flexible sur le d tendeur C Afin de garantir le raccordement...

Страница 7: ...sol d tecteur de fuite de gaz Pendant que vous tournez l crou raccord maintenez le d tendeur Le d tendeur ne doit jamais tre tourn C Une fois le flexible et le d tendeur correctement mont sur la boute...

Страница 8: ...a Gaz a t con u pour monter jusqu 400 C Pour une bonne cuisson de vos pizzas maintenez la temp rature du four entre 350 C et 400 C et assurez vous surtout que la pierre soit 350 C Nettoyageetentretien...

Страница 9: ...ative must not be manipulated by the user Make sure that the legs of the Piana Gas pizza oven are fully extended before use Make sure that the edges of each leg of the oven are a sufficient distance f...

Страница 10: ...Turning the gas block knob too quickly may prevent ignition The flame is too orange or blue Variations in the environment the food being cooked the ambient tempe rature and the state of the Piana Gaz...

Страница 11: ...mblingthegaspizzaoven Assemblingthegaspizzaoven V UNFOLD THE FOUR LEGS OF THE OVEN Step1 Step1 EN EN Piano Gas oven Cordierite round stone Gas block Flamebreaker Already installed Hose Regulator Hose...

Страница 12: ...own B Fix it with the screws EN EN CONNECTING THE HOSE TO THE REGULATOR A Slip the Hose clamp over the hose B Push the hose onto the regulator C In order to guarantee the connection tighten the hose c...

Страница 13: ...o gas leaks You can check this with a soapy water solution or by using an aerosol gas leak detector While turning the union nut hold the regulator The regulator must never be turned C Once the hose an...

Страница 14: ...e next steps Piana Gas has been designed to heat up to 400 C For proper baking of your pizzas keep the oven temperature between 350 C and 400 C and above all make sure that the stone is at 350 C Clean...

Страница 15: ...rappresentare un pericolo per te e per gli altri Le parti sigillate dal produttore o dal rappresentante non devono essere manipolate dall utente Assicurarsi che le gambe del forno per pizza Piana Gas...

Страница 16: ...4 Verificare che la bombola del gas e il tubo flessibile siano saldamente fissati attaccato al blocco gas 5 Una rotazione troppo rapida della manopola della valvola del gas pu impedire l accensione La...

Страница 17: ...iodelfornoperpizzaagas Montaggiodelfornoperpizzaagas V APRI LE QUATTRO GAMBE DEL FORNO Passo1 Passo1 FR IT Forno a gas piano Pietra tonda di cordierite Blocco gas Rompifiamma Gi installato Tubo flessi...

Страница 18: ...to B Fissarlo con le viti FR IT COLLEGAMENTO DEL FLESSIBILE AL REGOLATORE A Infilare il stringitubo sul tubo flessibile B Spingere il tubo flessibile sul regolatore C Per garantire il collegamento str...

Страница 19: ...con una soluzione di acqua saponosa o utilizzando un rilevatore di fughe di gas aerosol Mentre si gira il dado a risvolto tenere fermo il regolatore Il regolatore non deve mai essere ruotato C Una vo...

Страница 20: ...Piana Gas stata progettata per riscaldare fino a 400 C Per una corretta cot tura delle vostre pizze mantenete la temperatura del forno tra i 350 C e i 400 C e soprattutto assicuratevi che la pietra si...

Страница 21: ...resentar un peligro para usted y otros Las piezas selladas por el fabricante o representante no deben ser manipuladas por el usuario Aseg rese de que las patas del horno para pizza Piana Gas est n com...

Страница 22: ...e gas y la manguera est n firmemente adjunta bloque de gas 5 Girar la perilla de la v lvula de gas demasiado r pido puede evitar la ignici n La llama es demasiado naranja o azul Las variaciones en el...

Страница 23: ...pizzaagas Monta jedelhornodepizzaagas V DESPLIEGA LAS CUATRO PATAS DEL HORNO Etapa1 Etapa1 FR FR FR FR FR FR SP Horno de piano a gas Piedra redonda de cordierita Bloque de gas Cortador de llama Ya ins...

Страница 24: ...jelo con los tornillos FR FR FR FR SP FR FR FR SP CONEXI N DE LA MANGUERA AL REGULADOR A Deslice el abrazadera sobre la manguera B Empuje la manguera en el regulador C Para garantizar la conexi n apri...

Страница 25: ...onosa o utilizando un spray detector de fugas de gas Mientras gira la tuerca de uni n sujete el regulador El regulador no debe girarse nunca C Una vez que la manguera y el regulador est n correctament...

Страница 26: ...ientes pasos Piana Gas ha sido dise ado para calentar hasta 400 C Para una correcta cocci n de tus pizzas mant n la temperatura del horno entre 350 C y 400 C y sobre todo aseg rate de que la piedra es...

Страница 27: ...ann eine Gefahr f r Sie und andere darstellen Vom Hersteller oder Vertreter versiegelte Teile d rfen vom Benutzer nicht manipuliert werden Stellen Sie sicher dass die Beine des Pizzaofens Piana Gas vo...

Страница 28: ...Sie ob die Gasflasche und der Flexibel fest mit der am Gas block befestigt ist 5 Ein zu schnelles Drehen des Knopfes am Gasblock kann die Z ndung verhindern Die Flamme ist zu orange oder blau Schwank...

Страница 29: ...s ZusammenbaudesGas Pizzaofens V KLAPPEN SIE DIE VIER BEINE DES OFENS AUS Schritt1 Schritt1 FR DE Ofen Piana Gas Runder Stein aus Cordierit Gasblock Flammensperre Bereits installiert Flexibel Gas Regl...

Страница 30: ...t den Schrauben FR DE ANSCHLIESSEN DES SCHLAUCHS AN DEN REGLER A Schieben Sie den Schlauchschellen ber den flexibel B Schieben Sie den flexibel auf den Regler C Um die Verbindung zu gew hrleisten zieh...

Страница 31: ...vorhanden sind Sie k nnen dies mit einer Seifenwasserl sung oder mit einem Aerosol Gaslecksucher berpr fen Halten Sie beim Drehen der berwurfmutter den Regler fest Der Regler sollte niemals gedreht we...

Страница 32: ...tzung auf bis zu 400 C ausgelegt Um Ihre Pizzen rich tig zu backen halten Sie die Ofentemperatur zwischen 350 C und 400 C und achten Sie vor allem darauf dass der Stein eine Temperatur von 350 C hat F...

Страница 33: ...n maakt elke garantie ongeldig en kan een gevaar vormen voor u en anderen Door de fabrikant of vertegenwoordiger verzegelde onderdelen mogen niet door de gebruiker worden gemanipuleerd Zorg ervoor dat...

Страница 34: ...en flexibel stevig vastzitten bevestigd aan het gasblok 5 Te snel aan de knop van de gasblok draaien kan ontsteking voorkomen De vlam is te oranje of blauw Variaties in de omgeving het voedsel dat wo...

Страница 35: ...R Montagevandegaspizzaoven Montagevandegaspizzaoven V VOUW DE VIER OVENPOTEN UIT Stap1 Stap1 FR FR NL Piana Gasoven Ronde cordierietsteen Gasblok Vlamdover Al ge nstalleerd Flexibel Gasregelaar Slang...

Страница 36: ...het vast met de schroeven FR FR NL DE FLEXIBEL AANSLUITEN OP DE REGELAAR A Schuif de slang klem over de flexibel B Duw de flexibel op de regelaar C Om de verbinding te garanderen draait u de Slang kle...

Страница 37: ...plossing of met een gaslekzoekspray Houd de regelaar vast terwijl u de war telmoer draait De regelaar mag nooit gedraaid worden C Zodra de slang en regelaar correct op de cilinder zijn gemonteerd kun...

Страница 38: ...armen Voor het goed bakken van uw pizza s houdt u de oventemperatuur tussen de 350 C en 400 C en zorgt u er vooral voor dat de steen op 350 C staat Schoonmaakenonderhoud Schoonmaakenonderhoud VI Voord...

Страница 39: ...Partagezvosinstants dedolcevitaavecnous VERSION 2023 08 www ziipa fr...

Страница 40: ...Ningbo Yingchuang Intelligent Technology Co Ltd Tongguang Village Fengshan Street Yuyao 315400 Zhejiang China...

Отзывы: