background image

INFINITY ID2 INSTALLATION MANUAL.  


Software Versions: PANEL 1.N  & LOOP O.N 


Approved Document No: GLT-211-7-1


Issue 1.9    Author: MG/NJ     Date: 06/04/2016


PAGE 24


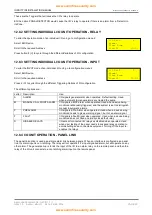
12. CONFIGURING THE ID2 FIRE ALARM PANEL 


12.1 CONFIGURING THE ZONES 


12.1.1 FROM A BLANK INFINITY ID2 PANEL 


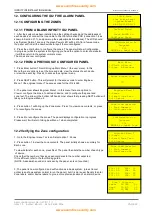
1. After the system has been installed, and the cabling checked and the addresses of  
each device set, connect the loop cable to the CIE termination PCB (connection 1-8 as  
shown in Section 21.1), and power up the system(mains & batteries). The LCD should 
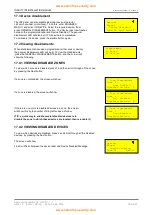
say “System Normal” and only the green Power LED will be lit. After a few seconds, 
the panel will find all the new devices & report them unconfigured 


2. Press the enter button to configure the zones. The panel will show Configuration  
in progress, (while the system is configuring you have the option to enter zone labels) 
 it will then return to the system normal screen. 
The zones are now configured. 
 

12.1.2 FROM A PREVIOUSLY CONFIGURED PANEL 

 
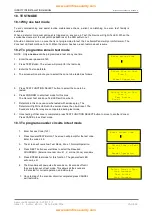
1. Press Enter button. This will bring up Main Menu 1 (the user menu). In this  
Menu there are options to set the time and date, view the status of each device,  
or view the event log. Press 4 to access the engineer menu 


2. Press NEXT button. This will prompt for the access code to enter Engineer 
Menu 1 (the engineer menu).The access code for the ID2 is 369  
 
 
3. The panel now shows Engineer Menu1. In this menu there are options to  
View or configure the zones, to edit each device, and to configure the panel and  
zone text. The arrow in the bottom left hand corner shows that pressing NEXT button will 
take you to Engineer Menu 2 
 
 
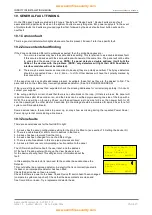
4. Press button 1 will bring up the Zone menu. Press 1 to view zone contents, or press  
2 to reconfigure the zones 
 
 
5. Press 2 to reconfigure the zones. The panel displays configuration in progress,  
Please wait. It will return to Engineer Menu 1 when completed. 


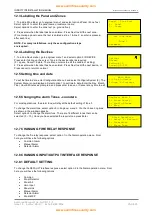
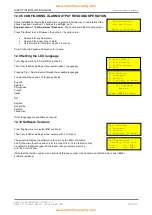
12.2 Verifying the Zone configuration 


1. Go to the Engineer menu 1 screen. Select option 1: Zones 
 
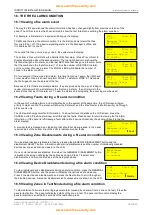
2. Press button 1 to view the zone contents. The panel initially shows a summary for 
Each zone 
 
To view details for each zone, press Next. The panel then lists the number of each type 
 of device,  
Check that the number of devices seen compares to the number expected. 
If it is different, refer to the fault finding guide. 
(NOTE: A sandwich sounder is not seen by the panel, so is not counted.) 
 
 
3. The panel is now configured, and will function as a basic system, (press Cancel  
until screen shows system normal to run the panel), but it is more user friendly to enter  
Zone labels, and/or device labels, to give a more precise location of an alarm device.  


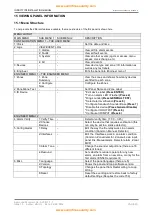
ID2/8 Zone 

Fire Alarm Panel 

System Normal 

24-09-2012 09:35


Main Menu 

1:Clock 3:Device 
2:Logs  4:Engineer 


 Enter Access Code  
 
        ***   


Engineer Menu 1 

1:Zones 
2:Panel/Zone Text 
3:ID Device       → 

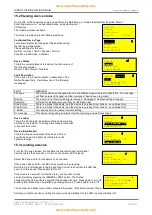
  Configuration in 

Progress 

30% 

ENTER to Label Zone 

Z01: 02    Z02:  03 
Z03: 00    Z04:  00 
Z05: 00    Z06:  00 

Z07: 00    Z08:  00 

   Devices Found 
 
   Press ENTER to 

 Configure Panel


  Zone 1 Contents 
Smoke   01|SND    02 
Heat    01|I/O    00 
MCP     01|ERR    00 
 

 Zone Configuration 
1: Zone Summary 

2: Configure now


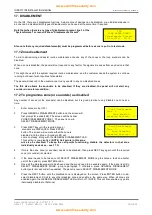
Configuration in 

Progress 

30% 

ENTER to Label Zone 

Engineer Menu 1 

1:Zones 
2:Panel/Zone Text 
3:ID Device       → 

 Zone Configuration 
1: Zone Summary 

2: Configure now


www.acornfiresecurity.com

www.acornfiresecurity.com

Содержание ID2/2/M

Страница 1: ...tware Versions PANEL 1 N LOOP O N Approved Document No GLT 211 7 1 Issue 1 9 Author MG NJ Date 06 04 2016 INTELLIGENT 2 WIRE FIRE DETECTION SYSTEM WITH ID TECHNOLOGY INSTALLATION MANUAL www acornfiresecurity com www acornfiresecurity com ...

Страница 2: ...1 7 ZONE WIRING 12 7 1 Specific device wiring instructions 13 7 1 1 CP3 AD Manual Call Point 13 13 7 1 2 MKII detectors All types Base connection 13 7 1 3 ZAI MI Input Module 14 7 1 4 ZAIO MI Input output Module 14 7 1 5 ZASC MI Sounder Control Module 15 7 1 6 ZAZM MI Conventional Zone Module 15 7 1 7 Xtratone Sounder Sounder Flasher 16 7 1 8 Sandwich Sounder 16 7 1 9 Addressable Remote LED Indica...

Страница 3: ...33 16 2 Viewing Faults during a fire alarm condition 33 16 3 Viewing Zone Disablements during a fire alarm condition 33 16 4 Viewing Device Disablements during a fire alarm condition 33 16 5 Viewing Zones in Test Mode during a fire alarm condition 33 17 DISABLEMENT 34 17 1 Zone disablement 34 17 2 To programme zone or sounders as disabled 34 17 3 Device disablement 35 17 4 Viewing disablements 35 ...

Страница 4: ...rth point eg building plumbing will help to discharge any static Always hold the PCB by its sides and avoid touching the legs of any components Keep the PCB away from damp dirty areas e g in a small cardboard box 1 2 Safety Precautions during Normal Operation of Panel NOTE When the ID2 panel is operating normally i e not being tended by service personnel the front cover should be screwed closed wi...

Страница 5: ...e 10 Test Condition Option with requirements The ID2 also has the following ancillary functions not required by the Standard Serial repeater output RS485 2 2 Power Supply Section The ID2 Fire Alarm Panels Power Supply Equipment PSE has been designed to EN 54 4 1997 A1 A2 Fire Detection Fire Alarm Systems Power Supply Equipment The PSE has been designed to charge batteries up to 7Ah within the time...

Страница 6: ...red sounders but also has 2 conventional sounder circuits All sounders on a ID2 panel will activate on any alarm It has been designed to give the advantages of an addressable system with the simplicity of a conventional system To help achieve this the ID2 uses default values to cut out many of the programming steps normally associated with addressable panels This leaves only the device label to be...

Страница 7: ... step manner the procedure for the basic design and installation of the ID2 range of Fire Alarm Control Panels It gives detailed instructions on how to use all the features on this fire alarm panel For operational and maintenance information please refer to document USER MANUAL MAINTENANCE GUIDE LOG BOOK It also contains a System set up table and Installation Certificate that must be completed by ...

Страница 8: ...es a bit of thought to zone allocation during the system design stage 1 Decide on the zone allocation for the system Each default zone can have a maximum of 15 devices fitted Consider the simplified 3 storey building below The advantage of this method of zone allocation is that it simplifies the panel setup by eliminating a programming stage 2 Sounder operation On the ID2 Panels it is a common sou...

Страница 9: ...ng to BS5839 Pt1 2013 Clause 26 Fire Detection and Alarm Systems for Buildings Code of Practice for System Design Installation and Servicing are Standard fire resisting cable to PH30 classification of EN 50200 Enhanced fire resisting cable to PH120 classification of EN 50200 Note that all cables should be at least 1mm 2 cross section On the ID2 the general recommendation would be to use standard f...

Страница 10: ...de that holds the panel manuals If semi flushing or fitting to a tight space remember to remove the manuals before fitting to the wall Fix the enclosure to the wall using the three mounting holes provided Check the build condition of the wall to decide a suitable screw fixing The mounting holes are designed for No 8 roundhead or countersunk woodscrews or similar Remove any debris from the enclosur...

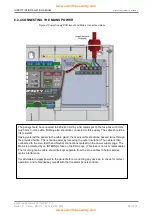
Страница 11: ...nel via the cable gland the mains cable should be passed twice through the provided ferrite This is made easier by removing the outer insulation The cable is then connected to the Live Earth and Neutral connections marked on the power supply cage The Mains is protected by an INTERNAL fuse on the PSU cage This fuse is not user replaceable The incoming mains cable should be kept separate from the zo...

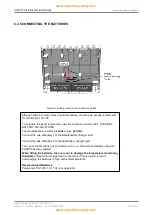
Страница 12: ... CALCULATIONS The two batteries are wired in series to give 24 Volts Connect the ve of Battery 1 to the black battery charger lead Connect the ve of Battery 2 to the red battery charger lead The ve of the first battery is connected to the ve of the second battery using the FUSED link wire supplied When fitting the batteries take care not to damage the temperature monitoring thermistor Next to the ...

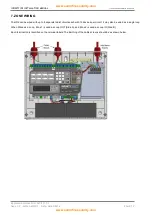
Страница 13: ...n be wired with up to 8 separate radial circuits each with 15 devices per circuit It may also be wired as a single loop When Wired as a Loop Zone 1 is used as Loop OUT Side A and Zone 2 is used as Loop IN Side B Each termination is identified on the terminal labels The Earthing of the cable screens should be as shown below www acornfiresecurity com www acornfiresecurity com ...

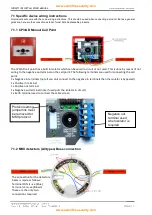
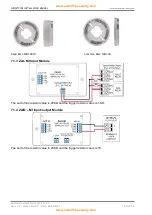
Страница 14: ... negative out terminal on the call point The following terminals are used for connecting the call point 2 x Negative in terminals note if you only connect to the negative in terminals then the isolator is bypassed 1 x Positive in terminal 1 x Positive out terminal 1 x Negative out terminal note if used puts the isolator in circuit 1 x Earth terminal used to connect the cable screen 7 1 2 MKII dete...

Страница 15: ...ate 06 04 2016 PAGE 14 Deep Base MKII CB D Common Base MKII CB 7 1 3 ZAI MI Input Module The end of line resistor value is 20KΩ and the trigger resistor value is 1 KΩ 7 1 4 ZAIO MI Input output Module The end of line resistor value is 20KΩ and the trigger resistor value is 1K www acornfiresecurity com www acornfiresecurity com ...

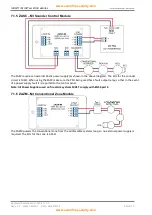
Страница 16: ...der circuit is 10KΩ When using the ZASC make sure the PSU being used has a fault output relay so that in the event of a power supply fault it is reported to the control panel Note All Power Supplies used on fire alarm systems MUST comply with EN54 part 4 7 1 6 ZAZM MI Conventional Zone Module The ZAZM powers the conventional zone from the addressable systems loop so no external power supply is req...

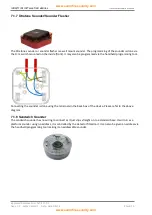
Страница 17: ...t It may also be programmed via the handheld programming tool Connecting the sounder is done using the terminals in the back box of the device Please refer to the above diagram 7 1 8 Sandwich Sounder The sandwich sounder has no wiring to connect as it just clips straight on to a standard base It will run as a platform sounder using no address it is controlled by the detector fitted to it It can al...

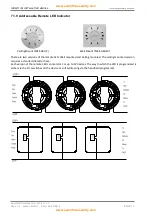
Страница 18: ...L C Wall Mount MKII ARL W There are two versions of the remote LED Wall mounted and Ceiling mounted The ceiling mounted version requires a standard detector base Each version of the remote LED can monitor 1 or up to 12 devices The way in which the LED is programmed is either via the D I L switches on the device or soft addressing via the handheld programmer www acornfiresecurity com www acornfires...

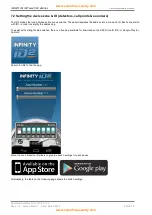
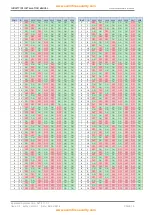
Страница 19: ...nel translates the address into a zone and ID Each zone starts with ID1 in order to simplify the addressing To assist with setting the dip switches there is a free app available for download on the APP Store for iOS or Google Play for Android Search for ID2 to find the app Move the zone device ID sliders to give the switch settings for each device Alternatively the table on the following page show...

Страница 20: ...N OFF OFF OFF ON OFF ON 2 14 ON OFF OFF OFF OFF ON ON ON 6 14 ON OFF OFF OFF OFF ON OFF ON 2 15 OFF OFF OFF OFF OFF ON ON ON 6 15 OFF OFF OFF OFF OFF ON OFF ON 3 1 OFF ON ON ON ON OFF ON ON 7 1 OFF ON ON ON ON OFF OFF ON 3 2 ON OFF ON ON ON OFF ON ON 7 2 ON OFF ON ON ON OFF OFF ON 3 3 OFF OFF ON ON ON OFF ON ON 7 3 OFF OFF ON ON ON OFF OFF ON 3 4 ON ON OFF ON ON OFF ON ON 7 4 ON ON OFF ON ON OFF O...

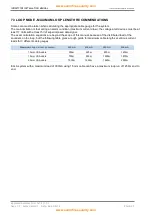
Страница 21: ... least 5V of superimposed data signal The exact calculation equations are beyond the scope of this manual because of the distributed load of the sounders on the loop but the following table gives a rough guide for maximum cable lengths at various current loads for 3 different cable gauges Maximum Loop Current in Alarm 500 mA 400 mA 300 mA 200 mA 1 0mm CSA cable 500m 625m 830m 1250m 1 5mm CSA cable...

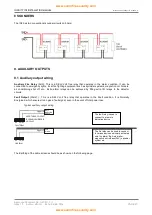
Страница 22: ... O relays to the detector circuits Fault Output FAULT This is a SELV volt free relay that operates in the Fault condition It is Normally Energised which ensures it can give a fault signal even in the event of total power loss Typical auxiliary output wiring NO CM NC FAULTRELAY FAULT INDICAT ION DEVICE NOT E T HENC CONT ACT ISOPEN WHEN T HEREIS NO FAULT T rigger I P NO CM NC FIRERELAY AUT O DIALER ...

Страница 23: ...ting the wiring Figure 6 Cable connections All cables entering the enclosure should have cable glands which will prevent unwanted openings in the enclosure The Zone circuits should be connected to the appropriate connector block on the Termination PCB All cable screens should be terminated at the brass earthing strip as shown in Figure 6 www acornfiresecurity com www acornfiresecurity com ...

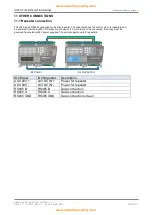
Страница 24: ...o 2 repeaters can be powered from the Aux24V DC output on the panel If 3 or more are to be connected then they must be powered from external 24V power supplies The panel supports up to 8 repeaters ID2 PANEL ID2 REPEATER ID2 Panel ID2 Repeater Description AUX 28V 24V DC IN Power for repeater AUX 28V 24V DC IN Power for repeater RS485 B RS485 B Data connection RS485 A RS485 A Data connection RS485 G...

Страница 25: ...ows that pressing NEXT button will take you to Engineer Menu 2 4 Press button 1 will bring up the Zone menu Press 1 to view zone contents or press 2 to reconfigure the zones 5 Press 2 to reconfigure the zones The panel displays configuration in progress Please wait It will return to Engineer Menu 1 when completed 12 2 Verifying the Zone configuration 1 Go to the Engineer menu 1 screen Select optio...

Страница 26: ...ed Select option 1 to set time date Enter the Day Month Year Hour Minutes as prompted and press enter to save or Cancel at any time to exit 12 6 Changing the alarm Tones sounders For most applications the alarm tone will stay at the default setting of tone 0 To change the alarm tone select option 5 in Engineer menu 2 You then have 3 options as shown in the window opposite Select option 3 to change...

Страница 27: ...O signals a MCP alarm when operated Used when device being monitored is Manually triggered and the system is set to distinguish manual automatic alarms P PREALARM I O signals a Pre Alarm when operated Used when a device being monitored needs to give a warning signal but not an alarm signal F FAULT I O signals a Fault Signal when operated Used when a device being monitored does not have a normally ...

Страница 28: ...ages The panel will have one of 2 language banks English Spanish Portuguese French Italian OR English Hungarian Serbian Lithuanian Other languages are available on request 12 10 Software Versions From Engineer menu 2 select Misc option 6 Then from the Misc Settings menu select option 2 Version The panel will display the software versions in its two Microcontrollers one for the main functions and o...

Страница 29: ...ow Confirming alarm 3 If the device in alarm has zonal verification set the panel will turn on the sounders of all other detectors set to zonal verification in that zone 4 If the detector drops below the alarm level within the programmed verification time 1 minute to 3 minutes 45 seconds the sounder will turn off but the panel will continue displaying Confirming Alarm for at least 5 minutes The bu...

Страница 30: ...eset This brings up the screen to select to reset The panel can be reset as follows Option Item Function 1 Logs Clears event log Note that the Event counter is not reset Code 159 to reset 2 Factory Sets the panel back to factory default Code 159 to reset NOTE The factory reset option does not delete any panel name that has been programmed into the panel To clear any programmed name follow the step...

Страница 31: ...on alarm LED Flasher Press 4 Ring sounder Press GENERAL TEST Select alarm verification Press 8 Configure Sandwich Sounder Base Press 7 Disable this device Press General Disable Configure I O OUTPUT Press 8 Configure I O INPUT Press 6 ENGINEER MENU 2 4 Alarm Verify 1 Verify Time Detector verify time 1 00 3 45 2 Choose Devices Select the device that requires verification this can only be set to a sm...

Страница 32: ... This device is signalling an internal fault by returning a value of less than 8 Device Label This is the 20 character description of the device location entered by the installer To change this Press Enter button to activate the cursor Device Identification This is the Zone and address of the device This is how the device will probably be referred to on the system drawings 15 3 Locating a device F...

Страница 33: ...s recorded are Power On Startup Panel Reset Evacuate Access Level 2 Access Level 1 Sounders Silenced Configure Loops Time Date Set Zone Disabled Zone Enabled Device Disabled Device Enabled Zone Test Start and Zone Test Finish Note during installation and commissioning it is possible to create a large number of events especially if a configured Zone is disconnected This is normal and is not a case ...

Страница 34: ...he LEDs will show general fault information To show fault event details on the LCD screen press the CANCEL button Prev next will now scroll through the faults Press cancel to return to viewing the fire alarm information If the panel is left viewing a fault after a short period of inactivity the panel will revert to the fire alarm display A sounder fault is classed as an Indication that should not ...

Страница 35: ...the screen will first prompt for a code 248 The screen will then show ZONE DISABLEMENT ZONE 1 The panel is now in SELECT DISABLEMENT MODE 3 Press NEXT key until the required zone or sounders are DISPLAYED Press ENTER button The screen will now show that the zone is disabled and the Zone or Sounder LED will come on steady along with the GENERAL DISABLEMENT LED This section is now disabled NOTE Call...

Страница 36: ...LED ZONES To view which zones are disabled press 1 and then scroll through all the zones by pressing the Next button If a zone is not disabled the screen will show If a zone is disabled the screen will show If there are one or more disabled devices in a zone the screen will show this by the number of Single Devices as follow TIP a quick way to enable several disabled devices is to disable the zone...

Страница 37: ...nd Zone Test LEDs will now be lit 7 Detectors in this zone can now be tested with smoke spray The Detector will light it s LED until the smoke clears then it will reset The Sounders the fire relay are not operated during test mode 8 Once testing of that zone is completed press TEST FUNCTION SELECT button to move to another Zone or Press CANCEL to exit test mode 18 3 To program sounder circuits in ...

Страница 38: ...plier If the wiring polarity is correct check that there is no cable break on the loop If there is a break the panel will report the break after 60 seconds or so and the break can be verified my measuring one side of the loop with a DVM The loop will be on for aprox 20 sec and then will power just one side for 5 sec then power both for 20 sec then power just the other side for 5 seconds So the vol...

Страница 39: ...mine the problem line Note connecting other equipment eg an oscilloscope or a PC to the panel can give an earth fault The Screen will indicate if it is a Positive or Negative voltage shorting to earth Earth Fault Pos or Earth Fault Neg DO NOT DISCONNECT THE MAINS EARTH CONNECTION THIS WILL CAUSE A PROBLEM WITH THE PANELS OPERATION 19 6 Double address This indicates that a double address has been d...

Страница 40: ...running condition due to various unexpected phenomena This will result in the panel attempting to correct itself Should this fault occur the System Fault LED General Fault LED General Fault relay and fault internal buzzer will be constantly active until the control panel is reset This should cause the system fault condition to clear If not consult your supplier www acornfiresecurity com www acornf...

Страница 41: ...nes 20 2 Device Values for Battery calculation Device Quiescent Alarm Comment ID2 Panel 50mA 102mA This is the current used during mains failure ID2 Repeater 50mA 75mA Fyreye MKII Addressable Optical Smoke Detector 0 5mA 5 mA Fyreye MKII Addressable Heat Detector 0 5 mA 5 mA Fyreye MKII Fixed Temperature Heat Detector 0 5 mA 5 mA Fyreye MKII Addressable Opto Heat Detector 0 5 mA 5 mA Zeta Addressa...

Страница 42: ...or panel IQD 4 x 10x0 9 0 6 0 65 1 0 1000 4 x 11 25 1000 0 045 A IAP 0 102A IAD 4 x 10x7 2 2 5 7 3 2 0 1000 4 x 83 8 1000 0 3352 A Therefore using the equation Battery Size Standby time in Amp Hours 1 25 x Df x TALM x IAP IAD TSBY x IQP IQD Battery Size Standby time in Amp Hours 1 25 x 2 x 0 5 x 0 102 0 3352 24 x 0 050 0 045 Battery Size Standby time in Amp Hours 1 25 x 0 4372 2 28 Battery Size St...

Страница 43: ...nal sounders 11 Fault Relay Volt free relay normally energised Operates on any fault 12 Fire Relay Volt free relay Operates on a fire condition 13 RS485 Connection for Repeater panel 14 15 RS232 NOT ACTIVE 16 Aux Power Supply Power External Equipment such as a repeater panel 17 Battery Connections Connects batteries to the PCB 18 Thermistor Monitors battery temperature 19 24VDC Input Connection fr...

Страница 44: ...AT C I E OUTPUT 900 mA IMIN AT C I E OUTPUT 0 4 mA OUTPUT VOLTAGE RIPPLE 700mV MAX CURRENT DRAW BY PSE 2mA MAX BATTERY INTERNAL RESISTANCE RIMAX 1 5 Ω CHARGER VOLTAGE 27 6V 22 24 o C CHARGER CURRENT 300 mA BATTERY DEEP DISCHARGE PROTECTION Batteries 21V DC ZONE VOLTAGE 19 5 28V DC 9V data 29 5V DC TOTAL ZONES RATING 500mA Max in Radial or loop mode NUMBER OF RADIAL CIRCUITS 1 8 NUMBER OF LOOPS 1 N...

Страница 45: ...erences to 2013 version 4 occurrences Added loop wiring terminal information Added info to Electrical Spec Max sounders Max loop zone current Aux 28V voltage current Changed number of repeaters that can be powered from panel from 3 to 2 Max Min ratings in Electrical Specifications table 1 3 8 7 2014 Corrected Charger current to 350mA Added addr detector wiring addressing Corrected Max Battery size...

Отзывы: