Installation
Introduction
This chapter deals with installing the
Chilli Master Controller and connecting
it to the Chilli network.
Installation
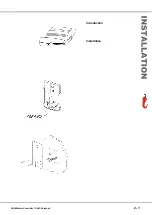
Open the case by pressing the latch at
the bottom of the case with a
screwdriver (see Figure 2-1).
Unscrew the two screws fixing the
wallplate to the case (see Figure 2-2).
Fix the wallplate to a standard 47mm
single gang backbox with the two M3.5
screws provided. Poke the Chilli
network cable through the hole in the
wallplate (see Figure 2-3).
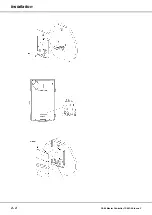
Hook the rear of the case over the
hook in the wallplate and refix the case
to the wallplate with the screws
removed earlier (see Figure 2-4).
Connect the Chilli network cable to the
5-pin header on the PCB, ensuring
correct orientation (see Figure 2-5).
Refit the front part of the unit by
pushing the hinges into the top of the
rear case and rotating on the hinge
until the latch at the bottom of the case
snaps closed (see Figure 2-6).
Chilli Master Controller 73-861-00 Issue 3
2 - 1
Figure 2 - 1
Figure 2 - 2
Figure 2 - 3
Содержание 01-201-00
Страница 1: ...CHILLI MASTER CONTROLLER OPERATING MANUAL ...
Страница 2: ......
Страница 8: ...2 2 Chilli Master Controller 73 861 00 Issue 3 Installation Figure 2 4 Figure 2 5 Figure 2 6 ...
Страница 32: ...4 2 Chilli Master Controller 73 861 00 Issue 3 Technical Specification ...
Страница 33: ......


