background image

ZS MK2

18

Rear member cut-outs

www.zepro.com

WL1 U7 U6 U5 U5 U4 U4 U3 U2 U1 U0

+

+

WL2

PA+

S5

S1+

S4

S3

S2

S1

S5+

S4+

S3+

S2+

PA-

CS+

Down

2H

Out

Down

Down

C1+

C1+

Up

Tilt

In

C2+

Up

Tilt

C3+

Up

CS

+

U1

U2

U3

U0

+

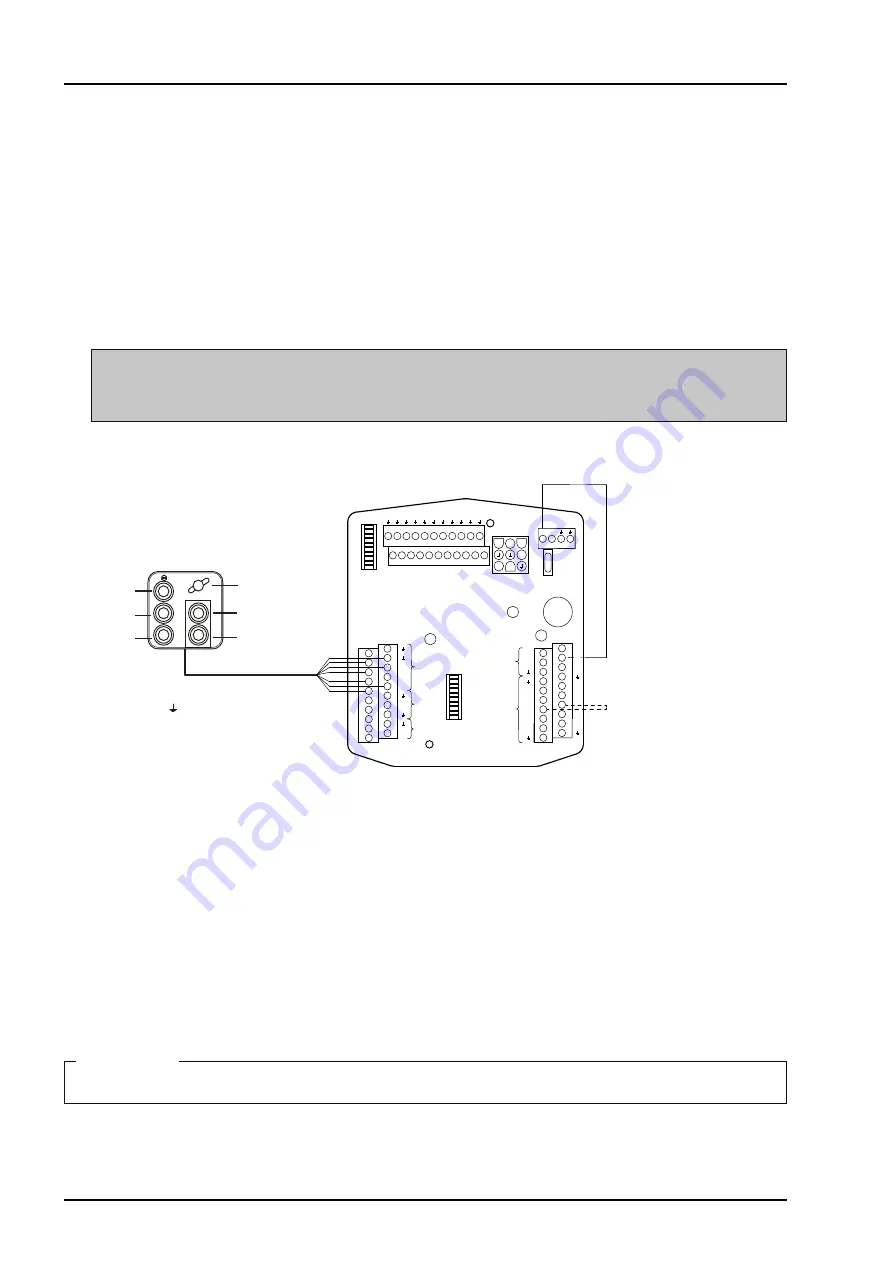
Picture 22. Temporary connection of controller

Jumper

4.2 

Temporary connection of lift

When the lift is installed, it is sometimes necessary to operate the lift functions in order to change the posi-

tions of the cylinders and the 1st booms. Temporarily connect the lift to enable the lift functions.
1. 

Connect the controller to the relay card.

2. 

Connect earth connection (GND) and +12/24V to the quick connectors on the main power cables of the 

lift.

3.  When operating, connect 

a cable between an available power supply connection (+) and CS on the relay 

card to simulate switch CS in the On position. Remove the jumper immediately after completed opera

-

tion. 


m


WARNING!


Take great care when running the lift functions, ensure nothing gets trapped, risk for personal injury 

and material damage.

4.2.1  Battery maintenance

When installing the lift, when the lift is operated repeatedly, the battery charger must be used between opera-

tions to maintain the battery charge level.


The battery charger must not be connected when operating the lift. Risk of 

material damage.

IMPORTANT

!


Jumper (Factory installed)

Black

C1+

White

( ), if available)

Brown

Up

Yellow

Down

Blue

Tilt

Green

In

Grey

Out

Up

Tilt
Down

Slider out

Slider in

Main power switch

Содержание ZS MK2

Страница 1: ...ZEPRO Tel 46 0 10 459 05 00 E mail zeprotech hiab com zepro com 78612TL Installation instructions Tail Lift ZS MK2 2021 06 16...

Страница 2: ......

Страница 3: ...Calculating the installation dimensions Slimeline 13 4 Rear member cut outs 15 4 1 Prepare the tail lift 16 4 2 Temporary connection of lift 18 4 3 Adjustment of slide profiles 19 5 Installation 20 5...

Страница 4: ...utotilt 41 10 Lubrication and oil level check 42 10 1 Lubrication points 42 10 2 Oil level check 42 11 Marking 43 11 1 Max permissible load 44 11 2 Identification plate 45 11 3 Work area 45 11 4 Warni...

Страница 5: ...given operation 1 2 Configuration This tail lift is available in a many different configurations It is available in two versions Standard and Slimline Lift height lift capacity slider profile length...

Страница 6: ...meets relevant requirements according to EN 1756 1 2001 A1 2008 1 6 Hydraulic oil If the hydraulic oil needs to be replenished only the oil recommended by ZEPRO is permitted to be used Hydraulic syst...

Страница 7: ...n switch or by releasing the lift s main fuse in order to reduce the risk of the battery discharging The length of time the vehicle can be stored without the battery charge level becoming too low depe...

Страница 8: ...losest part of the cylinder must be at least 40 mm Picture 6 The platform may not be tilted down more than 10 from the horizontal 2 2 Connection of third party equipment is forbidden m WARNING Connect...

Страница 9: ...gurations highlighted in grey in the table below may mean that some modification is necessary for the tail lift underrun protection to meet statutory requirements If in doubt contact ZEPRO for support...

Страница 10: ...ension 8 3 1 2 Statutory dimensions Make sure the installation location allows the tail lift to meet the statutory dimensions for underrun protec tion when in transport mode Distance between the platf...

Страница 11: ...akes sure the platform can be folded out The easiest way to calculated the installation dimensions is to use a CAD program 2D drawings are available for downloading from www c office com For help with...

Страница 12: ...Arm Lifting height H Cmax M N 135 1356 429 Max 389 Max 927 155 1542 518 Max 486 Max 1024 170 1727 607 Max 513 Max 1120 Picture 10 Installation dimensions P2 P1 H C Max N 538 M Picture 11 Installation...

Страница 13: ...rofile in such a position that when the platform is folded its rear edge aligns with the rear edge of the superstructure This makes sure the platform can be folded out Arm Lifting height Slide profile...

Страница 14: ...om Arm Lifting height Cmax M N 135 1356 515 Max 397 Max 841 155 1542 604 Max 494 Max 938 170 1727 693 Max 590 Max 1034 Picture 13 Installation dimensions Picture 14 Installation dimensions P2 P1 L C M...

Страница 15: ...he size of the cut outs depends on the calculated installed dimension A see illustration below 1 Measure and mark the location and depth of the cut outs on the rear beam The two cut outs must be centr...

Страница 16: ...ng nut and corresponding screw C see Picture 19 and pull out the hydraulic unit until the tank cap is accessible see Picture 21 m CAUTION Ensure that no cables are trapped or in any other way damaged...

Страница 17: ...y replace the transport plug with a regular tank cap Picture 21 Hydraulic unit and relay card RELAY CARD TANK CAP MOTOR OIL TANK SOLENOID VALVE HOUSING 5 Check whether the hydraulic tank is fitted wit...

Страница 18: ...n the main power cables of the lift 3 When operating connect a cable between an available power supply connection and CS on the relay card to simulate switch CS in the On position Remove the jumper im...

Страница 19: ...width of the chassis and centre the frame so the distance from the brackets to the centre of the frame is equally long on both the left and right hand sides Measure the distance between the brackets a...

Страница 20: ...oom and the platform see Picture 24 Position in Y axis Adjust the angle of the arms by carefully running the lift up down to attain the correct dimensions in the Y axis when all the attachment points...

Страница 21: ...ed on the chassis brackets Do not run the lift against the arm stop or with the platform installed until all bolts are properly tightened against the frame Do not load the lift until all screws have b...

Страница 22: ...the working position forwards is limited by the length of the platform Make sure the platform can be unfolded into the intended working position after installation 1 Unscrew the rear end caps on both...

Страница 23: ...t The space for adjusting the working position forwards is limited by the length of the platform Make sure the platform can be unfolded into the intended working position after installation 1 Unscrew...

Страница 24: ...Install the platform on the arms using the shafts and bolts supplied Tighten the screws Tightening torque 80 Nm 5 Install one of the tilt cylinders on the platform Use the enclosed shaft and screw Ti...

Страница 25: ...lock screw A See Picture 32 Tightening torque 3 5 Nm 12 Loosen the lock screw A on the other tilt cylin der 13 Turn the adjuster sleeve so that the tilt cylinder fits into the attachment point on the...

Страница 26: ...he lift arms and the vehi cle floor rear beam The left and right end stops must be reached at the same time as high as possible on the left arm IMPORTANT Welding on the lift arm is not permitted Insta...

Страница 27: ...s must always be installed in pairs one on each slider profile 1 Run the lift to transport position 2 Choose an appropriate hole pattern for installing the transport stop 3 If necessary cut the bracke...

Страница 28: ...nsport position 2 Unscrew the end caps from the slide profiles 3 On each slide profile unscrew the nut that tensions the chain and the two nuts that hold the bracket 4 Swap position of the left and ri...

Страница 29: ...hen delivered 1 When installing the angle sensor on the platform use the rivets supplied 2 Secure the sensor cable with cable ties IMPORTANT Route the cable between the platform and the lift arm tube...

Страница 30: ...cables to get longer life for the cables and to reduce the risk of unnecessary downtime The cable must not be fastened to brake lines or the vehicle s normal electrical system The cable must be prote...

Страница 31: ...a bracket that is used for installation on the tail lift 1 Install the bracket on the tail lift 2 Installing the controller on the bracket 3 The connector s cabling may in some cases be already conne...

Страница 32: ...Motor unit 245 A 145 A Minimum recommended conductor cross sectional area copper cables plus and minus cables Control power cable 1 5 mm2 1 5 mm2 Main power cable L 8m 35 mm2 35 mm2 Main power cable...

Страница 33: ...mmended that the CD 4 controller with main power switch be used The main power cable has to be run through a plastic collar and must not be fastened to the brake line or the vehicle s existing electri...

Страница 34: ...U7 U6 U5 U5 U4 U4 U3 U2 U1 U0 U1 U2 U3 WL2 PA S5 S4 S3 S2 S1 S1 S5 S4 S3 S2 PA CS CS Down 2H Out Down Down C1 C1 Up Tilt In C2 Up Tilt C3 Up U0 Picture 44 Connecting control current on tail lift insta...

Страница 35: ...uld be done together with existing cabling using cable ties Ensure the length of the cable is sufficient for moving the control card The outer sheathing on cables that connect to the control card must...

Страница 36: ...able 2 Run the cable and install with cable ties according to Picture 50 3 Connect the controller cables to ctrl 3 on the relay card See section 7 3 4 Connect the warning light cable to WL1 on the rel...

Страница 37: ...U2 U3 U0 CD11 CD18 CD9 B C E Black C1 White if available Brown Up B Yellow Down E Blue Tilt C Green In Grey Out Black C3 White if available Brown Up B Yellow Down E Black C3 Brown Up B Yellow Down E...

Страница 38: ...onnect the appropriate controllers and where applicable the warning lights 4 Run the cabling on the reverse of the control card and secure with cable ties 5 Fold in and secure the control card IMPORTA...

Страница 39: ...53 3 Connect the main power cable 3 to the connection point see Picture 53 4 Screw the cable connections and fuse into place using the knob 4 Install the cables at 90 or 180 from each other Install t...

Страница 40: ...ed by Approved by Stock nr Drawing nr Sheet Size Revision IS0 tolerances and drawing rules Tolerance Surface finish Welding 1 1 Drawn A CARGOTEC BRAND Used on ZEPRO El hydraulschema E H Schematic ZS M...

Страница 41: ...ize Revision IS0 tolerances and drawing rules Tolerance Surface finish Welding 1 1 Drawn A CARGOTEC BRAND Used on ZEPRO El hydraulschema E H Schematic ZS Mk2 c010 E AT ZS Mk2 c010 E AT Z55396 78582TL...

Страница 42: ...left side 3 The lift cylinders bearing against frame right and left side 4 The 1st booms bearing against frame right and left side 5 The slider s wheels right and left side Picture 57 Lubrication poi...

Страница 43: ...03 04 Picture 58 Overview of labelling 11 Marking Below an overview of the location of the different markings is shown Image of marking and further informa tion can be found under the each subchapter...

Страница 44: ...the model concerned next to all control device stickers Picture 59 Max permissible load for load capacity 1500 kg load centre distance 750 mm Picture 60 Load diagram for load capacity 2500 kg load ce...

Страница 45: ...ermitted load in kg Production number Year of manufacture Address and tel no of manufacturer Country of manufacture Type number for approved underrun protection RUPD Type number for electromagnetic co...

Страница 46: ...rsion Option for affixing on the opposite side of the vehicle Make sure the stickers are affixed so the image of the vehicle tail lift on the sticker is in the same direction as the vehicle on which i...

Страница 47: ...one is fitted affix the sticker on the inside of the vehicle body next to the hand control unit 11 7 Warning flags Install warning flags as close to the top and as close to the edge of the platform a...

Страница 48: ...l lift capacity Remove the test load from the platform Repeat the measurement of A B C D and verify that there has been no deformation of the lift or its fixing 12 1 2 Operation Place a test load on t...

Страница 49: ...ted Check That the red light in the driver s cab is disabled when the platform is in transport position and vice a versa and that it is enabled when the platform is deployed That the tail lift cannot...

Страница 50: ...ring the use of lifting equipment to get them in place Make sure the weight of the parts does not exceed the maximum permitted load of the lifting equipment Complete lift chassis ZS S MK2 without plat...

Страница 51: ......

Страница 52: ...Hiab is a world leading supplier of equipment intelligent services and digital solutions for on road load handling As an industry pioneer our company commitment is to increase the efficiency of our c...

Отзывы: