background image

AS220V2 

2x2 Dual Band 802.11ac Wave 2 Indoor Access Point 

User Manual


Page 47


4.3.3.2.1.1.


Generic Atheros 802.11bgn (wifi0) 

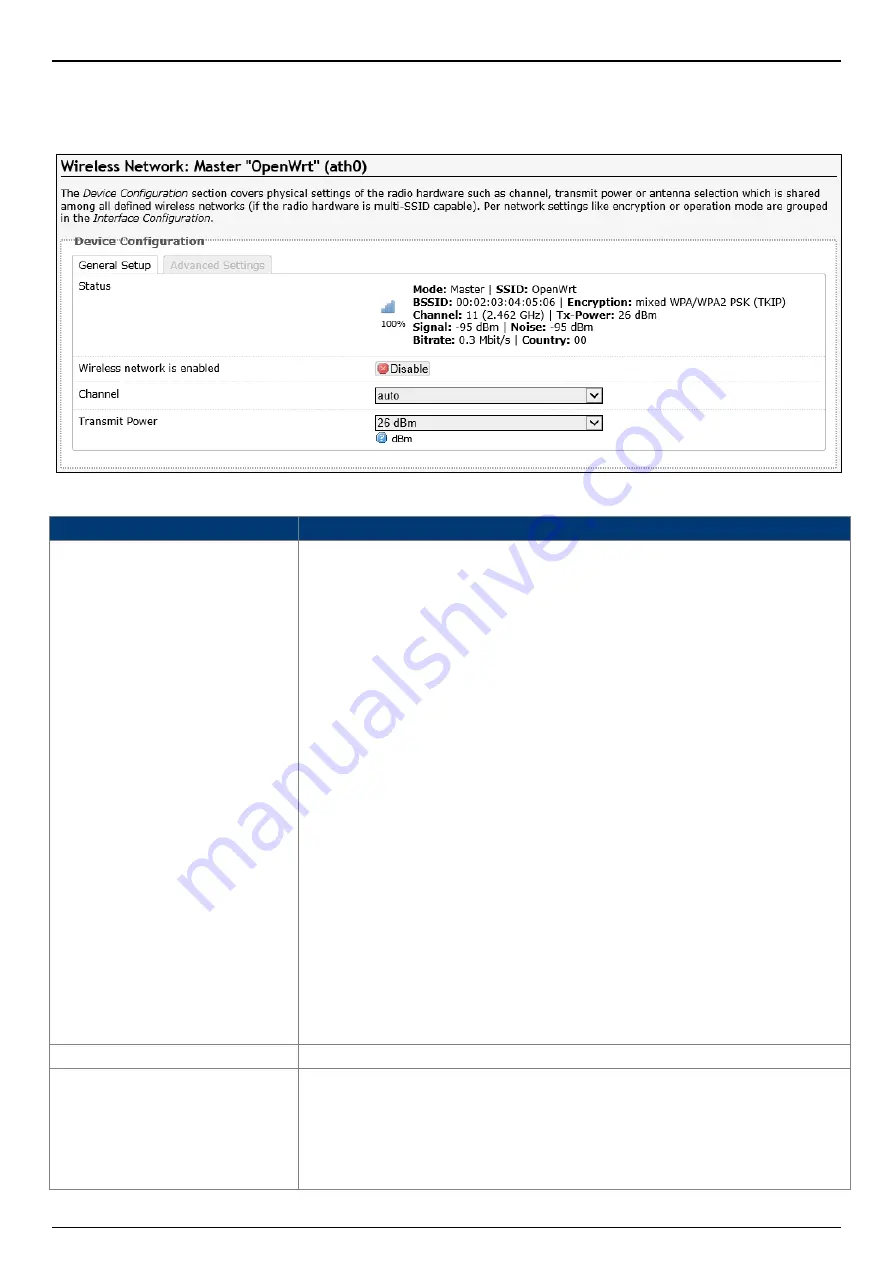
Click Add button, after clicking the Edit button in the Generic Atheros 802.11bgn (ath0) entry, the 

following will appear: 


The following parameters are available in this section: 

Parameter 

Description 

Status 

Displays a summary of the wireless configuration on this wireless 

interface. 


Signal Strength - Displays the wireless signal strength. 


Mode - Displays the wireless operating mode of the wireless 

interface. 


SSID - Displays the SSID hosted by the wireless interface. 


BSSID - Displays the BSSID hosted by the wireless interface. 


Encryption - Displays the wireless encryption used on the 

wireless interface. 


Channel - Displays the wireless channel number and 

frequency. 


TX-Power - Displays the TX (transmit) power of the wireless 

interface. 


Signal - Displays the wireless signal strength (in dBm) on the 

wireless interface. 


Noise - Displays the wireless noise level (in dBm) on the 

wireless interface. 


Bitrate - Displays the active data bitrate (in megabits per 

second) through the wireless interface. 


Country - Display the country setting on the wireless 

interface. 

Wireless network is enabled  Displays the current status of the wireless interface. 

Channel 

Select the wireless channel for the wireless interface here. The 

range is from 1 (2.412 GHz) to 11 (2.462 GHz). 

Select the auto option to allow the AP to automatically determine 

the best wireless channel for this interface. 

Select the custom option to manually entry the channel number. 

Содержание AS220V2

Страница 1: ......

Страница 2: ...7 3 3 Safety Notice 8 3 4 Powering the Access Point 8 3 5 The HTTP Interface 9 Chapter 4 Login to the HTTP Interface 9 4 1 Thin AP TAP Mode 9 4 2 Access Point Configuration 9 4 2 1 Status 10 4 2 2 4 2 2 1 Overview 10 4 2 2 2 General 11 4 2 2 3 System Log 12 System 12 4 2 3 4 2 3 1 AP Mode 12 4 2 3 2 Reboot 12 Technical Specifications 67 Chapter 5 Appendix 69 Chapter 6 Warranty 69 6 1 General Warra...

Страница 3: ...ts details are available on Z COM website at https www zcom com tw index product details id 7 Designed in compact appearance and provides flexible installations which blends into any interior areas The AS220V2 is equipped with a PoE out capability that enables cost effective deployment to smart surveillance applications The added benefit of the Wi Fi SON Self Organizing Network and Bluetooth locat...

Страница 4: ...indoor cabling requirements and Dynamic Frequency Selection DFS requirements Physical Ports 2 3 The following physical ports are available on the device The following table describes the physical ports that are available on the device from left to right Port Description WAN PoE port The WAN PoE port operates at 10 100 1000 Mbps at supports an RJ45 connection Supporting PoE In the AP can receive po...

Страница 5: ...ecessary reset button 2 4 If the access point needs to be reset please press and hold the reset button for more than ten seconds to restore to factory default settings LED Indicator 2 5 The following table describes the AP status referring to different LED behavior Color Behavior Description Red Steady Initializing Flashing Factory defaults waiting to be integrated Blue Flashing Device is busy upd...

Страница 6: ...se reserve space up to 15 cm in length above bracket for installation Wall mount 3 1 2 Determine where you want to mount the device position the mounting bracket onto the wall and use a marker to mark the two screw holes on the wall Note Before drill two holes into the wall please reserve space up to 15 cm in length above bracket for installation Drill the two holes into the wall and insert the tw...

Страница 7: ...ing board should be less than 15mm Install the mounting bracket onto the ceiling using two screws included in the packaging into the screw plugs in the ceiling Slide the device onto the mounting bracket to finish the installation Installing the Anti tamper Lock Optional accessory_AS 3 3 LK18 Slide all the cables through their respective holes on the anti tamper lock Install the mounting bracket pl...

Страница 8: ... outdoors the device may be damaged by lightning We recommend that you install additional lightning protection devices if necessary considering the conditions in your area 6 Supply stable power to the device Unstable power may cause the device to malfunction The device supports PoE power supply and is recommended if the device is installed near grid lines within less than 100 meters radius Powerin...

Страница 9: ...ick the Login button To return the information displayed in the textboxes to the defaults click the Reset button In a default access point configuration the AS420 default AP mode is TAP mode Thin AP TAP Mode 4 2 The procedure for completing the access point s essential configuration depends on whether you want it to be managed by wireless LAN controllers WLC To configure the access point to be man...

Страница 10: ...lowing entries IP address 192 168 1 168 or any available address in the 192 168 1 x network except 192 168 1 1 Subnet mask 255 255 255 0 Leave the Default gateway and DNS server fields empty Step 4 Click OK to save your changes Login into the access point Step 5 Launch a Web browser type default URL 192 168 1 1 to connect to the access point When a security alert dialog box appears click OK Yes to...

Страница 11: ...r a DHCP IP to the AP under Current IP Setting Under Wireless Switch Setting select Connect with Wireless Switch via IP and input the IP address of the AP access controller then click save apply to take effect Parameter Description ipMod Displays basic mode information of the ipMod IPv4 Select IPv4 mode IPv6 Select IPv6 mode Auto Auto detected if it is IPv4 or IPv6 DHCP Client Choose the DHCP Clie...

Страница 12: ...ible for the configuration of this AP Only a few functions are available to be configured on this AP in this mode Fat AP Specifies to use and configure this AP without a wireless controller in the network More functions are available to be configured on this AP in this mode 4 2 3 2 Reboot Click the Perform reboot link to reboot the device any unsaved configuration Fat AP Mode 4 3 A FAT AP is suita...

Страница 13: ...d to the AP DUID Displays the DUID DHCP Unique Identifier of active DHCPv6 clients connected to the AP The following parameters are available in the Wireless section Parameter Description Generic 802 11bgn Wireless Controller wifi0 wifi1 Displays information about the generic 802 11bgn wireless controller wifi0 wifi1 SSID Displays the SSID Service Set Identifiers for this wireless interface Click ...

Страница 14: ...e Displays the physical interface that the ARP entry resides on The following parameters are available in the Active IPv4 IPv6 Routes section Parameter Description Network Displays the physical or logical interface the active IPv4 IPv6 route resides on Target Displays the target IPv4 network range of the active IPv4 IPv6 route IPv4 IPv6 Gateway Displays the IPv4 gateway address used by the active ...

Страница 15: ...eak measurement for inbound data traffic Outbound Displays the outbound data traffic measurement kilobits and kilobytes per second in real time Average Displays the average measurement for outbound data traffic Peak Displays the peak measurement for outbound data traffic 4 3 1 6 3 Wireless This page is used to display the wireless signal strength and noise graph in real time The following paramete...

Страница 16: ... are available in this section Parameter Description Network Protocol Display the network Protocol used by the active network connection Source Destination Displays the source destination IP address and TCP UDP port number of the active network connection Transfer Displays the transfer data rate bytes and packets of the active network connection System 4 3 2 4 3 2 1 System This page is used to dis...

Страница 17: ... the specification 4 3 2 3 2 Crontab Examples A line in crontab file like below removes the tmp files from home someuser tmp each day at 6 30 PM 30 18 rm home someuser tmp 4 3 2 4 Backup Flash Firmware This page is used to backup restore the configuration or to update the firmware on the AP A factory reset of the software configuration can also be performed on this page ...

Страница 18: ...anual Page 18 Network 4 3 3 4 3 3 1 Interfaces After clicking the Add new interface button the following page will appear To configure the WAN LAN interfaces click the Edit button Note The following web page take WAN interfaces for example LAN interfaces are similar ...

Страница 19: ...arameter Description Status Displays basic status information of the interface Port Displays the interface name For example eth0 2 Uptime Displays the how long the interface is active MAC Address Displays the MAC address of the interface RX Displays the RX receiving data rate through the interface TX Displays the TX transmitting data rate through the interface After clicking the Switch protocol bu...

Страница 20: ...me of the DNS Domain Name System server for the WAN connection here More than one entry can be created Accept router advertisements Select this option to accept router advertisement on this interface Send router solicitations Select this option to send router solicitations from this interface Note This option is only available if Accept router advertisements are enabled IPv6 address gateway Note T...

Страница 21: ...ter the MTU Maximum Transmission Unit value here to override the default MTU value used on this interface Use gateway metric Enter the metric for the gateway here 4 3 3 1 1 3 Physical Settings The following parameters are available in this section Parameter Description Bridge interfaces Select this option to bridge this interface with another interface Enable STP Note This option is only available...

Страница 22: ...ned to this interface Select unspecified to remove the interface from a firewall zone To create a new firewall zone enter the name of the new firewall zone in the space provided The following parameters are available in this section Parameter Description Start Enter the starting IPv4 address in the DHCP pool here Limit Enter the maximum number of IPv4 addresses allowed in the DHCP pool here Lease ...

Страница 23: ...served Force Select this option to force the DHCP server function on the AP to assign IPv4 addresses to DHCP clients on the network even if another DHCP server is detected DHCP Options Enter the DHCP Option string for DHCP clients here 4 3 3 1 2 DHCP Client The following parameters are available in this section Parameter Description Status Please refer to page 19 After clicking the Switch protocol...

Страница 24: ... when requesting DHCP Enter the hostname that is sent when requesting DHCP here Accept router advertisements Select this option to accept router advertisement on this interface Send router solicitations Select this option to send router solicitations from this interface Note This option is only available if Accept router advertisements are enabled The following parameters are available in this sec...

Страница 25: ...endor Class to send when requesting DHCP Enter the ID vendor class of the DHCP client that is sent when the DHCP service is requested here Override MAC address MTU Enter a MAC address MTU value here to override the default MAC address MTU value for this interface The following parameters are available in this section Parameter Description Bridge interfaces Select this option to bridge this interfa...

Страница 26: ...rs are available in this section Parameter Description Create Assign firewall zone Please refer to page 22 4 3 3 1 3 Unmanaged The following parameters are available in this section Parameter Description Status Please refer to page 19 After clicking the Switch protocol button the following will appear ...

Страница 27: ... Parameter Description Status Please refer to page 19 Protocol For this section we ll discuss the Unmanaged option The following parameters are available in this section Parameter Description Bring up on boot Select this option to bring up this interface when the device rebooted The following parameters are available in this section ...

Страница 28: ...e if Bridge interfaces are enabled Interface Select the physical interface that will be associated with this interface configuration here If desired select and enter a Custom Interface name in the textbox provided Note Multiple selections are only available when the Bridge interfaces option is selected Normally only one interface can be selected here The following parameters are available in this ...

Страница 29: ... option to bring up this interface when the device rebooted Enable IPv6 negotiation on the PPP link Select this option to enable IPv6 negotiation on the PPP link Use default gateway Select this option to use the DHCP assigned default gateway on this interface Use gateway metric Enter the metric for the gateway here Use DNS servers advertised by peer Select this option to use the DHCP assigned DNS ...

Страница 30: ...ve 2 Indoor Access Point User Manual Page 30 4 3 3 1 5 PPtP The following parameters are available in this section Parameter Description Status Please refer to page 19 After clicking the Switch protocol button the following will appear ...

Страница 31: ...VPN server here PAP CHAP username password Enter the PAP CHAP username password for the PPTP account here The following parameters are available in this section Parameter Description Bring up on boot Select this option to bring up this interface when the device rebooted Use default gateway Select this option to use the DHCP assigned default gateway on this interface Use gateway metric Enter the me...

Страница 32: ...y timeout The connection is closed after the inactivity timer reached the timeout value Enter 0 to never timeout the connection Override MTU Enter the MTU value here to override the default MTU value used on this interface Additional command line arguments for PPP Enter additional command line arguments for PPP here The following parameters are available in this section Parameter Description Creat...

Страница 33: ...h protocol button the following will appear The following parameters are available in this section Parameter Description Status Displays basic status information of the interface Port Displays the interface name For example eth0 2 RX Displays the RX receiving data rate through the interface TX Displays the TX transmitting data rate through the interface ...

Страница 34: ...elect this option to use the DHCP assigned DNS server addresses on this interface Use custom DNS servers Enter the IP address or domain name for a custom DNS server here More than one entry can be created LCP echo failure threshold The peer will be presumed to be dead after the given amount of LCP echo failures are reached Enter 0 to ignore failures LCP echo interval LCP echo request are sent at t...

Страница 35: ...on Parameter Description Interface Select the physical interface that will be associated with this interface configuration here If desired select and enter a Custom Interface name in the textbox provided The following parameters are available in this section Parameter Description Create Assign firewall zone Please refer to page 22 ...

Страница 36: ...r to page 19 After clicking the Switch protocol button the following will appear The following parameters are available in this section Parameter Description Status Displays basic status information of the interface Port Displays the interface name For example eth0 2 RX Displays the RX receiving data rate through the interface TX Displays the TX transmitting data rate through the interface ...

Страница 37: ...I Enter the VPI Virtual Path Identifier for the PPPoA account here PAP CHAP username password Enter the PAP CHAP username password for the PPPoA account here The following parameters are available in this section Parameter Description Bring up on boot Select this option to bring up this interface when the device rebooted Enable IPv6 negotiation on the PPP link Select this option to enable IPv6 neg...

Страница 38: ... is only effective in conjunction with the failure threshold function Inactivity timeout The connection is closed after the inactivity timer reached the timeout value Enter 0 to never timeout the connection Override MTU Enter the MTU value here to override the default MTU value used on this interface The following parameters are available in this section Parameter Description Create Assign firewal...

Страница 39: ...e TX Displays the TX transmitting data rate through the interface Protocol For this section we ll discuss the UMTS GPRS EV DO option UMTS stands for Universal Mobile Telecommunications System GPRS stands for General Packet Radio Service EV DO stands for Evolution Data Optimized Protocol support is not installed Click the Install package button to install the package needed for this protocol Missin...

Страница 40: ...following parameters are available in this section Parameter Description Create Assign firewall zone Please refer to page 22 4 3 3 1 9 L2TP The following parameters are available in this section Parameter Description Status Please refer to page 19 After clicking the Switch protocol button the following will appear ...

Страница 41: ...nterface name For example eth0 2 RX Displays the RX receiving data rate through the interface TX Displays the TX transmitting data rate through the interface Protocol support is not installed Click the Install package button to install the package needed for this protocol L2TP Server Enter the IP address or domain name of the L2TP server here PAP CHAP username password Enter the PAP CHAP username ...

Страница 42: ...signed DNS server addresses on this interface Use custom DNS servers Enter the IP address or domain name for a custom DNS server here More than one entry can be created Override MTU Enter the MTU value here to override the default MTU value used on this interface LCP echo failure threshold The peer will be presumed to be dead after the given amount of LCP echo failures are reached Enter 0 to ignor...

Страница 43: ...ers are available in this section Parameter Description Create Assign firewall zone Please refer to page 22 4 3 3 1 10 DSlite The following parameters are available in this section Parameter Description Status Please refer to page 19 After clicking the Switch protocol button the following will appear ...

Страница 44: ...otocol support is not installed Click the Install package button to install the package needed for this protocol Local Peer IPv6 address Enter the local peer IPv6 address here Tunnel address Enter the IPv4 tunnel address for DS Lite here IPv4 netmask Select the IPv4 netmask for DS Lite here Select the custom option to manually enter the IPv4 netmask The following parameters are available in this s...

Страница 45: ...2 1 Wireless Overview This page is used to display and configure the 802 11 wireless settings The following parameters are available in this section Parameter Description Generic Atheros 802 11bgn wifi0 Displays information about the generic Atheros IEEE 802 11bgn wifi0 interface Channel Displays the wireless channel number and frequency Bitrate Displays the current data rate in megabits per secon...

Страница 46: ...plays the wireless channel number and frequency Bitrate Displays the current data rate in megabits per second through the wireless interface SSID Displays the SSID hosted by the wireless interface Mode Displays the configuration mode of the wireless interface BSSID Displays the BSSID hosted by the wireless interface Encryption Displays the wireless encryption used on the wireless interface After c...

Страница 47: ... the wireless encryption used on the wireless interface Channel Displays the wireless channel number and frequency TX Power Displays the TX transmit power of the wireless interface Signal Displays the wireless signal strength in dBm on the wireless interface Noise Displays the wireless noise level in dBm on the wireless interface Bitrate Displays the active data bitrate in megabits per second thro...

Страница 48: ... here Options to choose from are 20MHz 40MHz 2nd channel below 40MHz 2nd channel above and 80MHz Country Code Enter the country code here The following parameters are available in this section Parameter Description ESSID Enter the ESSID Extended SSID here Mode Select the wireless mode for the interface here Options to choose from are Access Point Network Select the network interface to attach to t...

Страница 49: ...cription Encryption After selecting the WPA PSK option the following settings are available Cipher Select the cipher method here Options to choose from are Force TKIP Temporal Key Integrity Protocol Key Enter the WPA passphrase here The following parameters are available in this section Parameter Description Encryption After selecting the WPA2 PSK option the following settings are available Cipher...

Страница 50: ...ription MAC Address Filter Select to enable or disable MAC address filtering here Options to choose from are disable allow listed only and allow all except listed The following parameters are available in this section Parameter Description MAC Address Filter After selecting the Allow listed only option the following setting is available MAC List Select the MAC address that is allowed access to the...

Страница 51: ...2 11h amendment here Separate Clients Select to enable the function that separates client to client communication here UAPSD Enable Select to enable the UAPSD Unscheduled Automatic Power Save Delivery function here Multicast Rate Enter the multicast rate here Fragmentation Threshold The range is from 1 to 2346 RTS CTS Threshold The range is from 0 to 2346 WMM Mode Select this option to enable the ...

Страница 52: ... wireless interface Signal Displays the wireless signal strength in dBm on the wireless interface Noise Displays the wireless noise level in dBm on the wireless interface Bitrate Displays the active data bitrate in megabits per second through the wireless interface Country Display the country setting on the wireless interface Wireless network is enabled Displays the current status of the wireless ...

Страница 53: ...ountry code here The following parameters are available in this section Parameter Description ESSID Enter the ESSID here Mode Select the wireless mode for the interface here Options to choose from are Access Point Network Select the network interface to attach to this wireless interface here Select the create option to enter and create and new network interface Hide ESSID Select this option to hid...

Страница 54: ... Options to choose from are Force TKIP Key Enter the WPA passphrase here The following parameters are available in this section Parameter Description Encryption After selecting the WPA2 PSK option the following settings are available Cipher Select the cipher method here Options to choose from are Force CCMP AES Key Enter the WPA2 passphrase here The following parameters are available in this secti...

Страница 55: ... Description MAC Address Filter After selecting Allow listed only option the following setting is available MAC List Select the MAC address that is allowed access to the wireless interface here Select custom option to manually enter the MAC address here The following parameters are available in this section Parameter Description MAC Address Filter After selecting Allow all except listed option the...

Страница 56: ...nge is from 0 to 2346 WMM Mode Select this option to enable the WMM mode here Number of Spatial Streams Enter the number of spatial streams here LDPC Select this option to enable the LDPC function here RX STBC Select this option to enable the RX received STBC Space Time Block Code function here TX STBC Select this option to enable the TX transmitted STBC function here 4 3 3 2 1 3 Associated Statio...

Страница 57: ...in this section Parameter Description Domain required Select this option to stop forwarding DNS request without the DNS name Authoritative Select this option to specify that this DHCP server is the only DHCP server on the local network Local server Enter the domain specification of the local DHCP server here Names matching this domain are never forwarded and resolved from DHCP or host files only L...

Страница 58: ...ter the name and path where the DHCP lease file will be saved here Ignore resolve file Select this option to ignore the resolve file Resolve file Enter the name and path for the DNS file here Ignore Hosts files Select this option to ignore hosts files Additional Hosts files Enter the name and path of the additional hosts files here More than one entry can be created The following parameters are av...

Страница 59: ...s No negative cache Select this option not to cache negative replies Strict order Select this option to only query DNS server in the order specified in the resolvfile Bogus NX Domain Override Enter the IP addresses of the host that supply bogus NX domain results here More than one entry can be created DNS server port Enter the TCP UDP port number for the DNS server connection here This port is use...

Страница 60: ...ase The following parameters are available in this section Parameter Description Hostname IPv6 Address DUID Leasetime remaining Displays the hostname IPv6 Address DUID Leasetime remaining of the active DHCPv6 lease The following parameters are available in this section Parameter Description Hostname MAC Address IPv4 Address Enter the hostname MAC Address IPv4 Address for the static DHCP client lea...

Страница 61: ...e target IPv6 address or network CIDR Classless Inter Domain Routing for the static IPv6 route here IPv6 Gateway Enter the IPv6 address of the gateway for the static IPv6 route here Metric MTU Enter the metric MTU for the static IPv6 route here 4 3 3 5 Diagnostics This page provides useful network utilities that can be used to troubleshoot network connectivity between the AP and other networking n...

Страница 62: ...y enter an IPv4 address or domain name in the textbox and click the Nslookup button This is used to querying the DNS to obtain domain name mapping IP address mapping and or DNS records After clicking the Ping button the following page will appear After clicking the Traceroute button the following page will appear After clicking the Nslookup button the following page will appear ...

Страница 63: ... synchronize step in the TCP three way handshake Enable vap isolate Select this option to enable the VAP Virtual Access Point isolate function Drop invalid packets Select this option to enable the firewall function that will drop invalid received packets in the firewall zone Input Select the input incoming action here Options to choose from are reject drop and accept Output Select the output outgo...

Страница 64: ...here Input Select the input incoming action here Options to choose from are reject drop and accept Output Select the output outgoing action here Options to choose from are reject drop and accept Forward Select the forwarding action here Options to choose from are reject drop and accept Masquerading Select this option to enable the masquerading function on the firewall zone MSS clamping Select this...

Страница 65: ... available for the IPv6 address family More than one entry can be created Restrict Masquerading to given destination subnets To restrict the masquerading function to a given destination subnet enter the IPv4 subnet of the destination here This option is not available for the IPv6 address family More than one entry can be created Force connection tracking Select this option to force connection trac...

Страница 66: ...from the newzone Allow forward from source zones Select the source zone here Traffic is forwarded from this zone to the newzone 4 3 3 7 Bluetooth This page is used to display and configure the Bluetooth settings on the AP 4 3 3 8 Externalvlan This page is used to enable VLAN transparent transmission settings on the AP ...

Страница 67: ... 35GHz 5 47GHz 5 85GHz EU 2 412 2 472GHz 5 15GHz 5 35GHz 5 47GHz 5 725GHz Japan 2 412 2 472GHz 5 15GHz 5 35GHz 5 47GHz 5 725GHz China 2 412 2 472GHz 5 15GHz 5 35GHz 5 725GHz 5 85GHz India 2 412 2 472GHz 5 15GHz 5 35GHz 5 725GHz 5 85GHz 5 85GHz 5 875GHz Operating Channels 2 4GHz Radio 5GHz Radio US 1 11 36 40 44 48 52 56 60 64 100 104 108 112 116 132 136 140 149 153 157 161 165 EU 1 13 36 40 44 48 ...

Страница 68: ... SSIDs 5 8 GHz Up to 8 SSIDs Bluetooth Low Energy BLE 4 1 Frequency 2400 2480MHz Antenna 1 5dBi Embedded Compliance Standards IEC EN 60950 EN55032 EN55024 EN 62311 EN 50385 WEEE RoHS Radio approvals EN 300 328 EN301 893 Europe EN 301 489 1 and 17 Europe SRRC China IEEE standards IEEE 802 11a b g n ac IEEE 802 11d e h i j k r u v time stamp w and z standards IEEE 802 3i u ab IEEE 802 3af at Powered...

Страница 69: ...d as DOA Dead on Arrival after conclusive test within the first 30 days of its shipping date from Z COM After 30 days from the shipping date defective products covered within the warranty are considered as RMA Return Material Authorization 4 Z COM reserves the right to inspect all defective products which must be returned and paid shipping fee by purchasers Warranty Conditions 6 1 2 Warranty servi...

Страница 70: ... symbol on the product and or its packaging must not be disposed of with unsorted municipal waste The symbol indicates that this product should be disposed of separately from regular household waste streams It is your responsibility to dispose of this and other electric and electronic equipment via designated collection facilities appointed by the government or local authorities Correct disposal a...

Страница 71: ... AC 48052 XX 48 V 0 52A power adaptor SP 48063 XX 48V PoE Injector power cord Note When ordering power adaptors you must specify the destination region by indicating US EU instead of XX Contact Information 6 5 All information may be changed by Z COM at any time without prior notice or explanation to the user For further information please refer to our website www zcom com tw ...

Отзывы: