HE4K-DCK-1X User Instructions
DOC-USR-0123-06
______________________________________________________________________________________
Z3 Technology, LLC
♦
100 N 8
th
ST, STE 250
♦
Lincoln, NE 68508-1369 USA
♦
+1.402.323.0702
27
6.4.2
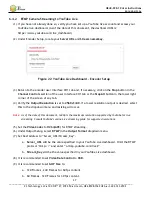
RTMP Camera Streaming to YouTube Live
(1)
If you have not already done so, verify you have set up a YouTube live account and access your
YouTube live dashboard. (As of the date of this document, the dashboard URL is:
https://www.youtube.com/live_dashboard)
(2)
Under Encoder Setup, locate your
Server URL
and
Stream name/key
.
(3)
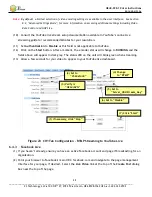
Return to the encoder user interface CH1 tab and, if necessary, click on the
Stop
button in the
Channel Controls
section of the user interface CH1 tab or the
Stop All
button in the lower right
corner of the screen of any tab.
(4)
Verify the
Output Resolution
is set to
2560x1440
. If a lower resolution output is desired, select
this in the dropdown menu and resizing will occur.
Note:
As of the date of this document, 1440p is the maximum resolution supported by YouTube for live
streaming. Consult YouTube’s online Live streaming guide for supported resolutions.
(5)
Set the
Video Codec
to
H264(AVC)
for RTMP streaming.
(6)
Under Output Setup, select
RTMP
in the
Output Format
dropdown menu.
(7)
Set Dest Address to “Server_URL/Stream_Key”.
a.
Server_URL
will be the value specified in your YouTube Live dashboard.
Omit the RTMP
proto
col “rtmp://” and enter “a.rtmp.youtube.com/live2”.
b.
Stream_Key
will be the value specified in your YouTube Live dashboard.
(8)
It is recommended to set
Video Rate Control
to
CBR
.
(9)
It is recommended to set
GOP Size
to:
a.
120 Frames
–
240 Frames for 60 fps content.
b.
60 Frames
–
120 Frames for 30 fps content.
Figure 22 YouTube Live Dashboard – Encoder Setup


