background image

10

SETUP THE WEATHER SERVER CONNECTION

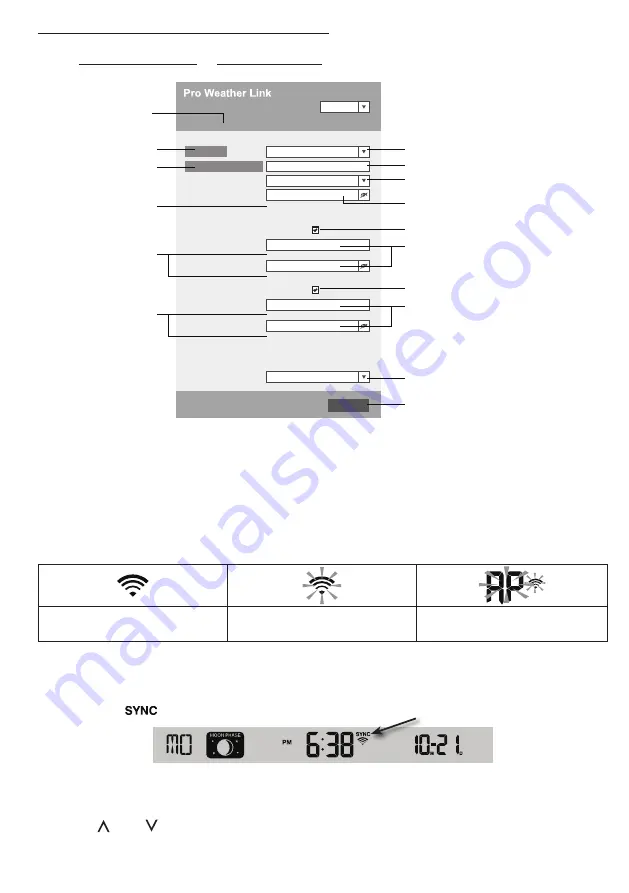
Enter the following information into the below web interface "SETUP" page. If you choose not 

to use 

Wunderground.com

 or 

Weathercloud.net

, leave the check boxes unchecked.

Function firmware version: 1.00  
WiFi firmware version: 1.00  

nist.time.gov

Server URL:

Ti

me server setup 


WiFi Router setup

SETUP

ADVANCED

Wunderground

Station ID

:

WDw124

******

******

******

IPACIR23Wc

W

eather server setup 


Station key:

Router

:

Add Router

Search

Security type:

Router Password:

WAP2

ROUTER_A

Appl

y

Language:

English

Weathercloud

Station ID

:

Station key:

Mac addres

s

00:0E:C6:00:07:10

Press to search router

Select the Wi-fi router (SSID) you will connect to

Manually enter the SSID if not on the list
Select router

’s security type (usually W

AP2)

Check to confirm upload to Weather underground
Enter new Station ID and Station key 

assigned by Wundeground

Check to confirm upload to Weathercloud

Select time server

Press to complete the setting

SETUP

 page

Router

’s password (leave blank if unsecured)

Press to allow add

 router manually

Password record remark

 (If you entered password)

Current ID and key recorded

(if any)

Current ID and key recorded

(if any)

Enter new Station ID and Station key 

assigned by Weathercloud

Press “SETUP” icon

 to SETUP

 page

NOTE:

 -

When WI-FI setup is complete, your PC or mobile will resume your default WI-FI connection.

 -

During AP mode, you can press and hold the 

[ WI-FI / SENSOR ]

 key for 6 seconds to stop 

AP mode and the console will restore your previous setting.

WI-FI CONNECTION STATUS

Below is the WI-FI icon status on the console LCD:

Stable: Console is in 

connection with WI-FI router

Flashing: Console is trying to 

connect to WI-FI router

Flashing: Console currently in 

Access Point (AP) mode

TIME SERVER CONNECTION STATUS

After the console has connected to the internet, it will attempt to connect to the internet time 

server to obtain the UTC time. Once the connection succeeds and the console's time has been 

updated, the “ 

 ” icon will appear on the LCD. 

Time zone: To display the time of your time-zone, change the time zone in CLOCK setting mode 

from '00' (default) to your time zone (e.g.08 for Hong Kong).

1 . 

Press and hold 

[ CLOCK SET ]

 key for 2s to enter time setting mode.

2 . Press 

[   ]

 or 

[   ]

 key to enter your time zone, then press and hold 

[ CLOCK SET ]

 key 

to confirm and exit. Please refer to CLOCK SETTING session of manual for details of other 

setting for the console . 

Содержание YC9387

Страница 1: ...WI FI color weather station with 5 In 1 professional sensor Model YC9387 User Manual MAX MIN HISTORY CHANNEL Youshiko...

Страница 2: ......

Страница 3: ...WUNDERGROUND 11 VIEW YOUR WEATHER DATA IN WEATHERCLOUD 12 FIRMWARE UPDATE 12 OTHER SETTING FUNCTIONS OF THE CONSOLE 13 CLOCK SETTING 13 MOON PHASE 14 POINTING THE WIRELESS 5 IN 1 SENSOR TO SOUTH 14 S...

Страница 4: ...brated for your easy installation They send data at a low power radio frequency to the console from up to 150m 450 feet away line of sight In the console a high speed processor is embedded to analyze...

Страница 5: ...ry compartment 24 OFF LO HI key 25 RESET key LCD DISPLAY 1 2 3 5 4 8 6 7 Display section 1 Indoor CH temperature humidity 2 Weather forecast 3 Time calendar moon phase 4 Wind direction speed 5 Outdoor...

Страница 6: ...5 IN 1 WEATHER SENSOR Your wireless 5 IN 1 sensor measures wind speed wind direction rainfall temperature and humidity for you It s assembled and calibrated for your easy installation INSTALL BATTERI...

Страница 7: ...the nut in the hexagon hole on the sensor then insert the screw in other side and tighten it by the screw driver Step 3 Insert the other side of the pole to the square hole of the plastic stand NOTE E...

Страница 8: ...THE BACKUP BATTERY 1 Remove the battery door of the console 2 Insert a new button cell battery 3 Replace the battery door NOTE The backup battery can backup Time Date Max Min Past 24 hours weather re...

Страница 9: ...e your sensor paired up the sensor signal strength indicator and weather reading will appear on your console display NOTE The additional wireless sensor s is not included This console can support diff...

Страница 10: ...information in the Step 2 enter a name for your weather station then choose Other in Station Hardware section Once you have completed click Submit to create your station ID and key 4 Jot down Your Sta...

Страница 11: ...se the valid email address to register your account 2 Sign in weathercloud and then you will go the Devices page click New to create new device 3 Enter all the information in Create new device page fo...

Страница 12: ...WI FI 3 In PC choose WiFi network settings or In Android iOS choose setting WI FI to select the console s SSID PWS XXXXXX in the list and it will need several second to connect PWS XXXXXX PWS XXXXXX...

Страница 13: ...ID and key recorded if any Current ID and key recorded if any Enter new Station ID and Station key assigned by Weathercloud Press SETUP icon to SETUP page NOTE When WI FI setup is complete your PC or...

Страница 14: ...speed gain Wind direction Rain gain Range 0 5 1 5 Default 1 00 Range 10 10 Default 0o Range 0 5 1 5 Default 1 00 Current gain 0 85 Current offset 2o Current gain 0 75 Function firmware version 1 00 W...

Страница 15: ...tion 3 Click Current Wind Evolution or Inside icon to view the live data of your weather station FIRMWARE UPDATE The console supports OTA firmware update capability Its firmware may be updated over th...

Страница 16: ...do not operate the PC and console During firmware update the console will stop upload data It will reconnect to your WI FI router and upload the data again once the update success If the console cann...

Страница 17: ...IRELESS SENSOR for mounting details 2 In normal mode of the console press and hold INDEX key for 10 seconds to enter into the calibration mode then press INDEX key again until the N icon appears on th...

Страница 18: ...stop the alarm and the alarm will activate again in the next day NOTE The snooze could be used continuously in 24 hours During the snooze the alarm icon will keep flashing TEMPERATURE HUMIDITY FUNCTIO...

Страница 19: ...and hold CHANNEL key for 2 seconds to toggle auto cycle mode to display the connected channels at 4 seconds interval During auto cycle mode press CHANNEL key to stop auto cycle and display the current...

Страница 20: ...mosphere pressure changes Based on the data collected it can predict the weather conditions in the forthcoming 12 24 hours within a 30 50km 19 31 miles radius Sunny Partly cloudy Cloudy Rainy Rainy St...

Страница 21: ...the rainfall record NOTE To ensure correct data please reset all the rainfall record when you reinstall your wireless 5 IN 1 sensor to other location MAX MIN DATA RECORD The console can record the ac...

Страница 22: ...re Low Alert current channel 0 C Indoor Humidity High Alert current channel 1 99 80 Indoor Humidity Low Alert current channel 40 Outdoor Temperature High Alert 40 C 80 C Outdoor temperature humidity 4...

Страница 23: ...ll the parts back when they are clean and fully dried PRECAUTIONS Keep and reading the User manual is highly recommended The manufacturer and supplier cannot accept any responsibility for any incorrec...

Страница 24: ...x 168 x 24 5mm 5 4 x 6 6 x 1in Weight 370g with batteries Main power DC 5V 1A adaptor Backup battery CR2032 3V batteries Operating temperature range 5 C 50 C Wi fi Communication Specification Wi fi st...

Страница 25: ...uracy 0 C or 40 C 2 C 32 F or 104 F 3 6 F 0 40 C 1 C 32 104 F 1 8 F Outdoor Accuracy 60 1 80 C 0 8 C 140 2 176 F 1 4 F 5 1 60 C 0 4 C 41 2 140 F 0 7 F 19 9 5 C 1 C 3 8 41 F 1 8 F 40 20 C 1 5 C 40 4 F...

Страница 26: ...Alert Weather Index Display Function Specification Note The following details are listed as they are displayed or operate on the console Weather index mode Feels like Wind Chill Heat Index and Dew po...

Страница 27: ......

Отзывы: