FORM 160.54-M1(503)
25
YORK INTERNATIONAL
nate. The
Backlight
is turned on and off with the “En-
able Back light” (J6-5) signal. The position of Pro gram
Jump er JP4 determines whether this is a +12VDC or
+5VDC sig nal. In some dis plays, the
Back light
turns
on when this signal tran si tions from low to high; others
turn on when it tran si tions from high to low. The po-
si tion of Program Jumper JP3 de ter mines the tran si tion
that will occur when the Display Con trol ler outputs the
“Enable Backlight” sig nal. Program Jump er JP3 must
be po si tioned according to the Dis play man u fac tur er’s
re quire ment.
Under Program control, the
Display Controller
con trols
the Back light brightness via the
Lamp Dimmer
circuit.
In or der to extend the life of the back light lamp, the lamp
bright ness is driven to 50% bright ness after 10 minutes
of Keypad inactivity. At this bright ness lev el, the Dis play
can still be read. Sub se quent ly, when Key pad ac tiv i ty
is detected (ie; a Key pad key is pressed), the lamp is
driv en back to full bright ness (100% bright ness). Some
display man u fac tur ers require a vari able voltage to vary
the bright ness; others require a vari able resistance. Pro-
gram Jumpers JP7 and JP8 allow either method to be
used. The
Lamp Dimmer
is an in te grat ed cir cuit that
is the electrical equiv a lent of a 10K ohm po ten ti om e ter
with 100 positions or steps (ref. Fig. 10). The
Display
Controller
con trols the po si tion of the po ten ti om e ter.
The
Lamp Dimmer
varies the bright ness of the Back-
light by applying either a vari able volt age (0-5.0VDC)
or a variable re sis tance (0-10K ohms), to the
Backlight
Inverter Board
. If Pro gram Jump ers JP7 and JP8 are in-
stalled, the
Lamp Dimmer
out put is a vari able volt age;
if both are re moved, the output is a vari able re sis tance.
The Lamp Dimmer out puts “Bright ness Control Wiper”
(J6-7) and “Bright ness Con trol -“ (J6-8) to the
Back-
light Inverter Board
. If con
fi
g ured for vari able volt age
output, the voltage be tween J6-7 and J6-8 can be varied
from 0 (100% bright ness) to 5.0VDC (0% bright ness). If
con
fi
g ured for vari able re sis tance, the re sis tance be tween
J6-7 and J6-8 would vary from 0 ohms (0% bright ness)
to 10K ohms (100% bright ness).
The
PC-104 Port
(J16 & J17) is an industry stan dard ar-
range ment of two connectors that allows the stack ing of
3.6 x 3.8 inch printed circuit boards (PC-104 Mod ules)
on the Microboard. The circuits on these boards have ac-
cess to the Microboard’s address/data bus, and there fore
become an extension of the Microboard. This pro vides
expansion of the Microboard’s capabilities with out
re-designing or changing the size of the Microboard.
PC-104 Modules are not used in all OptiView Control
Cen ter ap pli ca tions.
System pressures and temperatures, in the form of an a log
DC voltages from pressure transducers and tem per a ture
thermistors, are input to the
MUX
(mul ti plex ers). Under
Program control, the Micro selects these values, one
at a time, for input to the Analog to Digital (A/D) con-
verter. As each one is selected, it is passed to the
A/D
Converter
for conversion to a 12-bit digital word that is
then input in parallel form to the Mi cro. The Mi cro stores
each value in the
DRAM
for display re quests, fur ther
processing or Serial Port trans mis sion. Each val ue is
also stored in the
BRAM
for History data. The Micro
compares each val ue to Safe ty and Cycling shut down
thresholds stored in the FLASH Mem o ry Card. If any
thresholds are exceeded, the Mi cro ini tiates a shut down
by removing the run signal to the com pres sor starter by
de-energizing the ap pro pri ate dig i tal out put through the
FPGA
. It retrieves the ap pro pri ate shut down message
from the FLASH Mem o ry Card and sends it to the
Dis-
play Controller
for dis play. If any an a log inputs require
the state of any dig i tal out puts to be changed, the Micro
does this through the FPGA.
The system Pressure Transducers are de scribed in Sec-
tion 17 of this book. For mu las and graphs are included
to calculate the expected Trans duc er output voltage for
a given input pressure.
The Temperature Thermistors are de scribed in Section
18 of this book. Included are tables to convert the ex-
pect ed output voltage for any temperature applied to
the Thermistor.
Style F (and later) chillers are supplied with
factory-
mounted Flow Sensors
on the evaporator and condenser
(Flash Memory Card version C.MLM.01.07.xxx and
later is required for this feature). These are electronic
thermal-type sensors. The operating principle of the
sensor is thermal conductivity. It uses the cooling effect
3
Содержание MAXE OPTIVIEW YK
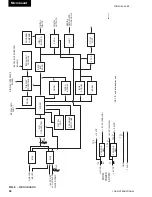
Страница 28: ...YORK INTERNATIONAL 28 FORM 160 54 M1 503 Microboard FIG 7 MICROBOARD LD07776...
Страница 60: ...YORK INTERNATIONAL 60 FORM 160 54 M1 503 Keypad FIG 32 KEYPAD CONNECTOR LD04074...
Страница 61: ...FORM 160 54 M1 503 61 YORK INTERNATIONAL FIG 33 KEYPAD LD04075 LD04076 8...
Страница 173: ...FORM 160 54 M1 503 173 YORK INTERNATIONAL 26 This page intentionally left blank...
Страница 177: ...FORM 160 54 M1 503 177 YORK INTERNATIONAL 26 This page intentionally left blank...


