<3. Operation>
3-4
IM 11T03E01-51E
3. Entering Data Values
NOTE
The data you have entered keep in memory even if you turn off the power. If the data you have
entered are provisional, reenter the normal data.
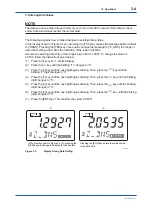
The following explains how to make changes to existing data entries.
In the display shown in Figure 3.4-(2), pressing the [YES] key causes the message field to default
to [*DENS]. Pressing the [YES] key once again changes the message to [*Z_DNS], the range of
lower limit setting, and makes the indication of the lower limit blink.
Assume the existing data entry of the range's lower limit is 1.2927. To change the value to
2.0535, follow the instructions given below:
(1) Press the [>] key so “1“ starts blinking.
(2) Press the
[ ]
>
key until the blinking "1" changes to ''2".
(3) Press the [>] key until the next digit begins blinking. Then, press the
[ ]
>
key until the
blinking ”2” digit changes to “0".
(4) Press the [>] key until the next digit begins blinking. Then, press the
[ ]
>
key until the blinking
digit changes to ''5”.
(5) Press the [>] key until the next digit begins blinking. Then, press the
[ ]
>
key until the blinking
digit changes to ''3”.
(6) Press the [>] key until the next digit begins blinking. Then, press the
[ ]
>
key until the blinking
digit changes to ''5”.
(7) Press the [ENT] key. This confirms the value “2.0535".
Pressing the
[
ENT
]
key enters the value shown
in the data field.
(1)
(2)
F0305.ai
In the display shown in Figure 3.4 (2), pressing the
[
YES
]
key will change the display to look like this.
Figure 3.5
Display During Data Setting
Содержание GD402G /M1
Страница 21: ...Blank Page ...
Страница 37: ...Blank Page ...
Страница 81: ...Blank Page ...
Страница 115: ...Blank Page ...
Страница 159: ...Blank Page ...
Страница 167: ......
Страница 169: ......
Страница 171: ...Blank Page ...


