background image

 | Maintaining Your Phone | 

100

Procedure

1.

Go to 

OK

 > 

Settings

 > 

System Settings

 > 

Base Restart

.

On the CP930W, go to 

Menu

 > 

Settings

 > 

Advanced Settings (default PIN: 0000)

 > 

Reboot Config

 >

Base Reboot

.

On the DD Phone, go to 

Menu

 > 

Advanced Settings (default PIN: 0000)

 > 

Reboot Config

 > 

Base

Reboot

.

On the CP935W, go to 

More

 > 

Advanced (default PIN: 0000)

 > 

Reboot

 > 

Base Reboot

.

2.

Enter the system PIN (default: 0000), and then press 

Done

.

On the CP935W, tap 

Reboot

.

3.

Confirm the action.

Results

After the above steps, the registration LED and network status LED on the base station go out simultaneously. After a

period of time, the LED indicators will glow green again when the base station restarts successfully.

Resetting the Base Station

Your system administrator may ask you to reset your phone to factory after you have tried all
troubleshooting suggestions but still do not solve the problem.

Except the handset registrations, the phone will reset all settings to the factory defaults after the resetting.
Check with your system administrator if the personalized settings are kept before resetting your phone to
factory.

Procedure

1.

Go to 

OK

 > 

Settings

 > 

System Settings

 > 

Base Reset

.

On the CP930W, go to 

Menu

 > 

Settings

 > 

Advanced Settings (default PIN: 0000)

 > 

Reboot Config

 >

Reset Base Settings

.

On the DD Phone, go to 

Menu

 > 

Advanced Settings (default PIN: 0000)

 > 

Reset Config

 > 

Base

Reset

.

On the CP935W, go to 

More

 > 

Advanced (default PIN: 0000)

 > 

Reset

 > 

Base Reset

.

2.

Enter the system PIN (default: 0000), and then press 

Done

.

On the CP935W, tap 

Base Reset

 directly.

3.

Select 

Reset to factory

.

A message prompts whether to reset the base.

4.

Confirm the action.

Results

All individual settings of the base station will be reset to factory defaults. The power LED indicator and
network LED indicator on the base station slowly flash in sequence during the resetting. LEDs on the base
station glow green after startup.

Important: 

 Base station reset may take a few minutes. Do not power off until the base station

starts up successfully.

Содержание W70B DECT

Страница 1: ...Yealink W70B DECT IP Phone User Guide V85 30...

Страница 2: ...28 W73H W78H W56H W53H W59R Line Status Screen 29 Icons on the Idle Screen 29 W73H W78H W56H W53H W59R Icons on the Calls Screen 31 W73H W78H W56H W53H W59R Icons on the Line Status Screen 31 Recharg...

Страница 3: ...ng Incoming Calls 48 Silencing a Call 48 Rejecting a Call Manually 48 Rejecting Anonymous Calls 49 Rejecting Calls with Do Not Disturb DND 49 Ending Calls 49 Muting Unmuting Audio 49 Holding and Resum...

Страница 4: ...ching for Contacts 69 Shared Directory 69 Adding Shared Contacts 69 Editing Shared Contacts 69 Deleting a Shared Contact 70 Deleting All Shared Contacts 70 Searching for Shared Directory Contacts 70 S...

Страница 5: ...the Repeater Mode 86 Customizing the Soft Keys 86 Phone Mode 87 Audio Settings 87 Silent Mode 87 Switching on Silent Mode 87 Switching off Silent Mode 88 Adjusting the Volume 88 Setting the Ring Tone...

Страница 6: ...97 Setting the Phone as PC Audio Device via Softphone 98 Setting the Phone as PC Audio Device via PC 98 Placing Calls via PC 98 Holding Resuming the PC Audio 98 Muting Unmuting the Microphone 99 Maint...

Страница 7: ...ion You can view more types of documents to make the phone to perform more functions The following types of related documents are available on each support page on Yealink support page Quick Start Gui...

Страница 8: ...nd the handset is registered to the base station all LEDs on the base station glow green No Item Description 1 Registration LED Indicates the handset registration status or the base station is in the...

Страница 9: ...information 4 Soft Keys Access the function directly It depends on the operating situation 5 Message Key Accesses the voice mail or missed call 6 Speakerphone Key Switches among the receiver headset a...

Страница 10: ...ons or ends a call Rejects an incoming call 10 Off hook Key Answers an incoming call Enters the redial calls list Places a call in receiver or headset mode 11 Keypad Provides digits letters and specia...

Страница 11: ...ptions on the screen 8 OK Key Confirms actions or enters the main menu 9 On hook Key Power Key Press briefly to return to the previous screen Long press to return to the idle screen Press to turn the...

Страница 12: ...information 4 Soft Keys Access the function directly It depends on the operating situation 5 Message Key Accesses the voice mail or missed call 6 Speakerphone Key Switches among the receiver headset...

Страница 13: ...the handset off Cancels actions or ends a call Rejects an incoming call 10 Off hook Key Answers an incoming call Enters the redial calls list Places a call in receiver or headset mode 11 Keypad Provi...

Страница 14: ...roll through information or options on the screen 8 OK Key Confirms actions or enters the main menu 9 On hook Key Power Key Press briefly to return to the previous screen Long press to return to the i...

Страница 15: ...information 4 Soft Keys Access the function directly It depends on the operating situation 5 Message Key Accesses the voice mail or missed call 6 Speakerphone Key Switches among the receiver headset...

Страница 16: ...the handset off Cancels actions or ends a call Rejects an incoming call 10 Off hook Key Answers an incoming call Enters the redial calls list Places a call in receiver or headset mode 11 Keypad Provid...

Страница 17: ...6 On hook Key Ends a call returns to the idle screen or turns off the phone 7 Touch Keypad Provides the digits letters and special characters in context sensitive applications It is possible to open a...

Страница 18: ...idle 15 Security Slot Allows you to connect a universal security cable to your phone so you can lock down your phone The phone will not be removed after locked 16 Micro USB Port Allows you to connect...

Страница 19: ...ume of the speaker ringer or media 6 Home Button Long press to power on off or return to the home page with one touch 7 Six Internal Microphones Provide 20 feet 6 meters and 360 degree sound pickup 8...

Страница 20: ...n or off The LED indicator glows green when the headset is activated MUTE Key Toggles the microphone on or off The LED indicator glows red when the mute feature is activated MESSAGE Key Accesses your...

Страница 21: ...screen above the soft keys The soft keys change depending on what you are doing at the time 11 Reversible Tab Secures the handset in the handset cradle when the phone is mounted vertically For more in...

Страница 22: ...phone prompts low battery or is charging Off The phone is powered off The phone is idle Menu on the W73H W78H W56H W53H W59R The handset provides a variety of features that are grouped into the menu M...

Страница 23: ...ll and Paging Directory To access the directory and manage the contacts Settings To personalize the setting of your handset History To access the call history list Note If your system administrator ha...

Страница 24: ...he navigation keys to select a different menu icon The name of the associated menu appears on the top of the screen 3 Press OK to open the selected menu Note You can only access Status and Settings if...

Страница 25: ...the idle screen Screen and Icons The user screens and icon indicators can help you navigate and understand the important information on the phone s status Idle Screen Calls Screen of CP930W Calls Scre...

Страница 26: ...Getting Started 26 W78H W59R W56H W53H CP930W...

Страница 27: ...Getting Started 27 DD Phone CP935W Signal Strength Weak to strong W59R W56H W53H W73H W78H CP935W CP930W DD phone No reception W59R W56H W53H W73H W78H CP930W DD phone CP935W Eco mode is on...

Страница 28: ...et number and registered handset name for example 1 is internal handset number indicating the handset is the Handset 1 of the base station Soft Keys The soft key labels on the screen directly above th...

Страница 29: ...icons on the idle screen you can easily get the current phone status such as message status W59R W56H W53H W73H W78H Icons Description Icons Description The ringer volume is 0 and the phone is in the...

Страница 30: ...one has enabled the Busy Forward feature The phone has enabled the Auto Answer feature The phone has enabled the No Answer Forward feature The microphone has been muted The phone has registered to a b...

Страница 31: ...gned to the line Icons Description Icons Description Call Forward Do Not Disturb DND Anonymous call rejection is enabled Anonymous call is enabled Unassigned outgoing line Rechargeable Battery The CP9...

Страница 32: ...d value integer from 1 to 960 Off Hour Idle Timeout It configures the time in minutes to wait in the idle state before phone enters power saving mode during the non office hours Valid value integer fr...

Страница 33: ...space character or the following special characters _ Press If it is in the uppercase ABC uppercase and lowercase Abc or lowercase abc input modes it will provide space character and the following spe...

Страница 34: ...iption 1 26 English Letters Tap to enter letters 2 Delete Key Tap to delete the entered characters one by one Long tap to delete two or more characters 3 Done Key Tap to confirm the settings 4 Two Spe...

Страница 35: ...ngs 5 Space Key Tap to enter spaces 6 Long tap to switch the input modes 7 Tap to switch to the lowercase input mode 8 Tap to switch to the symbolic input mode Tap to switch to the symbolic input mode...

Страница 36: ...istration Failure Selecting a Base Station to Connect Renaming the Base Station Deregistering a Handset Putting the Base Station into Registration Mode Before registering the handset you have to put t...

Страница 37: ...he CP930W go to Menu Settings Registration Register Handset On the CP935W go to More Basic Registration Register On the DDPhone go to Menu Basic Settings Registration Register Handset 2 Select the des...

Страница 38: ...tation to make it easy to discern About this task It is only applicable to W73H W78H W56H W53H W59R Procedure 1 Go to OK Settings Registration Select Base 2 Select a desired base station expect Bestba...

Страница 39: ...tgoing lines are assigned to the handset the first one will be the default outgoing line You can change the default outgoing line of the handset About this task It is only applicable to W73H W78H W56H...

Страница 40: ...nswers an internal intercom call automatically and plays a warning tone On Beep Off The handset answers an internal intercom call automatically without a warning tone Off Auto intercom feature is off...

Страница 41: ...er using the keypad On the CP935W tap and enter the desired number using the dailpad 2 Press the OK key or Off hook Key to dial out On the CP935W tap to dial out Placing Multiple External Calls When y...

Страница 42: ...irectly from your shared directory About this task It is not applicable to DD phones Procedure 1 Go to OK Directory Shared Directory On the CP930W CP935W select Directory or Menu Directory 2 Highlight...

Страница 43: ...number from the directory 5 Press OK to change the assigned speed dial number Deleting a Speed Dial Number When you no longer use the speed dial number you can delete it Procedure 1 Go to OK Settings...

Страница 44: ...dial Record Deleting All Redial Records Redialing a Number The handset keeps a record of all the placed calls You can call the recently dialed phone number Procedure 1 Press when the handset is idle t...

Страница 45: ...at once Procedure 1 Press when the handset is idle to access the redial list On the DD phone press when the phone is idle to access the redial number list 2 Select Options Delete All and select Yes to...

Страница 46: ...dial the number Answering Calls When you receive a call you can choose to answer it manually or automatically Assigning Incoming Lines to the Handset Answering a Call Answering a Call When in a Call A...

Страница 47: ...e W73H W78H W56H W53H W59R press the down navigation key to select the incoming call 2 Select Accept or Answer Results The active call is placed on hold and the incoming call becomes active Note You c...

Страница 48: ...es Receiver mode pressing the Off hook key to dial out Handsfree mode pressing the Speakerphone key to dial out Headset mode connecting a standard 3 5mm headset Silencing or Rejecting Incoming Calls W...

Страница 49: ...ject all incoming calls automatically when you do not want to be interrupted Before you begin Check with your system administrator to find out if the DND feature is available on your phone Procedure 1...

Страница 50: ...ur phone Procedure During a call select Options Hold On the CP930W DD phone CP935W select Hold Note When you have multiple calls on the phone and the current call is held you can press the up or down...

Страница 51: ...Transfer a call directly to the third party without consulting Semi Attended Transfer Transfer a call when receiving ringback Attended Transfer Consultative Transfer Transfer a call with prior consul...

Страница 52: ...supports creating a five way hybrid meeting and network conference During the conference follow these tips Mute your microphone when you are not speaking especially in noisy environments Avoid tapping...

Страница 53: ...when the phone receives an incoming call during the call s or a conference About this task It is only applicable to CP930W CP935W Procedure Tap Join when the phone receives a new call On the CP935W t...

Страница 54: ...icon of participant directly 2 Select the desired party you can do the following Select Far Mute to mute the party The muted party can hear everyone but no one can hear the muted party Select Remove t...

Страница 55: ...e CP935W connect to a PC using a Type C cable 2 Select Hold New Call 3 Enter the desired number to dial out or press Directory to select a contact 4 After the second party answers the call select Conf...

Страница 56: ...Options Conference On the CP930W select Conf On the DD phone CP935W select Conference The active call is placed on hold 3 Dial the second party s number 4 When the second party answers the call selec...

Страница 57: ...e conference call will only be held when all parties in the conference call place themselves on hold Procedure 1 Select Options Hold On the CP930W DD phone CP935W select Hold 2 Select Resume to resume...

Страница 58: ...ecording icon appears on the phone screen and the duration stops counting 2 Select Re REC to resume a recording Note If you hold the call during the recording none of the parties will be recorded unti...

Страница 59: ...Procedure 1 Select Pause to pause the playback 2 Select Play to restart the playback Fast Forwarding Rewinding a Playback While a recording plays you can fast forward or rewind the playback at any ti...

Страница 60: ...ing Multicast Paging You can send paging to the phones with pre configured multicast addresses on specific channels Before you begin Your system administrator has set the paging group for your phone P...

Страница 61: ...call and then retrieve the call either from your phone or another phone After parked the call is placed on hold you can continue the conversation after retrieving it Note Call park is not available on...

Страница 62: ...etrieve code from your system administrator Procedure 1 Dial the park retrieve code 2 Follow the voice prompt to retrieve Press the key on the phone where the call is parked Enter the desired extensio...

Страница 63: ...ppearance SCA Yealink phone supports using Shared Call Appearance SCA to share a line So that this line can be registered on more than one phone at the same time Your system administrator can set your...

Страница 64: ...l on public hold that any shared line phone can retrieve the held call Procedure During a call select Options Hold On the CP930W DD phone CP935W select Hold Placing a Call on Private Hold You can plac...

Страница 65: ...ared Line In the SCA scenario both you and other users can pull an existing call from another shared phone that is active or held Before you begin There is an active or held call on the shared line Co...

Страница 66: ...without scrolling through the menu About this task Note It is only applicable to W73H W78H W56H W53H W59R Procedure 1 Go to OK Voice Mail Set Key 1 2 Select the desired line and then press Select Leav...

Страница 67: ...arching for Contacts Adding Contacts When you add a contact to your Local Directory you can choose how much information you want to enter for your contact You are required to enter a contact name at l...

Страница 68: ...eleting a Contact Deleting All Contacts Deleting a Contact You can delete any contact from the Local Directory Procedure 1 Go to OK Directory or OK Directory Local Directory On the CP930W CP935W DD ph...

Страница 69: ...ailable on your phone Adding Shared Contacts Editing Shared Contacts Deleting a Shared Contact Deleting All Shared Contacts Searching for Shared Directory Contacts Saving a Shared Contact to the Local...

Страница 70: ...Directory Shared Directory On the CP930W CP935W go to Directory Shared Directory 2 Highlight a contact and select Options Delete All On the CP935W long tap the contact enter the selected interface se...

Страница 71: ...y You can store up to 30 contacts in the blocklist to block unwanted callers Adding a Blocklist Contact Viewing Blocklist Contacts Editing a Blocklist Contact Deleting Blocklist Contacts Adding a Bloc...

Страница 72: ...ontact to enter the details interface and then tap 3 Edit the contact information 4 Confirm the action Deleting Blocklist Contacts You can delete one or all blocklist contacts If a contact is removed...

Страница 73: ...Phone Book Contact to the Local Directory Updating Remote Phone Book Searching for Remote Phone Book Contacts In the Remote Phone Book you can enter search criteria to find your desired contact quickl...

Страница 74: ...Remote Phone Book You can manually update the contacts of RemotePhoneBook Procedure 1 Go to OK Directory On the CP930W DD Phones CP935W select Directory 2 Select the desired remote phone book 3 Go to...

Страница 75: ...lls CP935W Icon Description Received Calls Missed Calls Placed Calls Viewing History Records The history record saves the call information such as the caller s name and number local line and call dura...

Страница 76: ...mation Saving a History Record to Blocklist You can prevent someone from calling you again by saving a history record to the blocklist It is not applicable to DD phones Procedure 1 Press History 2 Sel...

Страница 77: ...d tap Delete The phone prompts you whether to delete all records 4 Confirm the action Customizing Your Phone You can make your phone more personalized by customizing various settings Turning Handset O...

Страница 78: ...off the device Note You cannot turn the CP930W off when the phone is charging Changing the Base PIN To avoid unauthorized registration or access to some features on the handset you should keep the ba...

Страница 79: ...y Screen Saver 2 Press Change to select the Screen Saver check box the default status is checked Changing the Brightness For W73H W78H W56H W53H W59R the handset backlight in charger or out of charger...

Страница 80: ...W59R Procedure 1 Go to OK Settings Display Keypad LED 2 Press Change to select the Keypad LED check box the default status is checked Changing the Language Your phone supports several languages that...

Страница 81: ...o to OK Settings Display Time Format or Date Format On the CP930W go to Menu Settings Basic Settings Display Time Format or Date Format On the DD phone go to Menu Basic Setting Time Date Time Date For...

Страница 82: ...omize the function of the shortcuts to make your handset more personalized Procedure 1 Go to OK Settings Shortcut 2 Select the desired shortcut and select Change The feature currently assigned to the...

Страница 83: ...lock type The phone supports the following phone lock types Menu key it prevents unauthorized users from accessing the menu changing the personal settings for your phone Function key it only allows u...

Страница 84: ...locked key the phone prompts you to enter an unlock PIN 2 Enter the desired PIN default 123 in the Unlock PIN field 3 Confirm the action The lock icon disappears from the phone screen Changing Your P...

Страница 85: ...standby mode About this task You can enable or disable the eco mode If the eco mode is enabled there is no signal interaction between the handset and the base station and the color of the signal stren...

Страница 86: ...greater freedom of mobility For more information on how to use DECT repeater with the base station refer to Yealink DECT Repeater User Guide Before you begin Repeater mode and eco mode features cannot...

Страница 87: ...de 2 Select the desired mode 3 Confirm the action Audio Settings You can change the basic audio settings on your phone Silent Mode Adjusting the Volume Setting the Ring Tone Silent Charging Setting th...

Страница 88: ...hone press the Volume key Setting the Ring Tone Ring tones are used to indicate the incoming calls Setting the Ring Tone for the Internal Calls Setting the Ring Tone for the External Calls Setting the...

Страница 89: ...About this task You can configure the following advisory tones independently Keypad Tone plays when you press any key on the keypad It is not applicable to CP935W Key Tone plays when you use the dial...

Страница 90: ...will not vibrate and ring Procedure 1 Go to OK Settings Audio Vibrator 2 Select the desired method Disabling the Noise Cancellation Noise cancellation helps improve intelligibility of speech in noisy...

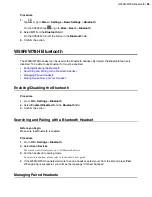
Страница 91: ...tivate the Bluetooth mode first when you need to connect the Bluetooth device to your phone Procedure 1 Tap or go to Menu Settings Basic Settings Bluetooth On the CP935W tap or go to More Basic Blueto...

Страница 92: ...ling the Phone Media You can enable the media audio feature to use the phone as a Bluetooth speaker for your mobile phone PC to play music Procedure 1 Select Paired Bluetooth Device or go to Menu Sett...

Страница 93: ...begin Make sure that the Bluetooth mode is activated Procedure 1 Select Edit My Device Information or go to Menu Settings Basic Settings Bluetooth Edit My Device Information On the CP935W tap Edit My...

Страница 94: ...and tap Unpair The phone prompts you whether to delete the device 3 Confirm the action Disconnecting the Bluetooth Device You can disconnect your Bluetooth device from your phone When you disconnect a...

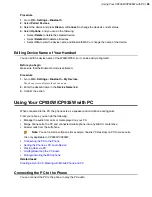
Страница 95: ...ing Paired Headsets Editing Device Name of Your Handset Enabling Disabling the Bluetooth Procedure 1 Go to OK Settings Bluetooth 2 Select Enabled Disabled from the Bluetooth field 3 Confirm the action...

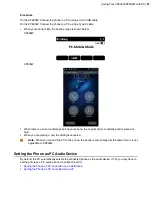
Страница 96: ...displays the device name 2 Enter the desired name in the Device Name field 3 Confirm the action Using Your CP930W CP935W with PC When connected to the PC the phone acts as a speaker and microphone du...

Страница 97: ...inal call or conference call is placed on hold When you are placing a call the dialing is canceled Note When you connect the PC to the phone the phone is also charged at the same time It is not applic...

Страница 98: ...rphone and click Set as Default Device On the CP935W click Echo Cancelling Speakerphone Yealink CP935W and click Set as Default Device 3 Click Microphone Yealink CP930W Speakerphone and click Set as D...

Страница 99: ...Investigating Warnings Restarting the Base Station Resetting the Base Station Restarting the Handset Resetting the Handset Triggering the Auto Provisioning Investigating Warnings When the default pas...

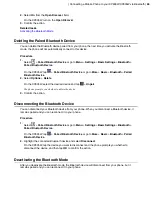
Страница 100: ...egistrations the phone will reset all settings to the factory defaults after the resetting Check with your system administrator if the personalized settings are kept before resetting your phone to fac...

Страница 101: ...e 1 Go to OK Settings System Settings Handset Reset On the CP930W go to Menu Settings Advanced Settings default PIN 0000 Handset Reset On the DD phone go to Menu Advanced Settings default PIN 0000 Res...

Страница 102: ...ther to update immediately 5 Confirm the action On the CP935W enter the user name and password directly and then tap to save and confirm the action Appendix Appendix A Menu Structure Appendix B Input...

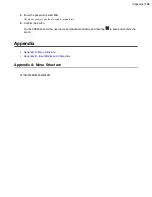
Страница 103: ...Appendix 103...

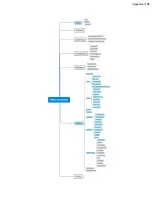
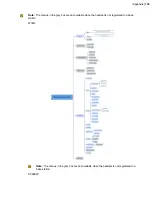
Страница 104: ...ote The menus in the gray box are not available when the handset is not registered to a base station W78H Note The menus in the gray box are not available when the handset is not registered to a base...

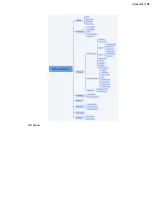
Страница 105: ...Appendix 105 DD phone...

Страница 106: ...Appendix 106 CP935W...

Страница 107: ...Appendix 107...

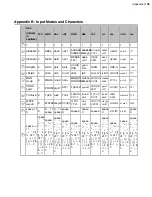
Страница 108: ...HI 4 ghi 4 4 4 JKLjkl5 5 JKL5 Jkl5 5 JKL5 jkl5 JKL 5 jkl 5 5 5 MNO mno6 6 MNO6 mno6 6 MN O 6 mn o 6 MN O 6 mn o 6 6 6 PQRS pqrs7 7 PQRS7pqrs7 7 PQRS 7 pqrs 7 PQR S 7 pqr s 7 7 7 TUVtuv8 8 TUV8 tuv8 8...

Отзывы: