3-1
HW0480311
HW0480311
3
Welding Preparation
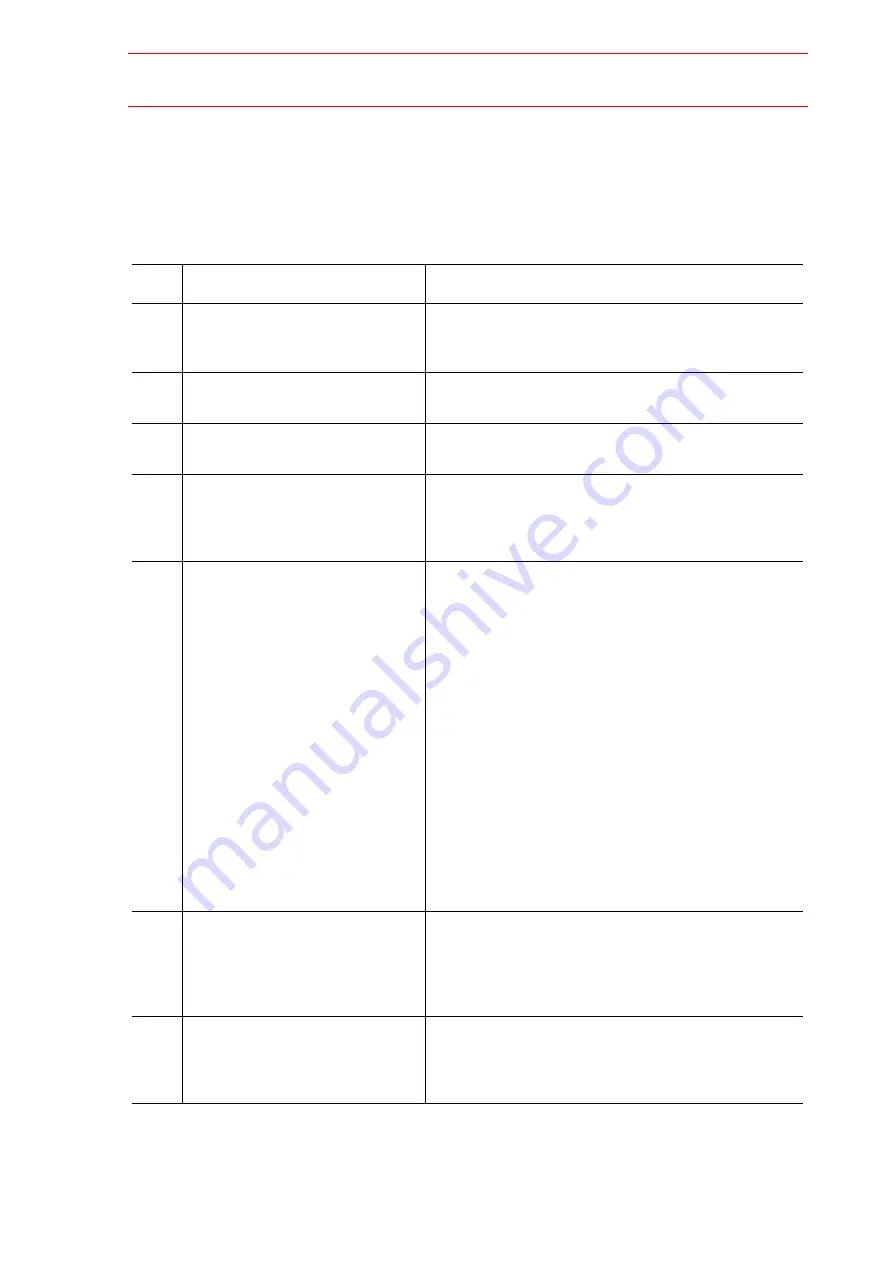
The following table describes the preparation procedure to start actual welding.
Table. 3 Welding Preparation Procedure
Step
Item
Details
1
Setting welding wire
Set a wire suitable to the welding method. Make sure
that the diameter of the roller of wire feeder matches
the wire diameter.
2
Checking torch
Confirm that a contact tip suitable to the diameter of
the wire is installed on the torch.
3
Turning ON the switch in the
switch gear
Confirm that connections are correct, then turn ON the
switch of the switch gear of the welding source.
4
Turning ON switches for the weld-
ing source
Turn ON the power switch. The power indicator lamp
lights and the built-in cooling fan starts. The fan stops
after fifteen minutes unless the arc starts. The fan
automatically restarts when the arc starts.
5
Setting feeding motor
The feeding motor type can be set by the parameter
C09.
0: Print servomotor (default setting)
1: Minertia servomotor for servo torch
2: 4-roller servomotor (YWE-WF340MELC)
Incorrect setting of the feeding motor precludes proper
welding because the wire cannot be fed at wire feed-
ing speed as directed by the set value.
When the parameter was changed, follow the instruc-
tions as follows:
1.
Keep on pressing the "Record" button for
more than three seconds to save changes.
Do not turn OFF the welding source while
saving.
2.
Confirm that the 7-segment LED indicators
light again, then turn OFF the welding source
once and ON again.
For details, refer to " 4.2.8 Selecting Feeding Motor ".
6
Setting welding source voltage
control
Set the welding source voltage control: either "Syner-
gic (auto adjustment)" or "Independent (individual)".
When "Synergic" is set, the LED indicator lamp above
"Auto Adjustment/Individual" button will light up.
"Synergic (auto adjustment)" is set before shipping.
7
Setting at the robot side
Set the welding source condition files (including “Syn-
ergic (auto adjustment)” or “Independent (individual)”).
For details, refer to " 16 Welding Source Condition
File of the Robot Controller ".
33/129


