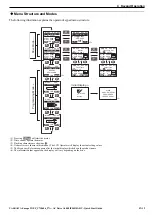
YASKAWA CIMR-AC4A WAA Series Скачать руководство пользователя страница 27

6  Parameter Table

YASKAWA Europe


TOEP_C710606_97A - AC Drive A1000 IP54READY - Quick Start Guide

 EN 27

H3-14

Analog Input 
Terminal 
Enable 
Selection

Determines which of the analog input 
terminals will be enabled when a digital 
input programmed for “Analog input 
enable” (H1-



 = C) is activated.

1: Terminal A1 only
2: Terminal A2 only
3: Terminals A1 and A2 only
4: Terminal A3 only
5: Terminals A1 and A3
6: Terminals A2 and A3

7: All terminals enabled

Multi-Function Analog Inputs

H4-01

Multi-Function 
Analog Output 
Terminal FM 
Monitor 
Selection

Selects the data to be output through multi-
function analog output terminal FM. 
Set the desired monitor parameter to the 
digits available in U

-



. For example, 

enter “103” for U1-03.

H4-02

Multi-Function 
Analog Output 
Terminal FM 
Gain

Sets the signal level at terminal FM that is 
equal to 100% of the selected monitor 
value.

H4-03

Multi-Function 
Analog Output 
Terminal FM 
Bias

Sets the signal level at terminal FM that is 
equal to 0% of the selected monitor value.

H4-04

Multi-Function 
Analog Output 
Terminal AM 
Monitor 
Selection

Selects the data to be output through multi-
function analog output terminal AM. 
Set the desired monitor parameter to the 
digits available in U

-



. For example, 

enter “103” for U1-03.

H4-05

Multi-Function 
Analog Output 
Terminal AM 
Gain

Sets the signal level at terminal AM that is 
equal to 0% of the selected monitor value.

H4-06

Multi-Function 
Analog Output 
Terminal AM 
Bias

Sets the bias value added to the terminal 
AM output signal.

H4-07

Multi-Function 
Analog Output 
Terminal FM 
Signal Level 
Selection

0: 0 to 10 V

1: -10 to 10 V
2: 4 to 20 mA

H4-08

Multi-Function 
Analog Output 
Terminal AM 
Signal Level 
Selection

0: 0 to 10 V

1: -10 to 10 V
2: 4 to 20 mA

Pulse Input Setting (Freq.)

H6-02

Pulse Train 
Input Scaling

Sets the terminal RP input signal frequency 
that is equal to 100% of the value selected 
in H6-01.

H6-03

Pulse Train 
Input Gain

Sets the level of the value selected in H6-01 
when a frequency with the value set in H6-
02 is input.

H6-04

Pulse Train 
Input Bias

Sets the level of the value selected in H6-01 
when 0 Hz is input.

Pulse Output Setting

H6-06

Pulse Train 
Monitor 
Selection

Select the pulse train monitor output 
function (value of the 

-



 part of 

U

-



).

Example: To select U5-01, set 501. 

No.

Name

Description

H6-07

Pulse Train 
Monitor 
Scaling

Sets the terminal MP output signal 
frequency when the monitor value is 100%. 
To have the pulse train monitor output equal 
the output frequency, set H6-06 to 102 and 
H6-07 to 0.

Motor Protection

L1-01

Motor 
Overload 
Protection 
Selection

0: Disabled

1: General purpose motor (standard fan 
cooled)

2: Drive dedicated motor with a speed range 
of 1:10
3: Vector motor with a speed range of 1:100
4: PM motor with variable torque
5: PM motor with constant torque control
6: General purpose motor (50 Hz)
The drive may not be able to provide 
protection when multiple motors are used, 
even if overload is enabled in L1-01. Set 
L1-01 to 0 and install separate thermal relay 
to each motor.

L1-02

Motor 
Overload 
Protection 
Time

Sets the motor thermal overload protection 
(oL1) time.

Stall Prevention

L3-01

Stall 
Prevention 
Selection 
during 
Acceleration

0: Disabled.

1: General purpose. Acceleration is 
paused as long as the current is above the 
L3-02 setting.


2: Intelligent. Accelerate in the shortest 
possible time without exceeding the L3-02 
level.
Note: Setting 2 is not available when using 
OLV/PM.

L3-02

Stall 
Prevention 
Level during 
Acceleration

Used when L3-01 = 1 or 2. 100% is equal to 
the drive rated current.

L3-04

Stall 
Prevention 
Selection 
during 
Deceleration

0: Disabled. Deceleration at the active 
deceleration rate. An ov fault may occur.

1: General purpose. Deceleration is 
paused when the DC bus voltage exceeds 
the Stall Prevention level.

2: Intelligent. Decelerate as fast as possible 
while avoiding ov faults.
3: Stall Prevention with braking resistor. 
Stall Prevention during deceleration is 
enabled in coordination with dynamic 
braking.
4: Overexcitation Deceleration. Decelerates 
while increasing the motor flux.
5: Overexcitation Deceleration 2. Adjust the 
deceleration rate according to the DC bus 
voltage.
6: Enabled. Decelerates adjusting the 
deceleration rate according to the output 
current and the DC bus voltage.

No.

Name

Description

Содержание CIMR-AC4A WAA Series

Страница 1: ...art Guide MANUAL NO TOEP C710616 97A Type CIMR AC4A Models 400 V Class 18 5 to 90 kW To properly use the product read this manual thoroughly and retain for easy reference inspection and maintenance En...

Страница 2: ...ten permission of Yaskawa No patent liability is assumed with respect to the use of the information contained herein Moreover because Yaskawa is constantly striving to improve its high quality product...

Страница 3: ...ADY Quick Start Guide Table of Contents 1 SAFETY INSTRUCTIONS AND GENERAL WARNINGS 4 2 MECHANICAL INSTALLATION 9 3 ELECTRICAL INSTALLATION 12 4 KEYPAD OPERATION 18 5 START UP 20 6 PARAMETER TABLE 25 7...

Страница 4: ...eady drives are prepared for being mounting in a panel to achieve protection class IP54 The drives heatsink is mounted outside the cabinet and not in IP54 area An adequate sealing is attached to the d...

Страница 5: ...any is responsible for any injuries or equipment damage resulting from failure to heed the warnings in this manual WARNING Indicates a hazardous situation which if not avoided could result in death or...

Страница 6: ...wear eye protection before beginning work on the drive Never short the output circuits of the drive Do not short the output circuits of the drive Failure to comply could result in death or serious in...

Страница 7: ...he drive Failure to comply could result in death or serious injury from falling equipment CAUTION Crush Hazard Do not carry the drive by the front cover Failure to comply may result in minor or modera...

Страница 8: ...esulting in poor system performance Use shielded twisted pair wires and ground the shield to the ground terminal of the drive Do not carelessly connect parts or devices to the drives braking transisto...

Страница 9: ...sink mounting to achieve protection class IP54 Ambient Temperature 10 C to 50 C outside panel up to 40 C controller part inside panel Drive reliability improves in environments without wide temperatur...

Страница 10: ...mensions Drive Dimensions Model CIMR A Dimensions mm Weight kg Figure W H D D1 4A0044 1 275 402 197 5 75 11 4A0058 2 300 455 275 102 21 4A0072 325 505 275 102 25 4A0088 370 565 283 105 36 4A0103 370 5...

Страница 11: ...s otherwise the sealing might be damaged Mount the drive and fix it with the matching size screws not shipped with the drive and mind the tightening torque Model CIMR A 1 prepared holes for screw or b...

Страница 12: ...ulse train inputs Power supply 10 5 Vdc max 20 mA Analog Input 1 Frequency Reference Bias 10 to 10 Vdc 20 k Analog Input 2 Frequency Reference Bias 10 to 10 Vdc 20 k 0 or 4 to 20 mA 250 Analog Input 3...

Страница 13: ...noise filter to the input side See the table in Main Circuit on page 13 or refer to the Technical Manual for details 2 Place the drive and EMC noise filter in the same enclosure 3 Use braided shield...

Страница 14: ...e capacity power supply transformer over 600 kVA Wiring the Main Circuit Output Consider the following precautions for the output circuit wiring Do not connect any other load than a 3 phase motor to t...

Страница 15: ...might fit tightly into the terminals To disconnect them grasp the wire end with a pair of pliers release the terminal using a straight edge screw driver turn the wire for about 45 and pull it gently...

Страница 16: ...peed reference 1 S6 Multi function input 6 Multi step speed reference 2 S7 Multi function input 7 Jog reference S8 Multi function input 8 External baseblock SC Multi function input common SN Multi fun...

Страница 17: ...0 to 10 Vdc input impedance 20 k Use switch S4 on the control terminal board to select between analog input or PTC input If PTC is selected set H3 06 E AC Frequency reference common 0 V E G Ground for...

Страница 18: ...drive is operating the motor flashes during deceleration to stop or when the frequency reference is 0 flashes quickly the drive is disabled by a DI the drive was stopped using a fast stop DI or a run...

Страница 19: ...y MONITR FREF d1 01 U1 01 000 00Hz 3 4 0 00 50 00 0 00Hz DRV FWD Rdy MODE U1 01 0 00Hz U1 02 0 00Hz U1 03 0 00A DRV Monitor Menu Rdy MODE PRG Modified Consts HELP HELP DATA MODE PRG Quick Setting DATA...

Страница 20: ...h speed accuracy This mode should be used if the motor parameters are unknown and Auto Tuning cannot be performed Open Loop Vector Control A1 02 2 General variable speed applications Applications requ...

Страница 21: ...20 of drive rated current for 60 s L3 02 Stall Prevention during Acceleration 150 120 L3 06 Stall Prevention during Run 150 120 Default carrier frequency 2 kHz 2 kHz Swing PWM Type Setting Application...

Страница 22: ...age is still applied to the motor during the tuning process even thought the motor may not be rotating b1 01 Reference source Frequency reference input 0 Operator keypad Set the frequency references i...

Страница 23: ...middle and right digit set the function and the left digit sets the output characteristics 0 Output as selected 1 Inverse output Multi Function Analog Inputs H3 The function of each analog input can...

Страница 24: ...e motor without load and check if all input outputs and the sequence work as desired 2 Connect the load to the motor 3 Run the motor with load and make sure that there is no vibrations hunting or moto...

Страница 25: ...s the DC Injection Braking current as a percentage of the drive rated current b2 03 DC Injection Braking Time at Start Sets DC Injection Braking Zero Speed Control when in CLV PM time at start Disable...

Страница 26: ...ital Inputs H1 01 to H1 08 Multi Function Digital Input Terminal S1 to S8 Function Selection Selects the function of terminals S1 to S8 Note Major functions are listed at the end of the table No Name...

Страница 27: ...nput Bias Sets the level of the value selected in H6 01 when 0 Hz is input Pulse Output Setting H6 06 Pulse Train Monitor Selection Select the pulse train monitor output function value of the part of...

Страница 28: ...urrent for a standard 4 pole YASKAWA motor Enter the no load current as indicated on the motor test report T1 10 Motor Rated Slip Stationary Auto Tuning Sets the motor rated slip After setting the mot...

Страница 29: ...Most Recent Fault U3 05 to U3 10 5th to 10th Most Recent Fault U3 11 to U3 14 Cumulative Operation Time at 1st to 4th Most Recent Fault U3 15 to U3 20 Cumulative Operation Time at 5th to 10th Most Rec...

Страница 30: ...e Run command and reset the drive Option External Fault An external fault was tripped by the upper controller via an option card Remove the fault cause reset the fault and restart the drive Check the...

Страница 31: ...the load Make sure that the drive is big enough to handle the load The overload capability is reduced at low speeds Reduce the load or increase the drive size DC Overvoltage DC bus voltage rose too h...

Страница 32: ...ttings 0 and F PID functions have been assigned to both analog inputs and the pulse input at the same time Fix any incorrect setting Refer to the Technical Manual for more details A function has been...

Страница 33: ...t Check the V f pattern setting Perform Auto Tuning without the load connected Check the input data and repeat Auto Tuning Motor iron core saturation alarm Calculated core saturation values out of ran...

Страница 34: ...drive the instruction manual and safety standards should be permitted to wire inspect and maintain the Safe Disable input NOTICE From the moment terminal inputs H1 and H2 have opened it takes up to 1...

Страница 35: ...is not active When Safe Disable was activated during stop normal operation can be resumed by simply turning on both Safe Disable inputs i e by deactivating Safe Torque Off When Safe Disable was activa...

Страница 36: ...function Digital Operator Display When both Safe Disable inputs are open Hbb will flash in the digital operator display Should only one of the Safe Disable channels be on while the other is off HbbF w...

Страница 37: ...Date of Publication Rev No Section Revised Content February 2012 1st edition June 2012 1 2 Change ambient temperature specifications Change dimensions tightening torque table 3 Extend EMC Filter Inst...

Страница 38: ...skawa co jp In the event that the end user of this product is to be the military and said product is to be employed in any weapons systems or the manufacture thereof the export will fall under the rel...

Отзывы: