Each “ – ” or “ + ” indicates a 32nd note. This bar graph
will display only a single instrument at a time. Suppose
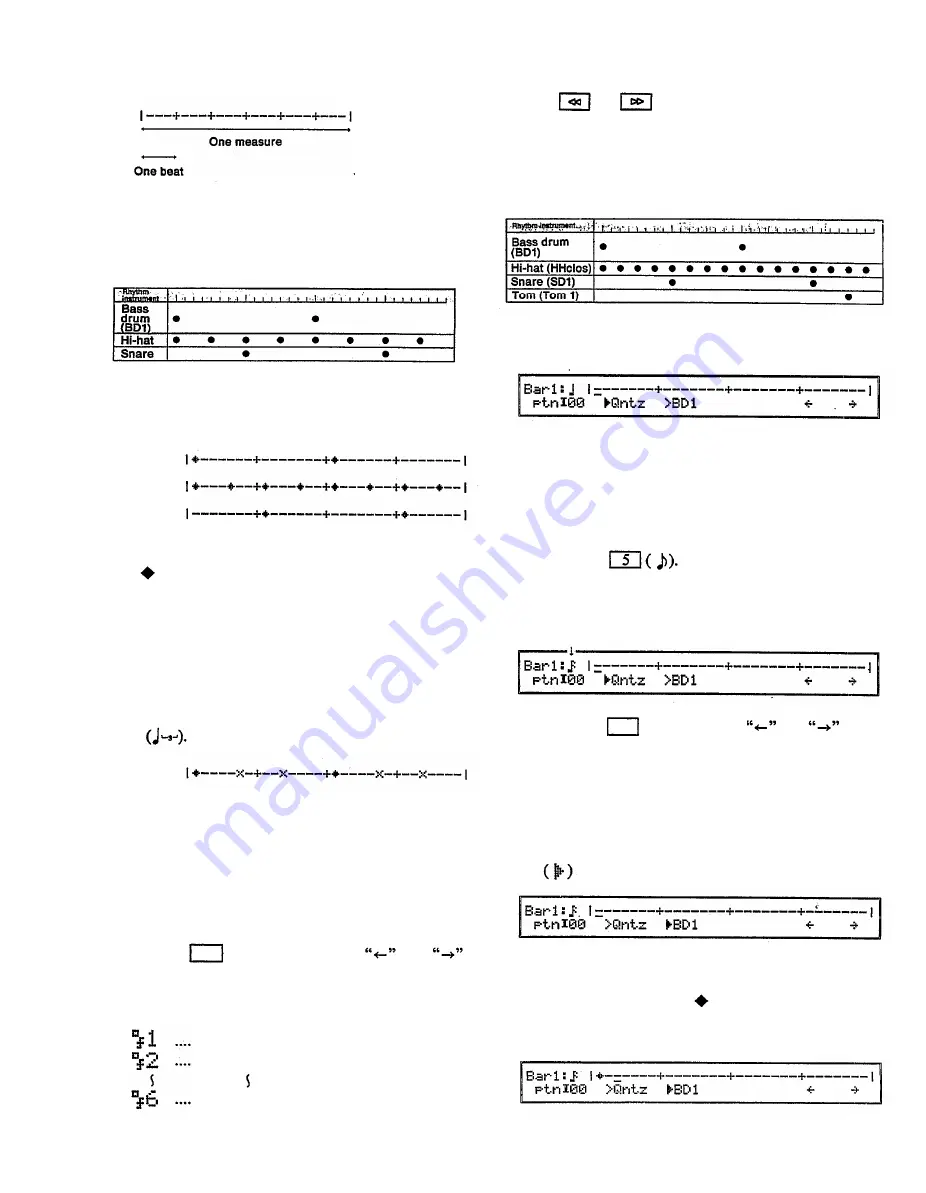
you are recording a rhythm pattern with three parts as
shown in the following diagram.
In this case you would input the bass drum, hi-hat, and
snare as shown in the following three bar graphs.
Bar graph for
bass drum
Bar graph
for hi-hat
Bar graph
for snare
The “ ” indicates a sound at a 32nd note interval.
Nearly any type of rhythm (in 32nd note steps) can be
entered in this way. However, 32nd notes cannot create
triplets or subtle rhythmic effects of playing slightly
ahead of or behind the beat. In these situations where
you need even finer rhythmic control, a 32nd note can
be divided into six steps. For example, the following
bar graph shows a bass drum entered as two steps of a
triplet
Bar graph for
bass drum
The “X” indicates that the actual timing of the note not
precisely on an interval of a 32nd note, but is “several
1/6ths of a 32nd note” after the indicated position. Since
the bar graph is in steps of a 32nd note, the precise actual
position is indicated by a special character (see below).
When entering a pattern with quantize turned off, each
of these 32nd notes will be subdivided into 6 steps.
Pressing the switches below the
and
will move the cursor backwards and forwards through
the pattern in steps of 1/6 of a 32nd note. The following
special characters will indicate your exact position.
1/6 position
2/6 position
6/6 position
64
Using the rhythm machine
Press or to move the cursor in steps of a
32nd note.
Here is an example of using step recording to create a
pattern. We will be creating the following 4/4 pattern
of one measure.
We begin with the following display.
(1) Set quantize: As you can see from the chart, the
rhythm pattern in our example does not use 32nd
notes. The shortest intervals are the 16th notes of
the hi-hat, so we will use 16th note quantization to
enter this pattern.
Make sure that the cursor is at “Qntz” (quantize)
and press (Quantize can also be set when
making the recording condition settings in the pre-
vious display.)
The selected quantization is displayed here
Press the keys below the and in the
display, and notice how the cursor (–) moves to left
and right. Since we have set quantization to 1/16,
the cursor will skip every other “ – ” (32nd note).
Before you continue, move the cursor back to the
beginning of the bar graph.
(2) Input the bass drum pattern: Move the cursor
to" > BD1” to get the following display.
Play the A1 note on the keyboard. (In this example
we assume that the rhythm assign (see page 69) is
set to PRESET 1.) A appears where the cursor
(_) was, and a bass drum note is input for the first
beat.
Содержание V50
Страница 1: ...YAMAHA AUTHORIZED PRODUCT MANUAL DIGITAL SYNTHESIZER ...
Страница 2: ...DIGITAL SYNTHESIZER Operating Manual YAMAHA ...
Страница 4: ...DIGITAL SYNTHESIZER ...
Страница 130: ...Initialized performance settings SNGL 4LYR DUAL 8LYR Appendix 125 ...
Страница 131: ...SPLT SEQ4 126 Appendix SEQ8 Initialized voice settings ...
Страница 133: ...MIDI DATA FORMAT SYNTHESIZER SECTION MIDI reception transmission block diagram 1 MIDI reception conditions 128 ...
Страница 140: ...135 ...
Страница 141: ... Table 2 136 ...
Страница 142: ... Table 3 137 ...
Страница 143: ...138 ...
Страница 144: ...139 ...
Страница 145: ...140 Table 4 ...
Страница 153: ...Performance data blank chart You may copy the following chart as a memo sheet for your performance settings 148 ...
Страница 154: ...Voice data blank chart You may copy the following chart as a memo sheet for your voice settings 149 ...
Страница 160: ...YAMAHA VG87090 89 01 1 5 CR R1 Printed in Japan YAMAHA CORPORATION P O Box 1 Hamamatsu Japan ...


