background image

CONNECTIONS

Connecting external components

 En

 30

Connecting BD/DVD players and other devices

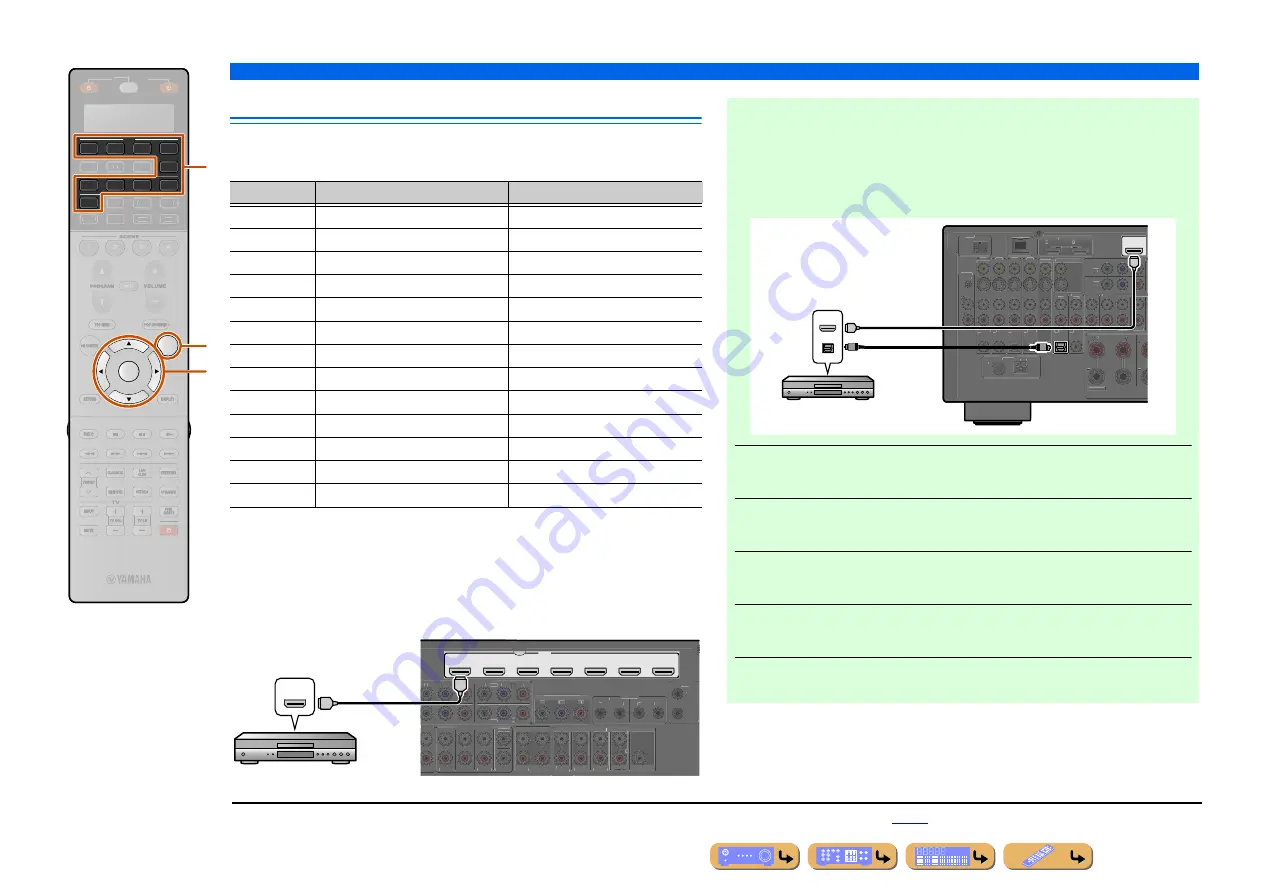
This unit has the following input jacks. Connect them to the appropriate output jacks on 
the playback devices such as BD/DVD players.

Connecting BD/DVD players and other devices with 
HDMI cable

Connect the device with an HDMI cable to one of the HDMI jacks of the AV1-7. The 
HDMI IN jack of the VIDEO AUX on the front panel can also be used.
Select the input source (AV1-7 or V-AUX) that the playback device is connected to for 
playback.

AV

4

4

3

1

2

V-AUX

4

3

1

2

PHONO

OPTION

ENTER

SOURCE

RECEIVER

AUDIO

7

5

6

USB

MULTI

NET

TUNER

DOCK

[ B ]

[ A ]

p

i

d

Input jack

Video input

Audio input

AV1

J

1

HDMI/Component video/S-video/Video

HDMI/Coaxial digital/Analog (Stereo)

AV2

J

1

HDMI/Component video/S-video/Video

HDMI/Coaxial digital/Analog (Stereo)

AV3

J

1

HDMI/Component video/S-video/Video

HDMI/Optical digital/Analog (Stereo)

AV4

J

1

HDMI/Component video/S-video/Video

HDMI/Optical digital/Analog (Stereo)

AV5

HDMI

HDMI

AV6

HDMI

HDMI

AV7

HDMI

HDMI

AUDIO1

Optical digital/Analog (Stereo)

AUDIO2

Coaxial digital/Analog (Stereo)

AUDIO3

Analog (Stereo)

AUDIO4

Analog (Stereo)

VIDEO AUX

HDMI/S-video/Video 

HDMI/Optical digital/Analog (Stereo)

PHONO

Analog (for turntable connection only)

AV 1

AV 2

AV 3

AV 4

HDMI

AV 5

AV 6

AV 7

(1 BD/DVD)

SPEAKERS

AV 3

AV 4

AUDIO 4

FRONT

SURROUND

SUR. BACK

SUBWOOFER

CENTER

MULTI CH INPUT

COMPONENT VIDEO

MONITOR OUT/ZONE OUT

ZONE OUT

PRE OUT

ZONE 2

FRONT/

F. PRESENCE

Y

P

B

P

R

Y

P

B

P

R

Y

P

B

P

R

C

D

SURROUND

SUR. BACK

CENTER

(REAR)

(FRONT)

SUBWOOFER

(

)

(

)

1

1

2

IN

1

2

2

1

OUT

IN

OUT

REMOTE

TRIGGER

OUT

+12V 0.1A MAX.

ZONE 3

(SINGLE)

HDMI

HDMI

HDMI

HDMI output

BD/DVD player

Receiving video signals from the HDMI jack and audio signals 
from jacks other than HDMI

This unit can use the AV1-4 or AUDIO1-4 input jacks to receive audio signals from 
other input jacks.
For example, if a playback device cannot produce audio signals from an HDMI jack, 
use the following method to change the audio input.

1

Press 

d

Input selector

 to choose an input source (AV1-4, V-AUX, 

AUDIO1-4, or PHONO).

2

Press 

p

OPTION

 to enter the Option menu.

3

Press 

i

Cursor


B

 / 

C

 to choose “Audio Select” and press 

i

ENTER

.

4

Press 

i

Cursor


D

 / 

E

 to choose an audio input jack and press 

i

ENTER

.

5

Once setup is complete, press 

p

OPTION

 to close the Option menu.

AV 1

(1 BD/DVD)

ZONE2/ZONE3

ANTENNA

75

HDMI OUT

EXTRA SP2

1

2

PHONO

GND

(1 BD/DVD)

AV 1

DOCK

NETWORK

AV 2

AV 3

AV 4

COAXIAL

COAXIAL

OPTICAL

OPTICAL

OPTICAL

AUDIO 1

(2 TV)

(3 CD)

AUDIO 2

AUDIO 3

AUDIO 4

FRONT

SURROUND

MULTI CH

COMPONEN

COAXIAL

AV OUT

a

b

c

d

e

f

Y

P

B

P

R

MON.OUT/ZONE OUT

ARC

ARC

SELECTABLE

AV 1

AV 2

A

B

GND AM

FM (4 RADIO)

HDMI

OPTICAL

HDMI

HDMI

O

O

HDMI/Audio (Optical) 

output

BD/DVD player

J

1 :

Coaxial digital and optical digital jack function can be assigned to other AV jacks using “Input Assignment.” Refer to “Input Assignment” for details (

p. 106

).

Содержание RX-V2067

Страница 1: ...Owner s Manual AV Receiver English for Asia Africa Oceania and Latin America...

Страница 2: ...IO 4 3 1 2 7 5 6 V AUX 4 3 1 2 USB MULTI NET PHONO TUNER DOCK B A h i Some features are not available in certain regions This manual is created prior to production Design and specifications are subjec...

Страница 3: ...sound decoders 50 Enjoying surround sound with the CINEMA DSP function 50 Enjoying unprocessed playback Straight decoding mode 51 Enjoying Hi Fi Sound Quality Pure Direct Mode 52 Enjoying stereo play...

Страница 4: ...ming from other remote controls 114 Changing source names in the display window 116 Macro programming features 117 Clearing configurations 118 Simplified remote control 120 Extended functionality that...

Страница 5: ...variety of sources Spatial sound playback with sound field effects CINEMA DSP 50 Playback with no sound field effects straight decoding 51 High fidelity sound playback Pure Direct 52 Enhanced sound pl...

Страница 6: ...ons such as play stop and pause using the TV screen Menu browse control 74 Configuring settings for this unit ON SCREEN menu Configure an input source Change the input source name Rename Icon Select 8...

Страница 7: ...put 102 Network settings Specify this unit s IP address IP Address 103 Accept the commands over a LAN network when this unit is in the standby mode Network Standby 103 Specify the mac address filter f...

Страница 8: ...This indicator also lights up when the Yamaha Wireless System for iPod is connected to this unit p 75 c Front panel display Displays information on this unit p 11 d PURE DIRECT Switches this unit to...

Страница 9: ...input sources or adjust volume for an external amplifier in another room or the built in amplifier for speakers in another room p 131 n INFO Changes the information displayed on the front panel displa...

Страница 10: ...gnals p 34 q MULTI CH INPUT jacks For connecting a player that supports a multi channel output p 35 r ZONE OUT jacks Outputs sound of this unit to an external amplifier set in a different room p 129 s...

Страница 11: ...cted j CINEMA DSP 3D indicator Lights up when CINEMA DSP 3D is activated p 51 k Cursor indicators Light up if corresponding cursors on the remote control are available for operations l MUTE indicator...

Страница 12: ...ns on and off the Option menu p 57 q DISPLAY Switches the display between the Now Playing view and the Browse view r Sound selection keys Switch between the current sound field effect sound program an...

Страница 13: ...and Zone3 p 131 2 3 SOURCE RECEIVER AV AUDIO SCENE MUTE RETURN DISPLAY TOP MENU POP UP MENU VOLUME PROGRAM 1 4 4 3 1 2 7 5 6 V AUX 4 3 1 2 USB MULTI NET PHONO TUNER DOCK 4 ON SCREEN OPTION ENTER FM ME...

Страница 14: ...unit Refer to SETUP p 81 for details Option menu Press pOPTION to display the Option menu Configure the optional settings for each input source Settings such as Tone Control and Volume Trim are applie...

Страница 15: ...en 60 degrees and 80 degrees from the listening position and with the speaker tops at a height of 1 5 1 8 m from the floor Presence left and right speakers The presence speakers are used for front eff...

Страница 16: ...configuration must be assigned to this unit to activate the speakers Use the Power Amp Assign function to apply the appropriate settings shown in the table for each speaker layout Refer to Power Amp...

Страница 17: ...L R speakers EXTRA SP1 jacks Presence L R speakers Power Amp Assign 7ch Normal Default Front L speaker Front R speaker Subwoofer Center speaker Surround L speaker Surround R speaker Presence R speaker...

Страница 18: ...in another room can also be controlled When the built in amplifier assigned to speakers in another room is turned on sound output automatically switches from the surround back speakers to the speakers...

Страница 19: ...t L speaker Front L speaker Main zone FRONT jacks Front L R speakers SUBWOOFER PRE OUT jack Subwoofer CENTER jack Center speaker EXTRA SP1 jacks J4 Zone2 speakers SURROUND jacks Surround L R speakers...

Страница 20: ...d the other cable into the negative black terminal Be careful that the core of the speaker cable does not touch anything or come into contact with the metal areas of this unit This may damage this uni...

Страница 21: ...AR FRONT SUBWOOFER 1 2 RS 232C IN 1 2 2 1 OUT IN OUT REMOTE TRIGGER OUT 12V 0 1A MAX MON OUT ZONE OUT ARC ARC SELECTABLE ZONE 3 AV 1 AV 2 A B 1 BD DVD SINGLE ZONE2 ZONE3 F PRESENCE GND AM FM 4 RADIO S...

Страница 22: ...woofer input jack to the SUBWOOFER 1 and or 2 jack on this unit with an audio pin cable J1 2 Set the subwoofer volume as follows Volume Set to approximately half volume or slightly less than half Cros...

Страница 23: ...subwoofer external front presence speakers Connections of speakers Assigning a speaker configuration Advanced speaker configuration Symbols on the table Front L speaker Center speaker Front R speaker...

Страница 24: ...bwoofer Power Amp Assign 7ch FPR 1ZONE L R L C R SL SR SBR SBL SW EA PR PL A richer sound field can be created with the simultaneous use of front speakers that support bi amp connection and front pres...

Страница 25: ...AMP PR PL NOTES When a component is connected to the PRE OUT and ZONE OUT terminals do not connect speakers to the SPEAKERS terminals corresponding to those PRE OUT and ZONE OUT terminals When an exte...

Страница 26: ...has a DVI jack an HDMI DVI D cable is required COMPONENT VIDEO jacks The signal is separated into three components luminance Y chrominance blue PB and chrominance red PR Use component video pin cables...

Страница 27: ...to component video S video or video signal according to the type of video input jacks used by the TV J2 J3 HDMI OUT 1 2 MONITOR OUT ZONE OUT Y PB PR MON OUT ZONE OUT ARC ARC SELECTABLE ZONE2 ZONE3 SUR...

Страница 28: ...CD AUDIO 2 AUDIO 3 AUDIO 4 FRONT SURROUND MULTI CH COMPONEN COAXIAL AV OUT a b c d e f Y PB PR MON OUT ZONE OUT 1 BD DVD AV 1 AV 2 A B GND AM FM 4 RADIO HDMI HDMI HDMI HDMI HDMI HDMI HDMI input TV Pro...

Страница 29: ...DIO 4 FRONT SURROUND MULTI CH COMPONEN COAXIAL AV OUT a b c d e f Y PB PR ARC ARC SELECTABLE 1 BD DVD AV 1 AV 2 A B GND AM FM 4 RADIO VIDEO V V Video input TV When using other TVs To transmit sound fr...

Страница 30: ...IO 4 FRONT SURROUND SUR BACK SUBWOOFER CENTER MULTI CH INPUT COMPONENT VIDEO MONITOR OUT ZONE OUT ZONE OUT PRE OUT ZONE 2 FRONT F PRESENCE Y PB PR Y PB PR Y PB PR C D SURROUND SUR BACK CENTER REAR FRO...

Страница 31: ...AV 1 AV 2 A B GND AM FM 4 RADIO COMPONENT Y PR PB Y PR PB O OPTICAL O Component video Audio Optical output BD DVD player Y PB PR AV 1 AV 2 A B ZONE2 ZONE3 ANTENNA 75 AV 1 HDMI OUT AV EXTRA SP2 1 2 PHO...

Страница 32: ...PB PR MON OUT ZONE OUT ARC ARC SELECTABLE 1 BD DVD AV 1 AV 2 A B GND AM FM 4 RADIO OPTICAL O O S VIDEO S S video Audio Optical output BD DVD player COAXIAL COAXIAL a b ZONE2 ZONE3 ANTENNA 75 AV 1 HDMI...

Страница 33: ...b c d e f Y PB PR MON OUT ZONE OUT ARC ARC SELECTABLE 1 BD DVD AV 1 AV 2 A B GND AM FM 4 RADIO VIDEO OPTICAL V V O O Video Audio Optical output BD DVD player 1 BD DVD ZONE2 ZONE3 ANTENNA 75 AV 1 HDMI...

Страница 34: ...e f Y PB PR MON OUT ZONE OUT ARC ARC SELECTABLE 1 BD DVD AV 1 AV 2 A B GND AM FM 4 RADIO OPTICAL O O CD player Audio Optical output Werecommendconnecting audiodeviceswithacoaxialdigital outputtotheAU...

Страница 35: ...is unit to MULTI CH Be sure to turn down the volume when connecting this unit and the other devices When both the HDMI connection and the analog video audio connection are performed between the HDMI c...

Страница 36: ...1 2 OUT IN OUT EX SURROUND SURROUND BACK SPEAKERS CENTER 1 AV 2 AV 3 AV 4 HDMI AV 5 AV 6 AV 7 SINGLE FRONT BI AMP AV 3 AV 4 SURROUND SUR BACK SUBWOOFER CENTER MULTI CH INPUT COMPONENT VIDEO MONITOR OU...

Страница 37: ...ROUND AV 1 HDMI OUT AV 2 AV 3 HD EXTRA SP2 1 2 PHONO GND 1 BD DVD AV 1 DOCK NETWORK AV 2 AV 3 AV 4 AV 3 AV 4 COAXIAL COAXIAL OPTICAL OPTICAL OPTICAL AUDIO 1 2 TV 3 CD AUDIO 2 AUDIO 3 AUDIO 4 FRONT SUR...

Страница 38: ...device Connect a USB memory device or USB portable audio player to the USB port on the front panel of this unit NOTE Be careful that the USB storage device is facing the correct way when inserted into...

Страница 39: ...SELECTABLE ZONE 1 BD DVD AV 1 AV 2 A B Indoor FM antenna AM loop antenna Position the AM antenna away from the receiver The wires of the AM antenna have no polarity You can connect either wire to the...

Страница 40: ...t utilizing an external power amplifier for details p 16 p 23 2 Place the supplied YPAO microphone at ear height in your listening position Face the head of the YPAO microphone upwards 3 Switch this u...

Страница 41: ...arts in 10 seconds Display during measurement RETURN ENTER SOURCE RECEIVER AV AUDIO 4 3 1 2 7 5 6 V AUX 4 3 1 2 USB MULTI NET PHONO TUNER DOCK B A i ENTER to Start Measurement YPAO VOLUME Multi Positi...

Страница 42: ...hes without any problems ENTER SOURCE RECEIVER AV AUDIO 4 3 1 2 7 5 6 V AUX 4 3 1 2 USB MULTI NET PHONO TUNER DOCK B A i Save Exit Measure Finish YPAO VOLUME Yes No MLT Position2 YPAO VOLUME The follo...

Страница 43: ...he automatic measurement J1 CANCEL Returns to the previous screen EXIT Finishes the automatic measurement without applying the result to the speaker setup When the warning message appears on this disp...

Страница 44: ...of each connected speaker Normal is displayed when the polarity of the connected speaker is normal Reverse is displayed when the polarity of the connected speaker is opposite Size Displays the size of...

Страница 45: ...onment may reduce the accuracy When E 9 is displayed resume the aborted step RETRY Restart measurement from the beginning 4 Press iENTER to execute the selected option When E 10 is displayed 1 Press i...

Страница 46: ...surround left right speakers is necessary E 7 No MIC The YPAO microphone has been removed While measuring take care not to touch the YPAO microphone E 8 No Signal The YPAO microphone could not disting...

Страница 47: ...jack s used to output signal Press wHDMI OUT repeatedly to select setting The HDMI output setting changes as follows Basic playback procedure AV AUDIO MUTE VOLUME 4 4 3 1 2 7 5 6 V AUX 4 3 1 2 USB MU...

Страница 48: ...in the following frequency range The display returns to the previous display soon after you release the key The tone control of the speakers or headphones can be set separately Set the headphone tone...

Страница 49: ...MI Output are provided at initial factory settings Settings that are not checked are not enabled when a scene key is pressed Use Load in the Scene menu to check settings to be enabled Refer to Adjusti...

Страница 50: ...SP mode You can even enjoy surround sound presence with just a minimal configuration of the front speakers only This unit will switch to Virtual CINEMA DSP mode automatically when Surround is set to N...

Страница 51: ...At minimum connect the front speakers center speaker and surround speakers Enable the center speaker and surround speakers in Configuration p 94 Enable CINEMA DSP 3D in the Option menu p 59 Enjoying...

Страница 52: ...usic Enhancer improves the sound quality of the compressed music source closer to its original depth and width J3 This mode can be used along with any other DSP modes Press sENHANCER to turn Compresse...

Страница 53: ...realistic live sound field features powerful sound as if the listener is in a row in front of a small stage The Roxy Theatre This is the sound field of a rock music live house in Los Angeles with app...

Страница 54: ...ations that match a wide range of movie genres from serious dramas to musicals and comedies The reverberations are modest but offer an optimum 3D feeling reproducing effects tones and background music...

Страница 55: ...d at the bottom of the TV screen 2 Use iCursor D E to select a scene and press iENTER The scene is selected Using the TV display to control this unit RETURN ON SCREEN ENTER SOURCE RECEIVER AV AUDIO 4...

Страница 56: ...menu screen Press iRETURN repeatedly to close the ON SCREEN menu Refer to Enjoying favorite sound field effect p 50 for various sound programs You can configure the detailed settings for each sound p...

Страница 57: ...formation refer to the Option menu on the next page 3 Use iCursor B C to select the desired setting and press iENTER Parameters of the selected item are displayed 4 Use iCursor D E to select the desir...

Страница 58: ...pplied to other input sources and ALL is displayed on the front panel display When settings specific to a certain input source are selected the input source name is displayed on the front panel displa...

Страница 59: ...kers are used J2 Adjustable range 6 0 dB to 6 0 dB Adjustment increments 0 5 dB Off Default Does not adjust the dynamic range automatically On Adjusts the dynamic range automatically Input Level Input...

Страница 60: ...tches communication with a Bluetooth component on and off p 77 Pairing Bluetooth component Pairing Performs pairing of this unit and a Bluetooth component p 77 Adjustable range 6 0 dB to 6 0 dB Defaul...

Страница 61: ...lowing methods Press qDISPLAY to cycle between the Now Playing view and the Browse view In the Now Playing view press iENTER and use iCursor B C to select the icon Then press iENTER to switch to the B...

Страница 62: ...for your listening environment 1 Switch this unit to the standby mode 2 Press MAIN ZONE A while pressing and holding STRAIGHT on the front panel Release the keys when ADVANCED SETUP is displayed on t...

Страница 63: ...preset number to which no station is registered Press xMEMORY for 3 seconds or longer The station will be registered automatically to the lowest open preset number or the next number after the one reg...

Страница 64: ...use these buttons first press iENTER Then select the desired one with iCursor B C and iENTER Manual Tuning You can tune in to a desired FM AM station by specifying its frequency Preset Select You can...

Страница 65: ...1 Page Down Scrolls the list to the next or previous page Now Playing Switches the display to the Now Playing view ENTER SOURCE RECEIVER AV AUDIO 4 3 1 2 7 5 6 V AUX 4 3 1 2 USB MULTI NET PHONO TUNER...

Страница 66: ...buttons on the Browse view To use these buttons first press iCursor E Then select the desired one with iCursor B C and iENTER 10 Pages Up 10 Pages Down Goes to 10 pages forwards or backwards 1 Page Up...

Страница 67: ...Use the Option menu to apply playback shuffle and repeat settings Refer to Shuffle playback p 60 and Repeat playback p 60 for details INFO ENTER TUN CH SOURCE RECEIVER AV AUDIO 4 3 1 2 7 5 6 V AUX 4 3...

Страница 68: ...ss iCursor E Then select the desired one with iCursor B C and iENTER 10 Pages Up 10 Pages Down Goes to 10 pages forwards or backwards 1 Page Up 1 Page Down Scrolls the list to the next or previous pag...

Страница 69: ...playback functions with the remote control Use the following remote control keys to operate playback stop skip etc USB storage device Shuffle repeat playback Use the Option menu to apply playback shu...

Страница 70: ...Page Down Scrolls the list to the next or previous page Now Playing Switches the display to the Now Playing view 1 Press dNET repeatedly to select NET RADIO as the input source 2 Press iCursor B C to...

Страница 71: ...nctions with the remote control Use the following remote control keys to operate playback stop the Internet Radio INFO ENTER TUN CH SOURCE RECEIVER AV AUDIO 4 3 1 2 7 5 6 V AUX 4 3 1 2 USB MULTI NET P...

Страница 72: ...item of each directory to a preset number To change the content assigned to preset numbers replace the content in the directory to new content without deleting the directory PC server Create eight pl...

Страница 73: ...mote control Simple remote control p 75 Playing back tunes from your iPod iPhone DOCK INFO SOURCE RECEIVER AV AUDIO 4 3 1 2 7 5 6 V AUX 4 3 1 2 USB MULTI NET PHONO TUNER TUN CH B A t d When playing ba...

Страница 74: ...ing Switches the display to the Now Playing view Close Returns to the video playback turning off the menu display 1 Press dDOCK to switch to the DOCK input 2 Press iCursor B C to select the content mu...

Страница 75: ...e rear panel of this unit Refer to the operating instructions of the YID W10 for more information RETURN DOCK REC ENTER SOURCE RECEIVER AV AUDIO 4 3 1 2 7 5 6 V AUX 4 3 1 2 USB MULTI NET PHONO TUNER B...

Страница 76: ...onnected ANTENNA 75 PHONO GND 1 BD DVD AV 1 NETWORK AV 2 AV 3 AV 4 COAXIAL COAXIAL OPTICAL OPTICAL a b c d GND AM FM 4 RADIO A B 1 23 Receiver of the Wireless System for iPod Position the receiver as...

Страница 77: ...0000 into the Bluetooth component J2 Playing back tunes from Bluetooth components NOTE When playing back from a Bluetooth component for the first time you must first pair the devices register the Blu...

Страница 78: ...4 3 1 2 USB MULTI NET PHONO TUNER B A i p d Depending on Bluetooth components a wireless connection is established automatically or by operating the Bluetooth components In that case it is not necessa...

Страница 79: ...Standby is set to On in the Network menu this unit can turns on and Web Control Center can be displayed on the PC even if this unit was in standby mode p 103 When Network Standby is set to Off we rec...

Страница 80: ...l a Zone Rename Friendly Name indicates the identification name of the device this unit connected to the PC Friendly Name or the names of zones can be changed b MAC Filter Applies the MAC address filt...

Страница 81: ...se iCursor D E to select an input source to be configured and press iCursor B 4 Use iCursor B C to select an item and press iENTER 5 Use iCursor B C to adjust the setting 6 Press hON SCREEN to close t...

Страница 82: ...he selected character 5 Repeat step 4 to enter the desired input source name 6 Confirm the input source name by pressing iENTER 7 Press iCursor C to select OK and press iENTER to register the new inpu...

Страница 83: ...a video signal input from another terminal can be output to the video monitor For example even if an audio and video component such as a DVD player that does not support a multi channel digital audio...

Страница 84: ...o be edited and press iCursor B 4 Use iCursor B C to select an item and press iENTER 5 Use iCursor B C D E to adjust the setting 6 Press hON SCREEN to close the menu Editing the SCENE function Scene m...

Страница 85: ...DETAIL DETAIL Specifies SCENE IR function and displays settings registered with the SCENE function in detail For more information see SCENE IR and Detail at right Off Disables the SCENE IR function Y...

Страница 86: ...m Compressed Music Enhancer or HDMI OUT you want to register 3 Press the eSCENE key until SET Complete appears on the front panel display 2 3 AV AUDIO SCENE 1 4 4 3 1 2 7 5 6 V AUX 4 3 1 2 USB MULTI N...

Страница 87: ...SCREEN to close the Sound Program menu Setting sound program parameters Sound Program menu RETURN ON SCREEN ENTER SOURCE RECEIVER AV AUDIO 4 3 1 2 7 5 6 V AUX 4 3 1 2 USB MULTI NET PHONO TUNER DOCK B...

Страница 88: ...und and the subsequent reflections By controlling the time between the reflected sounds you can change the apparent size of the virtual venue Changing this parameter from one to two doubles the appare...

Страница 89: ...B at 1 kHz This changes the apparent size of the acoustic environment over an extremely wide range Set a longer reverberation time to get more sustaining reverberation sound and set a shorter time to...

Страница 90: ...k R channel J2 Front Presence L Level Adjusts the volume of the front presence L channel J2 Adjustable range 0 to 100 PLIIx Movie PLII Movie Selects the Dolby Pro Logic IIx Movie or Dolby Pro Logic II...

Страница 91: ...usic is selected Center Image Adjusts the front left and right channel output relative to the center channel to make the center channel more or less dominant as necessary Adjustable range 0 to 100 Def...

Страница 92: ...Sets functions related to audio output such as adjustment of maximum volume and of dynamic range p 97 Video Sets video output functions such as video conversion settings resolution and aspect ratio p...

Страница 93: ...Auto Power Down Input Assignment Display Set Trigger Output1 Trigger Output2 Memory Guard Speaker Sound Video Multi Zone Function Language HDMI Control Control Select ARC Audio Return Channel TV Audio...

Страница 94: ...l surround back speakers p 24 5ch BI AMP SB FPR Enables the bi amp connection external surround back and presence speakers p 25 In the Configuration you can select the speaker size characteristic Larg...

Страница 95: ...ally change to None You can set surround back audio signals including from the playback source to be mixed down and produced from a single speaker 6 1 channel layout or produced from left and right su...

Страница 96: ...y to adjust the parameter and use iCursor B C repeatedly to adjust the gain 3 Press iENTER to exit the edit window 4 Repeat steps 1 to 3 to configure other parameters 5 Press hON SCREEN to close the m...

Страница 97: ...n the test tone off when you have finished making adjustments Lipsync Adjusts the delay between video and audio output Dynamic Range Selects the dynamic range adjustment method for Dolby Digital and D...

Страница 98: ...olume for regular home use MIN AUTO MIN Sets the dynamic range suitable for low volume or a quiet environment such as at night for bitstream signals except for Dolby TrueHD signals AUTO Adjusts the dy...

Страница 99: ...als interchangeably 480p 576p 1080i and 720p resolution video signals can not be output at the S video and video jacks of MON OUT ZONE OUT p 141 The converted video signals are only output at the MONI...

Страница 100: ...enhancement function Resolution Enhancement When this item is set to Auto image resolution is enhanced Off Default disables the resolution enhancement function Noise Reduction When this item is set to...

Страница 101: ...o signals from TV while the HDMI Control function is on When the TV is set to output sounds via this unit the TV audio input is automatically selected to the input source assigned here J2 TV1 TV2 Off...

Страница 102: ...is unit On Default Audio is output through this unit When this setting is selected audio from the external component is output in a format compatible with this unit Off Default Audio is not output thr...

Страница 103: ...ork when this unit is in standby mode MAC Address Filter Sets the MAC address filter to restrict network access to this unit Off Select this setting to specify IP address manually On Default Select th...

Страница 104: ...nus of Zone2 or Zone3 on the TV monitor Party Mode Set Enable or disable the party mode function Zone Scene Rename Changes the scene names of Zone2 or Zone3 Zone Rename Changes the name of Zone2 or Zo...

Страница 105: ...er and press iCursor D E to enter the selected character 5 Repeat step 4 to enter the desired zone name 6 Confirm the zone name by pressing iENTER 7 Press iCursor C to select OK and press iENTER to re...

Страница 106: ...n press iENTER 3 Press iCursor D E to select c and then press iENTER Select None to clear the existing assignment 4 Press iRETURN to apply change and return to the previous screen RETURN ENTER SOURCE...

Страница 107: ...screen when there is no video signal Power Default TRIGGER OUT 1 or 2 jack function is synchronized with the power status of the zone specified with Target Zone Source TRIGGER OUT 1 or 2 jack functio...

Страница 108: ...when the input source specified with this option is selected High Default J2 Electronic signal is transmitted when the input source specified with this option is selected This setting is available onl...

Страница 109: ...3 2 0 1 Bitrate The number of bits passing a given point per second Dialogue The dialogue normalization level preset to the current input bitstream signal is displayed when this unit cannot display t...

Страница 110: ...address of the primary and secondary DNS Domain Name System servers MAC Address Displays the MAC address filter set to this unit Status Displays the network status of this unit Remote ID Displays the...

Страница 111: ...A TUN CH i g q u d m b k g mSOURCE RECEIVER glows orange when operation of this unit is enabled mSOURCE RECEIVER glows green when operation of an external component is enabled Playback Stop DVD player...

Страница 112: ...area 116 MACRO Macro programming mode Use this feature to set the macro program 117 CLEAR Clearing mode Use this feature to clear the configurations of this unit 118 ERASE Erase mode Use this feature...

Страница 113: ...er a remote control code 2064 using uNumeric keys A remote control code can be entered using iCursor B C D E 3 2 1 6 9 8 7 ENT 0 SETUP 4 5 TV TV VOL TV CH MUTE INPUT 2 ENTER TUN CH SOURCE RECEIVER AV...

Страница 114: ...atedly to select LEARN and press iENTER 2 3 SCENE 1 2 4 ENTER SETUP SOURCE RECEIVER AV AUDIO 4 3 1 7 5 6 V AUX 4 3 1 2 USB MULTI NET PHONO TUNER DOCK TUN CH B A i A d e If you continuously want to set...

Страница 115: ...NG appears in the display window if learning was unsuccessful In this case start over from step 3 AV AUDIO TV TV VOL TV CH MUTE INPUT 4 4 3 1 2 7 5 6 V AUX 4 3 1 2 USB MULTI NET PHONO TUNER DOCK ENTE...

Страница 116: ...is remote control can learn approximately 200 functions However depending on the signals learned FULL may appear in the display before you program 200 functions In this case clear unnecessary programm...

Страница 117: ...t the press of a button Be sure to set up remote control codes or perform learning operations before programming the macro 1 Press ASETUP SETUP appears in the display window 2 Press iCursor B C repeat...

Страница 118: ...that you want to and press iENTER Operations assigned to the following modes can be cleared 4 Press dInput selector lRECEIVER A or kA to select the desired clear mode J1 5 Press and hold iENTER for ab...

Страница 119: ...want to clear for about 3 seconds If clearing is successful OK appears in the display window 6 Press ASETUP again to exit from the setup menu SETUP AV AUDIO 4 4 3 1 2 7 5 6 V AUX 4 3 1 2 USB MULTI NE...

Страница 120: ...3 INPUT l h Select the input source p 47 J1 VOLUME Adjust the volume level p 47 MUTE Mutes the audio output p 47 Input source operation keys Operate song playback stop and skip functions for USB or DO...

Страница 121: ...f this unit Extended functionality that can be configured as needed Advanced Setup menu PROGRAM l h MAIN ZONE A STRAIGHT SPEAKER IMP Sets the impedance of speakers REMOTE SENSOR Activate or deactivate...

Страница 122: ...2 ID1 is set for both remote control and receiver by default To avoid crossing remote control change the remote control ID for both remote control and receiver REMOTE CON AMP ID1 To change the remote...

Страница 123: ...initialized from the following When an option other than CANCEL is selected the applicable default settings will be restored when the unit switches to standby mode YES Default Video output signals of...

Страница 124: ...are version Check the version of firmware currently installed on this unit USB Default Updates the firmware of this unit using a USB flash drive NETWORK Updates the firmware of this unit over a networ...

Страница 125: ...wing operations by using the TV remote control Power On Off Volume Control Switching between audio output devices Using the HDMI Control function NOTE The following is an example of how to connect thi...

Страница 126: ...N SCREEN ENTER SOURCE RECEIVER AV AUDIO 4 3 1 2 7 5 6 V AUX 4 3 1 2 USB MULTI NET PHONO TUNER DOCK B A h i ZONE2 ZONE3 ANTENNA 75 AV 1 HDMI OUT EXTRA SP2 1 2 PHONO GND 1 BD DVD AV 1 DOCK NETWORK AV 2...

Страница 127: ...ut from this unit to the TV or audio output from the TV to this unit can be transmitted through a single HDMI cable Audio Return Channel function Audio signals transmitted from the TV to this unit can...

Страница 128: ...to which the HDMI audio signals will be assigned and press iRETURN 10 Press iCursor B C to select ARC Audio Return Channel and press iENTER J1 11 Press iCursor C to select On The Audio Return Channel...

Страница 129: ...f you want to output sound from Zone2 or Zone3 connect an external component to AV1 4 AUDIO1 4 or V AUX by analog connection For example if you want to output sound from an HDMI DVD player in Zone2 yo...

Страница 130: ...to Zone2 or Zone3 configure Monitor Out Assign p 104 When Monitor Out Assign is set to Zone2 or Zone3 the content window and Option menu of the input selected for the assigned zone can also be display...

Страница 131: ...nce 3 Press PROGRAM l h to adjust balance The display returns to the previous display soon after the key is released Controlling the content window on the TV monitor in another room When Monitor Out A...

Страница 132: ...r charge Replace all batteries 13 The unit enters standby mode The protection circuitry has been activated because of a short circuit etc Check that the speaker with an impedance of at least 6 Check t...

Страница 133: ...aker Manual Setup Level 96 Sound may not be output from certain channels depending on the input source or sound program Try another sound program 50 Problem Cause Remedy See page Only the center speak...

Страница 134: ...storted or the volume may decreased due to the nature of AV receivers Turn on all components connected to this unit Max Volume is set to a low value Set it to a higher value 98 Problem Cause Remedy Se...

Страница 135: ...gister stations you want to listen to as preset stations before operation 63 Wrong Station is displayed An invalid FM AM frequency has been input Input a frequency that can be received Problem Cause R...

Страница 136: ...rded in a format that this unit is compatible with The Internet Radio cannot be played The firewall of the network device is activated The Internet Radio can be played only when it passes through the...

Страница 137: ...ion has been added to the Bookmarks list Bookmark Off The stored Internet Radio station has been removed from the Bookmarks list USB Overloaded Over current passes through the connected USB device Tur...

Страница 138: ...l will function within a maximum range of 6 m and no more than 30 degrees off axis from the front panel Direct sunlight or lighting from an inverter type of fluorescent lamp strobe light etc is striki...

Страница 139: ...usic sources Movie mode for movie sources and Game mode for game sources Dolby Pro Logic IIx Dolby Pro Logic IIx is a new technology enabling discrete multichannel playback from 2 channel or multi cha...

Страница 140: ...its When digitizing an analog audio signal the number of times the signal is sampled per second is called the sampling frequency while the degree of fineness when converting the sound level into a num...

Страница 141: ...high definition video as well as multichannel digital audio using a single cable HDMI transmits all ATSC HDTV standards and supports 8 channel digital audio with bandwidth to spare to accommodate fut...

Страница 142: ...Video etc Bitstream High definition audio Dolby TrueHD Dolby Digital Plus DTS HD Master Audio DTS HD High Resolution Audio DTS Express Blu ray Disc HD DVD etc NOTES When CPPM copy protected DVD Audio...

Страница 143: ...U S and other countries iPhone is a trademark of Apple Inc MPEG Layer 3 audio coding technology licensed from Fraunhofer IIS and Thomson This receiver supports network connections Bluetooth Bluetooth...

Страница 144: ...net 100Base TX 10Base TX 1 Internet Radio Audio Format MP3 WMA PC Server Audio Format MP3 WMA WAV MPEG 4 AAC FLAC Max Audio Support fs 96 kHz 24 bit Cover Art Format PNG JPEG DLNA Version 1 5 DMP DMR...

Страница 145: ...Filter Characteristics fc 40 60 80 90 100 110 120 160 200 Hz H P F FRONT CENTER SURROUND SURROUND BACK Small 12 dB oct L P F SUBWOOFER 24 dB oct Video Section Video Format MONITOR OUT ZONE OUT Wall P...

Страница 146: ...usic Enhancer 52 Configuration Manual Setup Speaker setup 94 Connect Option menu 60 Connecting speakers 20 Connecting to network 37 Connecting USB storage device 38 Connections 15 Content window 61 Co...

Страница 147: ...ual Setup Speaker setup 94 PREOUT connection 25 Presence speaker 15 Presence speaker connection 20 Presence speaker layout 17 PRESET 113 Preset Select TUNER 64 Pure Direct Mode 52 Pure Direct Mode Sou...

Страница 148: ...Control Option menu 59 Transmitter of the Wireless System for iPod 75 Trigger connection 36 Trigger Output Function setup 107 TU Advanced Setup menu 122 Tuner indicator 11 TV Audio Input HDMI setup 1...

Страница 149: ...2010 Yamaha Corporation YC599A0 OMEN1...

Отзывы: