SETUP
Editing the SCENE function (Scene menu)
En
86
■
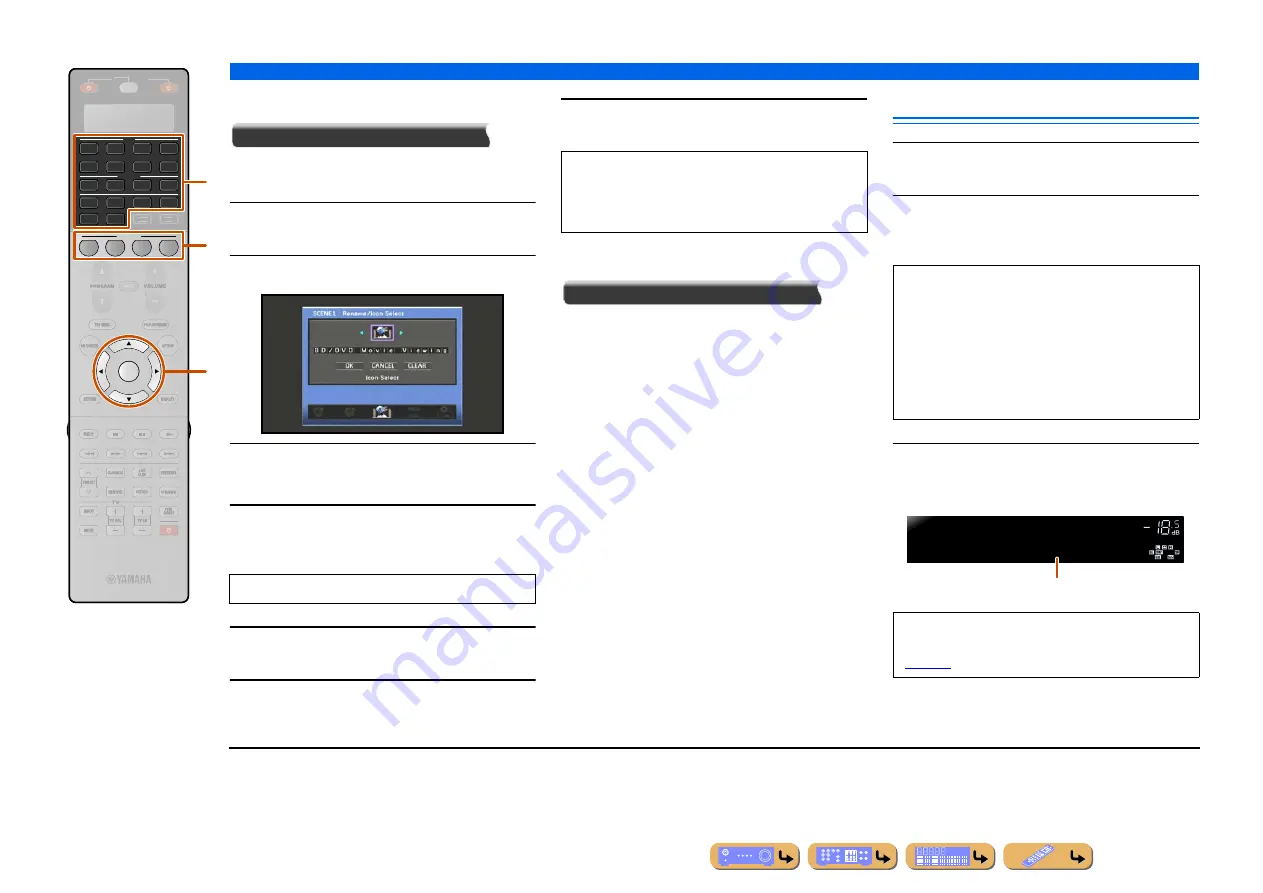
Changing a scene name and icon
Rename/Icon Select
Changes the scene name and icon displayed on the front
panel display or TV screen.
1
Use
i
Cursor
B
/
C
repeatedly to select
“Rename/Icon Select” and press
i
ENTER
.
2
Use
i
Cursor
D
/
E
to choose an icon.
3
Press
i
Cursor
C
and
i
ENTER
.
Editing the name is available.
4
Press
i
Cursor
B
/
C
to select a character,
and press
i
Cursor
D
/
E
to enter the
selected character.
5
Repeat step 4 to enter the desired scene
name.
6
Confirm the scene name by pressing
i
ENTER
.
7
Press
i
Cursor
C
to select “OK” and press
i
ENTER
to register the new input name.
■
Resetting a scene
Reset
Restores all settings for the selected scene to their
default values.
Simple registering as the SCENE
1
Use
d
Input selector
to select the input
source you want to register.
2
Set the settings such as sound program,
Compressed Music Enhancer, or HDMI OUT
you want to register.
3
Press the
e
SCENE
key until “SET
Complete” appears on the front panel
display.
2
3
AV
AUDIO
SCENE
1
4
4
3
1
2
7
5
6
V-AUX
4
3
1
2
USB
MULTI
NET
PHONO
TUNER
DOCK
4
ENTER
SOURCE
RECEIVER
[ B ]
[ A ]
i
e
d
Scene names may consist of up to 20 characters.
•
To cancel the operation without applying changes,
select “CANCEL” and then press
i
ENTER
.
•
To clear the characters entered in step 4, select
“CLEAR” and press
i
ENTER
.
The following settings can be registered with a
scene
J
1
:
Input, Audio Select, HDMI Output, Sound Program,
Pure Direct Mode, Tone Control, Adaptive DRC,
Compressed Music Enhancer, CINEMA DSP 3D
Mode, Dialogue Lift, Extended Surround, Video
Adjustment, Video Processing, Master Volume,
Lipsync, Setting Pattern, PEQ Select
When changing “SCENE,” also change the external
component that the remote control operates
(
VOLUME
S C E N E 4
S E T C o m p l e t e
Release the key when “SET Complete” is displayed
J
1 :
Settings that are not checked in the Scene menu’s “Load” item are
not enabled when the corresponding scene key is pressed.


