99
◆
◆
◆
◆
◆
◆
◆
◆
◆
◆
◆
◆
◆
◆
◆
◆
◆
◆
◆
◆
◆
◆
◆
◆
◆
◆
◆
◆
◆
◆
◆
◆
◆
◆
◆
◆
◆
◆
◆
◆
◆
9.
Record other tracks as desired, repeating steps
3
,
4
,
5
and
7
.
NOTE: Selecting the Realtime Recording (in step 6) will not be
necessary here, as long as you haven’t changed to a different
method.
NOTE: If you wish to change the data you’ve recorded, refer to
the section Editing Songs & Phrases on page 179 for
information on how to edit recorded song data.
HINT — Recording at other measures in a Song
Once you’ve recorded an initial track, you don’t have to start
recording from the beginning of the Song. You can actually
start recording at any other point in the Song. The operation is
exactly the same, except that you must change the Measure/
Beat parameter. To do this, highlight the parameter (Measure
or Beat), then change the value. A two-measure lead-in will
play prior to the first measure actually recorded.
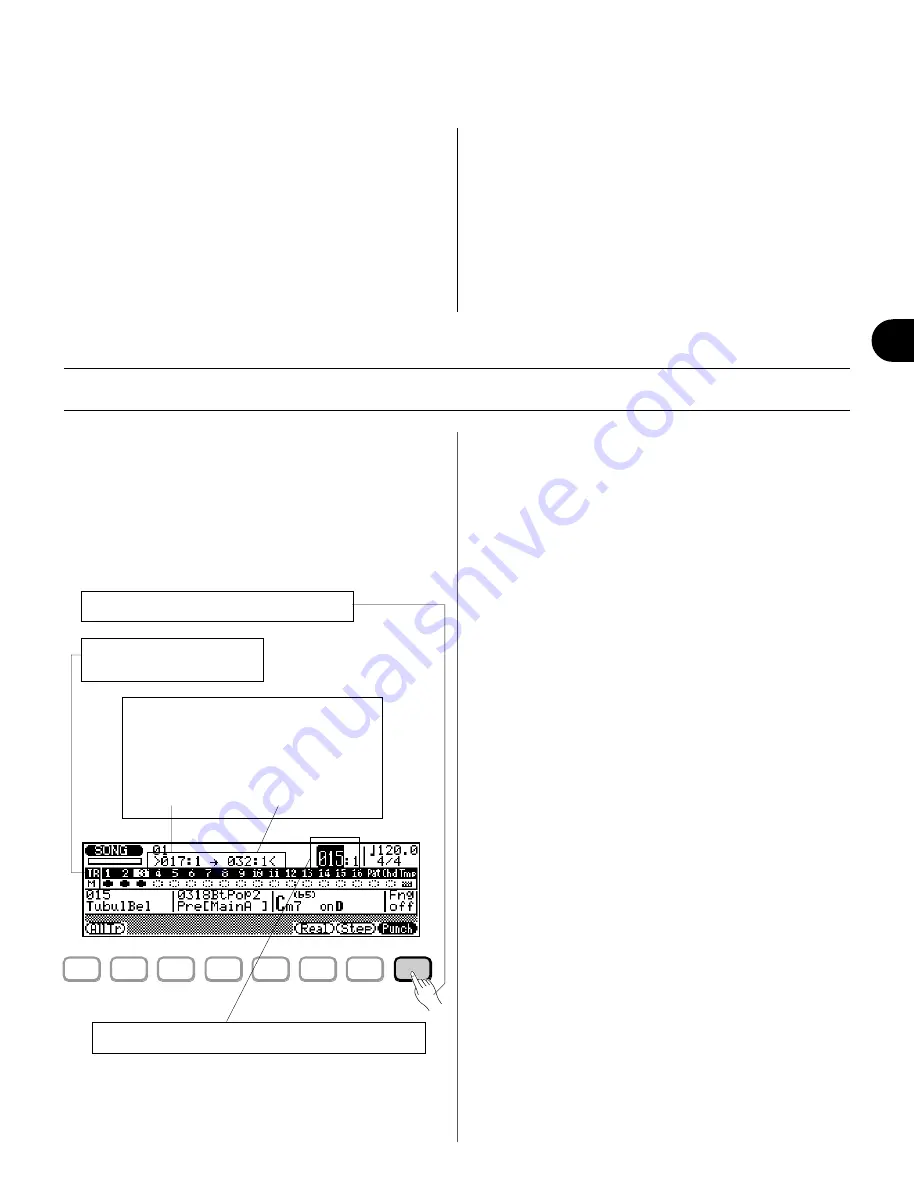
Punch-in Recording
Punch-in recording is a special type of realtime recording in
which you specify a range of measures you want to record,
leaving all other material on the track intact. This is
particularly useful for re-recording a short segment of an
otherwise perfect track — so you don’t have to re-record
the entire track.
To use Punch-in Recording: ................................................
1.
Make sure that record standby is on (RECORD lamp
should be lit; see step
5
in Realtime Recording
above).
2.
From record standby, select the Punch-in Record
mode by pressing
*
(Punch).
3.
Select a track for recording.
NOTE: Selecting a different Voice from the one used in the
originally recorded track automatically changes the Voice
assignment for the entire track — not just the Punch-in
measures.
4.
Specify the Punch-in and Punch-out points.
The Punch-in point is the measure and beat at which
recording will begin, and the Punch-out point is the
measure and beat at which recording will end.
5.
Create a playback-only lead-in by setting the main
Measure/Beat parameter to a few measures before
the Punch-in point.
Doing this gives you a specified amount of measures
before recording actually begins, so you can be ready to
record when the Punch-in point is reached.
6.
Press
R
to begin recording.
Recording begins automatically at the specified Punch-
in point, and ends at the Punch-out point. Playback
continues, however, even after the Punch-out point is
reached.
7.
To stop the operation, press
T
.
In the example display above, playback will begin at
measure 15, recording will begin on the first beat of
measure 17 and stop on the fourth beat of measure 32.
F1
F2
F3
F4
F5
F6
F7
F8
4.
Set the Punch-in and Punch-out points
(beginning and end of recording).
Highlight the parameters and change the
values.
• Punch-in
Measure/Beat
• Punch-out
Measure/Beat
3.
Select a track.
Highlight the desired track.
2.
Press
*
to select Punch-in Recording.
5.
Create a lead-in with the Measure/Beat parameters.
Song Mode: Recording Operations
Содержание QS300
Страница 1: ......
Страница 2: ......
Страница 3: ......
Страница 4: ......
Страница 46: ...42 ...
Страница 100: ...96 ...
Страница 108: ...104 ...
Страница 142: ...138 ...
Страница 166: ...162 ...
Страница 182: ...178 ...
Страница 207: ...203 Q S 3 0 0 APPENDIX Troubleshooting 204 Warning and Error Messages 206 Specifications 208 Index 209 APPENDIX ...
Страница 217: ......


