background image


51


Appendix


User’s Guide


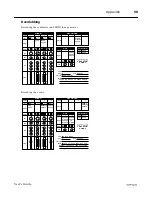
Mixdown


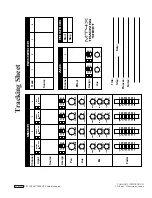
Add equalization and effects and record to the master recorder:


Glossary


Auxiliary Bus


The MT4X has two auxiliary buses. These buses are generally used to send signals to external signal 
processing units.

Auxiliary Send — Each channel module includes an AUX control, which selects an auxiliary bus 
and determines the amount of signal fed to corresponding the AUX SEND output connector.

Auxiliary Return — The AUX RETURN controls determine the destination and amount of signal 
that is fed back into the MT4X via the AUX RETURN input connectors. You can return an effect in 
stereo, to further enhance your recording.


Capstan


A slender metal pillar adjacent to the pinchroller. The capstan is driven by the DC servo motor and 
controls the tape speed. The tape pulled across the erase and record/playback heads by the pressure 
between the capstan and pinchroller.


CUE monitor


This bus is used to listen to previously recorded tracks. It is mostly used to assist the musicians 
recording a new part. You can also process effects through the monitor bus without recording them 
to tape. The CUE bus is monaural.


DAT (Digital Audio Tape)


A two-channel, 16-bit digital recording system using magnetic tape and a rotary head mechanism. 
DAT machines are often used as master recording units. Professional units can record at 33 kHz, 
44.1 kHz, and 48 kHz sampling rates.


dbx™ noise reduction


A system to reduce tape noise and improve the dynamic range of analog tape. dbx™ employs a pre-
emphasis to boost the high frequencies, followed by a 2:1 compression of the signal during 

R

EVEN

L
ODD

C

AUX 1

AUX 2

OFF

HIGH

MID

LOW

-12

+12

-12

+12

-12

+12

0

0

0

10

9
8
7
6
5
4
3
2
1
0

Input

Channel

Source

Assign

Pan

Aux

EQ

Fader

1

1

3

2

4

MIC/LINE

TAPE

R

EVEN

L
ODD

C

AUX 1

AUX 2

OFF

HIGH

MID

LOW

-12

+12

-12

+12

-12

+12

0

0

0

10

9
8
7
6
5
4
3
2
1
0

2

1

3

2

4

MIC/LINE

TAPE

R

EVEN

L
ODD

C

AUX 1

AUX 2

OFF

HIGH

MID

LOW

-12

+12

-12

+12

-12

+12

0

0

0

10

9
8
7
6
5
4
3
2
1
0

3

1

3

2

4

MIC/LINE

TAPE

R

EVEN

L
ODD

C

AUX 1

AUX 2

OFF

HIGH

MID

LOW

-12

+12

-12

+12

-12

+12

0

0

0

10

9
8
7
6
5
4
3
2
1
0

4

1

3

2

4

MIC/LINE

TAPE

MIXER

Track

Source

1

2

3

4

RECORDER

0

10

Channel

Effect

Assign

Aux

1

1

3

2

4

0

10

2

1

3

2

4

AUX

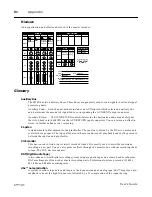
TRACKING

SHEET

Title: 

Step: 

Process: 

Notes: 

Date: 

Start

POSITION

Stop

X

the Big Beat

4

Jan 1st

Mixdown

   Lots of reverb on vocals and
flanger/delay on instruments to
get that big beat sound.

0005

0499

Lead &
backing
vocals

X

X

Synth
& MIDI
Organ

Drum
Machine

Bass

X

Vocal
reverb

Flanger
delay

Содержание MT4X

Страница 1: ...AUX 1 AUX 2 R EVEN L ODD MIC LINE TAPE ASSIGN C 10 9 8 7 6 5 4 3 2 1 0 MIC LINE 4 HIGH GAIN MID LOW AUX PAN 1 3 2 4 LINE MIC 12 12 12 12 12 12 AUX 1 AUX 2 R EVEN L ODD MIC LINE TAPE ASSIGN C 10 9 8 7...

Страница 2: ...f you can not locate the appropriate retailer please contact Yamaha Corporation of America Electronic Service Division 6600 Orangethorpe Ave Buena Park CA 90620 This applies only to products distribut...

Страница 3: ...designed to be used with Chrome tape CrO2 tape Bias HIGH or TYPEII position EQ 70 s It will not work properly with Ferrichrome tape formulations You may experience high frequency distortion if you us...

Страница 4: ...rom microphones to electronic instruments Each channel has a three band equalizer HIGH MID and LOW giving you flexible tone shaping capabilities Dual AUX SEND and AUX RETURN stereo connectors allow yo...

Страница 5: ...0 9 8 7 6 5 4 3 2 1 0 1 3 2 4 0 10 0 10 0 10 0 10 0 10 0 10 MIN MAX CUE LEVEL MONITOR SELECT STEREO CUE MONITOR PHONES MIC LINE 3 HIGH GAIN MID LOW AUX PAN 1 3 2 4 LINE MIC 12 12 12 12 12 12 AUX 1 AUX...

Страница 6: ...esponding channel The tone of the signal is adjusted through the equalizer and the volume at the channel faders It is then sent to the bus lines using the ASSIGN keys and PAN control Bus Lines There a...

Страница 7: ...H GAIN MID LOW AUX PAN 1 3 2 4 LINE MIC 12 12 12 12 12 12 AUX 1 AUX 2 R EVEN L ODD MIC LINE TAPE ASSIGN C 10 9 8 7 6 5 4 3 2 1 0 0 0 0 MIC LINE 2 HIGH GAIN MID LOW AUX PAN 1 3 2 4 LINE MIC 12 12 12 12...

Страница 8: ...SIGN C 10 9 8 7 6 5 4 3 2 1 0 0 0 0 2 4 7 6 5 3 1 10k 20k 1k 100 20 15 10 5 0 5 10 15 FREQUENCY Hz RESPONSE dB 50 5k 2k 500 200 3 AUX controls This rotary control is used to send the channel signal af...

Страница 9: ...ols adjust the level of the auxiliary return signal 0 MONITOR SELECT keys These keys are used to select the group buses the stereo bus and the cue bus signals The signals are routed to the MONITOR OUT...

Страница 10: ...when the power is turned on Note The tape speed cannot be changed while the tape transport is in motion Press the STOP key W then press the tape speed select key NOISE REDUCTION SYSTEM 1 2 3 4 TRACK...

Страница 11: ...e current setting but does not clear the memory points M AUTO PUNCH I O key This key is used to start and cancel the automatic punch in out function See Using the automatic punch in out function on pa...

Страница 12: ...the MT4X in record standby mode Once you press the PLAY key T recording will begin Press the key again to pause the recording T PLAY key and indicator U REW key This key is used to rewind the cassette...

Страница 13: ...status of the automatic punch in out function See Using the automatic punch in out function on page 21 a MEMO indicators These indicators illuminate when their respective memory points have been set b...

Страница 14: ...NE INPUT connections Input impedance 10 k Nominal input level 10 dB to 50 dB These 1 4 phone connectors are used to input microphones electronic instruments and line level sources i AUX RETURN 1 2 con...

Страница 15: ...OWER switch This switch turns the power on and off Note Always make sure the Master fader C is set to 0 and the MONITOR PHONES level control is set to MIN when turning the MT4X on or off CAUTION FOR C...

Страница 16: ...REO OUT L R MONITOR OUT L R MIC LINE INPUT 3 1 2 4 TAPE OUT 3 1 2 SYNC 4 AUX SEND 1 2 R R Sequencer Rhythm Programmer MIDI Converter FSK Signal MIDI OUT MIDI IN MIDI OUT Delay Processor Multi effect S...

Страница 17: ...y recorded tracks Punch in out recording Correct mistakes or add short segments to an existing track Ping pong recording Bounce several existing tracks onto another track Mixdown Mix the results of yo...

Страница 18: ...rotate the control fully clockwise to the MIC setting If you have plugged a synthesizer into the connector or are running a bassguitar or guitar through a signal processor line level output rotate th...

Страница 19: ...els If you set the levels too low you will be able to notice tape noise If you set the levels too high the tape will be saturated and distortion will result Therefore you should set the recording leve...

Страница 20: ...ne repeat the previous steps If the problem with the recording was a musical error press the REC PAUSE key and repeat steps 12 to 14 If the problem was due to incorrect recording levels or other engin...

Страница 21: ...lash 6 Press the MONITOR SELECT CUE key 7 Press the PLAY key to playback the tape As the tape plays adjust the CUE LEVEL controls for the selected tracks Set the monitor volume with the MONITOR PHONES...

Страница 22: ...e tape Play the part again 15 When the track is complete press the RETURN TO ZERO key to stop and rewind the tape The indicators above the REC PAUSE and PLAY keys switch off and the REC SELECT TRACK i...

Страница 23: ...in out function you specify the punch in and punch out locations The operation is then carried out automatically If you make a mistake you can repeat the operation with precision 1 Connect the input...

Страница 24: ...tion of about 1 second for your punch in and punch out locations This is because of the gap between the erase head and record playback head Otherwise you may find that you have accidentally erased mat...

Страница 25: ...er the punch out location becomes the post roll point The OUT indicator will switch off the START indicator will begin flashing and the tape is automatically rewound back to the pre roll point When ta...

Страница 26: ...nd back to the pre roll point When tape is rewound the AUTO PUNCH and START indicators will light and the indicator above the REHE key will flash rapidly If you are satisfied with the working points y...

Страница 27: ...l point When tape is rewound the AUTO PUNCH and START indicators will light Check the recording 11 Press the PLAY key again to play back the tape The MT4X will automatically play from the pre roll poi...

Страница 28: ...point see step 5 Mark the punch out point see step 6 The tape is rewound waiting for rehearsal also see step 6 Rehearsal mode see step 8 The tape is rewound ready for recording see step 9 Recording m...

Страница 29: ...Play the punch in part 5 Press the PLAY key at the punch out location The indicator above the REC PAUSE key switches off and the REC SELECT TRACK indicator resumes flashing You could also use the STOP...

Страница 30: ...punch in location step on the footswitch again The indicator above the REC PAUSE key lights Play the punch in part 7 Step on the footswitch at the punch out location The indicator above the REC PAUSE...

Страница 31: ...position for the source tracks 3 On each of the source tracks use the ASSIGN keys and the PAN control to select the group bus for the destination track 4 Press the REC SELECT key for the destination t...

Страница 32: ...SELECT TRACK indicators resume flashing Check the recording 13 Release the MONITOR SELECT GROUP key corresponding to the destination track and press the CUE key 14 Adjust the CUE LEVEL control of the...

Страница 33: ...ape 8 Press the REC PAUSE and PLAY keys to start recording When the recording is finished press the RETURN TO ZERO key to stop and rewind the tape 9 Check the recording Ping pong notes Avoid ping pong...

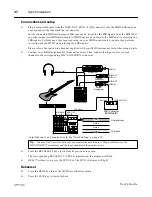
Страница 34: ...he stereo inputs of the master recorder into the STEREO OUT connectors g 2 Connect any external signal processors to the MT4X Plug a compatible cable from the AUX SEND connector j into the input conne...

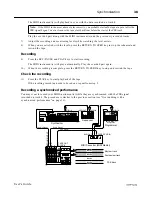
Страница 35: ...stop the rehearsal and rewind the tape Recording 8 Insert a tape into the master recorder 9 Start recording on the master recorder Press the PLAY key on the MT4X to start playback Check the recording...

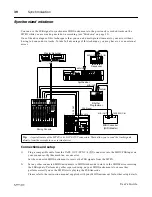
Страница 36: ...ou are laying down your basic tracks using a MIDI sequencer or rhythm machine to set the tempo Some MIDI sequencers and rhythm machines are already equipped with a SYNC OUT connector You can plug this...

Страница 37: ...e REC SELECT TRACK indicator on the display will flash 8 If dbx system is on press the SYNC key K The SYNC indicator on the display will light 9 If you are going to record audio signals from the MIDI...

Страница 38: ...IDI sequencer or rhythm machine cannot accept FSK signals you may need a MIDI FSK converter such as the Yamaha YMC10 You need to plug the MIDI FSK converter in between the MT4X and your MIDI instrumen...

Страница 39: ...input source for each channel to the corresponding MIC LINE INPUT connector Adjust the input and monitor levels See Overdubbing on page 19 3 Press the REC SELECT keys for the tracks you want to recor...

Страница 40: ...AY key to start playback of the tape If the resulting recording needs to be redone repeat from step 5 Recording a synchronized performance You may want to record your MIDI instrument s while they are...

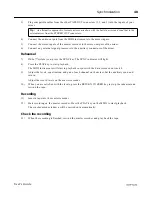
Страница 41: ...r Set the connected MIDI instrument to receive the FSK signals from the MT4X 2 Set any other connected MIDI instruments to MIDI clock mode to slave to the MIDI device receiving the FSK signals Perform...

Страница 42: ...the data recorded on track 4 9 Adjust the levels equalization and pan of each channel on the mixer Set the auxiliary send and return Adjust the record levels on the master recorder 10 When you are sa...

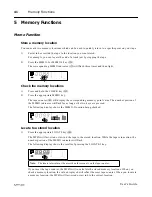
Страница 43: ...sed The following display shows the MEMO 2 location being checked Locate to a stored location 1 Press the appropriate LOCATE key P The MT4X will fast wind or rewind the tape to the stored location Whi...

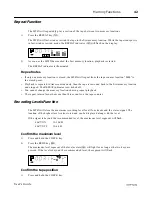
Страница 44: ...cator is switched off You cannot change the memory locations during repeat playback The repeat interval must be more than three counts on the tape counter Recording Levels Function The MT4X will store...

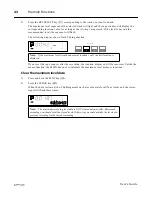
Страница 45: ...4X does not re calculate the maximum level memory locations Clear the maximum level data 1 Press and hold the STOP key W 2 Press the CLEAR key L When the data is cleared the 20 dB segments on the leve...

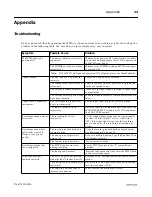
Страница 46: ...ct position The fader or monitor is set incorrectly Raise the fader for the input module Make sure the MONITOR SELECT switch is set to CUE and adjust the CUE LEVEL control Recordings sound noisy or di...

Страница 47: ...directions on the kit carefully wiping the record playback head and the capstan with a swab soaked in cleaning solution It is best to clean the pinchroller with a non alcohol based rubber cleaning so...

Страница 48: ...input level 56 dB GAIN control MAX input fader maximum Maximum input level 10 dB GAIN control MIN headroom margin AUX RETURN L R 1 2 Input impedance 10 k Nominal input level 10 dB AUX RETURN LEVEL con...

Страница 49: ...STEREO OUT GAIN control MIN Equalizer LOW 12 dB at 80 Hz Shelving MID 12 dB at 1 kHz Peaking HIGH 12 dB at 12 kHz Shelving Recorder Frequency Response 40 Hz to 18 kHz 3 dB Tape speed 9 5 cm sec dbx N...

Страница 50: ...L R OUT OUT AUX SEND MONITOR R L PHONES MONITOR PHONES INPUT MIC LINE 4 3 2 dbx R P PAN AUX LOW MID GAIN HA EQ BA TAPE MIC LINE CUE LEVEL METER dbx R P PAN AUX LOW MID GAIN HA EQ BA TAPE MIC LINE CUE...

Страница 51: ...E R EVEN L ODD C AUX 1 AUX 2 OFF HIGH MID LOW 12 12 12 12 12 12 0 0 0 10 9 8 7 6 5 4 3 2 1 0 2 1 3 2 4 MIC LINE TAPE R EVEN L ODD C AUX 1 AUX 2 OFF HIGH MID LOW 12 12 12 12 12 12 0 0 0 10 9 8 7 6 5 4...

Страница 52: ...DI organ EQ boost in lower range 0042 0499 Synth MIDI Organ MIDI Organ X X Rotary speaker effect X R EVEN L ODD C AUX 1 AUX 2 OFF HIGH MID LOW 12 12 12 12 12 12 0 0 0 10 9 8 7 6 5 4 3 2 1 0 Input Chan...

Страница 53: ...gital Audio Tape A two channel 16 bit digital recording system using magnetic tape and a rotary head mechanism DAT machines are often used as master recording units Professional units can record at 33...

Страница 54: ...el module includes a GAIN control that can alter the input levels to compensate for line instrument or microphone levels Head A transducer used to convert electrical impulses into patterns of magnetis...

Страница 55: ...notes The PITCH control changes the pitch of a playback by fine tuning the speed at which the tape passes over the head Post fader MT4X s auxiliary sends are configured post fader which means that the...

Страница 56: ...1 AUX 2 OFF HIGH MID LOW 12 12 12 12 12 12 0 0 0 10 9 8 7 6 5 4 3 2 1 0 2 1 3 2 4 MIC LINE TAPE R EVEN L ODD C AUX 1 AUX 2 OFF HIGH MID LOW 12 12 12 12 12 12 0 0 0 10 9 8 7 6 5 4 3 2 1 0 3 1 3 2 4 MIC...

Отзывы: