background image

Chapter 3  

Main Panel Window

DME Designer Owner’s Manual

80

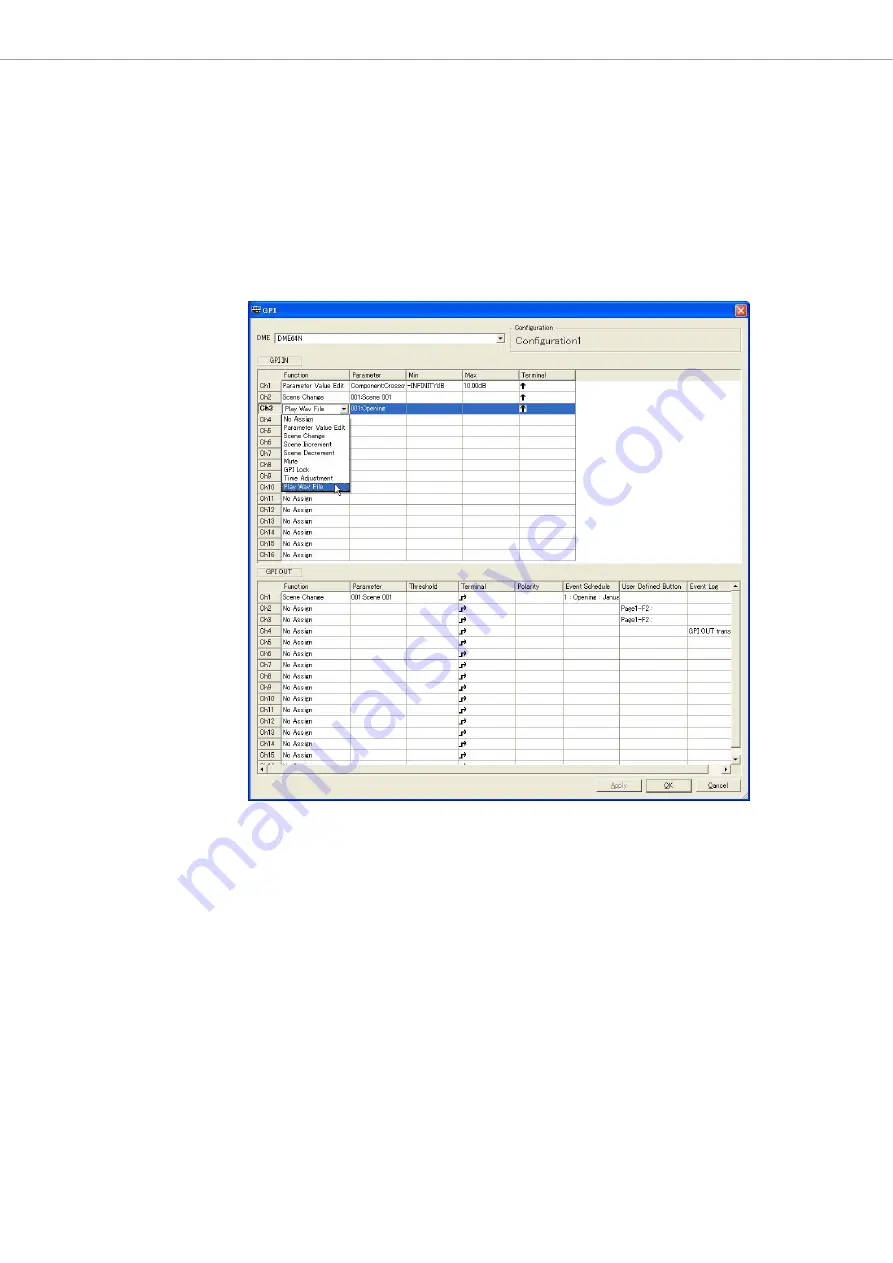
GPI IN

The DME64N has 16 GPI IN channels, and the DME24N has 8 GPI IN channels.
These settings determine which DME parameters will be controlled by input received at each 
individual GPI IN channel. The channel numbers are shown in the leftmost column.

[Function]

Specifies the function to be controlled by GPI input. Click to see a list from which you can choose 
the function to be assigned to the corresponding GPI IN channel.
The nine available functions are: [No Assign], [Parameter Value Edit], [Scene Change], [Scene 
Increment], [Scene Decrement], [Mute], [GPI Lock], [Time Adjustment], [Play Wav File].
The [Parameter], [Min], [Max], and [Terminal] items will change according to the selected function.

• [No Assign]

No function assigned. This is the default setting.
Select [No Assign] to clear an assigned function.
The [Parameter], [Min], [Max], and [Terminal] items are not available.

Содержание DME Designer

Страница 1: ...EN OWNER S MANUAL OWNER S MANUAL Version 1 2 Version 1 2 ...

Страница 2: ...software or reproduction of this manual in whole or in part by any means is expressly forbidden without the written consent of the manufacturer Yamaha makes no representations or warranties with regard to the use of the software and documentation and cannot be held responsible for the results of the use of this manual and the software This disc is a CD ROM Do not attempt to play the disc on an aud...

Страница 3: ...t level for a system built using DME Designer At least one zone must be located within the area Zone Specifies a space that has individual sound effects within the area and creates DME connection conditions You can create and switch between multiple configurations Configuration Information related to the layout and connection of components in a zone Scene Information related to configuration assig...

Страница 4: ... Name All On Opening Band Set 1 Band Set 2 Band Set 3 Preset All On BGM MC Band 1 Band 2 Band 3 Configuration Output Processor for Hall Output Processor for Hall Output Processor for Hall Output Processor for Hall Output Processor for Hall Preset All On BGM MC Band Band Band User Defined Button Scene Manager DME 1 Configuration Output Processor for Dome Local parameter link settings External devic...

Страница 5: ...dio processing Local parameter link settings This information is necessary to allow linked operation between similar parameters within a single DME unit External device settings This information is necessary to allow control of component parameters from external devices Independent settings are required for each external device The following external devices can be used MIDI controller MIDI Contro...

Страница 6: ... Compile Priority function in the Preferences dialog box page 209 Delay time can now be displayed for each component by using the Show Signal Delay function page 246 Monitoring points can now be edited by using the Monitoring Point List dialog box page 247 The status of connections in a configuration can now be analyzed in advance by using the Analyze function without connecting the DME unit page ...

Страница 7: ...hanges Fade ON OFF and Fade Mode changes Fade time changes Parameter link setting changes When a scene store is executed that scene becomes the current scene Wave files can be saved as DME data files and are included in import export operations page 32 Wave files can be saved in the Wav file library Event Log events can be output via GPI page 115 The on line indicator appears as a button which can...

Страница 8: ...Wiring Wire Auto Single to Right Wire Auto Multi to Right Wire Auto Single to Left Wire Auto Multi to Left Delete Wire It is now possible to simultaneously edit multiple objects of the same type Example Change the thickness or color of multiple wires at once Files related to user modules user module files library files user module editor files can be combined and exported imported as a single file...

Страница 9: ...ix and Matrix Mixer components has been changed to through 0 0 dB Snap copy is possible page 274 Snap can be retained until the application is quit or another file is opened Security status is displayed in the user module editor status bar Multiple controllers can be selected by clicking while holding the Ctrl key when the editor is in the design mode page 286 Picture Text Box Ellipse and Frame ha...

Страница 10: ...arameter List 124 Component Lock 127 Wav File Manager 128 DAW Control 132 Shortcut Keys 134 Backup 135 Chapter 4 Designer 136 Editing Configurations 136 Designer Window 137 Designer Window Menu 144 Toolkit Window 152 Objects 156 Design Window Shared Settings and Operations 207 Drawing and Editing Wires 219 Adding Deleting and Renaming a Zone 231 Adding Deleting and Renaming a Configuration 233 Are...

Страница 11: ...rted from the Start menu DME Designer is used with one user logged on The user logs on when the software is started DME Designer Start Up and Logon When Auto Logon Is Not Set 1 Click Start All Programs YAMAHA OPT Tools DME Designer DME Designer The Log On dialog box will be displayed 2 Click the at the right of the User box and select the user If no user has been created only Administrator will ap...

Страница 12: ...c logon has been set the Log On dialog box will not be displayed The user set for automatic logon will be logged on With automatic log on even if a password is set for a user it will not be requested during log on This is useful when logging on a specific user Starting by Opening a Project File DME Designer starts when a project file with a saved configuration is opened When the project file is op...

Страница 13: ...e Main Panel window File menu When you try to close DME Designer Project File has been modified Save will be displayed in a dialog box 2 To save the file click Yes To close without saving click No If you click Yes the file currently saved with the same name will be overwritten If the file has not been saved the File Save dialog box will always be displayed NOTE Sometimes the Project File has been ...

Страница 14: ...itor window Resource Meter window and others Main Panel Window Menus and buttons are available in the Main Panel window The current DME Designer environment including the active scene and zone the currently logged on user name and the connection status to the DME unit are displayed on the right side of the Main Panel window Main Panel Window Designer Window Component Editor Window Resource Meter W...

Страница 15: ...nfiguration of each DME unit Within the Configuration window are the User Module windows where you can assemble often used components into presets the Toolkit window which displays objects used in the other windows as the basic building blocks for sound designs and the Navigator window which lets you grasp the overall status of the system at a glance Area Window The Area window is used for designi...

Страница 16: ...uration of each DME unit contained in the Zone window By arranging and connecting components audio processors like mixers compressors effects and crossovers along with parts like faders and meters in the Configuration window you can create things like complex processors or matrix mixers that determine the actual internal structure that operates each DME unit User Module Window The User Module wind...

Страница 17: ...me for the parts that are arranged in the various design windows such as the Area Zone Configuration and User Module windows Objects are always laid out in the Toolkit window Only the appropriate objects for each window are displayed The blocks displayed at the higher level of the Toolkit window in particular are called components This refers to each type of processor that operates the DME Object ...

Страница 18: ... time as the designer window and provides a guide when creating configurations The usage percentage also depends on the sampling frequency at which the DME unit is set to operate Make sure that the usage percentage is kept below 100 Window Operations Operations in all windows are the same as for normal Windows applications The windows are controlled with the Minimize Maximize Restore and Close but...

Страница 19: ...an logon by specifying the name and password for a user that has been set as the administrator The administrator can build the system as a whole or apply function limitations that let other people edit Administrators or other people that can use DME Designer are called users The user name for the currently logged on user appears below User on the Main Panel window The default user named Administra...

Страница 20: ...re is an Exit button This closes the application without logging on a user 5 Cancel Button When the Log On dialog box is displayed after a user is logged off there is a Cancel button instead of an Exit button This cancels the logoff The original user will continue to be logged on Logon Procedure 1 Click at the right of the User A drop down list of user names will be displayed 2 Click the user you ...

Страница 21: ...l window 1 Click the File menu Log Off command on the Main Panel window Log on the next user in the Log On dialog box Automatic Logging On With the auto logon function you can have a specified user automatically logged on when the application is started If you enable the auto logon feature the specified user will be logged on when the application is started without displaying the Log On dialog box...

Страница 22: ...creating new ones and saving them are found in the File menu of the Main Panel window Creating New Project Files Project files are created using the File menu New command in the Main Panel window 1 Click File menu New in the Main Panel window Since the currently open project file must be closed before a new one can be created a Project file has been modified Save dialog box will be displayed 2 To ...

Страница 23: ...layed in this box Click the on the right to move to another folder The large box below displays the contents of the folder in this box 2 Up One Level Button Moves to the folder one level higher in the hierarchy 3 Create New Folder Button Creates a new folder in the folder currently being displayed 4 Views Button Changes the way the folder content list is displayed If you click this button a menu a...

Страница 24: ...e displayed as asterisks in the Password box Confirm Password Box Enter the password once again to confirm it Enter the same password as was entered into the Password box The characters you enter will be displayed as asterisks the same as in the Password box Save Button Saves the project file If the characters entered into the Password and Confirm Password boxes were not the same a Password is dif...

Страница 25: ...e As command Enter a filename and specify the folder where the file will be saved Saving a File with a New Name With the File menu Save As command in the Main Panel window you can save the currently open file with a new filename When saving for the first time this creates a new file A file that has already been saved with a name will be saved as a separate file 1 Click File menu Save As in the Mai...

Страница 26: ...red into the ID box To change it enter another ID into the box When using Save As to save a password protected file the dialog box will be displayed with the ID and password boxes automatically filled in with the ID and password that were assigned to the original file To change the ID and password enter new ones into the boxes 4 Enter the desired password into the Password box You can enter up to ...

Страница 27: ...ore another one can be opened a Project file has been modified Save dialog box may be displayed Open Command Project files are opened using the File menu Open command in the Main Panel window 1 Click File menu Open in the Main Panel window A Project file has been modified Save dialog box may be displayed 2 Click the Yes or No button The Open dialog box will be displayed 3 Selects the file to be op...

Страница 28: ...tton on the Enter ID Password dialog box the Wrong ID or password dialog box will be displayed Click the OK button and enter the correct ID and password the Enter ID Password dialog box Opening a Project File from the Recently Used Files List Recently used project files are displayed on the File menu in the Main Panel window If you click one of the filenames you can open that project file If secur...

Страница 29: ...ject file must be closed before another one can be opened Therefore a Project file has been modified Save dialog box will be displayed If security is set for the project file the Enter ID Password dialog box will be displayed Enter the ID and password to open the file Closing Project Files You cannot have multiple project files open simultaneously in DME Designer To close the currently open projec...

Страница 30: ...e files have ddf as the extension for their filenames DME Data Import This imports DME data file settings into a DME included in the current configuration 1 Make active the configuration that arranged the DME into which you are going to import If there are multiple configurations display the window in front for the configuration that arranged the DME to which you are going to import 2 Click the Fi...

Страница 31: ...ed in the current configuration will be displayed on the Import DME Configuration submenu Create New DME creates a new DME and imports settings NOTE Only users for whom the Operation Security Edit checkbox in the Security dialog box has been checked can import DME data For information about user security levels see Security Creating Users and Making User Settings on page 55 NOTE If DME data file i...

Страница 32: ...w in front for the configuration that arranged the DME from which you are going to export 2 Click the File menu in the Main Panel window and move the mouse cursor over Export DME Configuration A submenu will be displayed 3 On the submenu click on the DME from which you will export settings The Save As dialog box will be displayed 4 Enter the filename Determines whether a selected file type will be...

Страница 33: ...Chapter 2 DME Designer Overview DME Designer Owner s Manual 33 Export DME Configuration Submenu The DMEs included in the current configuration will be displayed on the Export DME Configuration submenu ...

Страница 34: ...nd external devices in the Zone window See Zone Window on page 237 Objects on page 156 Design Window Shared Settings and Operations on page 207 5 Placing Components Place components and user modules in the Configuration window See Configuration Window on page 242 User Module on page 250 Types of Components on page 259 6 Component Logical Connections Use wires to connect the components and user mod...

Страница 35: ...on Install the USB MIDI driver or DME N Network driver in the computer See separate DME Designer Installation Guide for details 3 MIDI Driver Setup Make the necessary settings for the MIDI driver installed in the computer If the driver is set up already check the settings before going online See separate DME Designer Installation Guide for details 4 MIDI Driver Port Setup The MIDI Setup dialog wil...

Страница 36: ...indow Current Scene page 42 See Scene Manager on page 63 8 Display the Synchronization dialog box Click Synchronization in the Tools menu or the large Synchronization button on the toolbar When the dialog box opens a list of connected DME units will be obtained DMEs connected to the computer are displayed in the Network list NOTE When requesting the Synchronization dialog box a one time alert will...

Страница 37: ...unit IP address that matches the DME currently in the DME Designer 10 Going Online Clicking the Go On Line button displays a dialog box where you can decide the synchronization method Click the Designer DME direction button Transfer of the configuration will begin and DME Designer will be synchronized with the unit If there are many zones this process may take time NOTE IP addresses are displayed ...

Страница 38: ...ow On Line button will light up The dialog box will close automatically if Close this window after synchronization is checked To go off line click either the ON Line button in the main panel window or the Go Off line button in the Synchronization dialog box NOTE It may not be possible to go online if a scene has not been stored when Recall Safe is selected ...

Страница 39: ...file is displayed at the right When a new project file has been opened or has not yet been saved Untitled will be displayed for the file name Tool Buttons Small Frequently used commands are arranged here as buttons When a command cannot be used its button will be grayed out Log On User Title Bar Menu Bar Tool Buttons Small Tool Buttons Large Mute Button Current Scene Current Zone Communication Sta...

Страница 40: ...res operations undone with the Undo button back to their original condition Redo on the Edit menu page 47 User Defined Button Opens the User Defined Button dialog box See User Defined Button on page 49 Word Clock Button Opens the Word Clock dialog box See Word Clock on page 49 GPI Button Opens the GPI dialog box See GPI on page 49 MIDI Button Opens the MIDI dialog box See MIDI on page 49 Parameter...

Страница 41: ...here the user control window will be displayed If you click New User Control the New User Control dialog box opens Synchronization Button Opens the Synchronization dialog box See Synchronization Dialog Box on page 76 Event Logger Button Opens the Event Logger window See Event Logger Window on page 111 Event Scheduler Button Opens the Event Scheduler dialog box See Event Scheduler Dialog Box on pag...

Страница 42: ...me of the current scene You can switch between scenes Scene Number Displays the number of the current scene A list where you can select a scene is displayed when you press the The EDIT indicator will light when a parameter has been edited after recalling or storing a scene Scene Name Displays the name of the current scene Scene Manager Button Opens the Scene Manager dialog box NOTE Press Ctrl key ...

Страница 43: ...ys the communication status between the DME unit and the computer On line Button When the DME unit is connected to a computer clicking this button alternately switches the unit s on line off line status The indicator will light when the DME unit is on line Message Transmit Receive Indicators Rx Lights when MIDI messages from the DME unit are received by DME Designer Tx Lights when MIDI messages ar...

Страница 44: ...roject If the currently open file was already given a name and saved that saved file will be overwritten The Save As dialog box will be displayed for files that have not yet been saved In this dialog box you can name the file when you save it No Button Closes the project without saving it If the file has already been given a name and saved the most recently saved version will remain as is If the p...

Страница 45: ...ject file will open Save Overwrites an already saved project file with the current changes If the file is being saved for the first time the Save As dialog box will be displayed See Project Files on page 22 Save as Saves the current project file as another file with a new name or in a new location When you select this command the Save as dialog box will be displayed See Project Files on page 22 Im...

Страница 46: ...ences on page 53 Log Off Logs off the currently logged on user Because the currently logged on user must be logged off before a new one can be logged on the Log On dialog box will be displayed so you can log on the next user See Users and Security on page 19 Exit Closes DME Designer A confirmation dialog box asking Project file has been modified Save will be displayed To save click Yes To close wi...

Страница 47: ...ommand When Redo is not possible the command will be grayed out Undo History Opens the Undo History dialog box Undoes multiple operations Also deletes the history of operations 1 List Displays all operations performed so far in order starting with the oldest You can select an operation by clicking on it 2 OK Button Undoes all operations below the one selected on the list The operation selected on ...

Страница 48: ...111 User Control This opens User Control The user controls that can be opened by the currently logged on user are displayed on a submenu If you click New User Control on the submenu the New User Control dialog box opens See User Control User Module Editor on page 279 Tools Menu Scene Manager Opens the Scene Manager dialog box See Scene Manager on page 63 NOTE Controls that are not available to the...

Страница 49: ...on page 116 Wav File Manager Opens the Wav File Manager dialog box See Wav File Manager on page 128 GPI Opens the GPI dialog box See GPI on page 79 MIDI Opens the MIDI dialog box See MIDI on page 90 User Defined Button Opens the User Defined Button dialog box See User Defined Button User Defined Parameters on page 98 DAW Control Opens the DAW Control dialog box See DAW Control on page 132 Remote C...

Страница 50: ...ox See Parameter List on page 124 Component Lock Opens the Component Lock dialog box See Component Lock on page 127 Security Opens the Security dialog box See Security Creating Users and Making User Settings on page 55 Shortcut Keys Opens the Shortcut Keys dialog box See Shortcut Keys on page 134 Backup Opens the Backup dialog box See Backup on page 135 Firmware Update Updates the DME unit firmwar...

Страница 51: ...ows Click a window name to bring that window to the front Close All Editor Windows Closes all editor windows About Menu About DME Designer Displays information about this application NOTE Each design windows within the Designer window can be switched using the Window menu in the Designer window ...

Страница 52: ...lect the desired zone and DME from the list File List A list of the files stored on the selected DME Send Button Transfers selected files from the computer to the DME Receive Button Transfers selected files from the DME to the computer Delete Button Deletes selected files from the DME NOTE Synchronization may become impossible if the Remaining Memory value the amount of remaining DME memory become...

Страница 53: ...me was changed a new project will be opened Create an empty file Opens a new project Load File Synchronization Opens the last opened file and synchronizes with the DME unit Contents Folder Specifies the folder where the images used by the Design windows and user controls are stored Click the Browse button and specify the folder Auto Save Set up the automatic file save feature Enable Auto save of p...

Страница 54: ...e is performed after the DME Designer is synchronized to the DME unit the next synchronization will be significantly faster because one the difference needs to be synchronized Check this checkbox to specify auto save after the DME Designer is synchronized to the DME unit Component Editor Tab Sets up operation of the Component Editor knobs sliders and edit boxes Refer to Changing Parameters on page...

Страница 55: ...n t need to create users for each file User Setting Restrictions Various restrictions apply depending on the security level of the user that is currently logged on The currently logged on user can edit only users at a security level lower than his or her own The currently logged on user cannot raise his or her own security level Administrator User The Administrator user is registered by default an...

Страница 56: ...et at levels 2 through 10 New users created subordinate to users at level 2 can be set at levels 3 through 10 New users can be created no higher than one level below the user that created them Scene sets the level for storing and recalling scenes The logged on user can store or recall scenes at levels equal to or lower than his or her own level For example a user at level 3 can recall scenes set f...

Страница 57: ...on is changed from ON to OFF when a password is set for the currently logged on user a Confirmation of Current User dialog box will be displayed Enter the user s password into the Password box and click the OK button If you click the Cancel button auto logon will remain ON Auto Logon User Selects the user for auto logon when Enable Auto Log On is checked The currently logged on user can set this c...

Страница 58: ...user can create multiple users at lower levels 1 Name Displays the user names The currently logged on user is displayed in bold text 2 Startup User Control Displays ON to automatically open the user control and make settings when the user is logged on 3 Add User Button Adds a user subordinate to the user selected on the list Clicking here displays the Add User dialog box Select the user that will ...

Страница 59: ...plays the Event Logger window Scene Store Recall Level Sets the level at which scenes can be stored and recalled Click the and buttons or enter a number into the box to set the level While levels 1 through 10 are available the range of levels that can be actually set varies according to the level of the user doing the setting When a user is created automatically this is set to One level lower than...

Страница 60: ...e characters you enter If you do not want to set a password the user leave the box blank Confirm Password Box Enter the password once again to confirm it When you type in the password box asterisks will be displayed instead of the characters you enter If you do not want to set a password the user leave the box blank Startup User Control When a user logs on user controls and settings which are spec...

Страница 61: ...r can be selected only if the logged on user is the Administrator If there are multiple users select the user that will be above the new user Multiple users can be created subordinate to a single user 3 Click the Add User button The Add User dialog box will be displayed 4 Enter the user name into the Name box 5 Enter the password into the Password box You can also create users with no password If ...

Страница 62: ...r to use Scene Store Recall Level and User Control Level will be set to one level lower than the user above the newly created user The initially set level will automatically be the highest level that can be set for that user To lower the level enter a larger number in the box Click the OK button and the dialog will close You can continue creating new users without closing the dialog box NOTE If th...

Страница 63: ...scene making a scene the current scene is called scene recall Scenes are recalled using the button next to the current scene on the Main Panel window or by using the Scene Manager dialog box Security for the Logged On User The currently logged on user can store recall or edit scenes that have a security level equal to or lower than his or her own User security levels are set with the Edit Store Re...

Страница 64: ...scene edit security levels Clicking here will display a list where you can change these security levels Only levels at or below the security level of the currently logged on user are displayed in the list When a user is created these settings are the same as the new user s security level but scene store and edit settings can be set lower Recall Security Displays the scene recall security level Cli...

Страница 65: ...vious scene is playing until the new level is reached If the configuration also changes the volume will rise from silence until it reaches the new value This can be set from zero to 60 seconds in 0 1 second increments Cut Button Cuts the scene selected on the list Copy Button Copies the scene selected on the list Paste Button Pastes the contents of the cut or copied scene into the scene selected o...

Страница 66: ...he scene number 999 the button will be grayed out and the insert function will not be available Delete the contents of scene number 999 before attempting to use the insert function Clear Button Deletes the contents of the scene selected on the list If the presets included in a scene are not used in another scene a Delete preset message will be displayed If the presets are not needed click the OK b...

Страница 67: ...tents stored there a new scene is created If a scene is already stored in the selected scene number it will be overwritten If Confirm Scene Store is checked on the Application tab of the Preferences dialog box a confirmation dialog box will be displayed before the scene is stored When a scene is stored the configuration parameters at that time are saved as preset parameters Presets are created aut...

Страница 68: ...mes You can also create delete and store presets or change their names DME Displays the DME Below the DME are Slot Component and AD If there are presets below them a button will be displayed When you click the it becomes a and the presets are displayed Preset Displays DME presets If you click the preset name selecting the text that is there you can change the preset name When presets are automatic...

Страница 69: ...ed preset is named New Preset Del Unused Button Deletes presets that are not used by DMEs included in the current zone NOTE Presets used in a scene cannot be deleted NOTE There is no OK button or Cancel button in the Scene Manager dialog box To close the dialog box click the Close button at the upper right of the dialog box Changes from storing recalling scenes or editing such as changing names or...

Страница 70: ...ntrol manager dialog box that can be accessed through the User Control sub menu of the main panel window View menu The user control security level for each user is set with Operation Security User Control Level in the Security dialog box For information about user security see Security Creating Users and Making User Settings on page 55 User Control Manager Dialog Box When you click User Control Ma...

Страница 71: ...ou to change it Security Level Displays the security level set for each user control Clicking here will display a list where you can change the security level User Displays the name of the user specified in User Control Clicking here will display a list of the available users NOTE Levels at or below the security level of the currently logged on user are displayed in the list ...

Страница 72: ...e Use the radio buttons to the left to select security level or user dependent control User Level Select a security level from the drop down list User Name Check a checkbox Click OK to create the specified User Control setup Delete Button Deletes the user control selected on the list OK Button Accepts the changed settings and closes the dialog box Cancel Button Closes the dialog box without changi...

Страница 73: ...ing parameter links see Creating Parameter Links on page 314 You can check the status of parameter links and edit them in the Parameter Link window Parameter Link Window When you click Parameter Link in the Tools menu the Parameter Link window is displayed You can also display the window by selecting Open Parameter Link from the context menu displayed in the user control user module editor and com...

Страница 74: ... set to ON or OFF using the Keep Offset item on the context menu that is displayed when you right click the name of a group Group Name You can select a group name by clicking on it Clicking the selected group name again will select the characters in the name allowing you to change it Clicking the plus or minus sign to the left of the group name displays or hides items that belong to that group You...

Страница 75: ...also control the DME in real time from DME Designer Operations performed in the DME Designer control editor are reflected in the DME unit and operations on the DME side are reflected in DME Designer You can not perform configuration editing using the Designer while online Offline The communication status becomes offline when editing configurations Switching Between Online and Offline You can switc...

Страница 76: ...nization dialog box is displayed The data from the current zone in the Designer is synchronized with the DME unit Here you can make settings for synchronizing the unit in DME Designer one on one with the DME that actually exists on the network Go On line Button Go Off line Button Designer Network Message Area Close this window after synchronization checkbox ...

Страница 77: ...ffline this button will be grayed out Close this window after synchronization Checkbox When this checkbox is checked the dialog window will close automatically after synchronization Designer The Designer list displays DME units arranged in the currently valid zone in the DME Designer The unit in the DME Designer is matched with a recognized IP address and they are compared one to one DME Name Disp...

Страница 78: ... devices with no relation to DMEs in Designer have gray icons IP Address Displays the DME IP address Message Area Displays a message that synchronization is in progress Reading from the DME Unit When you are offline in a condition where it is possible to go online you can read data Before this can be done configurations such as cards inserted in the slots and any connected serial devices must agre...

Страница 79: ...an switch DME scenes and change component change component parameters For hardware related information such as the connection method for GPI see the DME64N 24N Owner s Manual GPI Dialog Box When you click the GPI command on the Tools menu the GPI dialog box is displayed Sets GPI input output for the DME DME From the list select the DME where you will be making settings Configuration The current co...

Страница 80: ... be controlled by GPI input Click to see a list from which you can choose the function to be assigned to the corresponding GPI IN channel The nine available functions are No Assign Parameter Value Edit Scene Change Scene Increment Scene Decrement Mute GPI Lock Time Adjustment Play Wav File The Parameter Min Max and Terminal items will change according to the selected function No Assign No function...

Страница 81: ...ue with intermediate voltages produced the corresponding intermediate parameter values The specified Min and Max parameter values are alternately selected each time the voltage applied to GPI IN rises from below to above the median voltage The specified Min and Max parameter values are alternately selected each time the voltage applied to GPI IN drops from above to below the median voltage Example...

Страница 82: ...Scene Increment GPI input can be used to increment the scene number Parameter Min and Max are not available Terminal determines how the GPI input voltage will affect the specified parameter The scene number will be incremented each time the voltage applied to GPI IN rises from below to above the median voltage The scene number will be incremented each time the voltage applied to GPI IN drops from ...

Страница 83: ...ed parameter The scene number will be decremented each time the voltage applied to GPI IN rises from below to above the median voltage The scene number will be decremented each time the voltage applied to GPI IN drops from above to below the median voltage Same as Same as Max voltage applied to GPI IN Min voltage applied to GPI IN Median voltage Trigger Max voltage applied to GPI IN Min voltage ap...

Страница 84: ... when the voltage is below the median Mute will be alternately turned ON and OFF each time the voltage applied to GPI IN drops from below to above the median voltage Mute will be alternately turned ON and OFF each time the voltage applied to GPI IN rises from above to below the median voltage Max voltage applied to GPI IN Min voltage applied to GPI IN Median voltage MUTE ON MUTE OFF MUTE OFF Max v...

Страница 85: ... IN is above the median voltage and ON when the voltage is below the median GPI Lock will be alternately turned ON and OFF each time the voltage applied to GPI IN drops from below to above the median voltage GPI Lock will be alternately turned ON and OFF each time the voltage applied to GPI IN rises from above to below the median voltage Max voltage applied to GPI IN Min voltage applied to GPI IN ...

Страница 86: ...al switching device The internal clock time will be adjusted each time the voltage applied to GPI IN rises from below to above the median voltage The internal clock time will be adjusted each time the voltage applied to GPI IN drops from above to below the median voltage Same as Same as Internal clock time Time after adjustment 0 14 seconds Returned to 0 seconds 15 29 seconds Advanced to 30 second...

Страница 87: ...and specify on off control of 2 state parameters via an external switching device The specified Wave file will be played each time the voltage applied to GPI IN rises from below to above the median voltage The specified Wave file will be played each time the voltage applied to GPI IN drops from above to below the median voltage Same as Same as Median voltage refers to the voltage halfway between t...

Страница 88: ... parameter values to be output via GPI In this case Parameter is used to select the parameter to be output Threshold specifies the parameter threshold value Terminal and Polarity determine how the GPI voltage will be output in response to parameter changes Terminal Polarity GPI Output Ignored When value of the specified parameter is above the threshold level the output will be high and when below ...

Страница 89: ... is set in User Defined Button See User Defined Button User Defined Parameters on page 98 Event Log Event Log is shown when GPI OUT is set in Event Logger See Event Logger on page 111 Terminal GPI Output When the current scene is the same as the scene specified by Parameter the output will be high and when different the output will be low When the current scene is the same as the scene specified b...

Страница 90: ...elect the MIDI transmit channel from the list Rx Select the MIDI receive channel from the list Program Change Control Change Parameter Change Sets transmit Tx receive Rx OMNI and Echo for program change control change parameter change When ON clicking turns this OFF When OFF clicking turns this ON When OMNI is ON channel messages are received regardless of the receive channel setting When ECHO is ...

Страница 91: ... Change List The control change numbers and current settings are displayed in the list in the center No Displays the control change numbers Component Displays the assigned components Control changes that have no component assigned to them are blank If you click here a list will be displayed Usable components are on the list Click the component name to select it NOTE Because control change numbers ...

Страница 92: ...rameter selected in the Parameter box You can change the parameter by dragging the slider To make a finer setting press the Shift key while dragging the slider The value for the parameter will be shown while you are dragging the slider When you finish dragging and release the mouse button the slider will disappear The same slider is displayed whether you click the Min box or the Max box The black ...

Страница 93: ...ks Program Change Event Program numbers and the scenes assigned to them are displayed in a list No This displays program numbers from 1 to 128 Scene Displays the scene number and name of the assigned scene Program changes that have no scene assigned to them are blank When you click here a list of scenes is displayed Select the scene you want to assign All Clear Button Clears all scene assignments ...

Страница 94: ...is changed when assigning scenes numbered 129 and higher Eight banks can be used numbered from zero to seven Click the and select the bank where you will make settings Parameter Change Tab Specifies the parameter to be controlled by parameter change commands for each address Up to 128 can be set DME From the list select the DME where you will be making settings ...

Страница 95: ...eter change numbers Component Assigns components If you click here a list will be displayed Assignable components are on the list Click the component name to select it Parameter Set the assigned component link parameter When you click here a list is displayed of parameters included in the component selected in the Component box Select the parameter you want to assign ...

Страница 96: ...t key while dragging the slider The value for the parameter will be shown while you are dragging the slider When you finish dragging and release the mouse button the slider will disappear The same slider is displayed whether you click the Min box or the Max box The black part is the parameter range If you drag the left edge of the black part the Min value will change If you drag the right edge the...

Страница 97: ...DI port for the current zone used by DME Designer MIDI PORT Selects the MIDI driver used for transmitting and receiving MIDI messages Tx Selects from a list the MIDI driver used for transmitting MIDI messages Rx Selects from a list the MIDI driver used for receiving MIDI messages ...

Страница 98: ...In DME Designer user defined parameter settings are made using the User Defined Button dialog box The user defined parameter settings are shared between zone configurations User Defined Button Dialog Box When you click User Defined Button in the Tools menu the User Defined Button dialog box is displayed 1 2 3 4 Tabs Switches the set to which settings will apply You can set up to six function keys ...

Страница 99: ...r to be set directly The target parameter is specified in the Parameter field and the value to be set is specified in the Max field Scene Change Allows scene recall The scene to be recalled is specified in the Parameter field GPI OUT Allows GPI output The GPI setting is made in the Parameter field Play Wav File Allows initiation of Wave file playback The Wave file setting is made in the Parameter ...

Страница 100: ...Display box After you confirm the name by pressing the Enter key a short name will be created and displayed in the function key area as follows F1 shortnam The short name will also be displayed in the DME unit main display A short name is automatically created with up to eight characters for display as the user defined parameter name on the DME unit main screen Min Max Sets the lower and upper lim...

Страница 101: ...r A list of parameters included in the current configuration will be displayed 5 Select the parameter to assign to the function key 6 Click the LCD Display box and enter text for the user defined parameter name The LCD Display box can accept up to 23 characters but only eight characters can be displayed in the DME unit main screen When making a user defined parameter name the first eight character...

Страница 102: ...DME in the Word Clock dialog box When you click Word Clock on the Tools menu the Work Clock dialog box is displayed DME From the list select the DME where you will be making settings Clock Information Displays the word clock frequency for the DME selected in DME Clock Information Slot Information Clock Status The DME24N has only one SLOT and Cascade is not available The number of channels varies a...

Страница 103: ... 88 2kHz 96kHz Word Clock WCK IN Cascade IN OUT 64N only Clock buttons that are grayed out cannot be selected Close Button Closes the dialog box Status Meaning Indicates that there is no input signal Indicates there is an input signal and sync is possible with the current word clock Indicates there is an input signal but cannot sync with word clock clocks are different Indicates that there is no D...

Страница 104: ... is displayed Sets the monitor output destination DME From the list select the DME where you will be making settings Drop down list From the list select the card that will be the destination for the monitor output OK Button Accepts the changed settings and closes the dialog box Cancel Button Closes the dialog box without changing the settings ...

Страница 105: ...is displayed Here you can set the DME internal clock This can be set only when online The default is the computer date and time Set the date in the left box and the time in the right box You can change the numbers using the and at the right of the boxes NOTE You can close the dialog box using the Close button or by pressing Esc or Alt F4 ...

Страница 106: ...box is displayed This sets the DME unit language Language Select the language English German French Spanish and Japanese are in the list OK Button Accepts the changed settings and closes the dialog box Cancel Button Closes the dialog box without changing the settings NOTE You can close the dialog box using the Close button or by pressing Esc or Alt F4 ...

Страница 107: ...u the Open dialog box will be displayed You can perform a firmware update by specifying a firmware update file When performing a firmware update connect the DME unit and the computer When the DME update is finished the DME unit will be automatically restarted You also need to restart DME Designer NOTE If the firmware has been updated from V1 07 or lower to V1 10 or upper perform the update twice B...

Страница 108: ...e Open dialog box will be displayed 2 Select an update program with the extension DPB and click the Open button The Firm Update dialog box will be displayed The DMEs in the current zone will be displayed in a list 3 Check the DME you wish to update You can click on a checkmark to turn it ON OFF The Select All button places a checkmark next to all the DMEs The Clear All button turns OFF all the DME...

Страница 109: ...ect multiple update files for components DME Unit When performing the firmware update connect the DME unit and the computer by USB or Ethernet The USB MIDI or DME N Network Driver must be installed in the computer ICP1 To perform the firmware update the ICP1 and the zone master DME unit must be connected by Ethernet In addition the zone master DME unit must be connected to the computer as describe...

Страница 110: ...ent you wish to update You can click on the checkmark to turn it ON OFF The Select All button places a checkmark next to all the DMEs The Clear All button turns OFF all the DME checkmarks 4 Check the component you wish to update then click the Update button The component update will begin When the DME update is finished the DME unit will be automatically restarted You also need to restart DME Desi...

Страница 111: ... DME List Date Displays the date the event occurred Example Display 2004 08 24 Time Displays the time the event occurred Type Displays the event type and icon There are three event types Warning Warning event Error Error event Information Other events Zone Displays the name of the zone in which the event occurred DME Displays the name of the DME in which the event occurred Event Displays the conte...

Страница 112: ...ll be displayed in the window If All Zones is selected events will be displayed for all DMEs arranged in the zone Display button Information Warning Error Display Information Button Switches between displaying and hiding Information events When turned ON Information events are displayed in the Event Logger window Display Warning Button Switches between displaying and hiding Warning events When tur...

Страница 113: ...ly delete log files after __ days When a check is placed here log files exceeding the specified number of days are automatically deleted Specifies the number of days after which log files are automatically deleted Log file folder Specify the folder for saving log files Clicking the Browse button opens the standard operating system dialog box for specifying folders Here you can select a folder Log ...

Страница 114: ...resses and types of DME units included in the zone Click the DME from which to obtain events by placing a check next to it Output File Name Sets the file name and save location for the log file Clicking the Browse button opens the file select dialog box where you can select a file DME Log Clear Clears erases logs in the DME checked When you click this button a confirmation dialog is displayed ...

Страница 115: ... them Zone If you click here a list will be displayed Specifies a zone DME If you click here a list will be displayed Specifies DMEs Event You can turn sending of logs for each event ON or OFF Type If you click here a list will be displayed Select type of event Information Warning and Error are displayed in a list GPI OUT Sends GPI output for each event ...

Страница 116: ...DME unit during online status Scene changes parameter changes and GPI output can all be scheduled Event View Displays registered scheduling events When periodic events cyclical events are first displayed together they are displayed in order of date The order of same time events can be changed by dragging and dropping Click to select an event No Displays the event number Numbers are added from the ...

Страница 117: ...s the time for starting the event Enable Event Schedule Enables the scheduled events Add Button Adds an event Clicking here displays the Add Event dialog box If the maximum of 50 events has already been registered this button is grayed out Remove Button Deletes the event selected on the list This button is grayed out when no event is selected Edit Button Lets you edit the selected event Displays t...

Страница 118: ...ter the event name There is no limit to the number of characters Event Operation Set the operation that is executed when the event starts Operation When you click this button a list of events is displayed Specify the operation that is executed when the event starts The following three items are on the list Scene Change Changes the scene Parameter Value Edit Changes a parameter GPI Out Sends GPI ou...

Страница 119: ...e DME unit s current scene is the same as the scene specified in event scheduling the scheduled scene will not be recalled DME Unit From the list select the DME unit to which this scheduled event will apply The DMEs included in the zone are displayed in the list Component Select the component that has the parameter to be changed The list displays the components arranged for the DME that is selecte...

Страница 120: ...F or for each channel If it is set to OFF the LOW HIGH channel outputs HIGH LOW signal the HIGH LOW channel outputs LOW HIGH signal When Play Wav File is selected Scene Select a scene from the list Wave Select a Wave file from the list Wave files set by the Wav File manager can be specified Files can not be selected unless a Wav Player is included in the DME configuration ...

Страница 121: ...c event and the calendar is ignored Year Month Week Day Hour Set the period for the event using the radio buttons to the left Day Day of the week Set the conditions on the right side Select Day Day of the week and set the date and other information The items that can be set vary according to the selected period When the event period is Year All settings can be made When the event period is Month I...

Страница 122: ...cle When the event cycle is Year Only the Year setting is available When the event cycle is Month Only the Month and Week setting is available When the event cycle is Week Only the Month Week and Day settings are available When the event cycle is Day Only the Month Week Day and Day of the week settings are available When the event cycle is Hour Only the Month Week Day Day of the week and Hour sett...

Страница 123: ...und at the Yamaha pro Audio website URL below http www yamahaproaudio com DME Click to see a list and select a DME Function Select No Assign Parameter Value Edit or Level Meter Parameter Specifies the parameter to be controlled A list of parameters will be displayed according to the selection of Function Min Max Displays the minimum and maximum values for the parameter Type Selects a fader curve w...

Страница 124: ... displayed The DMEs included in the current configuration are displayed in the list Components in the selected DME are displayed in the component list Component List The components and user modules included in the DME their IDs and the component parameters are displayed in hierarchal list The AD and slot are also displayed ID Displays the component or parameter ID The following is displayed for th...

Страница 125: ...or all parameters for all DMEs When you click the Preview button the dialog box display will change and the print preview will be displayed in the center Buttons will be added to the upper part of the dialog box Print Button Prints a list of parameters Clicking here displays the Print dialog box When you click the Print button printing begins NOTE The displayed parameter values are those that were...

Страница 126: ...zontally Font Displays the set font Clicking the Font button displays the Font dialog box where you can change the font Target Set the parameters to be printed by clicking one of the radio buttons Selected Component Prints all parameters for the component selected in the list Selected DME Prints all parameters for the selected DME All DME Prints all parameters for all DMEs Close Button Ends the pr...

Страница 127: ...ttings will be transferred to the DME when the unit is placed on line The settings can only be changed while off line Select All Button Checks all component checkboxes Clear All Button Clears all component checkboxes OK Button Enters the settings and closes the dialog box Cancel Button Closes the dialog box without entering the settings NOTE The hierarchy of user components in user modules will be...

Страница 128: ...nformation Settings can be made here as well No The Wave file number is displayed in the leftmost column Numbers are added from the top in order List Name You can set up to 27 characters as a label separate from the Wave file name The Wave file name is displayed here by default File Name Up to 31 characters are displayed as the wave file name If you double click the name the file selection dialog ...

Страница 129: ...yed Select ON or OFF Next No Specifies the number for the Wave file to be played next If you click here a list will be displayed Select the number for the Wave file to be played next Stop This stops playback after this Wave file is finished playing without specifying the next wave file Since external input cannot be edited is displayed Store Button Saves the current settings in the Wav File Manage...

Страница 130: ...le cannot be used Remove Button Deletes settings from the selected line This button is grayed out when no Wave file is selected in the list Up Button Moves the selected line up one It is switched with the line immediately above The button will be grayed out if nothing is selected in the list or if No 1 is selected in the list Down Button Moves the selected line down one It is switched with the lin...

Страница 131: ...the dialog box Cancel Button Closes the dialog box without changing the settings Adding Wave Files To add a Wave file select the line where you want to add the file then click the Add button You can also add a Wave file by dragging and dropping it from the desktop to the Wav File Manager dialog box list ...

Страница 132: ...ME From the list select the DME you want to set The DMEs included in the current zone are displayed in the list DAW Type Select the DAW type The following choices are in the list Off Type1 and Type2 DAW Control Table The following can be set for each channel from 1 to 64 Function Controller Label Parameter Function Selects the function that will be changed by the DAW controller If you click here a...

Страница 133: ... displayed in a list When selected the first parameter included in the component is set in the Parameter field GPI Lock Assigns GPI Lock GPI Lock is set ON and OFF by the DAW controller When a selection has been made LOCK is displayed in the Label field Play Wav File Allows initiation of Wave file playback The Wave file setting is made in the Parameter field Wave files set by the Wav File manager ...

Страница 134: ...lay the Shortcut Keys dialog Click to select the desired shortcut item Enter New Key If assigned the current shortcut will be displayed A shortcut entered via the computer keyboard will be displayed OK Button Enters the settings and closes the dialog box Cancel Button Closes the dialog box without entering the settings ...

Страница 135: ...hecks next to multiple DMEs Folder Box Specifies the folder that will be the destination for saving and reading operations Clicking the Browse button opens the folder select dialog box where you can specify a folder The backup file name will be the DME s IP address If the folder is specified when sending DME data the file sent to the DME will be the file in the folder whose file name that matches ...

Страница 136: ...ion Security Edit checkbox in the Security dialog box has been checked can display the Designer window and edit configurations For information about the Security dialog box see Security Creating Users and Making User Settings on page 55 Edit Mode There is an Edit Mode in the Designer window When the Edit Mode is ON configurations can be edited When it is turned OFF the DME is controlled by DME Des...

Страница 137: ...le bar You can move the window by dragging the title bar There are Minimize Maximize Restore and Close buttons at the right edge of the title bar Menu Bar Commands that can be executed in the application are collected into categories on the menu bar When you click one of the categories a list of commands is displayed Title Bar Menu Bar Toolbar Toolkit Window Design Window Navigator Window Resource...

Страница 138: ...he clipboard Navigator Button page 140 Displays or hides the Navigator window Resource Meter Button page 139 Displays or hides the Resource Meter window Analyze Button Displays the Analyze dialog box and analyzes the configuration Analyze Configuration Analysis in Configuration Window page 249 Show Signal Delay Button The digital signal delay value is displayed in the Configuration window Show Sig...

Страница 139: ...n you are designing in the Configuration window it gives you a yardstick for judging the total usage percentage for DSP memory in the DME unit You cannot create a design that exceeds 100 percent usage in a single configuration window In addition the usage percentage varies depending on the sampling frequency even for the same component When the configuration is synchronized with the DME unit durin...

Страница 140: ...displayed the button changes to If you click this button the subordinate items will be hidden When the subordinate items are hidden the button changes to If you click this button the subordinate items will be displayed Subordinate items are also displayed and the button changes to when you click on an area zone configuration user module or DME device NOTE If the Matrix Mixer 64 input 64 output or ...

Страница 141: ... another Zone window is open it will be closed DME Device If you click a DME a Configuration window will be opened for that unit If that window is already open it will be displayed on top of any other windows Component Click a component and the component editor will open User Module The window specified by User Module Properties Double Click Action will open when clicked Components Included in the...

Страница 142: ...design areas See Area Window on page 235 Zone Window Used to design zone configurations See Zone Window on page 237 Configuration Window Used to design configurations for DME units arranged in a zone See Configuration Window on page 242 User Module Window Used to design user modules configurations A module that combines a number of other components yet is treated as a single component is called a ...

Страница 143: ... Manual 143 Toolkit Window The Toolkit displays objects that can be arranged in each design window The displayed contents vary according to which window is active See Toolkit Window on page 152 Displayed in the designer window Floating style ...

Страница 144: ...box will be displayed Sets the paper size and orientation Printing Each Design Window in Design Window Shared Settings and Operations page 214 Print Preview Displays a print preview of the active design window Printing Each Design Window in Design Window Shared Settings and Operations page 214 Print Prints the active window When you select this command the Print dialog box will be displayed Printi...

Страница 145: ...ected object Moves the selected object to the clipboard Copy Copies the selected object to the clipboard The selected object remains as is Paste This command pastes the object on the clipboard into the active window If there is no data on the clipboard or if the object on the clipboard is not a type that can be pasted into the active window this command cannot be used Delete Deletes the selected o...

Страница 146: ...ommand can be selected when an Area window Zone window or Configuration window is active It lets you edit the descriptive text legend displayed on the sheet in the Area window Zone window or Configuration window When this command is selected the Edit Legend dialog box will be displayed Legend Descriptive Fields in Objects page 198 Properties Opens the Properties dialog box for the selected objects...

Страница 147: ...kit Resource Meter or Navigator window A checkmark appears to the left of the command name when a window is displayed The Resource Meter window is displayed only when the Configuration window and User Module window are active Full Screen Displays in full screen mode Displays the active design window Area Zone Configuration or User Module window exclusively with it covering the entire screen A cont...

Страница 148: ... the checkmark disappears and short names are displayed Zoom In Gives a closer view of an area displayed on the screen Zoom Out Widens the area displayed on the screen Zoom To Selects the display magnification from a submenu Actual Size Returns the display to normal dimensions Fit in Window Increases or decreases the display magnification so that the sheet exactly fits the current window The entir...

Страница 149: ...t List This command can be used only when a Configuration window or User Module window is active A submenu here displays the same objects as the Toolkit window Clicking an object on the submenu then clicking the Configuration User Module window places the object in that window Component List Configuration Window in Toolkit Window page 154 Component List User Module Window in Toolkit Window page 15...

Страница 150: ...ve while in online status Probe Monitor in Configuration Window page 244 Monitoring Point List Opens the Monitoring Point List dialog box Registers points for monitoring with headphones Monitoring Point List in Configuration Window page 247 Edit Mode Turns the edit mode ON or OFF Edit Mode in Editing Configurations page 136 Sheet Opens the Sheet dialog box Sets the sheet size and background Sheet ...

Страница 151: ...dows The lower part of the menu displays the names of currently open windows A checkmark appears next to the active window When you click the name of a window that window becomes active Cascade Displays the windows overlapping one another Tile Displays the windows arranged side by side ...

Страница 152: ...in the Toolkit window The objects are categorized by type and displayed here in a hierarchy You can use the buttons to display or hide items below a particular level in the window Click the button to display the items on the next level down and the button to hide them Moving the Toolkit Window You can move the Toolkit window by dragging it If you drag the window to right or left side it will remai...

Страница 153: ...st submenu on the Tools menu or on the context menu that appears when you right click on the sheet Active Design Window Toolkit Window Area Window Area Parts List Zone Window Device List Configuration Window Component List User Module Window Component List Area Parts List Device List Component List Configuration Window Component List User Module Window DME ICP External Device Component SPX Compone...

Страница 154: ...onfiguration Window The Component List displays objects that can be arranged in Configuration windows The same objects are displayed in the Component List submenu on the Tools menu or on the context menu that appears when you right click on the sheet NOTE Configurations are added using the menu bar Tool menu Configuration dialog box Tools menu Toolkit window Device List submenu on the Tools menu o...

Страница 155: ...t displays objects that can be arranged in the User Module window The same objects are displayed in the Component List submenu on the Tools menu or on the context menu that appears when you right click on the sheet Toolkit window Tools menu Component List submenu on the Tools menu or on the context menu ...

Страница 156: ...in the sheet Name Window Where It can be Placed Displayed Explanation Zone Area Zones DME Zones DME and any cards inserted into its slots ICP Zones User defined parameter control External Device Zones External Device Component Configuration User Module User Module Audio processor Control parts SPX Component Configuration User Module SPX components User Module Configuration Combination of component...

Страница 157: ...yed in the Toolkit window or in the Area Parts List submenu in the Tools Menu If you right click on the name of a zone object located in the Area window a context menu will be displayed Zone Context Menu Open Opens the Configuration window Display Order Changes the display order of the objects according to a command in the submenu Properties Displays the Area Properties dialog box ...

Страница 158: ...not be displayed Font Button Clicking here displays the Select Font dialog box This sets the font used to display the object name For information about the Select Font dialog box see page 202 Color Button Clicking here displays the Select Color dialog box This sets the color of the object name text For information about the Select Color dialog box see page 203 Text Position Sets the location of th...

Страница 159: ...ut the Select Color dialog box see page 203 Image Button Displays an image inside the object You can use image files in the following formats BMP bmp PNG png XPM xpm and JPEG jpg Clicking here displays the Select Image dialog box Specify an image file and set its display method For information about the Select Image dialog box see page 205 OK Button Accepts the changed settings and closes the dial...

Страница 160: ...have been made for an expansion card installed in one of the DME slots the card will be displayed automatically DME24N DME64N DME24N with no I O card installed DME24N with an I O card installed in its expansion slot DME64N with no I O cards connected in slots DME64N with I O cards installed in expansion slots 1 2 and 4 ...

Страница 161: ...matically from the Configuration window Even if the I O components are deleted the wiring will remain When the DME64N Cascade Setting is Turned ON When Show Cascade Port is checked in the DME64N DME Device Properties dialog box the cascade I O components will be displayed in the Configuration window If Show Cascade Port is turned OFF in the DME64N DME Device Properties dialog box cascade I O compo...

Страница 162: ...CobraNet icon will be displayed in the DME object Object Selection To open a configuration window for a DME object arranged in the Zone window first select it by clicking on it then double click on it If you right click on the object a context menu will be displayed DME block with CobraNet card inserted ...

Страница 163: ...clipboard Delete Deletes the object you clicked on Duplicate Duplicates the object you clicked on Display Order Changes the display order of the objects according to a command in the submenu Flash Unit LEDs When selected the DME front panel will flash and will continue flashing until selected a second time Output Level When you select this command the Output Level dialog box will be displayed This...

Страница 164: ...e Select Font dialog box For information about the Select Font dialog box see page 202 Label Color Button This sets the color of the label text Clicking here displays the Select Color dialog box Port Label Color Button Sets the color for the I O port label text Clicking here displays the Select Color dialog box Color Button Sets the color of the object Clicking here displays the Select Color dialo...

Страница 165: ...card Card Label I O card names having up to 100 characters can be entered here Edit SlotN I O Port Label Button Specifies an I O port label for each slot Clicking here displays the Edit Port Label dialog box Port Style On Zone Window Specifies how the DME ports appear in the zone window Audio Port Classic Style Displays all audio ports Custom Port Style Customizes the port display Left Sets the nu...

Страница 166: ...margin for the Cascade connection audio signal Select 0 db or 18 db All DME Unit No settings for DME units other than the first unit will be automatically set to the same value as the first unit when connected These settings are grayed out after connection indicating that they cannot be changed Mixer I O Channel Here you can display and set the channel used for audio input output to a mixer If the...

Страница 167: ...ears next to it and long names are displayed If you select this command while a checkmark is next to it the checkmark disappears and short names are displayed When the Port Style On Zone Window Custom Port Style is selected labels specified here will not appear in the Zone Window Labels specified here are always displayed in the Configuration Window Edit Port Label and Type Dialog Box The Edit Por...

Страница 168: ... menu will be displayed ICP Object Context Menu Cut Cuts the selected object and moves it to the clipboard Copy Copies the selected object to the clipboard Paste Pastes the control panel object that is on the clipboard If the same control panel object exists on the sheet where you are pasting a new ICP object will be created Delete Deletes the object you clicked on Duplicate Duplicates the object ...

Страница 169: ...ays the Select Font dialog box For information about the Select Font dialog box see page 202 Back Color Button Sets the object color Click to display the Select Color dialog box Label Color Button This sets the color of the label text Clicking here displays the Select Color dialog box For information about the Select Color dialog box see page 203 User Defined Lock Sets whether user defined paramet...

Страница 170: ... context menu will be displayed AD824 AD8HR The AD824 is an eight channel analog to digital converter The AD8HR is an eight channel analog to digital converter that features a head amp with high quality sound You can connect Yamaha AD824 and AD8HR A D converters to a DME unit and control them remotely from DME Designer DME Designer has a component editor for controlling AD824 and AD8HR units If yo...

Страница 171: ... display order of the objects according to a command in the submenu Properties Displays the External Device Properties dialog box At the lowest position below External Device AD824 and AD8HR display the Serial Controlled Device Properties dialog box The other objects display the External Device Properties dialog box External Device Properties To display the External Device Properties dialog box se...

Страница 172: ...plication Box The linked application will be displayed Click the Browse button to locate and select an application Specifies the path to an application to be launched when an External Device object is double clicked File Box The linked file will be displayed Click the Browse button to locate and select a file Specifies the path to a file to be launched when an External Device object is double clic...

Страница 173: ...ox select AD824 or AD8HR then click the Properties command on the Edit menu This dialog box is the same as the External Device Properties dialog box except for Remote Remote Select the DME you will control remotely from AD824 and AD8HR DME Unit The DMEs in the current configuration will be displayed in a list Select the DME you will control remotely ID Selects an ID from 1 to 8 The default is 1 ...

Страница 174: ...ected object to the clipboard Paste Pastes the object that is on the clipboard Delete Deletes the object you clicked on Duplicate Duplicates the object you clicked on Display Order Changes the display order of the objects according to a command in the submenu Recall Component Library Recalls libraries with component parameters saved in them Clicking here displays the submenu When a library is sele...

Страница 175: ... You can enter up to 100 English characters to display over the object Width Box Specifies the width of the object in pixels Height Box Specifies the height of the object in pixels Style Sets the style of the object From the list select Plain Raised or Sunken Label Font Button Sets the font for the label Clicking here displays the Select Font dialog box For information about the Select Font dialog...

Страница 176: ...tton Sets the color for the I O port label text Clicking here displays the Select Color dialog box Color Button Sets the color of the object Clicking here displays the Select Color dialog box OK Button Accepts the changed settings and closes the dialog box Cancel Button Closes the dialog box without changing the settings NOTE For information about the Select Color dialog box see page 203 ...

Страница 177: ...ed object to the clipboard Paste Pastes the object that is on the clipboard Delete Deletes the object you clicked on Duplicate Duplicates the object you clicked on Display Order Changes the display order of the objects according to a command in the submenu Properties Displays the SPX Component Properties dialog box Recall Component Library Recalls libraries with component parameters saved in them ...

Страница 178: ...e Sets the style of the object From the list select Plain Raised or Sunken Label Font button Sets the font for the label Clicking here displays the Select Font dialog box For information about the Select Font dialog box see Select Font dialog box page 202 Label Color Button Sets the color for the label text Clicking here displays the Select Color dialog box Inputs Outputs Label Color Button Sets t...

Страница 179: ... then double click it the Slot Out component editor opens If you right click on the object a context menu will be displayed Slot Component Object Context Menu Open MY Card Editor Opens the editor for an MY Card inserted in a slot Open Slot Out Component Editor Opens the Slot Out component editor Cut Copy Paste Delete Duplicate The functions cannot be used with Slot components Display Order Changes...

Страница 180: ...ets the font for the label Clicking here displays the Select Font dialog box For information about the Select Font dialog box see Select Font Dialog Box page 202 Label Color Button This sets the color of the label text Clicking here displays the Select Color dialog box Inputs Outputs Label Color Button Sets the color for the I O port label text Clicking here displays the Select Color dialog box Co...

Страница 181: ...t Context Menu Open User Module Design Window Opens the User Module Design Window Open User Module Editor Opens the User Module Editor Cut Cuts the selected object and moves it to the clipboard Copy Copies the selected object to the clipboard Paste Pastes the object that is on the clipboard Delete Deletes the object you clicked on Duplicate Duplicates the object you clicked on Display Order Change...

Страница 182: ...files saved in the Library folder for user modules Open File Dialog Displays the file select dialog box You can recall libraries saved in folders other than the user module Library folder User Module Properties To display the User Module Properties dialog box select a user module object then click the Properties command on the Edit menu NOTE Libraries can be recalled only by users for whom Control...

Страница 183: ...displays the Select Color dialog box Inputs Outputs Labels Color Button Sets the color for the I O port label text Clicking here displays the Select Color dialog box Color Button Sets the color of the object Clicking here displays the Select Color dialog box Inputs Outputs Sets Sets the number of input output ports Enter a number into the Inputs box and Outputs box or set a value using the and but...

Страница 184: ...ssword Button Changes the password for user modules Clicking this button displays the Input Password dialog box Enter the current password and click the OK button The Set Password dialog box will be displayed and you can set a new password This button will be grayed out when Enable Security is turned OFF OK Button Accepts the changed settings and closes the dialog box Cancel Button Closes the dial...

Страница 185: ... displayed Placing Pictures There are three picture placement methods You can drop the Picture item from the Toolkit window into each design window You can double click Picture on the Toolkit window You can click Picture in the Area Parts Device List Component List on the Tools menu then click each design window When you place a picture object the Open dialog box is displayed Select the image file...

Страница 186: ...e you can change the image file If you right click on a picture object a context menu will be displayed Picture Module Object Context Menu Cut Cuts the selected object and moves it to the clipboard Copy Copies the selected object to the clipboard Paste Pastes the object that is on the clipboard Delete Deletes the object you clicked on Duplicate Duplicates the object you clicked on Display Order Ch...

Страница 187: ...out the Select Font dialog box see page 202 Label Color Button This sets the color of the label text Clicking here displays the Select Color dialog box For information about the Select Color dialog box see page 203 Port Label Color Button Sets the color of the I O port label Click to display the Select Color dialog box File Name Box Displays the path to the graphic file Browse Button Selects a gra...

Страница 188: ...number of ports to be displayed on the left Right Sets the number of ports to be displayed to the right Edit Port Label Button Sets the label and type for each port Click to display the Edit Port Label dialog OK Button Accepts the changed settings and closes the dialog box Cancel Button Closes the dialog box without changing the settings ...

Страница 189: ...gging the handles You can open the Text Properties dialog box by double clicking the box If you right click on the object a context menu will be displayed Text Object Context Menu Cut Cuts the selected object and moves it to the clipboard Copy Copies the selected object to the clipboard Paste Pastes the object that is on the clipboard Delete Deletes the object you clicked on Duplicate Duplicates t...

Страница 190: ... color of the background Clicking here displays the Select Color dialog box Draw Text Border Displays a frame around the text object If this is not checked only the text will be displayed on the sheet Text Border Style Box Sets the style of the object From the list select Plain Raised or Sunken Link Component Editor When On a Text object can be double clicked to open the component editor specified...

Страница 191: ... clicking the box If you right click on the object a context menu will be displayed Box Object Context Menu Cut Cuts the selected object and moves it to the clipboard Copy Copies the selected object to the clipboard Paste Pastes the object that is on the clipboard Delete Deletes the object you clicked on Duplicate Duplicates the object you clicked on Display Order Changes the display order of the ...

Страница 192: ...Sets the color of the box Clicking here displays the Select Color dialog box For information about the Select Color dialog box see page 203 Line Sets the line that frames the box Type Displays a list where you can select the type of line to frame the box The following types are available Solid Dash Dot DashDot and DashDotDot Size Box Sets the width of the line that frames the box This setting can ...

Страница 193: ...perties dialog box by double clicking the ellipse If you right click on the object a context menu will be displayed Ellipse Object Context Menu Cut Cuts the selected object and moves it to the clipboard Copy Copies the selected object to the clipboard Paste Pastes the object that is on the clipboard Delete Deletes the object you clicked on Duplicate Duplicates the object you clicked on Display Ord...

Страница 194: ...ialog box For information about the Select Color dialog box see page 203 Line Sets the line that frames the ellipse Type Displays a list where you can select the type of line to frame the ellipse The following types are available Solid Dash Dot DashDot and DashDotDot Size Box Sets the width of the line that frames the ellipse This setting can range from 1 to 100 pixels Color Button Sets the color ...

Страница 195: ... wire object one of three types of context menus will be displayed depending where you clicked Wire Object Context Menu Line Segment Start Wire Begins drawing a line segment from the location where you clicked Delete Wire Deletes the entire wire Cut Cuts the selected object and moves it to the clipboard Copy Copies the selected object to the clipboard Paste Pastes the object that is on the clipboa...

Страница 196: ...ire Deletes the entire wire Delete Deletes the node The nodes before and after will become directly connected Properties Displays the Wire Properties dialog box Wire Object Context Menu Termination Continue Wire Begins drawing wire from a termination node Start Wire Begins drawing a wire from the location where you right clicked Delete Wire Deletes the entire wire Properties Displays the Wire Prop...

Страница 197: ...ays a list where you can select the type of line The following types are available Solid Dash Dot DashDot and DashDotDot Line Color Button Sets the color of the line Clicking here displays the Select Color dialog box Selected Color Button Sets the color of the selected line Clicking here displays the Select Color dialog box OK Button Accepts the changed settings and closes the dialog box Cancel Bu...

Страница 198: ... one of the Legend fields displayed on the sheet the Edit Legend dialog box is displayed If you right click on the Legend the displayed context menu will have the Edit Legend command only If you click there it will display the Edit Legend dialog box The Edit Legend dialog box is used to enable disable Legend display and to set the contents displayed there You can display the Edit Legend command fr...

Страница 199: ...each field Legend Base Font Style Displays a list where you can select the font Show Legend Place a checkmark here to display the legend on the sheet Save as Default Legend Saves this legend as the default legend used when a new sheet is created When a new configuration is created it will have a legend with the same contents as this one Change for All Legends In Area Place a checkmark here to have...

Страница 200: ... the sheet Fixed Aspect Ratio When this is checked the relationship between horizontal and vertical is fixed When the value for Horizontal or Vertical changed the size of the other direction changes so that the proportions of the paper remain the same Save As Default Sheet Size When turned ON the current values will become the default for creating sheets New sheets will be created at the same size...

Страница 201: ...e 203 Image Button Displays an image as the sheet background You can use image files in the following formats BMP bmp PNG png XPM xpm and JPEG jpg Clicking here displays the Select Image dialog box For information about the Select Image dialog box see page 205 Change for All Sheets Changes all sheets so that they are the same OK Button Accepts the changed settings and closes the dialog box Cancel ...

Страница 202: ...tyle by clicking its name on the list below Normal Standard style Italic Italic or slanted text Bold Bold text Bold Italic Bold italic text Size Sets the text size The currently selected size is displayed in the box Select a size by clicking it in the list below Effects Sets effects for the text Check the effects you wish to set Strikeout Adds a strikeout line through the center of the text Underl...

Страница 203: ...ayed at the upper right of the dialog box by clicking on it in the palette Color information is displayed below the color palette If you like the color you selected click the OK button If you don t like the color you can select a new color by clicking in another location in the color palette or by dragging the cross symbol to another location there Grey colors can be selected on the tall thin char...

Страница 204: ...cted and a frame will appear around it 2 Set the color on the color palette 3 Click the Add to Custom Colors button The selected color will be added to Custom colors NOTE You can save another color in a box that already has an original color saved in it Just click on the box to select it The new color will overwrite the previous color which will be lost ...

Страница 205: ...he manner in which the image file will be displayed Center Centers the image in the object or sheet Tile Displays multiple copies of the image side by side until the available space is filled If the image file is smaller than the sheet it will be displayed repeatedly like tiles on a wall Fit Expands or reduces the size of the image to match the size of the sheet where it will be displayed File Box...

Страница 206: ... the image file Clicking here displays the Open dialog box Select a file with one of the following extensions bmp png xpm or jpg then click the Open button OK Button Accepts the changed settings and closes the dialog box Cancel Button Closes the dialog box without changing the settings ...

Страница 207: ...s command in the Designer window Print menu Graphics Ports Wires Specifies wire color thickness and type for each port type Color Sets the default color for the port and wire Width Sets the default wire width from a range of 1 to 5 Type Sets the port type NOTE The initial color and thickness of the wires produced when drawing connections are specified here The color and thickness of drawn wires ca...

Страница 208: ...Auto size based on original object If you place a checkmark here the paste duplicate position will be automatically adjusted so that the object does not overlap the original object Horizontal Pixels Box Sets the horizontal distance Vertical Pixels Box Sets the vertical distance Auto Suffix Number Turns automatic appending of sequentially numbered suffixes to the names of placed objects on or off D...

Страница 209: ...r of components that can be arranged Auto Delay Compensation This turns ON or OFF a function that automatically corrects the component delay when Fixed Delay is selected OK Button Accepts the changed settings and closes the dialog box Cancel Button Closes the dialog box without changing the settings NOTE These compile settings are reflected in online status If you change the settings in offline st...

Страница 210: ...dragging them Spacing This sets the spacing of the grid This setting can range from 2 to 99 pixels X Box This sets the spacing of the grid in the horizontal direction Y Box This sets the spacing of the grid in the vertical direction Show Grid Displays the grid Place a checkmark here to enable display and select the type of grid Line Displays the grid using lines Dot Displays the grid using dots Sa...

Страница 211: ...ension Because the DXF format uses the standard CAD file format it can be opened using CAD software DXF format files can also be opened by graphics software that support vector graphics such as Adobe Illustrator When you select this command the Export DXF dialog box will be displayed Symbols are substituted for external devices in the following three types of folders Microphone mike symbol Power A...

Страница 212: ...layed in the DXF File Name box Scale Sets the reduction ratio When the size of the sheet is large you can reduce it before exporting it Text Style Specifies the text font for output in DXF format The default is the TXT drawing font used in CAD Block Sets the block form used in the sheet Displays a list where you can select the form Block Makes the blocks rectangular and groups the text in the port...

Страница 213: ...e set for Horizontal and Vertical Custom Sizes Set a custom size by specifying the vertical and horizontal sizes of the sheet Horizontal Box Sets the horizontal width of the sheet Vertical Box Sets the vertical height of the sheet Unit Selects the unit used for setting the sheet size OK Button Saves the DXF file according to the settings in the dialog box Cancel Button Cancels the DXF file export ...

Страница 214: ...ated to printing are found on the Designer Window Print menu Print Setup When you select this command the Print Setup dialog box will be displayed Sets the paper size and orientation Paper Size Displays a list where you can select the paper size Orientation Sets the orientation of the paper Portrait Prints on the paper with its long sides vertical Landscape Prints on the paper with its long sides ...

Страница 215: ... can check the appearance of the page before printing it Print Displays the Print dialog box Close Closes the print preview window Print Prints the active window When you select this command the Print dialog box will be displayed Enter the number of copies to print into the Number of Copies box and click the Print button ...

Страница 216: ...use pointer changes shape Click the location on the sheet where you want to place the object Selecting Objects Selecting with a Click You can select an object by clicking on it If you click another object or an empty location on the sheet it will cancel selection of the object you previously clicked Selecting with Click Ctrl Key When you want to select multiple objects hold down the Ctrl key as yo...

Страница 217: ... Redo command to redo operations that have been undone Deleting Objects Objects can be deleted by selecting them and pressing the Delete key Moving Objects You can move objects by dragging them with the mouse If Snap to Grid is ON in the Grid dialog box the dragged objects will automatically align with the grid You can also move a selected object using the arrow keys If Snap to Grid is ON in the G...

Страница 218: ...and on the Edit menu Select the object for which you want to change the display order then select the appropriate command from the Display Order submenu on the Edit menu Top Moves the selected object to the top of the stack Bottom Moves the selected object to the bottom of the stack Front Moves the selected object up one level in the stack Back Moves the selected object down one level in the stack...

Страница 219: ...and destinations input side it also lets you draw connections and independent lines on the display Each wire has at least two wire nodes Between the nodes are line segments Selecting Wires and Canceling Selection You can select a line segment by clicking on it If you hold down the Alt key while clicking you will select the entire wire NOTE The color used when a wire object is selected can be set w...

Страница 220: ... only that line segment is selected If you hold down the Ctrl key while clicking you can select multiple line segments Furthermore if you drag the mouse from an empty location on the sheet so that nodes are enclosed by a box line segments between those nodes will be selected Canceling Line Segment Selection If you select another object or an empty location on the sheet it will cancel selection of ...

Страница 221: ...ultiple nodes by holding down the Ctrl key while clicking Furthermore if you drag the mouse from an empty location on the sheet so that nodes are enclosed by a box the enclosed nodes will be selected Canceling Node Selection If you select another object or an empty location on the sheet it will cancel selection of the object you previously clicked You can also cancel node selections by holding the...

Страница 222: ... to a logical signal within the hardware Component and user module hotspots normally include logical connections External device hotspots do not include logical connections Selecting Hotspots If you click a hotspot drawing will start To select press Shift click You can select multiple hotspots as follows Select a hotspot with Shift click then select additional hotspots using Ctrl Shift click Hotsp...

Страница 223: ...l and Horizontal Lines If you turn ON Prohibit Diagonal Connections in the Tools menu wires will be drawn only vertically or horizontally It will not be possible to draw diagonal wires When you select this command it is turned ON and a checkmark appears next to it If you select the command while it is ON it will turn OFF Even if Prohibit Diagonal Connections is turned OFF this function will operat...

Страница 224: ... complete the connection Drawing Start Location Start Method Hotspot Click Wire End Terminal Right click click Continue Wire on the menu Node Right click click Start Wire on the menu Line Segment Right click click Start Wire on the menu Anywhere on the Sheet Right click click Start Wire on the menu NOTE When creating diagrams the keyboard cursor keys can be used to move the mouse cursor and the En...

Страница 225: ...e will be connected to the destination hotspot you dragged and those that come after Begin dragging from the connection origin hotspot then press the Ctrl key after aligning the mouse pointer with the hotspot you will connect too A wire will be displayed below the destination hotspot Finish dragging while holding the Ctrl key down Method 2 Connect Multiple Selected Hotspots Select multiple hotspot...

Страница 226: ...ect the uppermost open hot spot to the left of the selected object and begin drawing a wire Press the F4 key to connect the uppermost open hot spot to the right of the selected object and the uppermost open hot spot to the left of the object on the right Press Shift F4 to connect the uppermost open hot spot to the left of the selected object and the uppermost open hot spot to the right of the obje...

Страница 227: ...sequential connections until no more open ports are available on either object Automatic connections will not be made over other objects Press the F8 key to clear all wires connected to the selected object Starting Drawing from the End Point Node Line Segment of an Existing Wire You can draw from the end or midway point of an existing wire If you start from a node or line segment a branch line wil...

Страница 228: ...ht clicked and you can start a branch wire from that node Drawing from Anywhere on the Sheet Right click the start position for drawing the click Start Wire on the context menu that is displayed Click the location where the line should bend then double click at the end location to finish drawing Finishing Drawing When the hotspots or already drawn wires are connected drawing is finished To finish ...

Страница 229: ...k the wire then click Delete Wire in the context menu Deleting Nodes Nodes can be deleted by selecting them and pressing the Delete key Nodes on both sides of the deleted node will become directly connected Editing by Dragging Moving Nodes You can move nodes by dragging them with the mouse When multiple nodes are selected and dragged with the mouse you can move all selected nodes simultaneously Se...

Страница 230: ...connection Logical connections are possible only in the Configuration window and the User Module window Wires in the Area window or Zone window can be drawn for display only Even in the Configuration window and User Module window you can also draw wires for display only Situations Where No Logical Connection Is Created Both sides are source output side signals Both sides are destination input side...

Страница 231: ...ne Zone List Lists the zones included in the project To change settings for a zone select it by clicking it in the list Add Button Adds a zone Clicking here displays the Please enter new name dialog box Enter a new name then click OK A zone will be added Delete Button Deletes the zone selected on the list Clicking here displays the Are you sure dialog box Click the OK button and the zone will be d...

Страница 232: ...st Clicking here displays the Enter new name for the current zone name dialog box Enter a zone name then click the OK button Close Button Closes the Zone dialog box NOTE The current name of the zone you will be renaming is displayed in the Current Zone Name box of the Enter new name for current zone name message ...

Страница 233: ...e configurations included in the zone being edited To change settings for a configuration select it by clicking it in the list Add Button Adds a configuration Clicking here displays the Please enter new name dialog box Enter a configuration name then click OK A configuration will be added Delete Button Deletes the configuration selected on the list Clicking here displays the Are you sure dialog bo...

Страница 234: ...plays the Enter new name for the current configuration dialog box Enter a configuration name then click the OK button Close Button Closes the Configuration dialog box NOTE The current name of the configuration you will be renaming is displayed in the Current Configuration Name box of the Enter new name for current configuration name message ...

Страница 235: ...icture Text Box Ellipse Wire Legend Title Bar You can move windows by dragging the title bar Zone Zones are added and deleted using the Zone dialog box You cannot perform operations such as deletion cut or copy You can change the position and design of zone objects in the Area window Double click to open a Zone window Objects You can perform edit operations such as arrange cut copy paste delete an...

Страница 236: ...than zones can be placed in the window by dragging them from the Toolkit window You can also place objects by double clicking them in the Toolkit window You can also display the Area Parts List from the Tools menu or from the context menu that appears when you right click on the sheet ...

Страница 237: ...e Picture Text Box Ellipse Circle Legend Title Bar Displays the zone name you have in the Zone dialog box There is always one zone named Zone 1 in a newly created project Configuration You can create multiple configurations within a zone but they cannot be arranged within the Zone window There is a Zone window for each configuration where devices can be arranged To switch configurations click the ...

Страница 238: ...Device List see page 154 DME Arrangement To place a DME object first drag the New icon When you drag the New icon and place it in the Zone window you also add an icon for that DME to the Toolkit window You can rename the DME in the DME Device Properties dialog box This also renames the DME icon in the Toolkit Window You can place a created DME in another configuration but you cannot place multiple...

Страница 239: ...ou also add an icon for that DME to the Toolkit window A DME added to the Toolkit window cannot be placed again in the same configuration window The DME placed in the Toolkit window will be displayed with a muted color To place multiple DMEs drag the New icon to add each DME Placing Existing DMEs When there are multiple configurations you can place existing DMEs in configurations other than their ...

Страница 240: ...ag the New icon from the Toolkit window You can place the created ICP in another configuration but you cannot place multiple identical ICPs in a single configuration If there are multiple ICPs in a hardware configuration create an equivalent number of ICP objects Placing a New ICP Subordinate to the ICP folder in the Toolkit window is the ICP1 folder Below these folders you will find a New icon Dr...

Страница 241: ...icate it has already been placed To place multiple ICPs drag the New icon to add each new ICP Placing Existing ICPs When there are multiple configurations you can place existing ICPs in configurations other than their original one Drag the ICP icon created in the Toolkit window to the Zone window The ICP will be placed in the Zone window The ICP added in the Toolkit window will be displayed with a...

Страница 242: ...ponent placed in the window the component editor will open If you double click a user module the user module will open I O Component Depending on the settings for the DME placed in the Zone window I O components will be automatically placed or added I O components can be arranged in the DME24N configuration window When Show Cascade Port is ON in the DME64N DME Device Properties dialog Cascade I O ...

Страница 243: ... of the Same Type You can arrange a number of components of the same type If there are two or more of the same component numbers will be attached to their names as follows Compressor 2 Compressor 3 and so on Multiple components placed in the configuration are independent and you can set different parameters for each of them NOTE If the Matrix Mixer 64 input 64 output or the Matrix Mixer 64 input 3...

Страница 244: ...can be used only when online with the DME and Configuration window or user module active When the probe monitor is ON no editing is possible except in the Component Editor Probe Monitor Procedure 1 Turn the probe monitor ON Click Probe Monitor in the Tools menu or the Probe Monitor button on the toolbar The shape of the mouse pointer changes 2 Click the output port you want to monitor The output p...

Страница 245: ...tor button on the toolbar to turn OFF the probe monitor When probe monitor is turned off the mouse pointer returns to its normal shape Monitoring the Second or Later Time The software remembers the location being monitored even when probe monitoring is turned OFF The next time probe monitoring is turned ON the location that was being monitored previously will be selected NOTE If the configuration ...

Страница 246: ...olbar ON and OFF settings for Show Signal Display are saved for each configuration window Switching the setting between ON and OFF in another configuration window has no effect on the current window You can edit the configuration while Show Signal Delay is turned ON Delay values for components and I O components are displayed at the lower center of the object Delay values for wires are displayed b...

Страница 247: ...t information When monitoring point information is cut information below that point moves up Copy Button Copies the selected monitoring point information Paste Button Pastes the copied monitoring point information at the selected line Insert Button The copied monitoring point information is inserted at the selected point Clear Button Deletes the selected monitoring point information NOTE Monitorin...

Страница 248: ...ou can then select components for monitoring Port R Sets the monitoring point R channel port Clicking here displays a list of ports for the component selected in the Component R field Click the port you want to monitor OK Button Updates the settings and closes the dialog box Cancel Button Closes the dialog box without changing the settings NOTE Components arranged in user modules are also displaye...

Страница 249: ...ox Because this function allows you to make sure there are no problems with component arrangement and wires without connecting to the DME unit it is useful for eliminating complier errors before executing Synchronization Message Box Displays the progress of the analysis operation When the analysis finishes the results are displayed If errors are detected during analysis they will display as shown ...

Страница 250: ...box in the Main Panel window User modules will be saved there If you do not change the setting in the Preferences dialog box the location will be C Program Files YAMAHA OPT Tools DME Designer User Modules User Module Manager When you click User Module Manager on the Tools menu the User Module Manager dialog box is displayed You can change settings rename or delete in the window that opens when you...

Страница 251: ... window If the correct password is not entered the window will stay closed When you place a checkmark here the Set Password dialog box appears Enter the same password into the Password box and Confirm Password box and click the OK button To disable user module security turn OFF the checkbox If you click the checkbox when it already has a checkmark the Input Password dialog box appears Enter the pa...

Страница 252: ...rary from the user module export file Export Button Saves the user module settings and library to the user module export file Click to display the Export dialog All features of this dialog window are the same as the standard Windows file save dialog except for the Export Library option Export Library can be sued to select the library to be saved Import Library Button Loads a file from the specifie...

Страница 253: ...oses the dialog box without changing the settings NOTE Settings in the User Module Manager dialog box are changed when you click the OK button If you mistakenly set security change the password or delete a user module you can click the Cancel button to close the dialog box and return to the original unchanged settings Please note that Import Export Import Library and Export Library will be applied...

Страница 254: ... 3 Drag the Blank User Module to the Configuration window When you release the mouse button at the location where you will place the user module the User Module Properties dialog box is displayed 4 Here you can set object properties Inputs Outputs Sets is set to 1 Set the required number of ports 5 Click the OK button A user module will be created and placed in the Configuration window The user mo...

Страница 255: ...Action and Security Settings at the lower part of the Save User Module dialog box They correspond to the same items in the User Module Manager dialog box When saved with different settings than the User Module Manager dialog box the saved settings are immediately applied Double Click Action Sets the window that opens when you double click on a user module placed in the component editor Open User M...

Страница 256: ...e asking This file already exists Overwrite will be displayed To overwrite click the Yes button To change the name click the No button and change the file name in the Save User Module dialog box NOTE When the Save User Module dialog box is displayed the name set in the user module s User Module Properties dialog box will be entered into the File name box If you change the name of a user module and...

Страница 257: ...place cut copy paste delete and move component and shape objects When you double click an object placed in the window the component editor will open Placing Components Components are placed the same as in the Configuration window You can place objects by dragging them from the Toolkit window to the User Module window You can also place objects by double clicking them in the Toolkit window The same...

Страница 258: ... can arrange a number of components of the same type If there are two or more of the same component numbers will be attached to their names as follows Compressor 2 Compressor 3 and so on Multiple components placed in the configuration are independent and you can set different parameters for each of them ...

Страница 259: ...d you can use the Component List on the Tools menu Components can be separated into groups based on types In the Toolkit window component groups are displayed as folders Some of the groups in the Toolkit window are further divided into subgroups Click the buttons to the left of the folders to display the components NOTE When the User Module window is active User Module is not present on the menu G...

Страница 260: ...nents Component List NOTE When the User Module window is active User Module is not present in the menu Group Component Variations Crossover 2 Way 3 Way 4 Way 5 Way 6 Way Crossover Processor 2 Way 3 Way 4 Way 5 Way 6 Way Crossover Processor II 2 Way 3 Way 4 Way 5 Way 6 Way Delay Long 1 Output 2 Output 3 Output 4 Output 5 Output 6 Output 7 Output 8 Output Short 1 Output 2 Output 3 Output 4 Output 5 ...

Страница 261: ...eo 7 Band 15 Band 31 Band PEQ Mono 2 Band 3 Band 4 Band 6 Band 8 Band Stereo 2 Band 3 Band 4 Band 6 Band 8 Band Fader 1 Channel 2 Channel 4 Channel 8 Channel 12 Channel 16 Channel Filter BPF Mono Stereo HPF Mono Stereo LPF Mono Stereo Notch Mono Stereo Programmable BPF Mono Stereo Programmable HPF Mono Stereo Programmable LPF Mono Stereo Meter 1 Channel 2 Channel 4 Channel 8 Channel 12 Channel 16 ...

Страница 262: ...t 16 Output Matrix Mixer 2 Input 1 Output 2 Output 4 Input 1 Output 2 Output 4 Output 8 Input 1 Output 2 Output 4 Output 8 Output 12 Input 1 Output 2 Output 4 Output 8 Output 12 Output 16 Input 1 Output 2 Output 4 Output 8 Output 12 Output 16 Output 32 Input 16 Output 32 Output 64 Input 32 Output 64 Output Pan LCR 1 Channel 2 Channel 4 Channel 8 Channel 12 Channel 16 Channel LR 1 Channel 2 Channel...

Страница 263: ...t 16 Output 12 Input 2 Output 4 Output 8 Output 12 Output 16 Output 16 Input 2 Output 4 Output 8 Output 12 Output 16 Output Source Selector 3 Position 1 Channel 4 Position 1 Channel 2 Channel 6 Channel 8 Position 1 Channel 2 Channel 6 Channel 16 Position 1 Channel Speaker Processor 1 Way 2 Way 3 Way 4 Way 5 Way 6 Way SPX Slot Slot In Component Editor Slot Out Component Editor Cascade Cascade In Co...

Страница 264: ...e Component Editor When you double click on a component located in a Configuration window the Component Editor window will open There is not just one window that is called the component editor The contents of the editor and the name on the title bar will differ according to type of component for which the window was opened Component Editor Window Structure The contents of the Component Editor wind...

Страница 265: ...nent editor parameter sets as files See Library on page 275 Graph Displays the effects of the component in a graphical format When parameters are changed the graph changes too In graphs that have control points adjust parameters by dragging the points As you drag the points the corresponding parameters reflect the changes you make Meter Displays the signal level Slider Knob You can change paramete...

Страница 266: ...isplayed You can set the action of the knobs and sliders on the Component Editor tab of the Preferences dialog box When you close the dialog box after changing settings those changes are immediately reflected in the component Knob Mode Sets how the knobs operate Slider Mode Sets the action that occurs when you click on the scale located under the sliders Edit Box Zoom Specifies whether the edit bo...

Страница 267: ...es dialog box Circular The knob is dragged following its shape as though you were drawing a circle Linear As you drag the knob to the upper the value increases Dragging it down decreases the value NOTE To make a finer setting press the Shift key while dragging the knob If you click a knob while pressing the Ctrl key the setting will return to its default value ...

Страница 268: ... dialog box Ramp When the fader bar is clicked the knob will move a preset amount in the corresponding direction Touch The slider does not move without directly touching it even if you click the mouse button Jump The slider jumps to the location where you click NOTE To make a finer setting press the Shift key while dragging the slider If you click a slider while pressing the Ctrl key the setting w...

Страница 269: ...n turned on the button lights up The color depends on the button s function In button sets of this type you can select one of several buttons When you do all other buttons in the set turn off Click here to execute a command Displays a menu When turned ON When turned OFF Click this button to switch all channels in the block ...

Страница 270: ... the Preferences dialog box is checked the edit box will zoom when the mouse is positioned over it mouse over Click Text in the selected edit box will turn red Values can be entered and edited via the keyboard It is not necessary to enter the unit Press the ENTER key to confirm the entry and display the unit Changing Values Using Spin Boxes When the mouse pointer is placed over an edit box a spin ...

Страница 271: ...on keys or the mouse wheel Up and Down Arrow Keys Increases or decreases number settings PageUp Key PageDown Key Increases or decreases number settings in large increments The PageUp key increases and the PageDown key decreases the setting Enter Key When you press the Enter key the numbers you entered will be confirmed Ctrl Key Enter Key When you press the Ctrl Enter key the setting will return to...

Страница 272: ...meter by dragging in the directions of the arrow Control points that can be dragged in any direction usually have their position determined by multiple parameters in the component editor These multiple parameters can be adjusted by dragging the point When there are multiple control points in the graph they are identified by their colors A bar with the same color as each control point can be found ...

Страница 273: ... time For more information about libraries see Library page 275 Snap Buttons A through D The Snap buttons allow you to switch between parameter sets The buttons change in appearance according to their ON OFF status and to whether or not there were changes to the parameter set from when the editor was started When there has been no change to the parameter set since the editor was started When a but...

Страница 274: ...rs in the editor to the settings you want to record 3 Click another snap button Recalling a Library 1 Click the snap button that has recorded the parameter set This turns it ON 2 The library is recalled Switching Parameter Set If you click a snap button that has a parameter set recorded the system switches to the parameter set recorded there Copying Parameter Sets Parameter sets can be copied betw...

Страница 275: ...s is called recalling them Library files have the following file name extensions cel for component editors ucl for user control editors and uml for user module editors If you store library files in folders that conform to the following path they will be automatically displayed in the component editor Recall Library menu C Program Files YAMAHA OPT Tools DME Designer Editor Library Component Group N...

Страница 276: ...without confusion when recalling Storing in the Library The library is the place to store component editor parameters Editor Window 1 Set the parameters to be stored in the library 2 Click the Store Library button in the component editor The Save Library File dialog box will be displayed 3 Enter the filename Select a filename that makes it easy to understand the contents of the parameter set 4 Spe...

Страница 277: ...mponent editor The Recall Library menu will be displayed 3 Click the library name filename in the Recall Library menu The parameters in the library will be recalled Designer Window If you right click on a component or user module in the design window a context menu will be displayed You can recall a library using the Recall Component Library command If you click Recall Component Library in the con...

Страница 278: ... not appear on the Recall Library menu You must specify the file you want in order to recall it 1 Click the Recall Library button in the component editor The Recall Library menu will be displayed 2 Click the Recall Library menu Open File Dialog The Open dialog box will be displayed 3 Move to the correct folder and select a library file 4 Click the Open button ...

Страница 279: ...create a compact control window by only including controls for parameters that are used frequently You can also lay out controls for multiple components so that you can adjust parameters for them from a single window There is also a Library button in the user control editor which you can use to save parameters to the library User controls are created by selecting View menu User Control New User Co...

Страница 280: ...ubmenu User Control Name Displays a menu of user controls included in the current configuration of the current zone Clicking one of the user controls opens the user control editor A checkmark appears next to already open windows New User Control When you select the New User Control command the User Control Manager dialog box will be displayed Here you can create delete rename and otherwise manage ...

Страница 281: ...ck the New button The New User Control dialog box will be displayed 3 Enter the name for the new user control into the Name box 4 Sets security for User Control Different settings are provided for individual security levels and users Security cannot be set higher than the user security level Click the User Level button to select a security level NOTE You can also display the User Control Manager d...

Страница 282: ...he list in the User Control Manager dialog box 6 Click the OK button in the User Control Manager dialog box When a new user control is created it will be displayed in the View menu User Control submenu in the Main Panel window If you click the control it will be displayed in a user control editor window Snap and Library appear appears in a new user control ...

Страница 283: ...ntrol is set to 2 only users at level 1 or level 2 can display or edit it Security levels for user controls can be changed in the User Control Manager dialog box by a user who has logged on at a security level equal to or higher than the user control 1 Click User Control Manager on the Main Panel window Tools menu The User Control Manager dialog box will be displayed 2 Changing User Control Securi...

Страница 284: ...r can edit user controls if a check has been placed for that user in the Operation Security Edit checkbox User controls at a level equal to or lower than the level set in Operation Security User Control Level will be displayed in the menu Using user security you can set whether user controls will open at logon or when a file is opened If Startup User Control is turned ON the user control editor wi...

Страница 285: ...tor Window Use Double Click Action in the User Module Manager dialog box or User Module Properties dialog box to set the window that will open when you double click in the Configuration window If the Open User Module Editor checkbox has been turned ON for a user module a user module editor can be opened for it For information about the User Module Manager dialog box see page 250 For information ab...

Страница 286: ...Design Mode command switches the design mode between ON and OFF A checkmark appears when the design mode is turned ON If you click in the context menu when the checkmark is present design mode will turn OFF and the edit window will return to operation mode NOTE Only users for whom the Operation Security Edit checkbox in the Security dialog box has been checked can turn the design mode ON NOTE You ...

Страница 287: ...perties page 181 User Module page 250 The lock icon will appear locked when the password has not been entered and layouts edited in the Design Mode cannot be saved When the password is entered it becomes temporarily possible to save the layout The lock icon will not appear if the Enable Security checkbox in the Properties dialog box is not checked ...

Страница 288: ...he palette disappears Commands for editing in the user control editor user module editor are provided on the edit palette Design Mode Off Button Turns OFF the design mode Undo Button Redo Button Used to undo redo operations Cut Button Copy Button Cuts or copies the selected controls See Cut Copy Paste Controls on page 303 Paste Button Pastes cut or copied controls See Cut Copy Paste Controls on pa...

Страница 289: ...ol this button arranges the controls between them at uniform intervals It puts the same amount of space between each control and its neighbor Align Vertically Button This button can be used only when three or more controls are selected It arranges the controls in a uniform vertical line Without changing the position of the uppermost and lowermost control this button arranges the controls between t...

Страница 290: ... any control that is not aligned with the grid position will cause it to align with the nearest grid Please note that after copying multiple controls in one operation from the component editor and adjusting their positions manually their positions could become disarranged when you select them by clicking on them if they do not already align with the grid interval Furthermore if you change the grid...

Страница 291: ... and operation mode When you are in design mode a checkmark will appear to the left of the command name Peak Hold Turns the peak hold meter ON or OFF and performs a reset The ON or OFF setting for peak hold applies to the whole zone On When you select this peak hold is turned ON and a checkmark appears next to it If you select this item while it is checked peak hold is turned OFF Reset Resets peak...

Страница 292: ...ode WhenYou Right Click an Empty Location Tab Order When using user control editors or user module editors this function displays the order in which you move through them by pressing the Tab key When you select this command numbers are displayed next to the edit boxes A checkmark appears next to Tab Order in the context menu To exit tab order settings click Tab Order the context menu or click anyw...

Страница 293: ...tor for the control you clicked Add Parameter to Parameter Link Adds a control to the parameter link group Click the group name displayed in the submenu See Creating Parameter Links page 314 If you click a parameter link group name a control is added to that group Property Opens the properties dialog box for the control See Control Properties on page 303 NOTE There some controls such as edit boxes...

Страница 294: ...e user control editor If you align the mouse pointer with a side or corner of the window its shape will change into a double headed arrow When the arrow is shaped like this dragging it will change the size of the window Even if you change the width of the window the library button will remain where it is in the upper right corner ...

Страница 295: ...ol editor window while in design mode then click Set Background Image on the displayed context menu Default Sets the background color to black the same as the component editor Select this if you have set the background with Color or Image and you want to return to the original background Color Sets the color of the background Use the Select Color button to select a color Select Color Button Clicki...

Страница 296: ...kground Layout Box This box displays a list where you can select how the image file will be displayed Center Centers the image in the window Tile Displays multiple copies of the image side by side until the available space is filled If the image file is smaller than the window it will be displayed repeatedly like tiles on a wall Fit Expands or reduces the size of the image to match the size of the...

Страница 297: ...rol in the component editor while in design mode the control will be selected and a red frame will be displayed around it Controls like knobs sliders edit boxes and labels are all separate objects Only the item clicked will be selected If you hold down the Ctrl key while clicking you can select multiple controls and labels If you use Ctrl click on a selected control it will cancel that control s s...

Страница 298: ...ol editor The context menu will be displayed 4 Click Design Mode on the menu Design mode will be turned ON 5 Drag the controls from the component editor to the user control editor NOTE If you drag controls like knobs and sliders edit boxes and labels that show parameter types and place them one by one in the user control editor they must be arranged in the user control editor If you select multipl...

Страница 299: ...ecking Double Click Action Open User Module Editor in the Store dialog box see Saving User Modules on page 255 for details about storing user modules 3 Double click a user module in the Configuration window The user module editor and edit windows for the components arranged in the user module will be displayed 4 Right click in the component editor or user module editor then click the Design Mode c...

Страница 300: ...ule editor press the Paste command shortcut key Ctrl V or the Paste button on the edit palette 1 Click on the source component editor window to make it active then select the control or controls you want to copy 2 Press the C key while holding down the Ctrl key The selected controls will be copied to the clipboard 3 With the target user control editor or user module editor active press the V key w...

Страница 301: ...he configuration or user module Controls for components arranged in the configuration can be copied only to the user control editor Controls for components arranged in a user module can be copied to both the user control editor and the user module Order of Controls Controls newly pasted in the user control editor will be displayed above any previously pasted controls they overlap The tab order for...

Страница 302: ...hen you select multiple controls using Shift click you can move all of them at the same time Dragging When grid is ON the upper left of the dragged controls will automatically align with the grid When dragging the coordinates displayed here refer to the upper left corner of the object being dragged The Distance to Right and Distance to Bottom are displayed in pixel units using the upper left of th...

Страница 303: ...ted by selecting them and pressing the Delete key Undo and Redo Commands During Editing You can undo or redo control movements size changes or deletions using the Undo and Redo commands in the Edit menu Control Properties A properties dialog box will open when you either double click a controller in the User Control Editor or User Module Editor or right click the controller and select Properties f...

Страница 304: ...es Dialog Box The Toggle Button Properties dialog box will appear when you either double click the ON OFF button or right click it and select Properties from the contextual menu This sets the text displayed by the button along with the color of the button Text box Enter the text to be displayed by the button You can set different text for when the button is ON and for when it is OFF Size Select a ...

Страница 305: ...utton Properties dialog box will appear when you either double click a radio button or right click it and select Properties from the contextual menu You can set the button s color size and font Color Select a color from the list White Red Yellow Green Blue or Violet Size Select a button size from the list Small 37x11 Small 44x11 Medium 75x11 Medium 74x22 or Large 111x33 Text Box Enter the text to ...

Страница 306: ...ont button Click this button to display the Select Font dialog box Sets the font font size and style For information about the Select Font dialog box see page 203 Alignment Specifies the horizontal alignment of the text Left Center or Right Rotate Rotates the text by the specified angle 90 0 90 or 180 Link Component Editor Specifies the component editor to be opened when text is clicked Text Color...

Страница 307: ... set to 60 Solid Frame Properties Dialog Box The Solid Frame Properties dialog box will appear when you right click a solid frame and select Properties from the contextual menu Here you can enter the text to be displayed Here you can set the frame size and divider location Frame Size The width is set using the Width and the height is set using Height The units are pixels Partition Line Sub Partiti...

Страница 308: ...to be displayed Here you can set the frame size and divider location Frame Size The width is set using the Width and the height is set using Height The units are pixels and the minimum value is 3 Frame Color Sets the color of the color frame Click this button to display the Select color dialog box For information about the Select color dialog box see page 203 Fill Color Sets the frame fill color C...

Страница 309: ...o the graphic file Select File Button Selects a graphic file Size Width Specifies the width in pixels Height Specifies the height in pixels Reset Button Click to display the graphic at it s original size Stretch When ON the graphic will be enlarged when a size that is bigger than it s original size is specified Link Component Editor When ON clicking the Select Component button selects the editor t...

Страница 310: ...ont Selects the font Click to display the Select Font dialog box Refer to Select Font Dialog Box on page 202 for more information on the Select Font dialog box Text Color Button Sets the text color Click to display the Select Color dialog box Alignment Selects Left Center or Right text alignment Rotate Rotates the text box Link Component Editor When ON clicking the Select Component button selects ...

Страница 311: ...ox Use Curve to select the degree of roundness Line Type Select a type of frame line from the list Solid Dash Dot Dash Dot Or Dash Dot Dot Size Sets the thickness of the frame line in pixels The range is from 1 to 100 Select Color Button Sets the color of the frame line Click to display the Select color dialog box Refer to Select Color Dialog Box on page 203 for more information on the Select Colo...

Страница 312: ... Dash Dot Dash Dot Or Dash Dot Dot Size Sets the thickness of the frame line in pixels The range is from 1 to 100 Select Color Button Sets the color of the frame line Click to display the Select color dialog box Refer to Select Color Dialog Box on page 203 for more information on the Select color dialog box Fill Color Sets the ellipse fill color when ON Select Color Button Sets the ellipse fill co...

Страница 313: ...n the user control editor or user module editor The context menu will be displayed 2 Click Tab Order in the context menu Numbers for the current tab order are displayed to the upper left of each edit box 3 Click the tab order numbers in the order in which you want to set the tab order Even if you do not want to change tab order number 1 click all the numbers in the order you desire starting from n...

Страница 314: ...lobal Link Add Group and Local Link Add Group commands create new groups Controls can be added by right clicking Adding Controls to a Group If you right click a control in the component editor a context menu will be displayed You can create groups or add controls using commands in the Add Parameter to Parameter Link submenu Groups that do not have the same type of parameters will be grayed out and...

Страница 315: ...local like groups are displayed in the Local Link submenu When you click a group name a control is added to the group Adding Multiple Controls You can select multiple controls in Design Mode When multiple controls are selected multiple parameters can be added to a group simultaneously ...

Страница 316: ...onent editor for it Name Function 1 Crossover Curve Displays the level of each frequency band distinguished by color Section Parameter Setting Range Function 2 Input Level to 10 dB Sets the input signal level 3 Output Level to 0 dB Sets the output signal level for each frequency band 4 Mute ON OFF Mutes the output signal level for each frequency band 5 Phase ON OFF Reverses the phase of the output...

Страница 317: ...tenuation for each octave and the filter type THRU turns off the filter 8 Frequency 20 Hz to 20 kHz Sets the LPF cutoff frequency 9 Gc 6 dB to 6 dB When AdjustGc Adjustable Gc is selected for Type this sets the gain for the cutoff frequency HPF Type Thru 6 dB Oct 12 dB Oct AdjustGc 12 dB Oct Butrwrth 12 dB Oct Bessel 12 dB Oct Linkwitz 18 dB Oct AdjustGc 18 dB Oct Butrwrth 18 dB Oct Bessel 24 dB O...

Страница 318: ...ve Also as you drag the points the Output Level and Frequency parameters reflect the changes you make You can adjust the Output Level parameter by vertically dragging the control point in the center of each curve You can adjust the Frequency parameter by horizontally dragging the control point at the intersection of the curves for each frequency band Changing the Output Level Parameter Changing th...

Страница 319: ...setting you can adjust Gc gain on the cutoff frequency between 6 dB and 6 dB If you set 3 dB it becomes a Butterworth filter If you set 6 dB it becomes Linkwitz Riley filter When you select Adjustable Gc the Gc knob is displayed Butrwrth Butterworth This filter has the most general characteristics The pass band is flat and the gain for the cutoff frequency is 3 dB Bessel For curves where phase cha...

Страница 320: ...e a common configuration in the component editor If you click the Crossover Compressor PEQ or Delay button in the Navigator section an editor for the crossover compressor parametric equalizer or delay will be displayed in a separate window A separate component editor will open for each output channel such as Low or Mid when you click on the compressor parametric equalizer or delay Section Paramete...

Страница 321: ...ors of the lines on the graph Crossover When you click the Crossover button for the crossover processor it opens the crossover editor window 2 Way Low High 3 Way Low Mid High 4 Way Low Low Mid High Mid High 5 Way Sub Low Low Low Mid High Mid High 6 Way Sub Low Low Low Mid Mid High Mid High Name Function 1 Crossover Curve Displays the level of each frequency channel distinguished by color Section P...

Страница 322: ...F cutoff frequency 5 Gc 6 dB to 6 dB When AdjustGc Adjustable Gc is selected for Type this sets the gain for the cutoff frequency 6 HPF Type Thru 6 dB Oct 12 dB Oct AdjustGc 12 dB Oct Butrwrth 12 dB Oct Bessel 12 dB Oct Linkwitz 18 dB Oct AdjustGc 18 dB Oct Butrwrth 18 dB Oct Bessel 24 dB Oct AdjustGc 24 dB Oct Butrwrth 24 dB Oct Bessel 24 dB Oct Linkwitz 36 dB Oct AdjustGc 36 dB Oct Butrwrth 36 d...

Страница 323: ... 6 Frame the range depends on the Frame value Beat the range depends on the Beat value Sets the delay time 2 Level to 0 dB Sets the output signal level for each channel 3 On ON OFF Turns delay ON 4 Mute ON OFF Mutes the signal for each frequency band 5 Delay Scale ms Sample Meter Feet Frame Beat Selects the units for setting the delay time The selected button will light up and the units in the Del...

Страница 324: ...Displays the PEQ curve Parameter Setting Range Function 2 Type PEQ L SHELF 6 dB Oct L SHELF 12 dB Oct H SHELF 6 dB Oct H SHELF 12 dB Oct HPF LPF Select the filter type from a menu 3 Q 0 1 to 16 0 Sets the frequency band width for each band 4 Frequency 20 Hz to 20 kHz Sets the frequency for each band 5 Gain 18 dB to 18 dB Sets the gain for each band 6 Bypass ON OFF Turns ON bypass for each band 7 P...

Страница 325: ...utput Meter Displays the output signal level Parameter Setting Range Function 4 Threshold 54 dB to 0 dB Sets the threshold value 5 Ratio 1 1 to 1 Sets the compression ratio 6 Knee HARD 1 2 3 4 5 Sets the way compression is applied 7 Attack 0 to 120 ms Sets the attack time 8 Release 44 1 kHz 6 ms to 46 s 48 kHz 5 ms to 42 3 s 88 2 kHz 3 ms to 23 s 96 kHz 3 ms to 21 1 s Sets the release time The set...

Страница 326: ...lick the Crossover Delay PEQ or Compressor button in the Navigator section an editor for the crossover delay parametric equalizer or compressor will be displayed in a separate window A separate component editor will open for each output channel such as Low or Mid when you click on the delay parametric equalizer or compressor Name Function 1 Input Meter Displays the input signal level 2 Output Mete...

Страница 327: ...tor window Name Function 1 Crossover Curve Displays the level of each frequency band distinguished by color Section Parameter Setting Range Function 2 Frequency Frequency 20 Hz to 20 kHz Sets the cross frequency between each frequency band 3 Polarity Polarity Normal Inverted Reverses the output signal phase for each frequency band 4 Mute Mute ON OFF Mutes the signal for each frequency band This is...

Страница 328: ...ets the LPF cutoff frequency 7 Gc 6 dB to 6 dB When Adjustable Gc is selected for Type this sets the gain for the cutoff frequency 8 HPF Type Thru 6 dB Oct 12 dB Oct AdjustGc 12 dB Oct Butrwrth 12 dB Oct Bessel 12 dB Oct Linkwitz 18 dB Oct AdjustGc 18 dB Oct Butrwrth 18 dB Oct Bessel 24 dB Oct AdjustGc 24 dB Oct Butrwrth 24 dB Oct Bessel 24 dB Oct Linkwitz 36 dB Oct AdjustGc 36 dB Oct Butrwrth 36 ...

Страница 329: ...s on the Fs value Meter 0 to 171 8 Feet 0 to 563 6 Frame the range depends on the Frame value Beat the range depends on the Beat value Sets the delay time 2 Level to 0 dB Sets the output signal level for each channel 3 On ON OFF Turns delay ON 4 Delay Scale ms Sample Meter Feet Frame Beat Selects the units for setting the delay time The selected button will light up and the units in the Delay edit...

Страница 330: ...ame Function 1 PEQ Curve Displays the PEQ curve Parameter Setting Range Function 2 Type PEQ L SHELF 6 dB Oct L SHELF 12 dB Oct H SHELF 6 dB Oct H SHELF 12 dB Oct HPF LPF Select the filter type from the menu 3 Q 0 1 to 16 0 Sets the band width of each band 4 Frequency 20 Hz to 20 kHz Sets the frequency of each band 5 Gain 18 dB to 18 dB Sets the frequency gain for each band 6 Bypass ON OFF Bypasses...

Страница 331: ...uction attenuation 3 Output Meter Displays the output signal level Parameter Setting Range Function 4 Threshold 54 dB to 0 dB Sets the threshold value 5 Ratio 1 1 to 1 Sets the compression ratio 6 Knee HARD 1 2 3 4 5 Sets the way compression is applied 7 Attack 0 to 120 ms Sets the attack time 8 Release 44 1 kHz 6 ms to 46 s 48 kHz 5 ms to 42 3 s 88 2 kHz 3 ms to 23 s 96 kHz 3 ms to 21 1 s Sets th...

Страница 332: ...nction 1 Delay All Bypass ON OFF Bypasses from input to output 2 Input Level to 0 dB Sets the input signal level 3 Mute ON OFF Mute the input signal 4 Delay Tap Delay ms 0 to 1300 Sample the range depends on the Fs value Meter 0 to 446 7 Feet 0 to 1465 4 Frame the range depends on the Frame value Beat the range depends on the Beat value Sets the delay time There are two edit boxes displaying milli...

Страница 333: ...ap Delay ms 0 to 130 Sample the range depends on the Fs value Meter 0 to 44 7 Feet 0 to 146 5 Frame the range depends on the Frame value Beat the range depends on the Beat value Sets the delay time There are two edit boxes displaying milliseconds and the units selected for Delay Scale 5 Level to 0 dB Sets the output signal level for each channel 6 On ON OFF Turns ON each channel s delay 7 Mute ON ...

Страница 334: ...e effects of the component The trigger source is set in the KeyIn section of the component editor The currently selected trigger source is displayed on the button Click the button and select the trigger source from the menu SELF Sets the input signal as the trigger source for mono channel components L R Sets the left or right input signal as the trigger source for stereo channel components LR BOTH...

Страница 335: ...e The compression ratio of the compander hard is large The slope is also large The compression ratio of the compander soft is small with a gentle compression The parameters in the component editor are the same Name Function 1 Compander Curve Displays results graphically The horizontal axis is the input signal level and the vertical axis is the output level 2 Gain Reduction Meter Displays the gain ...

Страница 336: ...eyIn input Stereo channel compressors have two inputs two outputs and one KeyIn input Double click a component to open the component editor for it The parameters are the same for mono channel and stereo channel components KeyIn Mono SELF KEYIN Selects the trigger source from a menu The currently selected trigger source is displayed on the button Stereo L R LR BOTH KEYIN On ON OFF Turns the compand...

Страница 337: ... 3 Output Meter Displays the output signal level Parameter Setting Range Function 4 Threshold 54 dB to 0 dB Sets the threshold value 5 Ratio 1 1 to 1 Sets the compression ratio 6 Knee HARD 1 2 3 4 5 Sets the way compression is applied 7 Attack 0 to 120 ms Sets the attack time 8 Release 44 1 kHz 6 ms to 46 s 48 kHz 5ms to 42 3 s 88 2 kHz 3 ms to 23 s 96 kHz 3 ms to 21 1 s Sets the release time The ...

Страница 338: ...ld 54 dB to 0 dB Sets the threshold value 5 Ratio 1 1 to 1 Sets the compression ratio 6 Knee HARD 1 2 3 4 5 Sets the way the de esser effect is applied 7 Attack 0 to 120 ms Sets the attack time 8 Release 44 1 kHz 6 ms to 46 s 48 kHz 5 ms to 42 3 s 88 2 kHz 3 ms to 23 s 96 kHz 3 ms to 21 1 s Sets the release time The setting range may very depending on the operating frequency 9 Gain 0 dB to 18 dB S...

Страница 339: ...ain reduction attenuation 3 Output Meter Displays the output signal level Parameter Setting Range Function 4 Threshold 54 dB to 0 dB Sets the threshold value 5 Range 70 dB to 0 dB Sets the amount by which the level is reduced 6 Attack 0 to 120 ms Sets the attack time 7 Hold 44 1 kHz 0 02 ms to 2 13 s 48 kHz 0 02 ms to 1 96 s 88 2 kHz 0 01 ms to 1 06 s 96 kHz 0 01 ms to 981 ms Sets the hold time Th...

Страница 340: ...reo channel components Name Function 1 Expander Curve Displays results graphically The horizontal axis is the input signal level and the vertical axis is the output level 2 Gain Reduction Meter Displays the gain reduction attenuation 3 Output Meter Displays the output signal level Parameter Setting Range Function 4 Threshold 54 dB to 0 dB Sets the threshold value 5 Ratio 1 1 to 1 Sets the compress...

Страница 341: ... channel and stereo channel components 8 Release 44 1 kHz 6 ms to 46 s 48 kHz 5 ms to 42 3 s 88 2 kHz 3 ms to 23 s 96 kHz 3 ms to 21 1 s Sets the release time The setting range may very depending on the operating frequency 9 Gain 0 dB to 18 dB Sets the output gain KeyIn Mono SELF KEYIN Selects the trigger source from a menu The currently selected trigger source is displayed on the button Stereo L ...

Страница 342: ...he output signal level Parameter Setting Range Function 4 Threshold 54 dB to 0 dB Sets the threshold value 5 Range 70 dB to 0 dB Sets the amount by which the level is reduced 6 Attack 0 to 120 ms Sets the attack time 7 Hold 44 1 kHz 0 02 ms to 2 13 s 48 kHz 0 02 ms to 1 96 s 88 2 kHz 0 01 ms to 1 06 s 96 kHz 0 01 ms to 981 ms Sets the hold time 8 Decay 44 1 kHz 6 ms to 46 s 48 kHz 5 ms to 42 3 s 8...

Страница 343: ...gnal level Parameter Setting Range Function 4 Threshold 54 dB to 0 dB Sets the threshold value 5 Attack 0 to 120 ms Sets the attack time 6 Release 44 1 kHz 6 ms to 46 s 48 kHz 5 ms to 42 3 s 88 2 kHz 3 ms to 23 s 96 kHz 3 ms to 21 1 s Sets the release time The range varies according to the operating frequency 9 KeyIn Mono SELF KEYIN The trigger source can be selected from this menu The currently s...

Страница 344: ...ers each with a different number of frequency bands Mono channel and stereo channel equalizers are available for each type Graphic Equalizer GEQ Boosts or cuts signals within the specified frequencies The mono group contains 7 band 15 band and 31 band mono channel components The stereo group contains 7 band 15 band and 31 band stereo channel components Mono channel GEQs have one input and one outp...

Страница 345: ...s band 6 GEQ ON ON OFF Turns the GEQ ON 7 Range Button 15 12 6 24 Selects the gain adjust width 8 EQ Flat Returns the faders of all bands to 0dB 9 Input Level to 10 dB Sets the input signal level Phase ON OFF Reverses the phase of the input signal HPF Frequency 20 Hz to 20 kHz Sets the HPF cutoff frequency Bypass ON OFF Turns bypass ON LPF Frequency 20 Hz to 20 kHz Sets the LPF cutoff frequency By...

Страница 346: ...g on the component but all share a common configuration in the component editor Name Function 1 EQ Curve Displays the equalizer effect You can change the parameter by dragging the control point with the mouse Section Parameter Setting Range Function 2 Input Level to 10 dB Sets the input signal level 3 Phase ON OFF Reverses the phase of the input signal 4 Equalizer Type PEQ L SHELF 6 dB Oct L SHELF...

Страница 347: ...ation rate per octave can be set to 6 dB Oct or 12 dB Oct H SHELF High Shelving There is no sound attenuation at high frequencies The sound is attenuated at a constant rate from the cutoff frequency towards the lower frequencies The attenuation rate per octave can be set to 6 dB Oct or 12 dB Oct HPF This is a high pass filter Q 0 7 Attenuates the low frequencies with a gentle curve 12 dB Oct LPF T...

Страница 348: ...ing scene recall When you turn this ON the fader moves gradually to the position after the jump If you turn this OFF it immediately jumps to the parameters saved in the recalled scene See The Scene Manager Dialog Box page 63 for details about settings for the components to be faded and the time period when the Fade is On Parameter Setting Range Function 1 Phase ON OFF Reverses the phase of the out...

Страница 349: ...There are two types of BPF components mono channel and stereo channel Mono channel BPFs have one input and one output Stereo channel BPFs have two of each Double click a component to display the component editor for it The parameters are the same for mono channel and stereo channel components Section Parameter Setting Range Function 1 Input Level to 10 dB Sets the input signal level 2 Phase ON OFF...

Страница 350: ...channel HPFs have two of each Double click a component to display the component editor for it The parameters are the same for mono channel and stereo channel components Section Parameter Setting Range Function 1 Input Level to 10 dB Sets the input signal level 2 Phase ON OFF Reverses the phase of the input signal 3 HPF Frequency 20 Hz to 20 kHz Sets the cutoff frequency 4 Slope 6 dB Oct 12 dB Oct ...

Страница 351: ...hannel LPFs have two of each Double click a component to display the component editor for it The parameters are the same for mono channel and stereo channel components Section Parameter Setting Range Function 1 Input Level to 10 dB Sets the input signal level 2 Phase ON OFF Reverses the phase of the input signal 3 LPF Frequency 20 Hz to 20 kHz Sets the cutoff frequency 4 Slope 6 dB Oct 12 dB Oct S...

Страница 352: ... have two of each Double click a component to display the component editor for it The parameters are the same for mono channel and stereo channel components Section Parameter Setting Range Function 1 Input Level to 10 dB Sets the input signal level 2 Phase ON OFF Reverses the phase of the input signal 3 Notch Frequency 20 Hz to 20 kHz Sets the center frequency 4 Q 0 1 to 63 0 Sets the band width o...

Страница 353: ...o channel components Section Parameter Setting Range Function 1 Input Level to 10 dB Sets the input signal level 2 Phase ON OFF Reverses the phase of the input signal 3 HPF Frequency 20 Hz to 20 kHz Sets the HPF cutoff frequency 4 Type Thru 6 dB Oct 12 dB Oct AdjustGc 12 dB Oct Butrwrth 12 dB Oct Bessel 12 dB Oct Linkwitz 18 dB Oct AdjustGc 18 dB Oct Butrwrth 18 dB Oct Bessel 24 dB Oct AdjustGc 24...

Страница 354: ...B Oct Butrwrth 24 dB Oct Bessel 24 dB Oct Linkwitz 36 dB Oct AdjustGc 36 dB Oct Butrwrth 36 dB Oct Bessel 48 dB Oct AdjustGc 48 dB Oct Butrwrth 48 dB Oct Bessel 48 dB Oct Linkwitz Sets the attenuation for each octave and the filter type THRU turns off the filter 9 Gc 6 dB to 6 dB When AdjustGc Adjustable Gc is selected for Type this sets the gain for the cutoff frequency Bypass ON OFF Turns bypass...

Страница 355: ...mponents Section Parameter Setting Range Function 1 Input Level to 10 dB Sets the input signal level 2 Phase ON OFF Reverses the phase of the input signal 3 HPF Frequency 20 Hz to 20 kHz Sets the HPF cutoff frequency 5 Type Thru 6 dB Oct 12 dB Oct AdjustGc 12 dB Oct Butrwrth 12 dB Oct Bessel 12 dB Oct Linkwitz 18 dB Oct AdjustGc 18 dB Oct Butrwrth 18 dB Oct Bessel 24 dB Oct AdjustGc 24 dB Oct Butr...

Страница 356: ...components Section Parameter Setting Range Function 1 Input Level to 10 dB Sets the input signal level 2 Phase ON OFF Reverses the phase of the input signal 3 LPF Frequency 20 Hz to 20 kHz Sets the LPF cutoff frequency 5 Type Thru 6 dB Oct 12 dB Oct AdjustGc 12 dB Oct Butrwrth 12 dB Oct Bessel 12 dB Oct Linkwitz 18 dB Oct AdjustGc 18 dB Oct Butrwrth 18 dB Oct Bessel 24 dB Oct AdjustGc 24 dB Oct Bu...

Страница 357: ...available with 1 2 4 8 12 and 16 channels Double click a component to display the component editor for it The number of channels varies depending on the component but all share a common configuration in the component editor Name Function 1 Meter Displays signal levels for each channel 1 Meter component editor ...

Страница 358: ... for sound measurement This sound covers a frequency range of 20 Hz to 20 kHz As the frequency doubles the energy of the sound is cut in half The sound level is equal at all frequencies Burst Outputs pink noise continuously Section Parameter Setting Range Function 1 Wave Form Sine 100 Hz 1 kHz 10 kHz Vari Selects the frequency and waveform that will be generated Only one of the six Sine and Noise ...

Страница 359: ...o 100 Selects and displays the playback file Only files set in the DME unit in which this component is placed by the Wav File Manager can be selected 3 List Open the Wav File Manager to display a list of files set in the DME unit in which this component is located This list functions as a play list 4 IG Selects the previous file in the play list 5 HI Selects the next file in the playsuit 6 F Plays...

Страница 360: ...that exceed a specified threshold There are five mixer types each with a different number of inputs Double click a component to display the component editor for it The number of channels varies depending on the component but all share a common configuration in the component editor The auto mixer component editor consists of two sections input channels and master output 1 3 8 4 5 2 6 7 9 Auto Mixer...

Страница 361: ...55 1 m to 1 06 s 96 kHz 50 6m to 981 m Sets the gate hold time The setting range may vary depending on the operating frequency 5 Input Channels Decay 44 1 kHz 110 m to 46 s 48 kHz 101 m to 42 3 s 88 2 kHz 55 m to 23 s 96 kHz 51 m to 21 1 s Sets the speed for closing the gate The setting range may vary depending on the operating frequency 6 Solo ON OFF Turns solo ON 7 On ON OFF Turns ON each channe...

Страница 362: ...ng on the component but all share a common configuration in the component editor The delay matrix component editor consists of four sections input output matrix and block The Master buttons in the Input and Output sections display windows where you can make master input and output settings Delay and level for each channel are set in separate windows that display four channels each Section Name Fun...

Страница 363: ...ace the mouse pointer over a group its channel numbers are highlighted Click to open the Delay Matrix Crosspoint editor window 4 Block On Turns ON output for all channels in the Crosspoint window Lights the ON button does not change the delay matrix component editor 5 Off Turns OFF output for all channels in the Crosspoint window does not change the delay matrix component editor 6 Nominal Resets a...

Страница 364: ...hannel s signal 2 Level to 10 dB Sets the level of the signal from each channel s input 3 Solo ON OFF Turns ON solo for each channel 4 On ON OFF Turns ON each channel s input 5 Block On Turns ON input for all channels in the Input Master window When turned ON the On button lights up 6 Off Turns OFF input for all channels in the Input Master window 7 Nominal Resets all input signal levels in the In...

Страница 365: ... the output signal level for each channel 2 Level to 10 dB Sets the output signal level for each channel 3 On ON OFF Turns ON each channel s output 4 Block On Turns ON output for all channels in the Output Master window When turned ON the On button lights up 5 Off Turns OFF output for all channels in the Output Master window 6 Nominal Resets all output signal levels in the Output Master window mak...

Страница 366: ...splayed and then click another output channel that channel group will be displayed in the Delay Matrix All Inputs to One Output editor window One Delay Matrix All Inputs to One Output editor window is displayed for each delay matrix component editor Section Parameter Setting Range Function 1 Bus Send Level Delay 0 to 500 Sets the delay time for each input channel 2 Level to 10 dB Sets the output s...

Страница 367: ...to One Output editor window switch the channel group that is displayed in the window Section Parameter Setting Range Function 1 Input Channel Displays the selected input channel Select another channel from a menu 2 Phase ON OFF Reverses the phase of the input signal 3 Level to 10 dB Sets the input signal level 4 Solo ON OFF Turns solo ON 5 On ON OFF Turns input ON 6 Bus Send Level Delay 0 to 500 S...

Страница 368: ...he delay matrix component editor the input channels are arranged vertically while the output channels are arranged horizontally Section Parameter Setting Range Function 1 Input Channel Switches to another channel group 2 Output Channel Switches to another channel group 3 Bus Send Level Delay 0 to 500 Sets the delay time for each crosspoint 4 Level to 10 dB Sets the output signal level for each cro...

Страница 369: ...Delay Matrix Crosspoint editor window is displayed that channel group will be displayed in the open Delay Matrix Crosspoint editor window Only one Delay Matrix Crosspoint matrix window is displayed for each delay matrix component editor Matrix Mixer In the matrix mixer the input channels and output buses are arranged in a checkerboard configuration You can adjust the group balance for each output ...

Страница 370: ...no other components can be used even though the resource meter does not reach 100 The 64 input 64 output Matrix Mixer component or the 64 input 32 output Matrix Mixer component cannot be used in the DME24N Section Name Function 1 Input Master Opens the Input Master window 2 Output Master Opens the Output Master window 3 Matrix Output level meters These meters display the output level for each chan...

Страница 371: ... channel number on the left side of the matrix the Matrix Mixer One Input to All Outputs editor window opens The matrix is divided into groups each with four input channels and four output channels When you place the mouse pointer over a group its channel numbers are highlighted Click to open the Matrix Mixer Crosspoint editor window Output level meter Click to open the Matrix Mixer All Inputs to ...

Страница 372: ...to 10 dB Sets the signal level from each channel input to the output bus 3 Solo ON OFF Turns ON solo for each channel 4 On ON OFF Turns ON each channel s input 5 Block On Turns ON input for all channels in the Input Master window When turned ON the On button lights up 6 Off Turns OFF input for all channels in the Input Master window 7 Nominal Resets all output signal levels in the Input Master win...

Страница 373: ...r each channel 2 Level to 10 dB Sets the output signal level for each channel 3 On ON OFF Turns ON each channel s output 4 Block On Turns ON output for all channels in the Output Master window When turned ON the On button lights up 5 Off Turns OFF output for all channels in the Output Master window 6 Nominal Resets all output signal levels in the Output Master window making them 0 dB 7 Minimum Res...

Страница 374: ...ne Output editor window is displayed and then click another output channel that channel group will be displayed in the Matrix Mixer All Inputs to One Output editor window One Matrix Mixer All Inputs to One Output editor window is displayed for each matrix mixer component editor Section Parameter Setting Range Function 1 Bus Send Level Level to 10 dB Sets the output signal level for each input chan...

Страница 375: ...trix Mixer One Input to All Outputs editor window is displayed and then click another input channel that channel will be displayed in the Matrix Mixer One Input to All Outputs editor window One Matrix Mixer One Input to All Outputs editor window is displayed for each matrix mixer component editor Section Parameter Setting Range Function 1 Input Channel Displays the selected input channel Select an...

Страница 376: ...nel Switches to another channel group 2 Output Channel Switches to another channel group 3 Bus Send Level Level to 10 dB Sets the output signal level for each crosspoint 4 On ON OFF Turns ON output for each crosspoint 5 Block On Turns ON output for all channels in the Crosspoint window When turned ON the On button lights up 6 Off Turns OFF output for all channels in the Crosspoint window 7 Nominal...

Страница 377: ...t and Output sections of the Matrix Mixer Crosspoint editor window switch the channel group that is displayed If you click another channel group when the matrix mixer component editor is active and an Matrix Mixer Crosspoint editor window is displayed that channel group will be displayed in the open Matrix Mixer Crosspoint editor window Only one Matrix Mixer Crosspoint matrix window is displayed f...

Страница 378: ... dB reference Center Center Nominal Uses the center volume as a reference setting it as 0 dB The LR speakers are 3 dB LR LR Nominal Uses the LR speaker volumes as a reference setting them as 0 dB The center volume is 3 dB LCR In the LCR component one input is divided into left center and right outputs The number of outputs is triple the inputs Components are available with 1 2 4 8 12 and 16 channe...

Страница 379: ... component but all share a common configuration in the component editor Parameter Setting Range Function 1 CSR 0 to 100 Sets the ratio for sending the center signal to LR 2 Pan L63 Center R63 Sets LR orientation 3 Pan Nominal Position Center LR Selects the nominal position from a menu Parameter Setting Range Function 1 Pan L63 R63 Sets the LR orientation 2 Pan Nominal Position Center LR Selects th...

Страница 380: ...tered there Name Location Setting Range Function 1 2D Surround Pan Graph Sets the sound image orientation You can move the sound image by clicking and dragging 2 Speaker Button L Left L63 F63 Clicking here moves the sound image to the button location 3 C Center C F63 4 R Right R63 F63 5 Ls Left Surround L63 R63 6 Bs Back Surround C R63 7 Rs Right Surround R63 R63 8 LFE Low Frequency Effect Sub Woo...

Страница 381: ...pter 6 Component Guide DME Designer Owner s Manual 381 Dragging You can move the control by dragging it with the mouse Click If you click within the graph the control point will move to that position Click ...

Страница 382: ...Chapter 6 Component Guide DME Designer Owner s Manual 382 Speaker Button If you click any speaker button besides the LFE button the control point will jump to that speaker s position Click ...

Страница 383: ...nd Pan Graph Sets the sound image orientation You can move the sound image by clicking and dragging 2 Speaker Button Clicking here moves the sound image to the button location 3 Position Left Right Position L63 C R63 Displays the LR surround location 4 Front Back Position F63 C R63 Displays the front back surround location 5 Divergence Front 0 to 100 Sets the ratio for sending the front center sig...

Страница 384: ...nd image orientation You can move the sound image by clicking and dragging 2 Speaker Button Clicking here moves the sound image to the button location 3 Position Left Right Position L63 C R63 Displays the LR surround location 4 Front Back Position F63 C R63 Displays the front back surround location 5 Divergence Front 0 to 100 Sets the ratio for sending the front center signal to front L and front ...

Страница 385: ... image by clicking and dragging 2 Speaker Button Clicking here moves the sound image to the button location 3 Position Left Right Position L63 C R63 Displays the LR surround location 4 Front Back Position F63 C R63 Displays the front back surround location 5 Divergence Front 0 to 100 Sets the ratio for sending the front center signal to front L and front R 6 Rear 0 to 100 Sets the ratio for sendin...

Страница 386: ...ber of channels varies depending on the component but all share a common configuration in the component editor Routers let you route signals from various Input locations by connecting them to various Output locations One output can be connected to one input only A single input can be output to multiple channels but multiple inputs cannot be output over a single channel In other words you can distr...

Страница 387: ...ne is displayed connecting them Click to set routing for that position If another output channel has been assigned to the clicked input channel the original assignment will not be cleared If another input channel has been assigned to the clicked output channel the original assignment will be cleared Clearing Routing Settings If you click the dot that indicates routing the routing indicated by that...

Страница 388: ...he number of input sources and Channel is the number of channels included in the source For example a 4 Position 2 Channel component allows you to select a single 2 channel source from four 2 channel input sources 3 Position and 16 Position components are all 1 Channel types while 1 2 and 6 Channel versions of 4 Position and 8 Position components are provided ...

Страница 389: ...es the only difference being the number of sources The Source Selector connects the selected input to the output For example if you select 1 for a 4 Position 2 Channel component IN1 1 will be connected to OUT 1 and IN1 2 will be connected to OUT2 If you select 2 IN2 1 will be connected to OUT 1 and IN2 2 will be connected to OUT2 Source Selector Component ...

Страница 390: ...tor Name Function 1 Crossover response phase Crossover phase response color coded for output channel 2 Crossover response level Crossover level response color coded for each output channel 3 Input meter Displays the input signal level 4 Output meter Displays the output level for each band 5 Crossover Curve Display Button Turns crossover curve display for each output channel on or off Section Param...

Страница 391: ... signal level 9 Crossover Opens the crossover editor window Delay Opens the delay editor window PEQ Opens the parametric equalizer editor window Output Level to 10 dB Sets the output level from each output channel Mute ON OFF Mutes the output of each output channel Limiter Opens the limiter editor window 1 Way ALL 2 Way Low High 3 Way Low Mid High 4 Way Low Low Mid High Mid High 5 Way Sub Low Low ...

Страница 392: ...and Frequency parameters can also be changed by directly dragging the control points Changes to the Frequency parameter are shown on the crossover phase response graph The control point in the center of the graph can be dragged vertically to change the Output Level parameter Control points at the intersections between the frequency bands can be dragged horizontally to change the Frequency The Outp...

Страница 393: ...y appears as a dotted line when muted 4 LPF Type Thru 6dB Oct 12dB Oct AdjustGc 12dB Oct Butrwrth 12dB Oct Bessel 12dB Oct Linkwitz 18dB Oct AdjustGc 18dB Oct Butrwrth 18dB Oct Bessel 24dB Oct AdjustGc 24dB Oct Butrwrth 24dB Oct Bessel 24dB Oct Linkwitz 36dB Oct AdjustGc 36dB Oct Butrwrth 36dB Oct Bessel 48dB Oct AdjustGc 48dB Oct Butrwrth 48dB Oct Bessel 48dB Oct Linkwitz Sets the roll off slope ...

Страница 394: ...ted 8 Frequency 20 Hz to 20 kHz Sets the HPF cutoff frequency 9 Gc 6 dB to 6 dB Sets the cutoff frequency gain when the Type setting is AdjustGc Adjustable Gc Parameter Range Function 1 Delay ms 0 to 500 Sample the range depends on the Fs value Meter 0 to 171 8 Feet 0 to 563 6 Frame the range depends on the Frame value Beat the range depends on the Beat value Sets the delay time Two edit boxes sho...

Страница 395: ...ded to compensate for this roll off For this reason the gain can only be set to higher than 0dB and the frequency higher than 500Hz Name Function 1 Crossover response phase Shows crossover phase response 2 Crossover response level Shows crossover level response Parameter Range Function 3 Type PEQ L SHELF 6dB Oct L SHELF 12dB Oct H SHELF 6dB Oct H SHELF 12dB Oct HPF LPF APF 1 1st APF 1 2nd Horn EQ ...

Страница 396: ... Displays the output level Parameter Range Function 4 Threshold 54 dB to 0 dB Sets the threshold level 5 Attack Fast Mid Slow Manual 0 to 120ms Sets the attack time 6 Release Fast Mid Slow Manual 44 1kHz 6ms to46s 48kHz 5ms to 42 3s 88 2kHz 3ms to 23s 96kHz 3ms to 21 1s Sets the release time With the Fast Mid or Slow settings the optimum value is automatically set based on the longest wavelength a...

Страница 397: ...e SPX component to display the context menu click Recall Component Library then select the effect type from the Effect Type submenu Double click this component to display the component editor for it Name Function 1 Input Meter Displays the input signal level 2 Mix Balance Control Adjusts the balance between the fundamental tone and the effect tone 3 Bypass button When turned ON the input signal is...

Страница 398: ... Reflection spacing Liveness 0 to 10 Early reflections decay characteristics 0 dead 10 live Ini Dly 0 0 to 500 0 ms Initial delay before reverb begins Diff 0 to 10 Reflection diffusion left right reflection spread Density 0 to 100 Reflection density ER Num 1 to 19 Number of early reflections FB Gain 99 to 99 Feedback gain Hi Ratio 0 1 to 1 0 High frequency feedback ratio HPF THRU 21 2 Hz to 8 00 k...

Страница 399: ... reverse phase feedback Hi Ratio 0 1 to 1 0 High frequency feedback ratio HPF THRU 21 2 Hz to 8 00 kHz High pass filter cutoff frequency LPF 50 0 Hz to 16 0 kHz THRU Low pass filter cutoff frequency Echo Two input two output stereo delay with crossed feedback loop Delay L 0 0 to 1350 0 ms Left channel delay time Delay R 0 0 to 1350 0 ms Right channel delay time FB Dly L 0 0 to 1350 0 ms Left chann...

Страница 400: ...9 to 99 Feedback gain plus values for normal phase feedback minus values for reverse phase feedback Offset 0 to 100 Lowest phase shifted frequency offset PHASE 0 00 to 354 38 degrees Left and right modulation phase balance Stage 2 4 6 8 10 12 14 16 Number of phase shift stages LSH F 21 2 Hz to 8 00 kHz Low shelving filter frequency LSH G 12 to 12 dB Low shelving filter gain HSH F 50 0 Hz to 16 0 k...

Страница 401: ...reverse phase feedback Mode 1 to 10 Pitch shift precision Rotary One input two output rotary speaker simulator Rotate STOP START Rotation stop start Speed SLOW FAST Rotation speed see SLOW and FAST parameters Slow 0 05 to 10 00 Hz SLOW rotation speed Fast 0 05 to 10 00 Hz FAST rotation speed Drive 0 to 100 Overdrive level Accel 0 to 10 Acceleration at speed changes Low 0 to 100 Low frequency filte...

Страница 402: ...nsitivity Direction UP DOWN Upward or downward frequency change Decay 44 1kHz 6 0ms to 46 0s 48kHz 5 0ms to 42 3s 88 2kHz 3ms to 23 0s 96kHz 3ms to 21 1s Decay speed Offset 0 to 100 Delay time offset FB Gain 99 to 99 Feedback gain plus values for normal phase feedback minus values for reverse phase feedback LSH F 21 2 Hz to 8 00 kHz Low shelving filter frequency LSH G 12 to 12 dB Low shelving filt...

Страница 403: ...ulation delay time Wave Sine Tri Modulation waveform Rev Flange One input two output reverb and flanger effects in parallel Rev Time 0 3 to 99 0 s Reverb time Ini Dly 0 0 to 500 0 ms Initial delay before reverb begins Hi Ratio 0 1 to 1 0 High frequency reverb time ratio Diff 0 to 10 Spread Density 0 to 100 Reverb density HPF THRU 21 2 Hz to 8 00 kHz High pass filter cutoff frequency LPF 50 0 Hz to...

Страница 404: ...s in parallel Rev Time 0 3 to 99 0 s Reverb time Ini Dly 0 0 to 500 0 ms Initial delay before reverb begins Hi Ratio 0 1 to 1 0 High frequency reverb time ratio Diff 0 to 10 Spread Density 0 to 100 Reverb density HPF THRU 21 2 Hz to 8 00 kHz High pass filter cutoff frequency LPF 50 0 Hz to 16 0 kHz THRU Low pass filter cutoff frequency Rev Bal 0 to 100 Reverb and panned reverb balance 0 all panned...

Страница 405: ...Feedback delay time FB Gain 99 to 99 Feedback gain plus values for normal phase feedback minus values for reverse phase feedback Delay Hi 0 1 to 1 0 Delay high frequency feedback ratio HPF THRU 21 2 Hz to 8 00 kHz High pass filter cutoff frequency LPF 50 0 Hz to 16 0 kHz THRU Low pass filter cutoff frequency Dly Rev 0 to 100 Delay and reverb balance 0 all delay 100 all reverb Rev Time 0 3 to 99 0 ...

Страница 406: ...ow pass band pass Type 3 HPF LPF BPF Filter 3 type high pass low pass band pass Freq 1 28 0 Hz to 16 0 kHz Filter 1 frequency Freq 2 28 0 Hz to 16 0 kHz Filter 2 frequency Freq 3 28 0 Hz to 16 0 kHz Filter 3 frequency Level 1 0 to 100 Filter 1 level Level 2 0 to 100 Filter 2 level Level 3 0 to 100 Filter 3 level Reso 1 0 to 20 Filter 1 resonance Reso 2 0 to 20 Filter 2 resonance Reso 3 0 to 20 Fil...

Страница 407: ...1s Compressor release time Cmp Knee 0 to 5 Compressor knee Lookup 0 0 to 100 0 ms Lookup delay Cmp Byp ON OFF Compressor bypass L M XOver 21 2 Hz to 8 00 kHz Low mid crossover frequency M H XOver 21 2 Hz to 8 00 kHz Mid high crossover frequency Slope 6 dB 12 dB Filter slope Ceiling 6 0 dB to 0 0 dB OFF Specifies the maximum output level Exp Thre 54 0 dB to 24 0 dB Expander threshold Exp Rat 1 1 to...

Страница 408: ...omponent only has outputs 4 8 and 16 channel types are provided Right click the component and select Open Slot In Component from the contextual menu to open the component editor The component editor is the same for all types Name Function 1 Meter Shows the signal level for each channel ...

Страница 409: ...by right clicking the component then clicking Open Slot Out Component Editor on the displayed context menu Parameter Setting Range Function 1 Phase ON OFF Reverses the phase of the output signal for each channel 2 On ON OFF Turns ON each channel s output 3 Delay 0 to 24 Samples Sets the delay time 4 Level to 0 dB Sets the output level 5 Dither Off 16 20 24 Sets the quantization bit rate for conver...

Страница 410: ...s a Cascade In component which can be displayed by checking Show Cascade Port in the DME Device Properties dialog box Right click the component and select Open Component Editor from the contextual menu to open the component editor The component editor is the same for all types Name Function 1 Meter Shows the signal level for each channel ...

Страница 411: ...Out The Cascade Out Component only has inputs Right click the component and select Open Component Editor from the contextual menu to open the component editor The component editor is the same for all types Name Function 1 Meter Shows the signal level for each channel ...

Страница 412: ...ut DME24 I O ports Unit Input Double click Unit Input to display the component editor for it Analog Out Double click Unit Output to display the component editor for it The displayed parameters are the same as for Slot Out component editor Parameter Setting Range Function 1 48 ON OFF Turns ON phantom power 48V 2 Gain 10 to 60 dB Sets the head amp gain 1 2 Internal Head Amp component editor ...

Страница 413: ...s halved and even numbered channels are unavailable In the Double Speed Mode digital audio data is transmitted and received at the current high sampling rate 88 2 96 kHz In the Single Mode digital audio data is transmitted and received at half the current high sampling rate 88 2 96 kHz Setting Examples When the MY card word clock is used as the master word clock Double FS determines whether the sp...

Страница 414: ...le Speed Single Selects the format for 88 2 96 kHz 2 Double Fs ON OFF When ON the speed of the word clock from the MY Card is doubled 3 Output Format Double Channel Double Speed Single Selects the format for 88 2 96 kHz Parameter Setting Range Function 1 Input Format Double Channel Double Speed Selects the format for 88 2 96 kHz 2 Double Fs ON OFF When ON the speed of the word clock from the MY Ca...

Страница 415: ...Channel Double Speed For other cards it is Double Channel Single 2 Double Fs ON OFF When ON the speed of the word clock from the MY Card is doubled Only for MY16 AE MY8 AE96 MY16 TD When On is set for the MY8 AE96 the Input Format is Double Channel When Off is set the input format is Double Speed 3 Output Format Double Channel Double Speed Single Selects the format for 88 2 96 kHz For MY8 AE96 the...

Страница 416: ...ut 0 to 65279 Sets the input bundle number Output 0 to 65279 Sets the output bundle number 3 Serial Channel Rx OFF 1 16 Sets the serial channel for the receive side Tx OFF 1 16 Sets the serial channel for the send side 4 Properties Bit Length Bit Off 16 bit 20 bit 24 bit Sets the bit rate for output Mutes the signal if Bit Off is set 5 Latency 5 33 ms 2 67 ms 1 33 ms Sets the delay NOTE The parame...

Страница 417: ...l converter Double click the component to display the component editor for it NOTE If a DME is not selected in the properties dialog box the component editor will not be displayed even if you double click page 170 Parameter Setting Range Function 1 48 ON OFF Turns ON phantom power 48V 2 Gain 10 to 62 dBu Sets the head amp gain 3 Word Clock 48 kHz 44 1 kHz BNC Slot Sets the operating frequency for ...

Страница 418: ...t editor will not be displayed even if you double click page 170 Section Parameter Setting Range Function 1 Gain 48 ON OFF Turns ON phantom power 48V 2 HPF ON OFF Turns output ON 3 Frequency 20 to 600Hz Sets the cutoff frequency 4 Gain 10 to 62 dBu Sets the head amp gain 5 Word Clock Word Clock 96 kHz 88 2 kHz 48 kHz 44 1 kHz Word Clock In Digital Out A Sets the operating frequency for the Word Cl...

Страница 419: ...then Butterworth and there is little distortion of the waveform when square waves are passed through Components Crossover Crossover Processor Crossover Processor II Programmable BPF Programmable HPF Programmable LPF Speaker Processor Butterworth Butrwrth One type of filter characteristics This filter has the most general characteristics The pass band is flat and the gain for the cutoff frequency i...

Страница 420: ... is also used as the frequency band button Components Crossover Crossover Processor Crossover Processor II De Esser GEQ PEQ BPF HPF LPF Notch Programmable BPF Programmable HPF Programmable LPF Oscillator Speaker Processor SPX Remote HA Gain Sets the amplification factor for the entire signal level Components Crossover Processor Crossover Processor II Compander Compressor De Esser Expander GEQ PEQ ...

Страница 421: ...input signal between right and left Components LCR LR SPX Pan Nominal Position Sets the 0 dB reference for pan There are two selections available Center and LR LR Nominal Center nominal uses the center volume as a reference The means the center volume is 0 dB and the LR speakers are 3 dB LR nominal uses the LR speaker volume as the reference The means the LR speaker volume is 0 dB and the center i...

Страница 422: ... from the previous high It s a good ideal to try an initial release time setting in the range of 0 11 to 0 5 milliseconds Components Crossover Processor Crossover Processor II Compander Compressor De Esser Expander Limiter Speaker Processor SPX Slope In a high pass filter HPF or low pass filter LPF this sets the attenuation amount for each octave A large value results in rapid attenuation Clicking...

Страница 423: ...d on the list The File menu Preference ContentsFolder has been changed or the User Module folder has been moved Check that there are user module files umf in the ContentsFolder and User Module folders Cannot switch configurations in the Navigator Window While online you cannot not switch to a configuration different from the current scene If you can switch between scenes you will be able to switch...

Страница 424: ...l aligning 302 copy 303 cut 303 moving 302 paste 303 placing 297 properties 303 Control Change tab 91 Crossover 316 Crossover Processor 320 Crossover Processor II 326 Current Scene 42 Current Zone 43 D DAW Control 132 Decay Decay Time 419 De Esser 337 Delay 332 419 delay long 332 delay short 333 Delay Matrix 362 Delay Scale 420 Delay value 246 Design Mode 286 Design window 142 exporting 211 printi...

Страница 425: ...alog box 90 Miscellaneous 358 Mixer 360 Auto Mixer 360 Delay Matrix 362 Matrix Mixer 369 Monitor dialog box 104 Monitoring Point List 247 Mute button 42 MY Card 413 N Navigator window 17 140 Notch Filter Notch 352 O Object 17 arranging 216 236 238 editing 217 selecting 216 types 156 Offline 75 switching between online and offfline 75 Online 35 75 switching between online and offfline 75 Open 27 op...

Страница 426: ...ing 313 Text box 189 Threshold 422 Title bar 39 137 Tool button large 41 small 39 Toolbar 138 Toolkit window 17 143 displaying 152 moving 152 types 153 Tools menu 48 149 U User logged on user 43 User 19 creatng new 61 list 58 User Control 70 279 creating new 281 security 283 User Control Manager dialog box 70 User Control menu 280 User Defined Button User Defined Parameters 98 User Defined Button ...

Страница 427: ...U R G Pro Audio Digital Musical Instrument Division Yamaha Corporation 2004 Yamaha Corporation MW D0 ...

Отзывы: