Automation
251
DM2000 Version 2—Owner’s Manual
Trim Mode
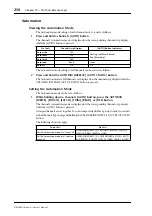
Trim mode can be set as follows.
1
While holding down a channel’s [AUTO] button, press the AUTOMIX [REL-
ATIVE] (TRIM) button.
The channel’s Automation mode is displayed on the corresponding channel strip display
while its [AUTO] button is pressed.
Grouped channels are set together. You can temporarily disable a group in order to set indi-
vidual channels by pressing and holding the USER DEFINED KEYS [12] (CTRL/CLUTCH)
button.
The following shortcuts apply.
In Trim mode, you can display channel and send level values relatively (instead of absolute
decibel values) on the channel strip displays by holding down the USER DEFINED KEYS
[13] (ALT/FINE) button while adjusting the faders and Encoders.
Arming Parameters for Automation
Parameters can be selected for automation recording as follows.
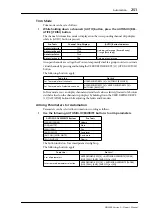
1
Use the following AUTOMIX-OVERWRITE
buttons to arm parameters.
The button indicators for armed parameters light up.
The following shortcuts apply.
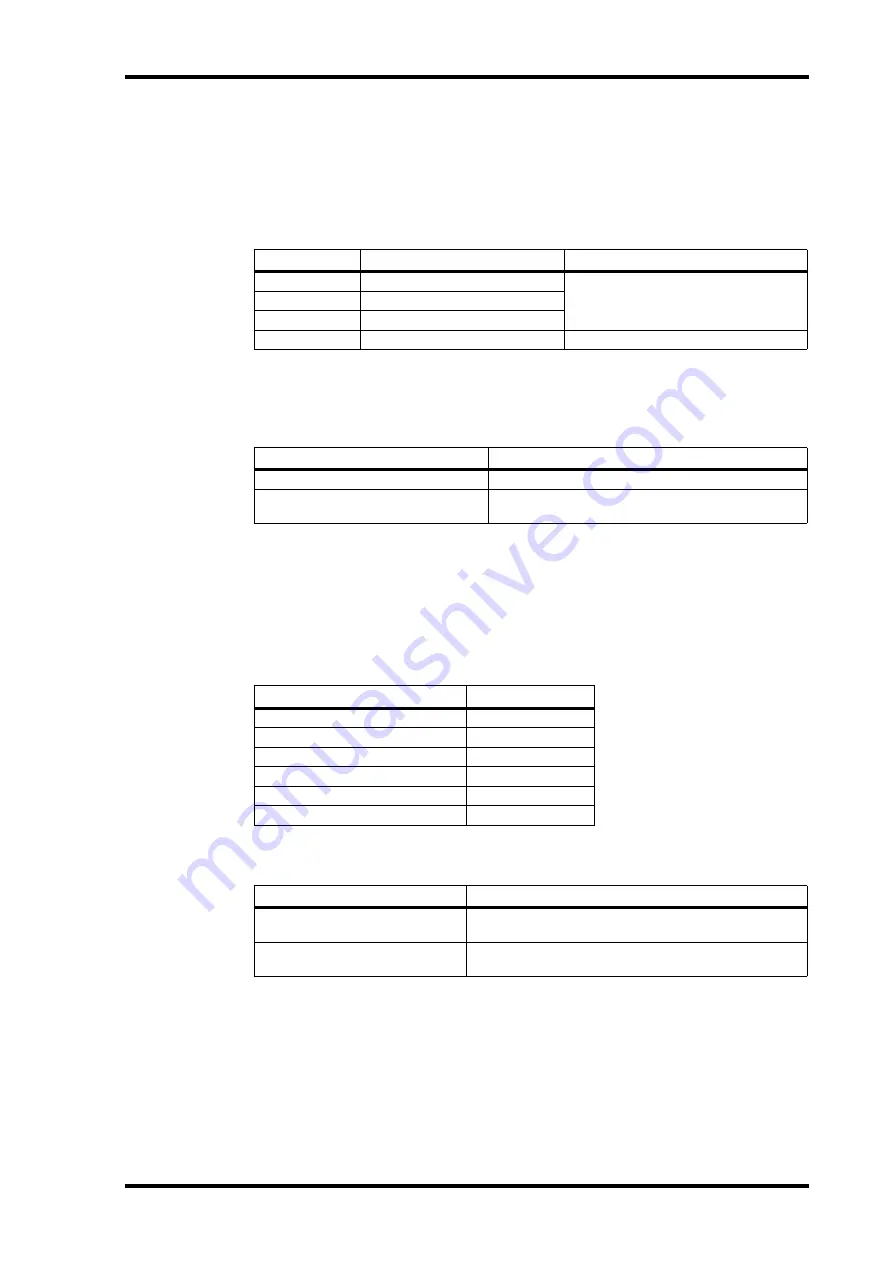
Pro Tools
Channel Strip Displays
[AUTO] Button Indicators
Auto trim/write
TWrt
Flashing red/orange (Record Ready)
Orange (Recording)
Auto trim/touch
TTch
Auto trim/latch
TLch
Auto trim/read
TRd
Flashing green/orange
To do this...
Do this!
Set Trim mode for all channels
USER DEFINED KEYS [5] + AUTOMIX [RELATIVE]
Set Trim mode of all selected channels
USER DEFINED KEYS [5] + USER DEFINED KEYS [4] +
AUTOMIX [RELATIVE]
AUTOMIX-OVERWRITE Buttons
Pro Tools
[FADER] (FADER)
Volume
[ON] (MUTE)
Mute
[PAN] (PAN)
Pan
[AUX] (SEND)
Send level
[AUX ON] (SEND MUTE)
Send mute
[EQ] (PLUG-IN)
Plug-in
To do this...
Do this!
Arm all parameters
USER DEFINED KEYS [5] + AUTOMIX-OVERWRITE [FADER],
[ON], [PAN], [AUX], [AUX ON], or [EQ]
Inverse armed parameter selection
USER DEFINED KEYS [13] + AUTOMIX-OVERWRITE [FADER],
[ON], [PAN], [AUX], [AUX ON], or [EQ]


