background image


37 


Version 1 – GBR (25/10/2022) 

D-502-0287 

-


The automatic display time of the customer menu is 15 s from the last activity. After this time, the 
adjusted values are saved, and the controller is switched off. Repeat the previous steps to re-enter the 
customer menu. 

5.5.2.


Setting the air output for the BOOST regime - 1st screen 

-


After entering the customer menu, the air output setting scale 11; 12 (controller description number) 
immediately displays the set air output for the BOOST regime


o


The BOOST regime factory setting is at maximum air output - all the LEDs are lit to indicate fan 
output


-


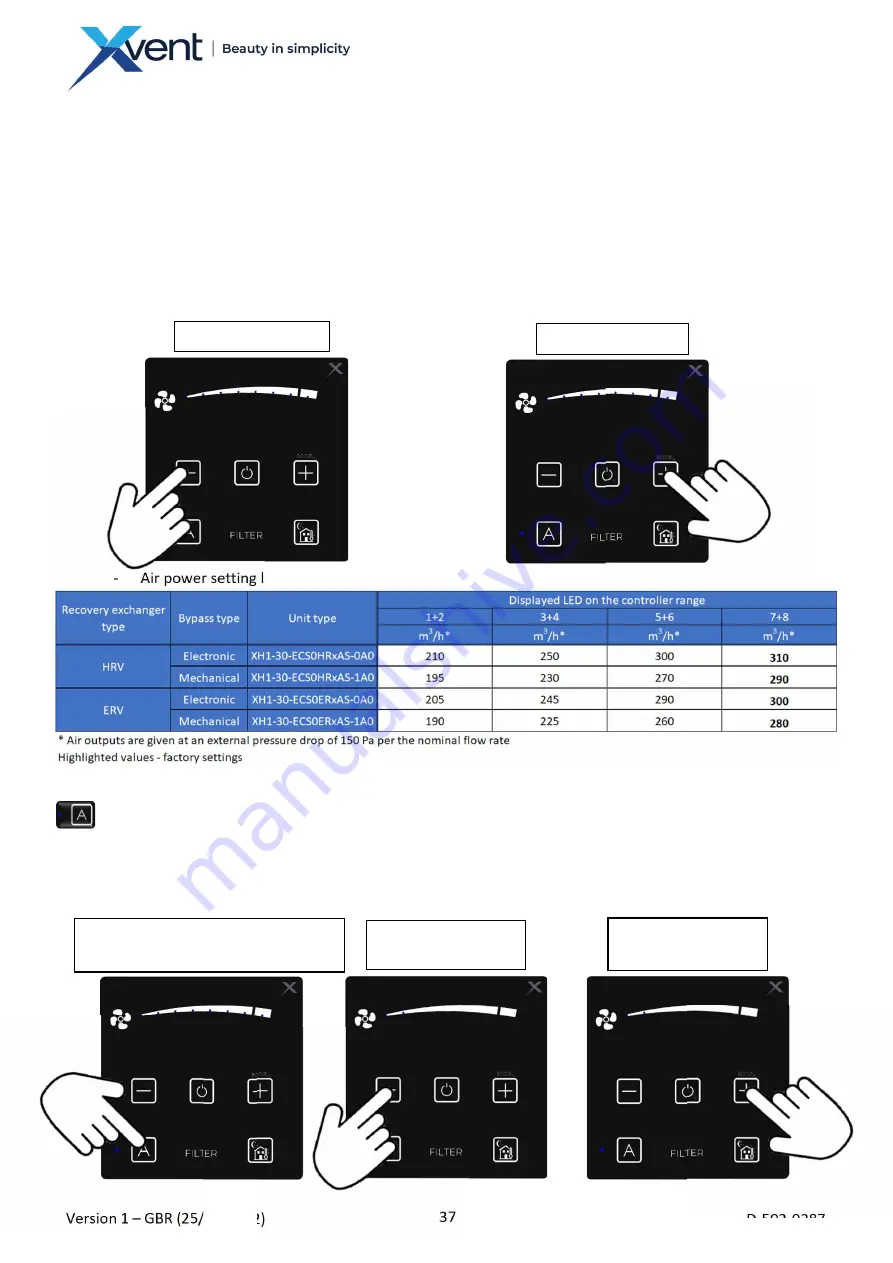
The air output is adjusted using the button 1 (decrease) and button 3. (increase). The display on the 
scale is always two LEDs at a time


-


Air power setting level in the BOOST regime 


-


To save the set values, leave the controller idle (approx. 15 s) until it switches off. 

5.5.3.


BOOST regime run time setting - 2nd screen 

-


After entering the customer menu, press button 4, where the LED lights up 

-


The LED at button 4 will flash - you are in the BOOST regime 

-


On the air output adjustment scale 11.; 12, there  you will see the set time of the BOOST regime 

o


The factory setting is 1min - 1 and 2 LEDs are lit 

-


Set the running time using button 1 (decrease) and button 3. (increase). 


Air output decrease 

Air output increase 

Tab. 17 

Setting  the  running  time  of  the 
BOOST regime in the customer menu 

Reducing  running 
time 

Increasing  running 
time 

Fig. 45 

Fig. 44 

Содержание XHOUSE-300

Страница 1: ...1 Version 1 GBR 25 10 2022 D 502 0287 OPERATING AND INSTALLATION MANUAL CENTRAL RECUPERATION UNITS XHOUSE...

Страница 2: ...Bolt M6x30 position 7 10 1 7 8 Filters position 8 10 1 7 9 Filter caps position 9 10 1 7 10 Preheating position 10 10 1 7 11 Fans position 11 10 1 7 12 Recuperator position 12 10 1 7 13 Bypass damper...

Страница 3: ...Information Safety 24 4 2 Electrical Accessories to the Xhouse Unit 24 4 2 1 Connecting Electrical Accessories 24 4 2 2 Connection of the CO2 NL ECO CO2 and RH NL ECO RH sensors AQS sensors AQS CO2 AQ...

Страница 4: ...Filter Inserting 39 6 3 Reset filter countdown 40 7 1 Inspection cleaning the exterior of the unit 41 7 1 1 Visual Inspection of the Unit Casing 41 7 1 2 Visual Inspection of the Supply Cable 41 7 2 I...

Страница 5: ...ual without prior notice Children and persons with reduced physical sensory or mental capabilities or lack of experience and knowledge may use the unit only under supervision or if they were instructe...

Страница 6: ...room temperature of 5 C to 30 C and the maximum relative humidity of 70 non condensing The maximum working altitude of the unit is 2 000 m above sea level The temperature of supplied fresh air from t...

Страница 7: ...least 2 hours after unpacking 1 5 Contents of the Xhouse unit package Xhouse unit with design cover 1x Siphon hose 18 14 1000 mm for condensate drainage 1x 2 5x120tie strap 2x Quick manual safety data...

Страница 8: ...8 Version 1 GBR 25 10 2022 D 502 0287 5x 6 7 5 8 9 Fig 2 5 8 19 Fig 3...

Страница 9: ...9 Version 1 GBR 25 10 2022 D 502 0287 10 11 12 14 13 20 21 15 Fig 4 Fig 5...

Страница 10: ...n request Evaluation of filters per SN EN ISO 16890 1 7 9 Filter caps position 9 Filter caps are used to seal the filters in the unit cover They are made of black pressed EPP plastic expanded polyprop...

Страница 11: ...arked ends of 50 mm 1 7 20 Condensate drain position 20 Plastic condensate drain made of ABS material It is used to drain condensate from the unit 1 7 21 Connection sockets position 21 The 125 mm conn...

Страница 12: ...rs Xhouse 300 XH1 030 ECS0HRxAS xA0 heat exchanger Basic technical parameters Xhouse 300 XH1 030 ECS0ERxAS xA0 enthalpy exchanger EC Declaration of Conformity the current and full version of the EC De...

Страница 13: ...0HRxAS 0A0 heat exchanger electronic bypass o unit radiates to the interior inside the room o unit radiates into the duct nominal air output XH1 030 ECS0HRxAS 1A0 heat exchanger mechanical bypass o un...

Страница 14: ...thalpy exchanger electronic bypass o unit radiates to the interior inside the room o unit radiates into the duct nominal air output XH1 030 ECS0ERxAS 1A0 enthalpy exchanger mechanical bypass o unit ra...

Страница 15: ...15 Version 1 GBR 25 10 2022 D 502 0287 Tab 11 Tab 12 2 3 Heat and moisture recovery efficiency XH1 030 ECS0HRxAS xA0 heat exchanger XH1 030 ECS0ERxAS xA0 enthalpy exchanger...

Страница 16: ...iring box to electrically connect the unit you must turn off the power and secure the power supply against accidental turn on Check that the electrical connection point wiring box outlet meets the uni...

Страница 17: ...stribution in the customer menu more air is supplied than exhausted The fan balancing cannot replace the separate air supply to the heater in any way due to the possibility of controlling by AQS senso...

Страница 18: ...installation procedure may result in the unit s damage or malfunction or potential harm to the health and property of the user Take special care when installing the condensate drain via a condensation...

Страница 19: ...ontact a specialist in the field structural engineer Drill holes in the wall and partially screw in the screws for hanging the unit Mount the unit onto the prepared anchor bolts Tighten the anchor bol...

Страница 20: ...er loop approximately halfway along the siphon hose Secure the loop with 1 piece of tie strap against any undesired movement but at the same time so as not to deform break the siphon hose Pay particul...

Страница 21: ...ose coupling 3 2 3 2 Connecting an additional condensate drain to the siphon ventilation in air conditioned rooms The unit is equipped with an additional second condensate drain on the fresh air suppl...

Страница 22: ...pipe joints that are connected to the unit must be sufficiently sealed to prevent unwanted leaks and subsequent problems such as condensation The connected piping must be of the same diameter as the u...

Страница 23: ...y voltage of 1 230V 50 60Hz may not be modified in any way otherwise there is a risk of damaging the electrical elements of the unit 3 3 2 Connection to Mains The unit is equipped with a separate stra...

Страница 24: ...lectrical accessories in the control box o Loosen the securing screws of the design cover and remove it o Unscrew the locking screw of the control box M6x20 o Loosen the 2x M6x20 bolt on the upper cla...

Страница 25: ...he grommet nut to secure the supply cable Fig 30 a Loosen the locking screws of the design cover remove the cover 2x b Unscrew the locking screw of the control box 1x c Unscrew the 1x M6x20 screw on t...

Страница 26: ...d socket The regulation is normally integrated into the body of the unit and in any case must not be handled in any other way than as specified in this manual Location of terminals in the control unit...

Страница 27: ...o The unit controller will start to decrease the flow rate continuously again while reducing the concentration o The aim of the regulation ventilation is to find the ideal degree of ventilation flow...

Страница 28: ...on the unit controller his ensures that the unit is switched on off only via an external switch 4 2 4 External Contact Connection BOOST EXT2 FILTER The unit control allows the connection of an externa...

Страница 29: ...onnecting an external electric heater POSTHEATER The unit can be connected to an external electric heater hereinafter referred to as a heater with the maximum output of 1 500 W voltage 1 x 230 V The u...

Страница 30: ...manufacturer s instructions e g flow direction distance from the unit heater position distance of temperature sensor from the heater etc If the heater manufacturer requires a minimum line velocity fo...

Страница 31: ...31 Version 1 GBR 25 10 2022 D 502 0287 4 3 Block diagram of the Xhouse unit wiring Fig 38...

Страница 32: ...ain switch from position 0 OFF to position 1 ON and wait until o All the LEDs on the controller flash 3 times o All the status LEDs flash o The LEDs stop flashing controller is loaded you can continue...

Страница 33: ...display is lit for approx 4 s then the controller returns to the sleep regime The functions that can be started from this regime are listed in Table 17 Description of the control functions of the Xho...

Страница 34: ...34 Version 1 GBR 25 10 2022 D 502 0287 5 4 2 Description of the functions of the buttons and regulation Tab 14...

Страница 35: ...according to Table 19 or according to your request with buttons 1 or 3 If necessary consult an HVAC professional for the correct ventilation performance setting o If you did not manage to complete the...

Страница 36: ...is reached ventilation shall be switched on with the minimum flow rate CO2 800 ppm RH 65 o If the reduction of the concentration of the monitored substances in the room is not achieved the unit contr...

Страница 37: ...justed using the button 1 decrease and button 3 increase The display on the scale is always two LEDs at a time Air power setting level in the BOOST regime To save the set values leave the controller i...

Страница 38: ...ibution overpressure and consult a chimney sweep if used in rooms with a fireplace Incorrect fan distribution settings can result in reduced comfort in the building improper operation of the unit and...

Страница 39: ...ilter position 5 on the controller Before starting to replace filters make sure you have new ones o Filter M5 XH 030 FILTER M5 o Filter F7 XH 030 FILTER F7 6 1 Filter Removal Loosen the M6x20 plastic...

Страница 40: ...at regular intervals otherwise the functionality of the unit may be impaired Children may not perform cleaning maintenance without supervision Compressed air steam solvents aggressive chemicals abras...

Страница 41: ...e g soapy water 7 1 2 Visual Inspection of the Supply Cable Visually check that the supply cable is not damaged loosen or torn from the connecting peripherals In case of damage consult with the person...

Страница 42: ...fully slide the fan beam and fan assembly position 11 out of the slot in the unit body Vacuum dirt from the fan chamber and if necessary wipe it with a damp cloth with a common cleaning agent e g soap...

Страница 43: ...changer Then visually inspect and clean the heat recovery exchanger position 12 Vacuum the heat exchanger Beware of vacuuming around the heat recovery exchanger in the area of the air exhaust where th...

Страница 44: ...event them from turning Secure the EPP cover of the unit through the control cover plate with a 3 5x20 self tapping screw For the further procedure refer to chapter 6 2 Filter Inserting To revive the...

Страница 45: ...ing may only be performed by a qualified professionally trained worker and only using original spare parts The manufacturer reserves the right to make changes to the device that do not affect the esse...

Страница 46: ...e type of metal and hand them over to the relevant organisations dealing with the reusable waste collection The parts made of plastic materials and rubber that are not subject to natural decomposition...

Страница 47: ...installation site or as agreed The method of resolving warranty repairs is exclusively at the discretion of the company s service centre The complaining party shall receive a written statement on the...

Отзывы: