background image

Walk-behind floor scrubber -www.xtremepolishingsystems.com 


lift   the   pallet   (with   the   machine)   using   a  fork   lift   truck   and  load  it   onto  the  means 

of transport; 


anchor the machine to the means of transport with cables connected to the pallet and 

machine itself 

6

.


PRACTICAL GUIDE FOR THE OPERATOR


6.1. 

Controls - Description


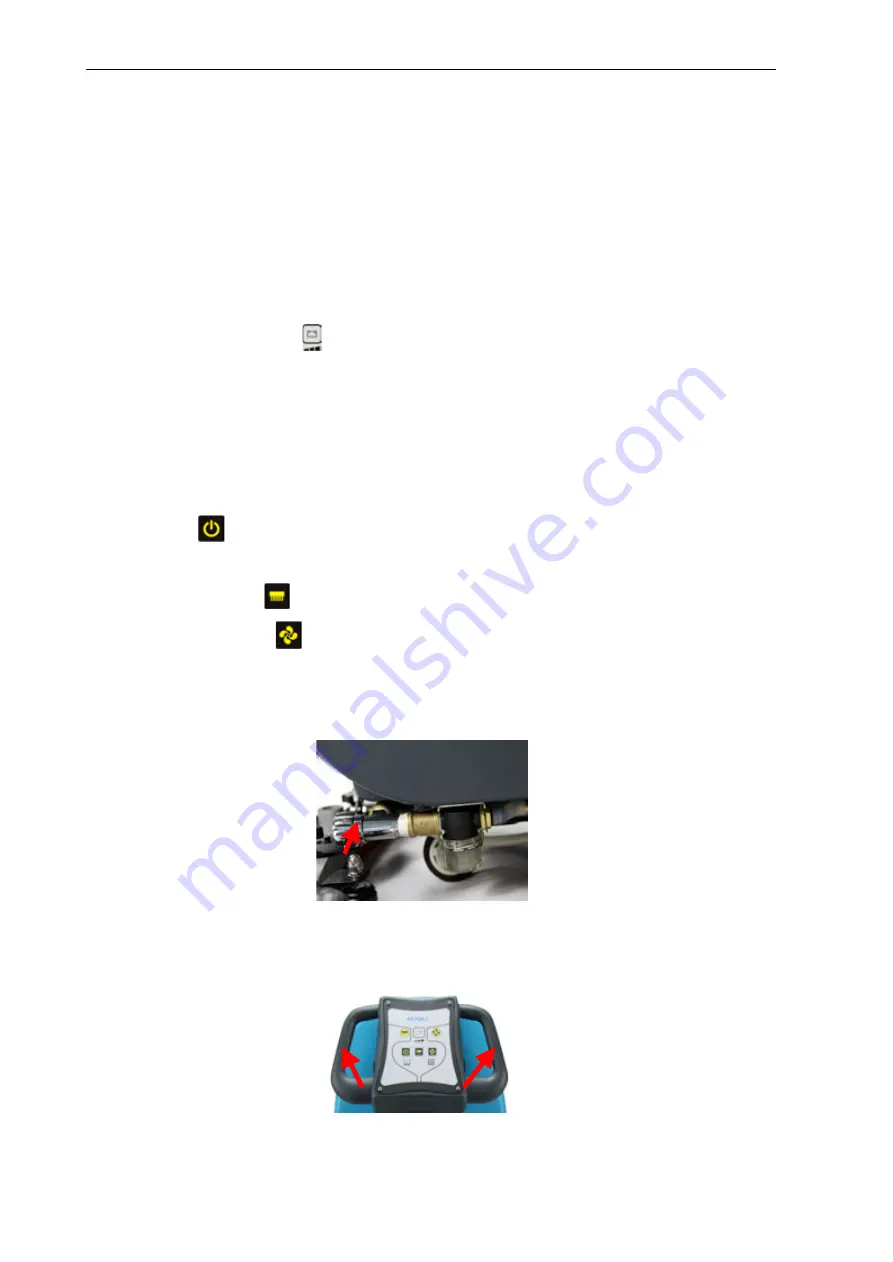
With reference to fig. 6, the machine has the following controls and indicator lights: 

•    

Battery power indicator 

        :

3 locations and 3 LED lights Total 9 classes show battery 

power,    high medium,less, each battery indicator has three states,    green light means power 

is good, yellow means medium, red means less. 

Low location yellow LED lights: without electricity, need to be recharged; 

Low location Red LED    lights: completely discharged,    brush plate will    stop in few seconds   

and    brush motor light will be off, It means that    the battery is over discharged,    It will cause 

irreparable damage to Circuit board. 

l


Power off 

        :Turn on or off all functions of the machine . It is a safety device. To stop 

the machine, press the button.


l

  Brush motor button             

(with light brush plate switch):run or stop bush motor.


l

  Suction motor button          (with light water suction switch):run or stop suction motor. 

l

  The light will be on When the suction motor is powered. 

l

  Water drain valve (Picture 12): ajust the water yield to clean ground depends on the floor 

situation.ajust water yield by rotate water drain valve. Increase by clockwise,decease by 

unclockwise. 


Picuture (12) 

l

  Operate handle.(Picutre 

13

),

control the operation direction. 


Picture (13 ) 


Squeegee lever

: raises (when lifted) or lowers (when pushed down) the squeegee. 

Содержание Genie Magic 2

Страница 1: ...X T R E MEP OL I S H I N GS Y S T E MS 2 2 0 0N W 3 2 n dS t r e e t 7 0 0 P o mp a n oB e a c h F L3 3 0 6 9 www x t r e me p o l i s h i n g s y s t e ms c o m 8 0 0 6 5 9 5 8 4 3 ...

Страница 2: ...UIDE FOR THE OPERATOR 14 6 1 Controls Description 14 6 2 Mounting and adjusting the squeegee 15 6 3 Moving the machine when not in operation 16 6 4 Mounting and changing the brush drive disks 16 6 5 Detergents Instructions 17 6 6 Preparing the machine for work 17 6 7 start working 18 6 8 Some useful tips to get the most from your scrubber drier 20 6 9 Pre wash 20 6 9 1 Drying 20 6 9 2Draining the ...

Страница 3: ... lead to damage to the operator machine floor being washed and environment To find the topic that interests you more rapidly consult the list of contents at the beginning of the manual Parts of the text requiring special attention are highlighted in bold and preceded by the symbols illustrated and described here DANGER Indicates the need for attention in order to avoid a series of consequences whi...

Страница 4: ...ying flat horizontal smooth or moderately rough even and obstacle free floors in civil and industrial premises It is available in both battery and cable versions to meet all running time and weight requirements The scrubber drier spreads a solution of water and detergent in the correct concentration on the floor and then scrubs it to remove the dirt By carefully choosing the detergent and brushes ...

Страница 5: ... contains and transports the mixture of clean water and detergent ref pic 1 the recovery tank collects the dirty water picked up from the floor after washing ref pic 2 detergent tank recovery tank pic 1 pic 2 control panel ref pic 3 control panel pic 3 head assembly the main element is the brushes ref pic 4 and 5 which distribute the detergent solution on the floor and remove the dirt MB55 head as...

Страница 6: ...on and on the safety plates fitted to the machine The Manufacturer declines all liability for damage to people or things resulting from failure to observe the instructions The appliance must be used exclusively by persons trained in its use and or who have demonstrated their ability and have been expressly instructed to use the appliance The machine must not be used by minors The machine must not ...

Страница 7: ...s Never use detergents other than those specified Follow the instructions on the relative safety sheet Detergents should be kept out of reach of children In the event of contact with the eyes wash immediately with abundant water If swallowed consult a doctor immediately Make sure the power sockets used for the models with cable or battery charger are connected to a suitable earth system and protec...

Страница 8: ...pulled Then replace the panel carefully to guarantee the safety of the operator Only original accessories and spare parts supplied by the Manufacturer may be used in order to guarantee safe problem free operation of the machine Never use parts removed from other machines or from other kits This machine has been designed and constructed to provide ten years service from the fabrication date shown o...

Страница 9: ...er delivers the machine make sure the packaging and machine are both whole and undamaged If the machine is damaged make sure the carrier is aware of the damage and before accepting the goods reserve the right in writing to request compensation for the damage 5 3 Unpacking When unpacking the machine the operator must be provided with the necessary personal protection devices gloves goggles etc to l...

Страница 10: ...d clean and the connections must be tight 5 4 1Batteries preparation While installing or performing maintenance on the batteries the operator must be provided with the necessary personal protection devices gloves goggles overalls etc to limit the risk of accident Keep away from naked flames avoid short circuiting the battery poles avoid sparks and do not smoke The batteries are normally supplied f...

Страница 11: ...etergent tank by pulling the catch ref pic 10 pic 10 3 Lift the dirty water drum and tilt it backwards by about 90 This provides access to the battery compartment in the detergent tank from above 4 Place the batteries in the compartment in the direction shown in the drawing printed inside the compartment on the detergent tank Mount the batteries on the machine using lifting means suitable for thei...

Страница 12: ...rger not provided with the machine you must fit it with the connector supplied with the machine To install the connector proceed as follows remove about 13 mm of protective sheath from the red and black wires of the battery charger insert the wires into the connector contacts and squeeze them forcefully with suitable pliers respect the polarity red wire black wire when inserting the wires into the...

Страница 13: ... location Red LED lights completely discharged brush plate will stop in few seconds and brush motor light will be off It means that the battery is over discharged It will cause irreparable damage to Circuit board l Power off Turn on or off all functions of the machine It is a safety device To stop the machine press the button l Brush motor button with light brush plate switch run or stop bush moto...

Страница 14: ...uts down 6 2 Mounting and adjusting the squeegee The squeegee is responsible for the first phase of drying To mount the squeegee on the machine proceed as follows 1 check that the squeegee mount is raised otherwise lift it by means of the squeegee lever 2 Tighten the two knobs on the squeegee as shown in Picture 16 below Picture 16 3 slacken the two knobs at the centre of the squeegee 4 insert the...

Страница 15: ...the nut on the squeegee wheel will make squeegee wheel away from ground then squeegee is closer to ground tighten the nut will compress squeegee wheel to ground then squeegee is further away from ground Generally adjusting nut to make two squeegee wheels just touch ground is ok 6 3 Moving the machine when not in operation To move the machine proceed as follows 1 raise the squeegee 2 push the head ...

Страница 16: ...ntrations Do not use solvents or hydrocarbons The temperature of the water and detergent must not exceed the maximum indicated in the technical specification They must be free of sand and or other impurities The machine has been designed for use with low foam biodegradable detergents made specifically for scrubber driers For a complete and up to date list of the detergents and chemicals available ...

Страница 17: ... the necessary familiarity Always empty the dirty water drum before filling the detergent tank again For effective cleaning and to extend the working life of the machine follow a few simple rules prepare the work area by removing all possible obstacles begin working from the furthermost point to avoid walking on the area you have just cleaned choose the straightest possible working routes divide l...

Страница 18: ...just water yield depending requirement l adjust working pressure by adjusting Knob Uncover the water tank you can see this knob Rotate clockwise to increase pressure counterclockwise rotation can reduce stress IMPORTANT Empty the dirty water drum each time you fill the detergent tank Never leave the suction motor on and detergent tap open when parked when the dirty water drum is full the level ind...

Страница 19: ...ed water needed less In some particularly dirty place you can stay the machine properly there in order to have more time to separate dirt for cleaner to get better cleaning effect 6 9 1 Drying Lower the squeegee and with the suction motor on pass over the same area washed previously The result is equivalent to in depth washing and subsequent ordinary maintenance will take less time To wash and dry...

Страница 20: ... 6 10 empty water tank DANGER Please wear appropriate personal protective equipment Disconnect the machine power before Empty the water tank 7 PERIODS OF INACTIVITY If the machine is not used for some time remove the squeegee and brushes or drive disks wash them and put them away in a dry place preferably in a bag or wrapped in plastic film away from dust Park the machine with the head lowered Mak...

Страница 21: ... Picture 26 picture 27 Picture 26 picture 27 Do NOT connect the battery charger to the main wiring connector of the scrubber drier In the case of gel batteries use a charger specific for gel batteries only l Charge the batteries as described in the battery charger manual l at the end of charging disconnect the connectors l reconnect the battery wiring connector to the machine connector 9 MAINTENAN...

Страница 22: ...inst the float switch remove the suction motor air filter from the float switch support in side the dirty water drum at the top clean the filter with running water or the detergent solution used on the machine dry the filter thoroughly before replacing it in the support Make sure the filter is correctly located in its housing screw the cap back on the dirty water drum Pic 28 Pic 29 Pic 30 9 3 Dete...

Страница 23: ...hem remove the blade picture 32 reuse the same blade by reversing the edge in contact with the floor until all four edges are worn out or replace with a new blade fitting it onto the screws on the body of the squeegee reposition the two blade retainers by centring the widest part of the slots over the fixing screws on the squeegee body then pushing the blade retainers inwards refasten the catch Re...

Страница 24: ... table For the complete fuse table see the spare parts catalogue Picture 33 Never use a fuse with a higher amperage than specified If a fuse continues to blow the fault in the wiring boards if present or motors must be identified and repaired Have the machine checked by qualified personnel 9 6 Routine maintenance 9 6 1 Daily operations After each day s work proceed as follows disconnect the machin...

Страница 25: ...ctor disconnected connect the batteries to the machine Batteries are flat Recharge the batteries Brushes do not work Brush motor does not turn on Start the motor switch the motor thermal cutout has tripped the motor is overheated release the brush lever turn off the brush switch leave the machine to cool down for at least 45 minutes the power supply of motor thermal cutout connectors are disconnec...

Страница 26: ...tor or the motor is faulty Connect the power or replace the motor the fuse has blown replace the fuse The squeegee does not clean or suction is ineffective the edge of the rubber blades in contact with the floor is worn replace the rubber blade the squeegee or hose is blocked or damaged Cleaning it and repair Suction hose is blocked Cleaning the hose the suction hose is not connected to the squeeg...

Страница 27: ... unit is broken therefore the brush does not move Replace it the brush motor thermal cutout has tripped cause the motor is overheated Top the machine turn it off and leave it to cool at least 45 minutes The machine tends to pull to one side the direction adjustment knob must be adjusted appropriately for the floor regulate the direction of movement by adjusting the direction adjustment knob ...

Отзывы: