background image

91 / 99 

www.xovis.com 


For better identifying objects influencing the internal processing, it is best to switch the 
sensor to head coordinates. Refer to chapters 3.2.7.9.1 and 3.2.10.4 to learn how to change 
the coordinate mode. Now, with coordinate mo

de set to “head”, false detections are shown 

where they really appear.


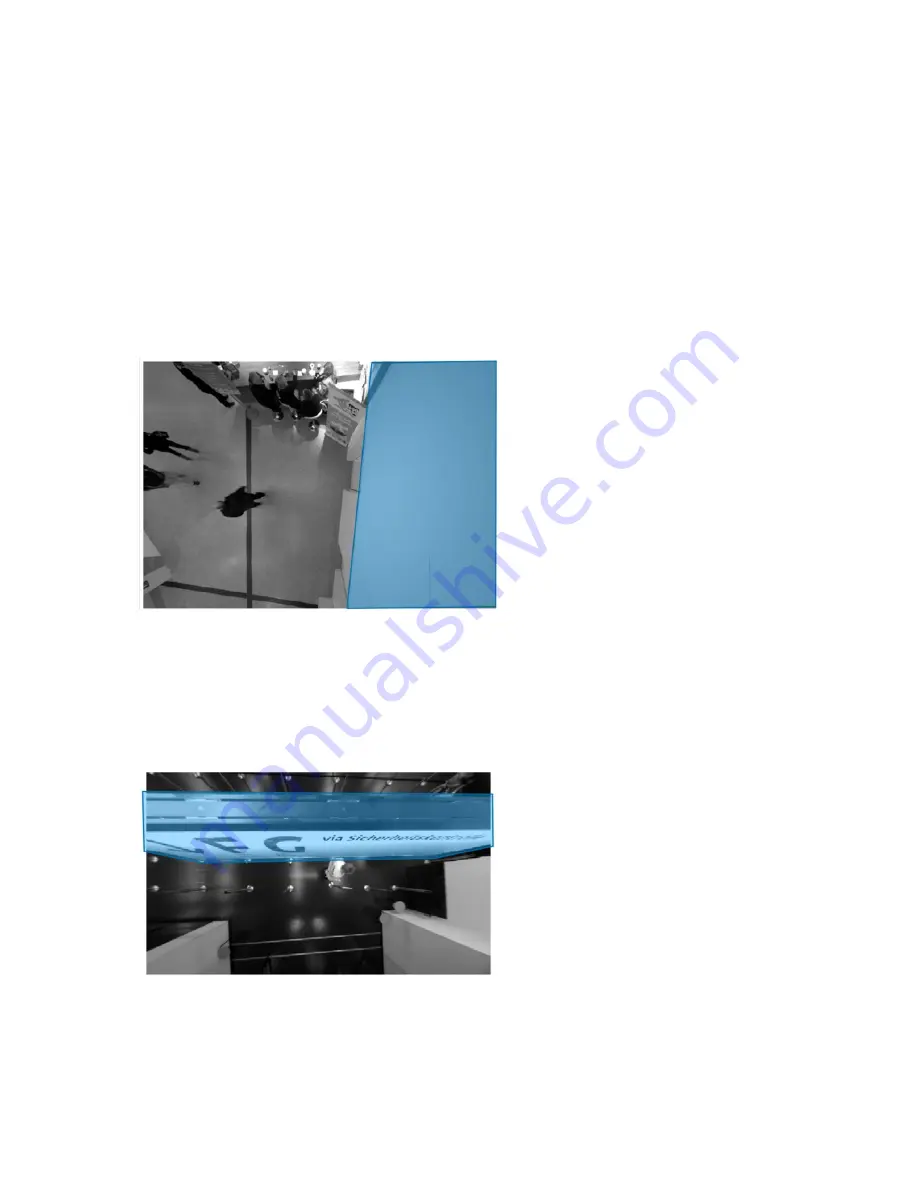
Figure 55 shows a situation combining two reasons for using taboo masks in the same 
scene: First, a significant part of the scene is covered by the wall which reaches towards the 
sensor. This can cause disturbing artefacts which can influence the sensors vision 
algorithms. Second, the situation shows two doors in the inner area of the scene, i.e. not at 
the scene border, same as already in Figure 54. Telling the sensor about this artificial scene 
boundary helps for proper person deletion when leaving through the doors. Masking out the 
area appropriate eliminates such possible misbehavior:  


Figure 55: Taboo mask on unstructured white wall and marking the scene boundary over two doors 

Figure 56 shows a situation with a big sign located within the sensors view. As this sign is 
very close to the sensor, the stereo vision processing could be disturbed. And, again as with 
the situations in Figure 54 and Figure 55, it is important to tell the sensor about this scene 
boundary. Otherwise person bubbles could stick at the sign when the person walks 
underneath it. Masking out the sign appropriate eliminates such possible misbehavior. 


Figure 56: Taboo mask on a sign within the sensor view 

Note that, other than with floor masks, taboo masks usually cover slightly more than 
necessary. This is important due to the fact, that disturbing artefacts which are masked out 
by taboo masks show inexact dimensions and can slightly slop over their actual region. 

Содержание PC Series

Страница 1: ...PC Series User manual...

Страница 2: ...trademarks are the property of their respective owners Non disclosure reminder All information in this document is strictly confidential and may only be published by Xovis AG Switzerland Document his...

Страница 3: ...3 2 2 Setting up the sensor in the network 9 3 2 3 Xovis Sensor Explorer 10 3 2 4 Access the web interface 14 3 2 5 Login to the sensor 15 3 2 6 Navigation 15 3 2 7 Setup Wizard 17 3 2 8 Live View 42...

Страница 4: ...Placement of dwell zones 93 Time synchronization mechanism 95 5 Technical data 97 6 Certificates Tests 98 7 Custom Integration 99 API 99 Plugin Architecture 99...

Страница 5: ...ustomer section on the Xovis website at www xovis com PC Series hardware concept The housing of a PC Series sensor is designed to be mounted directly on the ceiling Xovis offers several accessories al...

Страница 6: ...rnet The sensor is powered by PoE Class 0 compliant to IEEE 802 3af As defined by the standard the network switch port needs to provide 15 Watts at 48 V Sensor LED The PC Series sensor provides a mult...

Страница 7: ...e 3 Figure 3 Person generation When a person track once was generated the person stays tracked until it leaves the scene again and its head is touching the visible scene border Tracking counting at bo...

Страница 8: ...rdinate mode which can either be foot or head then defines where to show the tracking of a person The displaying of the person tracks paths on the other hand influences the definition of the counting...

Страница 9: ...ion of coordinate modes In the left image foot coordinates are in use In the right image head coordinates are in use The situation shows that the first possible position of person bubbles is clearly c...

Страница 10: ...n directly by double clicking the XovisSensorExplorer exe file The following screen shows up Figure 8 Xovis Sensor Explorer On the top right of the screen an IP range can be specified This range will...

Страница 11: ...second number the sensors internal temperature 3 2 3 2 Installing a sensor in a fix IP environment The Xovis Sensor Explorer will only display sensors properly configured and reachable on the network...

Страница 12: ...he user to be patient for 20 seconds After this time the sensor should have come up with the new IP settings If the PC running the Xovis Sensor Explorer is located in the same IP range or allows routi...

Страница 13: ...nt to the sensor and a message informs the user to be patient for 20 seconds After this time the sensor should have come up with the new IP settings and can be found in the according network and IP ra...

Страница 14: ...ping its IP address directly into a web browser on a PC connected to the same network as the sensor Alternatively the sensors web page can be opened by double clicking a sensor in the Xovis Sensor Exp...

Страница 15: ...orgot your password link This allows to reset the sensor using the Sensor Master Key SMK The reset procedure is described in chapter 3 2 10 4 5 3 2 6 Navigation The navigation bar is located at the to...

Страница 16: ...e two entries for EULA and third party licenses display the respective licenses The Logout button ends the session of the currently logged in user and returns to the login page The currently logged in...

Страница 17: ...n needed for a proper usage of the sensor 3 2 7 1 Welcome screen Figure 18 Setup wizard The welcome screen of the wizard gives a quick description of the intent of the wizard and allows the user to ch...

Страница 18: ...ss after pressing Save In that case the new IP address needs to be entered in the web browser after saving 3 2 7 3 Date Time In the next screen the wizard is asking for setting the sensors date time a...

Страница 19: ...wer frequency of the country of operation This is needed to adjust the sensors frame rate to the illumination frequency By clicking Next these settings are applied to the sensor 3 2 7 5 Sensor setting...

Страница 20: ...e scene image The help button beside the play button also offers a short explanation when hovering over it with the mouse The floor is masked by selecting the drawing tool Floor and directly drawing t...

Страница 21: ...scene should be covered by the floor mask For special situations it can be desired to limit the floor mask to a part of the actual floor only e g when persons passing in a neighboring zone should be i...

Страница 22: ...e scene is considered as floor and therefore enabled for person detection The floor mask is applied when clicking Next 3 2 7 7 Re calibrate Sensor The wizard will now ask if a re calibration should be...

Страница 23: ...en the user is asked to verify the person size This is important to validate the distance measurement of the sensor In most cases especially on mounting heights below 3 5 meters the person sizes will...

Страница 24: ...e effect can be observed immediately Also the average person size is reset every time the slider is moved Please note that person sizes do shrink near border when leaving entering the scene so especia...

Страница 25: ...es the height from floor at which a person gets detected and analyzed by the sensor This parameter influences the detection of small persons children and can be reduced to 80 cm at least With this par...

Страница 26: ...e most recent part of the track of every person within the scene is visualized Figure 24 Displayed path of tracked person The Live maps section allows to show hide several types of visualization maps...

Страница 27: ...nd deletion points of persons As with the path live map when the start stop checkbox gets unchecked the points will disappear from the scene and be reset Please note that all live visualizations are i...

Страница 28: ...rientation is indicated with a centered arrow pointing in the direction of forward crossing see Figure 27 Figure 27 Orientation of a count line A count line offers several ways to analyze person cross...

Страница 29: ...tool gets disabled One or more lines then need to be deleted to re enable the line drawing tool 3 2 7 9 5 Count zone The count zone is the second counting and observation tool available with the PC2 A...

Страница 30: ...ene elements When hovering over the elements within the list the element gets hightlighted both within the list and within the scene When clicking on a specific element it gets marked red both within...

Страница 31: ...big part of the scene image it can be helpful to hide it when modifying other scene elements Figure 32 Hide show a scene element Delete a scene element The trash bin icon allows to delete any scene el...

Страница 32: ...or deactivation zone more on this later a special warning will inform the user that the association has to be removed prior to be able to delete the count zone Switch count line orientation The count...

Страница 33: ...uration When clicking on this icon a dialog is displayed allowing the user to control a series of parameters associated with this count item These parameters are explained in the following two chapter...

Страница 34: ...cel out each other That way multiple counting of one and the same person which moves continuously forward and backward in the region of the count line is ignored This is the preferred mode to get exac...

Страница 35: ...crossings are only counted on this count line when the person is neither generated nor deleted within the deactivation zone Example situations In the following several examples demonstrate the differ...

Страница 36: ...ll as the use of an activation deactivation zone can be crucial to the desired behavior In out count is recommended count mode as it combines instantaneous update of the first crossing plus filtering...

Страница 37: ...tings of a count line are directly displayed in the scene item list The example below indicates that Zone 0 is set as activation zone and that persons below 100 cm height are not considered for counti...

Страница 38: ...ne data persistence dwell time If toggled to On fill level and dwell time statistics are stored on the sensor When set to On a minimum and a maximum dwell time have to be specified Persons dwelling fo...

Страница 39: ...arted and ended outside the zone are considered for dwell time calculation Please refer to chapter 4 3 Placement of dwell zones for more information on this 3 2 7 10 Privacy mode After setting up the...

Страница 40: ...image information is shown at all The scene background is just displayed as a white area Tracking is shown without restrictions 3 No image information and no tracking information is shown Only the cou...

Страница 41: ...ery sensor and is provided together with the corresponding order invoice Alternatively send a request to support xovis com 3 2 7 11 Finishing the wizard When the privacy mode is set the wizard will be...

Страница 42: ...42 99 www xovis com 3 2 8 Live View The live view is the default landing page after logging in to the sensor or after finishing the setup wizard Figure 42 Live view...

Страница 43: ...counts list The blinking small green dot displayed in the upper left corner of the Scene box indicates an intact connection to the sensor 3 2 8 2 Live count states The Counts box lists all configured...

Страница 44: ...es the count line values every minute the stored statistics will only be influenced for the last single minute 3 2 8 3 24h live statistics The 24h activity shows measurements of a specific count item...

Страница 45: ...ing The Validation Recording box allows to manage validation recordings of the sensor A validation recording contains the scene video the person tracks the count item configuration and all line counti...

Страница 46: ...time is immediately updated to the latest sensor time and the end time will hold the start time value plus 1 minute This can be helpful to quickly start a short validation recording i e if an interest...

Страница 47: ...sequence files as one recording and display the recording accordingly The button clear recordings allows to remove all sequence files from the sensor 3 2 8 4 3 Multisensor Validation Recording The mu...

Страница 48: ...g singlesensor slaves need to also have data push configured if common provisioning of these files is desired on the remote side Please see the Xovis Validation Viewer manual to learn how to evaluate...

Страница 49: ...rs 1 day With the From and To buttons the time range can be specified on a minute basis After selecting the properties the chart can be updated by clicking on the update chart button To reset the prop...

Страница 50: ...to a CSV file by clicking on the CSV export button located all on the bottom of the dialog All settings are also applied to the CSV export e g the chosen granularity and period 3 2 9 1 1 Count zone c...

Страница 51: ...nd of each time bin When changing the granularity to rougher granularities than 1 minute the new time bins will contain the occupancies of their last included minute bin For example when selecting a 5...

Страница 52: ...ell time during every time bin When choosing rougher granularities than 1 minute the data from the stored 1 minute values are combined For correct statistical combination of these dwell times the sens...

Страница 53: ...umber of tracks with dwell times longer than the maximal dwell time Invalid tracks Shows the number of tracks which have not been created and deleted outside the dwell zone for further information see...

Страница 54: ...e shown on the scene The slide bar allows to navigate through the monitored time period and to visualize the start stop points depending on it Based on this it is now possible to see how the start sto...

Страница 55: ...ghlight paths with less traffic The Height map displays the average person heights within the scene This averaged map can help to if a sensor was moved after configuration The averaged map will then s...

Страница 56: ...on update has to be clicked All below the map view the button Refresh scene image allows to re capture the displayed scene image Toggling the switch Show scene elements allows to overlay or hide count...

Страница 57: ...ackground image here other than with the single sensor visualization maps 3 2 10 Config View The config view allows the complete configuration of the sensor However it is usually recommended to config...

Страница 58: ...nt All changes made in the config view will first be applied to the sensor when pressing the Save button 3 2 10 1 2 Discard changes The Discard changes button discards all changes made since saving th...

Страница 59: ...IP address after applying the factory default settings Attention Applying the factory default settings will delete all custom made settings including all count elements All stored count data will be...

Страница 60: ...onnection will fail if the sensor is assigned to a different IP address by the DHCP server after rebooting 3 2 10 1 5 Export Import The Export Import button offers a convenient way to save the whole s...

Страница 61: ...is started by clicking on Import The user then is asked to confirm the import process of the configuration Please be aware that the configuration currently applied to the sensor will be completely ov...

Страница 62: ...ed by the scene view controls described in chapter 3 2 7 9 3 When hovering over the count elements within the scene the element gets hightlighted both within the scene and within the counts list menti...

Страница 63: ...and taboo masks violet and blue icon are used rarely and only for troubleshooting The drawing procedure is the same as for floor masks The meaning and usage of exclusion and taboo masks will be explai...

Страница 64: ...button see chapter 3 2 10 1 1 An unsaved changes reminder pops up as soon as any changes will be performed It will disappear only after clicking on the save button by undoing any changes or by clicki...

Страница 65: ...granularity for count data The protocol Which method to use for pushing the data HTTP S FTP or SFTP SSH validation recording uses FTP SFTP only Data push format for line zone data only Which data form...

Страница 66: ...ush xovis com with a custom URL parameter auth The test button allows to instantaneously test the connectivity to the remote destination When clicking on it the sensor tries to send a sample message t...

Страница 67: ...fied password The recordings will be stored in the directory sensor 00 1E C0 DF 65 D9 rec The password will never be displayed and will also be stored in an encrypted format on the sensor Once set a p...

Страница 68: ...push count data sensor status or a validation recording sequence to the selected destination at any time This can be useful for example when a sensor was installed two weeks ago but outgoing network c...

Страница 69: ...e push the sensor can be set to send person tracks to a remote site even if the sensor is located behind a firewall The finest highest granularity available here is 0 25 seconds the lowest one is 2 5...

Страница 70: ...be licensed afterwards Please refer to the separate plugin manuals to learn more about these default plugins Additional plugins can be added by clicking on the Add Plugin button In the subsequently d...

Страница 71: ...4 4 Users The Users section allows to manage the users The PC2 sensor offers an Administrator and a User account The User account is disabled by default and can be enabled by specifying a password for...

Страница 72: ...be performed Figure 49 shows the navigation when logged in with the User account Figure 49 Disabled Config view when logged in with User account When logged in as Administrator and the User account is...

Страница 73: ...me UI language and privacy mode please refer to the corresponding chapters in the wizard section see chapter 3 2 7 Setup Wizard The sensor reset allows to complete reset the sensor to its factory stat...

Страница 74: ...crypted access to the sensor API and WebGUI is prevented When toggling this switch to disabled a popup will inform the user about the deactivation of the http WebGUI Attention When disabling HTTP here...

Страница 75: ...as single sensor With a click on the Setup multisensor button the dedicated configuration wizard will start In the first screen all involved single sensors can now be added to the multisensor The dev...

Страница 76: ...rds are matching The time server is set up Privacy Mode is set to 0 or 1 If one of those conditions is not met an error message will inform the user about the reason In this example the IP was wrong a...

Страница 77: ...e center When all slaves are added clicking Next will bring up the stitching page The automated stitching is based on tags which have to be placed underneath the involved sensors with a distance betwe...

Страница 78: ...r sensor the notification Ready for stitching appears on the bottom left side Attention Make sure to never use a specific tag e g A more than once in a multisensor stitching process After clicking on...

Страница 79: ...e stitched still image of the multisensor It is possible to activate the tracking shows the bubbles the traces and the live maps path and start stop Counts The section Counts will show the counts of t...

Страница 80: ...ultisensor view in the Config tab allows to setup count lines and zones for the multisensor Likewise when configuring a Single Sensor a multisensor allows to draw up to 8 count lines and zones by usin...

Страница 81: ...com The sections Settings Multisensor contains a list of all involved sensors with their IP address Furthermore the multisensor stitching wizard can be restarted here and the multisensor can be delet...

Страница 82: ...m time The sensors internal time date Last configured The time of last configuration change or not configured factory default when the sensor was not yet configured Booted The last boot time Privacy m...

Страница 83: ...on The Data retention box informs about the amount of days that are stored on the sensor The sensor can store up to 122 full days for count lines and up to 61 full days for count zones This number of...

Страница 84: ...icon on the right of each connection indicates if the latest try succeeded or not green check if succeeded red alert if not 3 2 11 5 Plugins In the Plugins box all plugins currently activated on the s...

Страница 85: ...d file extension is xfw When a valid file is chosen the Upgrade button will get enabled Clicking on it will start the upgrade installation procedure The following dialog will be displayed By clicking...

Страница 86: ...in case of trouble shooting Sensor images left right shows the grayscale image of both lenses This can help to identify dirt and scratches on the lenses Furthermore it also helps identifying obstacles...

Страница 87: ...om another client Whenever the sensors configuration gets changed by another client i e when more than one user is working on the sensor configuration at the same time the web GUI will inform the user...

Страница 88: ...firmware upgrade or just a communication issue in the local network e g very low bandwidth Whenever this message appears working with the UI could get limited With low connectivity image stream and c...

Страница 89: ...e location thereby is always referenced to a persons foot position The exclusion mask can help to hinder false detections or bubbles sticking on objects like pillars walls or lamps To identify situati...

Страница 90: ...e boundaries e g for proper handling people leaving the scene Therefore scene boundaries which differ from the actual sensors view boundaries should be marked by using taboo masks for everything behin...

Страница 91: ...proper person deletion when leaving through the doors Masking out the area appropriate eliminates such possible misbehavior Figure 55 Taboo mask on unstructured white wall and marking the scene bounda...

Страница 92: ...ation The following example gives a better understanding on how the two masks work The following image illustrates a person walking close to a mirror red and the reflection of the person green As the...

Страница 93: ...of a person is located within the purple mask it will get deleted immediately For the sample situation this is exactly what the user was looking for Placement of dwell zones The dwell time analysis u...

Страница 94: ...ulated time between the zone entry and the zone exit red But as its dwell time was shorter than the minimal dwell time its dwell time value will not be considered for further statistical dwell time an...

Страница 95: ...ed as red and green points show the limits of the sensor s tracking area For optimal dwell time analysis the dwell zone has to be placed inside the sensor s tracking area Time synchronization mechanis...

Страница 96: ...nchronization recommended Yes No Was the power break only short e g a power cut only No Invalid time synchronization required Yes Sensor uses manually set time Sensor uses last known time before reboo...

Страница 97: ...s sensor works moderate with the WebGUI in use live view provides limited fps only Needed bandwidth for data transmission 20 KB s sensor works but without using the WebGUI ok for operational use afte...

Страница 98: ...ide reasonable protection against harmful interference in a residential installation This equipment generates uses and can radiate radio frequency energy and if not installed and used in accordance wi...

Страница 99: ...on on the sensor interface and custom integration can be found in the API documentation Interested integrators can contact Xovis to receive a copy of the API documentation Plugin Architecture The plug...

Отзывы: