1/ Left : Slower attack, Faster Decay and Release
2/ Center : Faster attack, Slower Decay and Release
3/ Right : Slower Attack, Decay and Release
Important note on the envelope
s : Their behavior is heavily related and tied to the GATE TIME parameter specified in the Sequencer
line. In a traditional ADSR envelope, the release parameter is only heard when the sustain level is not set to zero. Keep this in mind,
and please read the chapter of this manual on the Sequencer Gate Time parameter, where this relationship is explained in detail.
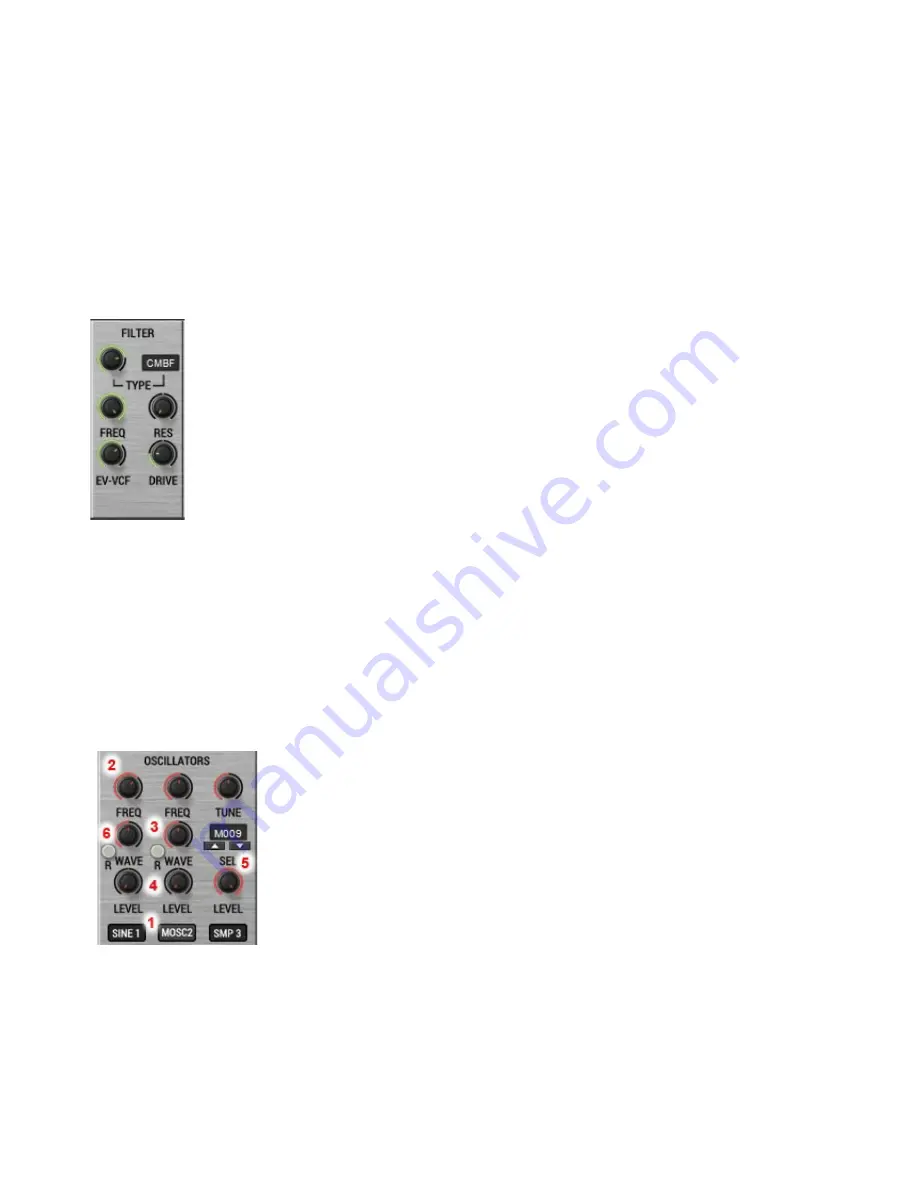
The Filter Section (6)
Deep in the heart of all analog synthesizer are filters. StiX filters make use of the famous Xils-Lab modeled
analog filters, with their unique 0df and non linear algorithms.
Filter Type
: The first knob let you specify the filter type, which is simultaneously displayed in the Filter
Display box. The choices are :
1/ LP 24 DB Cem334 Filter ( also used in PolyKB II Xils-Lab Synthesizer and units like RSF
Kobol/Polykobol )
2/ LP 12 DB XXY22 Filter ( Also Used in the Syn’x 2/Minisyn’X synthesizer and Elka Synthex )
3/ BP 6 DB ……. (Also Used in the Syn’x 2/Minisyn’X synthesizer and Elka Synthex )
4/ BP 12 DB …….. (Also Used in the Syn’x 2/Minisyn’X synthesizer and Elka Synthex )
5/ HP 12 DB …….. (Also Used in the Syn’x 2/Minisyn’X synthesizer and Elka Synthex )
6/ CMBF : Comb Filter with finite impulse response
7/ CMBI : Comb Filter with infinite impulse response
Cut-Off
: Specifies the cut-off point of the selected filter.
Resonance
: Set the resonance factor of the filter. ( Resonance adds emphasis to frequencies that are around the
Cut-Off point )
EV-VCF
: Sets the amount of modulation of the VCF envelope to the cut off point.
Drive
: Applies pre or post filter drive to the signal. ( Click on the label to toggle between pre and post drive
action )
The Oscillators Section (4)
You can combine up to 3 oscillators to sculpt each drum sound.
The first two oscillators are modeled analog morphing oscillators. Morphing
means that you can morph in a continuous way between waveforms, going
from Triangle (Wave knob full left) to a Pulse (Wave Knob Full Right ) . You
can switch any of these two oscillators to a Sine by clicking on the Oscillator
Label (1) (It will become « Sine » ) In this case the Waveform Button (3) will
perform WaveShaping on the Sine signal, instead of Wave Morphing.
The last Oscillator let you choose between Noise (White) and a Sample (5).
You can load this sample from StiX Factory content, or choose any Sample of
your collections. ( In this case, please note that the Sample length is limited to
2 seconds, and that it will be converted into a mono file if it’s stereo)
Oscillator 1 & 2 Pitch (FREQ) (2)
: Let you specify the pitch of the Oscillator
Oscillator 1 & 2 WaveForm (WAVE) (3)
: Set the waveform of the oscillators ( From Triangle to Pulse, center position is a
Sawtooth ) If the Oscillator is set to Sine, the WaveForm button allows to perform WaveShaping on the Sine Waveform.
17


