background image

Printing 


WorkCentre 7220/7225 Multifunction Printer 

79 


User Guide 


Portrait 

Landscape 


Portrait 
2-Sided Print 

Portrait 
2-Sided Print, Flip on Short 

Edge 

Landscape 
2-Sided Print 

Landscape 
2-Sided Print, Flip on Short 

Edge 


Selecting Paper Options for Printing 

There are two ways to select the paper for your print job. You can let the printer select which paper to 

use based on the document size, paper type, and paper color you specify. You can also select a specific 

tray loaded with the desired paper. 


Printing Multiple Pages to a Single Sheet 

When printing a multiple-page document, you can print more than one page on a single sheet of paper. 

Print 1, 2, 4, 6, 9, or 16 pages per side by selecting Pages Per Sheet on the Page Layout tab. Page Layout 

is on the Document Options tab. 


Printing Booklets 

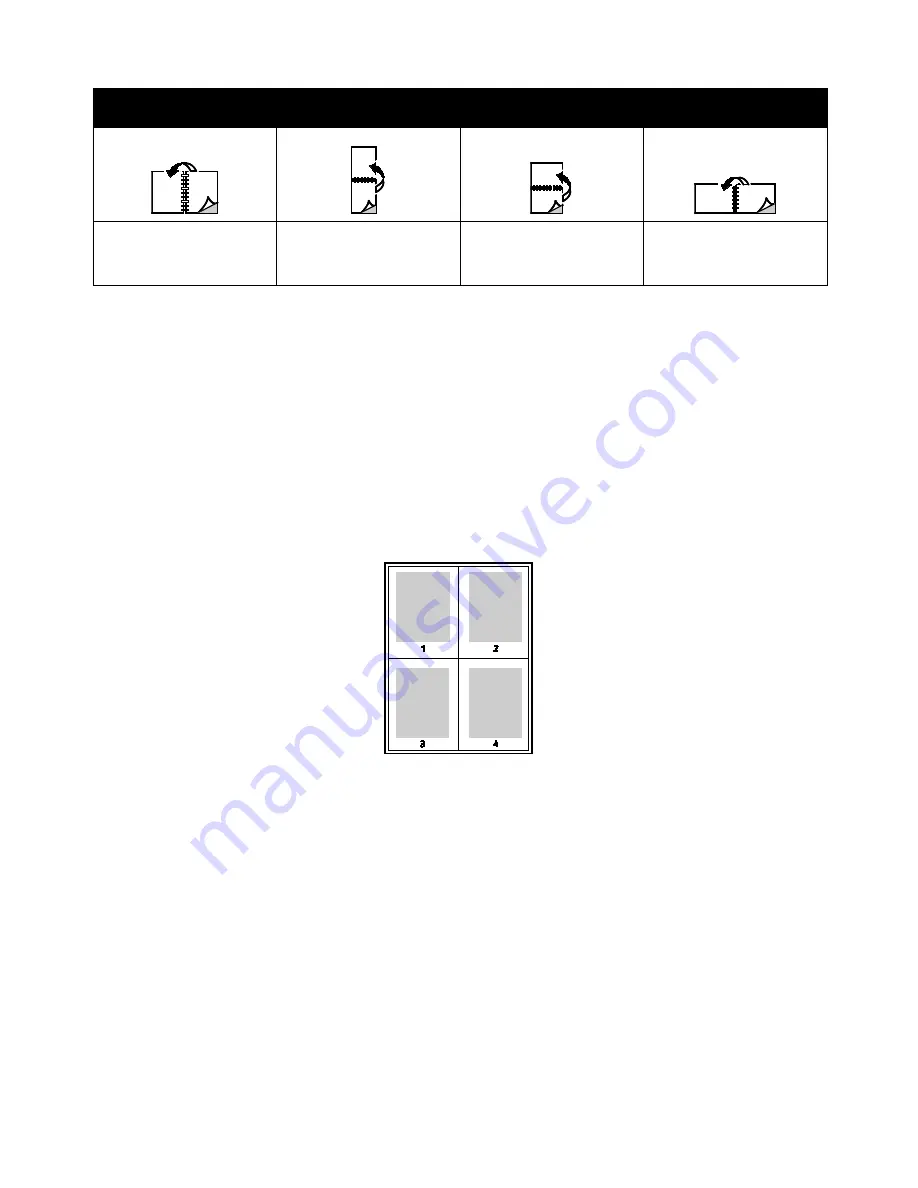
With 2-sided printing, you can print a document in the form of a small booklet. Create booklets from any 

paper size that is supported for 2-sided printing. The driver automatically reduces each page image and 

prints four page images per sheet of paper, two page images on each side. The pages are printed in the 

correct order so that you can fold and staple the pages to create the booklet. 

When you print booklets using the Windows PostScript or Macintosh driver, you can specify the gutter 

and creep. 


Gutter

 specifies the horizontal distance in points between the page images. A point is 0.35 mm 

(1/72 in.). 


Creep

 specifies how much the page images are shifted outward, in tenths of a point. Shifting 

compensates for the thickness of the folded paper, which would cause the page images to shift 

slightly outward when folded. You can select a value from zero to 1 point. 

Содержание WorkCentre 7220

Страница 1: ...ente Deutsch Benutzerhandbuch Espa ol Gu a del usuario Portugu s Guia do usu rio Nederlands Gebruikershandleiding Svenska Anv ndarhandbok Dansk Betjeningsvejledning Suomi K ytt opas Norsk Brukerh ndbo...

Страница 2: ...the United States and or other countries Apple AppleTalk Bonjour EtherTalk Macintosh Mac OS and TrueType are trademarks of Apple Inc registered in the U S and other countries HP GL HP UX and PCL are...

Страница 3: ...formation 19 2 Features 21 Parts of the Printer 22 Left Front View 22 Right Rear View 23 Telephone and Fax Connection 24 Internal Components 24 Document Feeder 25 Control Panel 25 Integrated Office Fi...

Страница 4: ...orted Paper 50 Recommended Media 50 Ordering Paper 50 General Paper Loading Guidelines 50 Paper That Can Damage Your Printer 51 Paper Storage Guidelines 51 Supported Paper Types and Weights for 1 Side...

Страница 5: ...otification for Windows 85 Printing Special Job Types 86 Secure Print 86 Sample Set 87 Delay Print 88 Saved Job 88 Held Print Jobs 91 Releasing Held Print Jobs 91 Print From 92 Printing from a USB Fla...

Страница 6: ...ination 138 Sending a Scanned Image to a Destination 138 Scanning to a Computer 139 Scanning to a Computer 139 Using One Touch Scanning 140 8 Faxing 141 Basic Faxing 142 Document Glass 143 Document Fe...

Страница 7: ...esets or Turns Off Frequently 189 Printing Takes Too Long 190 Document Fails to Print 191 Document Prints from Wrong Tray 192 Printer is Making Unusual Noises 192 Automatic 2 Sided Printing Problems 1...

Страница 8: ...ronmental Health and Safety Contact Information 243 B Regulatory Information 245 Basic Regulations 246 United States FCC Regulations 246 Canada 246 European Union Radio Interference 247 European Union...

Страница 9: ...Contents WorkCentre 7220 7225 Multifunction Printer 9 User Guide Battery Removal 263 Other Countries 264...

Страница 10: ......

Страница 11: ...tional Safety 15 Maintenance Safety 17 Printer Symbols 18 Environmental Health and Safety Contact Information 19 Your printer and the recommended supplies have been designed and tested to meet strict...

Страница 12: ...ot push objects into slots or openings on the printer Touching a voltage point or shorting out a part could result in fire or electric shock Do not remove the covers or guards that are fastened with s...

Страница 13: ...know if an outlet is grounded ask an electrician to check the outlet Do not use a ground adapter plug to connect the printer to an electrical outlet that does not have a ground connection terminal WAR...

Страница 14: ...into the printer The printer is exposed to water Any part of the printer is damaged Telephone Line Cord WARNING To reduce the risk of fire use only No 26 American Wire Gauge AWG or larger telecommuni...

Страница 15: ...dequate space for operation and servicing Place the printer in a dust free area Do not store or operate the printer in an extremely hot cold or humid environment Do not place the printer near a heat s...

Страница 16: ...erox supplies is not recommended The Xerox Warranty Service Agreement and Total Satisfaction Guarantee do not cover damage malfunction or degradation of performance caused by use of non Xerox supplies...

Страница 17: ...aintenance procedure that is not specifically described in the documentation supplied with your printer Do not use aerosol cleaners Clean with a dry lint free cloth only Do not burn any consumables or...

Страница 18: ...warning could cause serious injury or even death Ignoring this caution could damage property Hot surface on or in the printer Use caution to avoid personal injury Do not burn the item Do not lift her...

Страница 19: ...ent Health and Safety in relation to this Xerox product and supplies contact the following customer help lines United States 1 800 828 6571 Canada 1 800 828 6571 Europe 44 1707 353 434 For product saf...

Страница 20: ......

Страница 21: ...WorkCentre 7220 7225 Multifunction Printer 21 User Guide This chapter includes Parts of the Printer 22 Information Pages 29 Administration Features 30 More Information 34 2 Features...

Страница 22: ...arts of the Printer This section includes Left Front View 22 Right Rear View 23 Telephone and Fax Connection 24 Internal Components 24 Document Feeder 25 Control Panel 25 Integrated Office Finisher 27...

Страница 23: ...l Panel 7 Center Output Tray 8 Output Tray 9 Secondary Power Switch 10 Front Door 11 Trays 1 4 12 Locking Casters Right Rear View 1 Reset Button 2 USB Port Type B 3 USB Ports Type A 4 Controller LED 5...

Страница 24: ...Features 24 WorkCentre 7220 7225 Multifunction Printer User Guide Telephone and Fax Connection 1 Line 1 2 Line 2 Internal Components...

Страница 25: ...Lever 4 Inner Cover 5 Document Guides 6 Document Feeder Tray 7 Document Output Tray 8 CVT Glass 9 Document Glass Control Panel The control panel consists of the touch screen USB port and buttons you...

Страница 26: ...twice to reset all features to their default settings and clear existing scans 9 Stop temporarily stops the current job Follow the onscreen instructions to cancel or resume your job 10 Start starts t...

Страница 27: ...Features WorkCentre 7220 7225 Multifunction Printer 27 User Guide Integrated Office Finisher 1 Staple Cartridge 2 Finisher Front Door 3 Finisher Top Cover 4 Center Tray 5 Integrated Office Finisher...

Страница 28: ...nal 12 Staple Cartridge 13 Finisher Front Cover 14 Office Finisher LX Wireless Network Adapter The wireless network adapter is a USB device that transfers data between the printer and a wireless local...

Страница 29: ...the printer control panel press the Machine Status button 2 On the Machine Information tab touch Information Pages then touch the desired information page 3 Touch Print Note Information pages can als...

Страница 30: ...n the printer compares the information that you provide to another source of information such as an LDAP directory The information can be a user name and password or the information stored on a magnet...

Страница 31: ...ory The system administrator sets authorization permissions To set or edit user permissions for access to printer features you must log in as the administrator Accounting Accounting monitors the print...

Страница 32: ...ngs on the Tools tab on the control panel touch screen Logging In as the System Administrator at the Control Panel 1 At the control panel press Log In Out 2 Type admin then touch Next 3 Type your pass...

Страница 33: ...ation Pages Configuration Report Print 3 Touch Close after the report prints Automatic Data Collection This printer automatically collects data and transmits it to a secure offsite location Xerox or a...

Страница 34: ...WC7220_WC7225support Information about menus or error messages Press the control panel Help button Information Pages Print from the control panel or from CentreWare Internet Services click Status Info...

Страница 35: ..._________________________________ If you need additional help using your printer 1 Refer to this user guide 2 Contact the system administrator 3 Visit the Xerox website at www xerox com office WC7220...

Страница 36: ......

Страница 37: ...s chapter includes Installation and Setup Overview 38 Modifying General Settings 42 Installing the Software 44 See also Installation Guide packaged with your printer System Administrator Guide at www...

Страница 38: ...lly Connecting the Printer to the Network Use a Category 5 or better Ethernet cable to connect the printer to the network An Ethernet network is used for one or more computers and supports many printe...

Страница 39: ...hen turned off Using the secondary power switch to turn on and off the printer is the preferred method To operate the printer turn on both switches First turn on the main power switch then turn on the...

Страница 40: ...ueue 2 Turn off the secondary power switch then wait 10 seconds after the touch screen goes dark before proceeding Note When the optional Office Finisher LX is installed the secondary power switch is...

Страница 41: ...1 Optimizing Printer Performance Several factors influence printer performance including temperature humidity air pressure and the chemical characteristics of the paper and coatings The printer must...

Страница 42: ...pear contact the system administrator or log in as a system administrator For details see Logging In as the System Administrator at the Control Panel on page 32 3 Touch Save Setting Energy Saver Mode...

Страница 43: ...ogging In as the System Administrator at the Control Panel on page 32 3 To set the time zone touch Time Zone then touch the arrows to adjust the time zone 4 To set the date touch Date select a format...

Страница 44: ...ments Windows XP SP3 and later Windows Server 2003 and later Macintosh OS X version 10 5 and later Novell Netware 5 0 and later UNIX and Linux Your printer supports connection to various UNIX platform...

Страница 45: ...indow it displays the IP address Record the IP address for future use 10 Select the desired driver 11 Click Install If the installer prompts you for the IP address enter the IP address of the printer...

Страница 46: ...X Systems is a two part installation process It requires the installation of a Xerox Services for UNIX Systems code package and a printer support package The Xerox Services for UNIX Systems code packa...

Страница 47: ...erox com office WC7220_WC7225drivers For details about UNIX and Linux drivers see the System Administrator Guide at www xerox com office WC7220_WC7225docs Other Drivers The following drivers are avail...

Страница 48: ......

Страница 49: ...WorkCentre 7220 7225 Multifunction Printer 49 User Guide This chapter includes Supported Paper 50 Loading Paper 54 Printing on Special Paper 61 4 Paper and Media...

Страница 50: ...our printer Recommended Media A list of paper and media recommended for your printer is available at www xerox com paper Recommended Media List United States www xerox com europaper Recommended Media...

Страница 51: ...ive for details Paper Storage Guidelines Storing your paper and other media properly contributes to optimum print quality Store paper in dark cool relatively dry locations Most paper is susceptible to...

Страница 52: ...6 g m Extra Heavyweight Labels 217 256 g m Tray 5 Envelope 75 90 g m Transparency Supported Standard Paper Sizes Tray Number European Standard Sizes North American Standard Sizes All trays A3 297 x 42...

Страница 53: ...imum Size 128 x 140 mm 5 x 5 5 in 297 x 432 mm 11 7 x 17 in Weight 75 g m 169 g m Supported Custom Paper Sizes Tray Number Paper Sizes Minimum Maximum Trays 1 4 Width 140 297 mm 5 5 11 7 in Length 182...

Страница 54: ...r 60 Loading Paper in Trays 1 4 1 Pull out the tray until it stops 2 Ensure that the guide locks are set in the correct position for the standard or custom size paper you are loading For details see S...

Страница 55: ...the paper in the tray Do one of the following For long edge feed insert letterhead and pre printed paper face down with the top edge toward the front Load hole punched paper with the holes to the lef...

Страница 56: ...d touch Confirm To change the paper size type or color when the tray is set to Dedicated mode press the Machine Status button Then touch Tools Device Settings Paper Management Tray Contents Select the...

Страница 57: ...ign the edges of the stack on a level surface This procedure separates any sheets that are stuck together and reduces the possibility of jams Note To avoid jams and misfeeds do not remove paper from i...

Страница 58: ...t Note Do not load paper above the maximum fill line Overfilling the tray can cause the printer to jam 5 Adjust the width guides until they touch the edges of the paper 6 When prompted select an optio...

Страница 59: ...d paper settings In the custom position the guides move in 1 mm increments To move the guide locks from the standard to the custom paper size position do the following 1 Pull out the tray until it sto...

Страница 60: ...the control panel prompts you to load a specific paper size color and type If you move the guides to load a different paper size in trays 1 4 the control panel displays an error message Once you load...

Страница 61: ...pends on the quality and construction of the envelopes Try another envelope brand if you do not get desired results Maintain constant temperatures and relative humidity Store unused envelopes in their...

Страница 62: ...he flaps closed Load envelopes up to 297 mm 11 7 in long edge feed with the flaps leading into the printer Load C4 and custom size envelopes longer than 297 mm 11 7 in short edge feed with the flaps l...

Страница 63: ...s down and on the leading edge toward the left Notes Maximum stack height of 43 mm 1 7 in The envelope tray accepts envelope paper weights from 75 90 g m 3 Adjust the paper guides so they rest lightly...

Страница 64: ...can cause print quality problems or cause them to jam in the printer Rotate stock frequently Long periods of storage in extreme conditions can cause labels to curl and jam in the printer In the print...

Страница 65: ...right 4 Close the tray Set the paper size type and color at the control panel For details see Changing Paper Size Type and Color on page 60 Loading Labels in Tray 5 1 Open tray 5 and pull out the ext...

Страница 66: ...the top edge toward the front of the tray For short edge feed load labels face down with the top edge to the left Notes Do not load Extra Heavyweight Labels 217 256 g m in tray 5 Do not load paper ab...

Страница 67: ...tray You can print Heavyweight Glossy Cardstock from trays 1 4 only Guidelines for Printing on Glossy Cardstock Do not open sealed packages of glossy cardstock until you are ready to load them into th...

Страница 68: ...for Printing on Transparencies Remove all paper before loading transparencies in the tray Handle transparencies by the edges using both hands Fingerprints or creases can cause poor print quality Do n...

Страница 69: ...Multifunction Printer 69 User Guide This chapter includes Printing Overview 70 Selecting Printing Options 71 Managing Jobs 75 Printing Features 78 Printing Special Job Types 86 Held Print Jobs 91 Prin...

Страница 70: ...e size color and type 3 Access the print settings in your software application For most software applications press CTRL P for Windows or CMD P for Macintosh 4 Select your printer from the list 5 Acce...

Страница 71: ...elp Xerox print driver software Help information is available from the Printing Preferences window Click the Help button in the bottom left corner of the Printing Preferences window to see the Help In...

Страница 72: ...settings For most software applications click File Print or press CTRL P 2 To open the Properties window select your printer then click the Properties or Preferences button The title of the button var...

Страница 73: ...inting Options Selecting Printing Options for Macintosh To use specific printing options change the settings before sending the job to the printer 1 With the document open in your application click Fi...

Страница 74: ...future print jobs To save a set of printing options 1 With the document open in your application click File Print 2 Select your printer from the Printers list 3 Select the desired printing options fr...

Страница 75: ...2 To resume printing press the Interrupt button again To pause the print job with the option to delete it 1 At the control panel press the Stop button 2 Do one of the following To delete the print job...

Страница 76: ...ob the job is held until you release it by typing a passcode at the control panel To view a list of secure print jobs 1 At the printer control panel press the Job Status button 2 Touch Secure Print Jo...

Страница 77: ...anaging Jobs in CentreWare Internet Services You can view a list of active jobs and delete print jobs from the Active Jobs list in CentreWare Internet Services You can also print copy move or delete s...

Страница 78: ...of the Paper Paper Types for Automatic 2 Sided Printing The printer can print a 2 sided document automatically on supported paper Before printing a 2 sided document verify that the paper type and wei...

Страница 79: ...tab Page Layout is on the Document Options tab Printing Booklets With 2 sided printing you can print a document in the form of a small booklet Create booklets from any paper size that is supported fo...

Страница 80: ...is tab also provides a Custom Automatic Color option for advanced color corrections based on RGB Color CMYK Color Spot Color CIE Color or Gray The two remaining tabs provide additional ways of adjusti...

Страница 81: ...ing an insert after designated pages within a document separates sections or acts as a marker or placeholder Ensure that you specify the paper to use for the insert pages Insert Options provides the o...

Страница 82: ...and flips the pages on the short edge The job then can be bound on the short edge of the pages Use Job Setting prints the job using the attributes shown in the Job Settings box Job Setting displays t...

Страница 83: ...font size font type font color and angle A Picture Watermark uses an image as the watermark The picture file can be in bmp gif or jpg format You can create a picture watermark to print on a document a...

Страница 84: ...ach tray To create and save custom sizes for Windows 1 In the print driver click the Printing Options tab 2 Click the arrow at the right of the Paper field then select Other Size Output Paper Size New...

Страница 85: ...ars on your computer screen with the name of the job and the name of the printer where it was printed Note This feature is only available on a Windows computer printing to a network printer To be noti...

Страница 86: ...ptions tab from the Job Type list select Secure Print 2 Type then retype a 4 10 digit passcode for the secure print job 3 In the Confirm Passcode field type the passcode again Notes If you do not supp...

Страница 87: ...touch Delete Sample Set The Sample Set job type allows you to print a sample copy of a multiple copy job and hold the remaining copies at the printer After you review the sample copy you can select t...

Страница 88: ...Delayed Print default time is midnight Sending a Delay Print Job 1 On the Printing Options tab from the Job Type list select Delay Print 2 In the Delay Print window select the Tab key to move from the...

Страница 89: ...list Click the arrow to the right of the field then select Default Public Folder 4 To print the job now and also save the job select the Print and Save check box 5 Select Public 6 Click OK 7 Verify th...

Страница 90: ...destination folder Click the arrow to the right of the field and select a folder name from the list 5 To print the job now and also save the job select the Print and Save check box 6 To store your jo...

Страница 91: ...the copies hold until you release them If the system administrator has configured the Hold All Jobs feature any job sent to the printer is held until you release it Releasing Held Print Jobs 1 At the...

Страница 92: ...ll through the list and locate the printable file next to the list use the arrows If the print file is in a folder to open the folder touch the name 3 Touch the name of the printable file 4 Select the...

Страница 93: ...rn to the list of documents in the mailbox touch Browse To return to the list of folders touch Back Printing from CentreWare Internet Services You can print pdf ps pcl and xps files directly from Cent...

Страница 94: ......

Страница 95: ...WorkCentre 7220 7225 Multifunction Printer 95 User Guide This chapter includes Basic Copying 96 Selecting Copy Settings 98 6 Copying...

Страница 96: ...n the upper right corner of the touch screen Note To correct the number of copies entered using the alphanumeric keypad press the C button then re enter the number 5 Change the copy settings as needed...

Страница 97: ...originals The document feeder accepts paper weights 38 128 g m for 1 sided pages and 50 128 g m for 2 sided pages The document feeder accepts paper sizes from 85 x 125 mm 3 3 x 4 9 in through 297 x 4...

Страница 98: ...7220 7225 Multifunction Printer User Guide Selecting Copy Settings This section includes Basic Settings 99 Image Quality Settings 102 Layout Settings 105 Output Format Settings 108 ID Card Copying 114...

Страница 99: ...akes copies in black only Black White copies in black and white only Colors in the original are converted to shades of gray More provides additional choices Color copies in full color output using all...

Страница 100: ...ct a paper tray loaded with the desired paper to make copies on letterhead colored paper transparencies or different paper sizes To select the tray to use for copies 1 Press the Services Home button t...

Страница 101: ...llated copies print in the following order 1 1 1 2 2 2 3 3 3 4 4 4 5 5 5 6 6 6 To select uncollated copies 1 Press the Services Home button then touch Copy If your printer has a finisher under Copy Ou...

Страница 102: ...es Home button then touch Copy 2 Touch the Image Quality tab then touch Original Type 3 On the Original Type screen select the appropriate settings On the left side of the screen touch the content typ...

Страница 103: ...n touch Copy 2 Touch the Image Quality tab then touch Image Enhancement 3 On the Image Enhancement screen adjust the contrast Auto Contrast allows the printer to set the contrast automatically Manual...

Страница 104: ...touch Color Balance Note This feature is not available when Output Color is set to Black and White 3 To adjust the density levels of all four colors a On the Color Balance screen touch Basic Color b M...

Страница 105: ...seen before turning it over 4 Touch OK Specifying the Size of the Original To scan the correct area of the original specify the original size 1 Press the Services Home button then touch Copy 2 Touch t...

Страница 106: ...placement of an image on the copy page This is useful if the image is smaller than the page size Originals must be positioned as follows for image shift to work correctly Document Feeder Position ori...

Страница 107: ...to erase from each edge touch Side 2 then touch the Left Right Top and Bottom arrows or touch Mirror Side 1 Note You can use preset values that were previously saved by the system administrator Touch...

Страница 108: ...is mode the printer scans all of the originals before printing the copies To create a booklet 1 Press the Services Home button then touch Copy 2 Touch the Output Format tab then touch Booklet Creation...

Страница 109: ...de 2 by 180 degrees touch Rotate Side 2 Front Only includes only a front cover Back Only includes only a back cover 6 Under Paper Supply touch the desired tray 7 Touch OK Specifying Chapter Start Pagi...

Страница 110: ...s 6 To specify the paper tray to use for the insert a Touch Paper Supply b Touch the desired tray c Touch OK 7 Touch Add The insert appears in the list on the right side of the screen 8 Repeat the thr...

Страница 111: ...t then touch the desired operation in the drop down menu 10 Touch OK Adding Annotations You can automatically add annotations such as page numbers and the date to your copies Notes Annotations are not...

Страница 112: ...uch a blank row use the touch screen keyboard to type up to eight characters then touch OK e Under Position touch an arrow to position the Bates Stamp in the header or footer The sample page shows the...

Страница 113: ...ortrait Originals or Landscape Originals 5 Touch OK Repeating an Image You can make multiple copies of an original image on one or both sides of the paper This is useful for duplicating a small image...

Страница 114: ...rvices Home button then touch ID Card Copy 2 Touch the ID Card Copy tab 3 Verify the output color paper supply and reduce enlarge settings Change the settings as needed 4 Touch the Image Quality tab 5...

Страница 115: ...ce Enlarge touch an option To reduce or enlarge the percentage incrementally touch Plus or Minus To reduce or enlarge the percentage using the alphanumeric keypad to type a specific value touch the cu...

Страница 116: ...e of the original document If known select how the original was produced Lightening or Darkening ID Card Copies You can lighten or darken the copy for each side Use the slider to lighten or darken the...

Страница 117: ...text or images printed on one side of the paper can be seen on the other side Use the Auto Suppression setting to reduce the sensitivity of the printer to variations in light background colors To cha...

Страница 118: ...e required settings such as layout adjustments image quality and options c Touch the Job Assembly tab then touch Build Job On d Select or clear the Display this window between segments check box e Tou...

Страница 119: ...lete the job To release and print the remaining copies of the job touch Submit Job If the sample copy is unsatisfactory touch Delete All Segments Saving Copy Settings To use a particular combination o...

Страница 120: ......

Страница 121: ...omputer 139 Using One Touch Scanning 140 The system administrator must set up this feature before you can use it For details see the System Administrator Guide at www xerox com office WC7220_WC7225doc...

Страница 122: ...hard drive For details see the Help in CentreWare Internet Services To scan an image 1 On the control panel press the yellow Clear All button to clear previous settings 2 Load your original documents...

Страница 123: ...r Insert originals face up with page one on top The confirmation indicator illuminates when you load the originals correctly Adjust the paper guides so they fit against the originals The document feed...

Страница 124: ...ages You do not need a password to scan images to the public folder or to retrieve them All users can view scanned documents in the public folder You can also create a password protected private folde...

Страница 125: ...em administrator can create a private folder at any time For details on enabling or disabling Scan to Mailbox see the System Administrator Guide for your printer model To create a private folder with...

Страница 126: ...lect Mailboxes 4 In the Scan to Mailbox section click the folder containing the scan Your scan file appears in the Folder Contents window Notes For a password protected private folder click the Folder...

Страница 127: ...redefined Network File Repository To scan an image and send it to a predefined network file repository 1 Load the original on the document glass or in the document feeder 2 Press the Services Home but...

Страница 128: ...the Friendly Name field then create a name for the template 7 Under Protocol select an option 8 Configure the destination IP Address Port number or Host Name Port number 9 Enter the name of the destin...

Страница 129: ...e original on the document glass or in the document feeder 2 Press the Services Home button then touch Workflow Scanning 3 Touch the Down arrow then select Scan to Home Templates from the menu 4 From...

Страница 130: ...full color If the original is a black and white document the printer scans in black only Black White scans in black and while only Grayscale Detects and scans various shades of gray Color Scans in fu...

Страница 131: ...reen select an option Auto Contrast allows the printer to set the contrast automatically Manual Contrast allows you to adjust the contrast manually Move the Manual Contrast slider up or down to increa...

Страница 132: ...a standard paper size In the scrolling list touch the desired paper size Custom Scan Area allows you to specify the height and width of the area to scan Touch the Height Y and Width X arrows to specif...

Страница 133: ...select a language from the drop down menu f Touch OK 4 To select the action to take if a file already exists a Touch If File Already Exists b On the If File Already Exists screen select an option c To...

Страница 134: ...riginals for the next segment b When the Build Job screen appears touch Program Next Segment c Press the green Start button to scan the originals for that segment 6 Repeat the previous step for each r...

Страница 135: ...lready in the USB memory port press Services Home then touch Workflow Scanning Scan to USB 3 On the USB Drive Detected screen touch Scan to USB 4 To change any of the scan settings use the options at...

Страница 136: ...New Recipient b Touch the Down arrow then select To or Cc or Bcc from the menu c Touch the Enter email address and select Add field then use the touch screen keyboard to type the email address d Touc...

Страница 137: ...format and options a Touch File Format b On the File Format screen under Format select an option c Under Options for PDF PDF A XPS or TIFF select an option Multi page creates a multi page document fro...

Страница 138: ...icon appears grayed out on the touch screen To scan an image and send it to a destination 1 Load the original on the document glass or in the document feeder 2 Press the Services Home button then touc...

Страница 139: ...ur computer click Select Scan Device select the scanner then click Select 7 To select a size for the scanned image click Scan Size and select an option 8 To select the sides to scan from the original...

Страница 140: ...n have several one touch selections each with a different scan destination and different scan settings To use One Touch Scanning 1 Load the original on the document glass or in the document feeder 2 P...

Страница 141: ...ng an Embedded Fax 144 Sending a Server Fax 154 Sending an Internet Fax 158 Sending a LAN Fax 164 Using the Address Book 165 The system administrator must set up some fax features before you can use t...

Страница 142: ...ropriate fax 3 Address the fax using one or more of the available options The Enter Number and Press Add field allows you to enter a fax number manually Use the alphanumeric keypad to enter the number...

Страница 143: ...Insert originals face up with page one on top The confirmation indicator illuminates when you load the originals correctly Adjust the paper guides so they fit against the originals The document feede...

Страница 144: ...m the address book Address Book allows you to select fax numbers from your Address Book Touch the Down arrow then select Individual or Group from the drop down menu Touch the Up or Down arrows to scro...

Страница 145: ...see Selecting Fax Options on page 146 9 Press the green Start button The printer scans the pages and transmits the document when all pages have been scanned Note To pause the job press the Stop butto...

Страница 146: ...1 Storing a Fax for Local or Remote Polling 151 Printing or Deleting Secure Faxes 151 Polling a Remote Fax 152 Building a Fax Job 153 Adjusting Brightness and Sharpness You can lighten or darken the i...

Страница 147: ...ot change the contrast Auto Contrast allows the printer to set the contrast automatically 4 Touch OK Specifying the Size of the Original To ensure that you are scanning the correct area of the documen...

Страница 148: ...ouch an option Off is the default setting Both Pages scans both pages of the book Left Page Only scans the left page of the book Right Page Only scans the right page of the book 4 To set the amount to...

Страница 149: ...et the printer to the current time To specify the time to send your fax 1 Press the Services Home button then touch Fax 2 Touch the Fax Options tab then touch Delay Send 3 Touch Specified Time Touch t...

Страница 150: ...is feature For details see the System Administrator Guide at www xerox com office WC7220_WC7225docs To store a fax in a local mailbox 1 Press the Services Home button then touch Fax 2 Touch the Fax Op...

Страница 151: ...g options Non Secure Polling scans your originals and stores them as documents Anyone with this fax number can access the documents Secure Polling scans your originals and stores them as documents You...

Страница 152: ...e Enter Number and Press Add field allows you to enter a fax number manually Use the alphanumeric keypad to enter the number then touch Add Dialing Characters allows you to insert characters such as a...

Страница 153: ...book 3 Touch the Job Assembly tab then touch Build Job On 4 Touch Options a Select or clear the Display this window between segments check box b Select or clear the Turn Build Job Off after Job is Sub...

Страница 154: ...The Enter Number and Press Add field allows you to enter a fax number manually Use the alphanumeric keypad to enter the number then touch Add Dialing Characters allows you to insert characters such a...

Страница 155: ...ted on one side of the paper can be seen on the other side Use the Auto Suppression setting to reduce the sensitivity of the printer to variations in light background colors To select Auto Suppression...

Страница 156: ...etermine the size of the original Preset Scan Areas specifies the area to scan when it matches a standard paper size In the scrolling list touch the desired paper size Custom Scan Area allows you to s...

Страница 157: ...Faxing WorkCentre 7220 7225 Multifunction Printer 157 User Guide Building a Fax Job For details see Building a Fax Job on page 153...

Страница 158: ...lect To or Cc from the menu c Touch the Enter email address and select Add field then use the touch screen keyboard to type the email address d Touch Add e Use the touch screen keyboard to type additi...

Страница 159: ...ltifunction Printer 159 User Guide 6 Adjust fax options as needed 7 Press the green Start button The printer scans the pages and sends the document as an email attachment in pdf or tiff file format wh...

Страница 160: ...ness To adjust the image 1 Touch the Services Home button then touch Internet Fax 2 Touch the Advanced Settings tab then touch Image Options 3 On the Image Options screen adjust the sliders as needed...

Страница 161: ...nd small file size 150 dpi produces good image quality for onscreen viewing and small file size 200 x 100 dpi produces good image quality and moderate file size 200 dpi produces good image quality and...

Страница 162: ...the Layout Adjustment tab then touch Original Size 3 On the Original Size screen select an option Auto Detect allows the printer to determine the size of the original Preset Scan Areas specifies the a...

Страница 163: ...delivery receipt from each recipient then prints the report Note The report could be delayed depending on the response time of the recipients To print an acknowledgment report 1 Touch the Services Ho...

Страница 164: ...lications click File Print or press CTRL P 2 Select your printer then click Properties to open the print driver dialog box 3 On the Paper Output tab from the Job Type list select Fax 4 Click Recipient...

Страница 165: ...ook touch Create New Contact To add the new recipient information to an existing address book contact touch Add to Existing Contact 5 To add name and company information for the new entry to the right...

Страница 166: ...the right of the blue Internet Fax icon touch the field Touch Enter Internet Fax Number use the alphanumeric keypad to enter the number then touch OK 6 To mark a contact as a favorite to the right of...

Страница 167: ...acts or All Contacts 4 Touch the desired entry using the scroll arrows as needed 5 Touch Details 6 To mark a contact as a favorite to the right of the global address book email fax or Internet fax fie...

Страница 168: ......

Страница 169: ...ltifunction Printer 169 User Guide This chapter includes General Precautions 170 Cleaning the Printer 171 Routine Maintenance 177 Billing and Usage Information 183 Ordering Supplies 184 Moving the Pri...

Страница 170: ...o not remove the covers or guards that are fastened with screws You cannot maintain or service any parts that are behind these covers and guards Do not attempt any maintenance procedure that is not de...

Страница 171: ...s and Document Cover To ensure optimum print quality clean the document glass regularly Cleaning helps avoid output with streaks smears and other marks that transfer from the glass while scanning docu...

Страница 172: ...n cause paper jams or deteriorate print quality For best performance clean the document feed rollers once a month 1 Lift the lever and open the top cover of the document feeder 2 While turning the rol...

Страница 173: ...n the printer exterior 1 To avoid activating buttons and menus press the Energy Saver button 2 To remove fingerprints and smudges clean the touch screen and control panel with a soft lint free cloth 3...

Страница 174: ...procedure when the printer is copying or printing To prevent a printer malfunction or damage to the internal hard drive turn off the secondary power switch Wait 10 seconds after the touch screen goes...

Страница 175: ...er by pushing down the orange tabs and pulling the waste container toward you 5 Remove the laser window cleaning wand from inside the front door 6 Insert the laser window cleaning wand slowly into eac...

Страница 176: ...Printer User Guide 8 Align the bottom of the waste container with the tabs 9 Rotate the waste container up toward the printer until it clicks into place 10 Turn on the main power switch then close th...

Страница 177: ...plies on page 184 Replacing Staple Cartridges A message appears on the control panel when a staple cartridge is empty Replacing Staples in the Integrated Finisher 1 Open the finisher front door 2 Grip...

Страница 178: ...case into the staple cartridge 1 then push the rear side into the cartridge 2 6 Grip the staple cartridge by the orange handle and insert the cartridge into the stapler until it clicks 7 Close the fin...

Страница 179: ...the right as shown 4 Grip the staple cartridge by the orange handle and pull it firmly toward you to remove it Check inside the finisher for any loose staples and remove them 5 Pinch both sides of the...

Страница 180: ...Push it in until it clicks 8 Close the finisher front door Replacing Staples in the Booklet Maker of the Office Finisher LX WARNING Do not perform this procedure while the printer is printing 1 Open...

Страница 181: ...on in the finisher Note If you have trouble inserting the cartridge ensure that the staples are positioned correctly in the cartridge Note The booklet maker uses two staple cartridges Booklet stapling...

Страница 182: ...LX WARNING Do not perform this procedure while the printer is printing 1 Lift the finisher transport top cover then open the front transport cover 2 Pull out the hole punch waste container 3 Empty th...

Страница 183: ...ter control panel press the Machine Status button 2 To view basic impression counts touch the Billing Information tab Black Impressions Total number of pages printed with no color specified Color Impr...

Страница 184: ...that get depleted during the operation of the printer Consumable supplies for this printer are the Genuine Xerox Toner Cartridges in Cyan Magenta Yellow and Black Note Each consumable includes install...

Страница 185: ...ormance caused by use of non Xerox supplies or the use of Xerox supplies not specified for this printer The Total Satisfaction Guarantee is available in the United States and Canada Coverage could var...

Страница 186: ...e printer level to avoid spilling toner Note When moving the printer over a long distance remove the drum cartridges and toner cartridges to prevent toner from spilling Pack the printer inside a box C...

Страница 187: ...220 7225 Multifunction Printer 187 User Guide This chapter includes General Troubleshooting 188 Jams 195 Print Quality Problems 220 Copy and Scan Problems 228 Fax Problems 229 Getting Help 231 10 Trou...

Страница 188: ...rect 193 Scanner Errors 194 This section contains procedures to help you locate and resolve problems Resolve some problems by simply restarting the printer Printer Has Two Power Switches This printer...

Страница 189: ...r On and Off on page 39 The power cord is not correctly plugged into the outlet Turn off the printer power switch and plug the power cord securely into the outlet For details see Turning the Printer O...

Страница 190: ...per types like heavyweight paper and transparencies take more time to print Ensure that the print driver and control panel are set to the proper paper type The printer is in Energy Saver mode Wait It...

Страница 191: ...int job then touch Details 5 Note the Tray number listed under Resources and the status of the selected tray 6 Load the correct paper type or color in the tray or select another tray Incorrect network...

Страница 192: ...printer Printer is Making Unusual Noises Probable Causes Solutions One of the trays is not installed correctly Open and close the tray from which you are printing There is an obstruction or debris ins...

Страница 193: ...Control Panel on page 32 1 Click the Properties tab 2 In the navigation pane click the arrow to the left of General Setup 3 From the expanded General Setup menu select Date and Time 4 In the Date and...

Страница 194: ...rinter User Guide Scanner Errors Probable Causes Solutions Scanner is not communicating Turn off the printer and check the scanner cable Wait two minutes and turn the printer on again If the problem i...

Страница 195: ...tifunction Printer 195 User Guide Jams This section includes Clearing Paper Jams 196 Clearing Jams in the Office Finisher LX 209 Minimizing Paper Jams 210 Troubleshooting Paper Jams 212 Clearing Stapl...

Страница 196: ...er 207 Clearing Jams in the Integrated Finisher 209 CAUTION To avoid damage always remove jammed paper carefully without tearing it Try to remove the paper in the same direction it normally moves thro...

Страница 197: ...y 1 5 Remove any crumpled paper from the tray 6 Verify that the paper is loaded correctly in the tray and that the guides are pressed firmly against the paper Note For a Paper Size Jam message remove...

Страница 198: ...User Guide 7 Push the tray completely back into the printer 8 Verify the size type and color of the paper Change the selection for any incorrect setting 9 On the printer touch screen touch Confirm Cl...

Страница 199: ...til it stops 5 Remove any crumpled paper from the tray 6 Verify that the paper is loaded correctly in the tray and that the guides are pressed firmly against the paper Note For a Paper Size Jam messag...

Страница 200: ...User Guide 7 Push the tray completely back into the printer 8 Verify the size type and color of the paper Change the selection for any incorrect setting 9 On the printer touch screen touch Confirm Cle...

Страница 201: ...on the control panel 5 Remove any crumpled paper from the tray 6 Verify that the paper is loaded correctly in the tray and that the guides are pressed firmly against the paper Note For a Paper Size J...

Страница 202: ...7220 7225 Multifunction Printer User Guide 7 Push the tray completely back into the printer 8 Verify the size type and color of the paper Change the selection for any incorrect setting 9 On the print...

Страница 203: ...Tray 5 1 Remove any paper from tray 5 2 If you did not find jammed paper push up the latch on the left side of the printer to open door A WARNING Internal parts of the printer can be hot Use caution w...

Страница 204: ...tray Note Do not load paper above the maximum fill line Overfilling can cause paper jams 6 Verify the size type and color of the paper Change the selection for any incorrect setting 7 On the printer t...

Страница 205: ...ut the handle labeled A1 WARNING The area around the fuser can be hot Use caution to avoid injury 4 Remove the jammed paper 5 Close the fuser by pushing in the handle until it stops CAUTION To avoid d...

Страница 206: ...Troubleshooting 206 WorkCentre 7220 7225 Multifunction Printer User Guide Clearing Jams at Door D 1 Open tray 5 2 Open door D 3 Remove the jammed paper 4 Close door D then close tray 5...

Страница 207: ...open the top cover of the document feeder as shown 2 If the original is not caught in the entry to the document feeder pull it straight out in the direction shown 3 If the message on the control pane...

Страница 208: ...opened lift the document cover and remove the original 8 If the original is not visible when the document cover is opened lift the document feeder tray then remove the paper 9 Lower the document feede...

Страница 209: ...the finisher 1 3 Turn the green knob in the direction shown to remove the paper 2 4 To remove the paper pull it in the direction shown Note If the paper is torn remove all torn pieces from the printer...

Страница 210: ...paper is torn remove all torn pieces from the finisher 3 Close the transport cover Minimizing Paper Jams The printer is designed to function with minimal paper jams using Xerox supported paper Other...

Страница 211: ...er A guide that is not properly adjusted can cause poor print quality misfeeds skewed prints and printer damage After loading the trays select the correct paper type and size on the control panel When...

Страница 212: ...electricity is present Try a new ream of paper Do not fan transparencies before loading in tray Using unsupported paper Use only Xerox approved paper For details see Supported Paper on page 50 Humidit...

Страница 213: ...ns The label sheet is facing the wrong way in the tray Load label sheets according to the instructions from the manufacturer Load labels face up in trays 1 4 Load labels face down in tray 5 Envelopes...

Страница 214: ...Sizes and Weights for Automatic 2 Sided Printing on page 53 Paper type is set incorrectly in the print driver Ensure that the paper type is set correctly in the driver and that the paper is loaded in...

Страница 215: ...aring Staple Jams in the Integrated Finisher 1 Grip the staple cartridge by the orange handle and pull it firmly toward you to remove it 2 Remove any loose staples or other debris from inside the fini...

Страница 216: ...ge into the stapler until it clicks 6 Close the finisher front cover Clearing Staple Jams in the Office Finisher LX WARNING Do not perform this procedure while the printer is printing 1 Open the finis...

Страница 217: ...eck inside the finisher for any loose staples and remove them 6 Pull the staple cartridge clamp firmly in the direction shown to open it 7 Remove the jammed staples by pulling them in the direction sh...

Страница 218: ...ssembly Push it in until it clicks 10 Close the finisher front door Clearing Booklet Staple Jams in the Office Finisher LX WARNING Do not perform this procedure while the printer is printing 1 Open th...

Страница 219: ...re that the staples are positioned correctly in the cartridge Note The booklet maker uses two staple cartridges Booklet stapling requires that both staple cartridges contain staples 6 Starting at Step...

Страница 220: ...could vary outside these areas Please contact your local representative for details Notes To ensure consistent print quality the toner cartridges and imaging units for many models of equipment are des...

Страница 221: ...ows metal clasps side seams or adhesives with release strips Padded envelopes Plastic media Ensure the paper type selected in your print driver matches the paper type on which you are printing If you...

Страница 222: ...the print driver is set to Xerox Automatic Color To produce more vivid results select a mode of Color Correction For example when printing graphics in which the sky does not look blue enough for a mor...

Страница 223: ...Please contact your local representative for details Note To enhance the print quality toner print drum cartridges for many models of equipment are designed to cease functioning at a predetermined poi...

Страница 224: ...To isolate the problem 1 Print a similar document from another application and look for the same print quality problems If the document still has the same print quality problems it is probably a print...

Страница 225: ...printed with a solid color one or more of the drum cartridges could be defective Correct the problem before continuing 4 If the colors of the pages do not match your expectations run the control panel...

Страница 226: ...If the defect occurs in one color only replace the corresponding imaging unit If the defect occurs in all colors and is visible on all the test pages replace the fuser Repeating Spots or Lines Spot o...

Страница 227: ...en follow the instructions Vertical White Lines or Streaks One Color Lines or streaks appear in one color of your output 1 Print the test pages to identify the affected color 2 To clean the laser wind...

Страница 228: ...from the document glass There is debris on the document glass When scanning the debris creates a spot on the image Clean all glass surfaces with a lint free cloth The reverse side of the original is s...

Страница 229: ...gainst the document The fax received by the recipient is blurry The document is positioned incorrectly Position the document correctly The document glass is dirty Clean the document glass The text in...

Страница 230: ...fax the document again The sender loaded the pages incorrectly Contact the sender The printer answers the call but does not print the fax The memory is full To increase available memory delete stored...

Страница 231: ...l panel Help button provides additional information Control Panel Help To view additional information about error or status messages on the control panel touch the Help button Most of the control pane...

Страница 232: ...At the printer control panel press the Machine Status button 2 On the Machine Information tab touch Information Pages then touch the desired information page 3 Touch Print Note Information pages can a...

Страница 233: ...al impressions are the total number of color impressions plus black impressions Note A page is one side of a sheet of paper that can be printed on one or two sides A sheet printed on two sides counts...

Страница 234: ...printer www xerox com office WC7220_WC7225docs Recommended Media List United States www xerox com paper European Union www xerox com europaper Technical support information for your printer including...

Страница 235: ...This appendix includes Printer Configurations and Options 236 Physical Specifications 238 Environmental Specifications 240 Electrical Specifications 241 Performance Specifications 242 Environmental H...

Страница 236: ...Up to 25 pages ppm on the WorkCentre 7225 Multifunction Printer 110 Sheet document feeder Color touch screen control panel Trays 1 2 with 520 sheet capacities Tray 5 with 50 sheet capacity Scan to US...

Страница 237: ...X Booklet maker for Office Finisher LX Convenience stapler Standard work surface Trays 3 4 with 520 sheet capacities Envelope tray McAfee enhanced security features Embedded PDL support for Adobe PS3...

Страница 238: ...h 640 mm 25 1 in Height 1132 mm 44 6 in Weight 115 kg 253 5 lb Configuration with Integrated Office Finisher Width 1039 mm 41 in Depth 640 mm 25 2 in Height 1132 mm 44 5 in Weight 127 kg 280 lb Config...

Страница 239: ...e 7220 7225 Multifunction Printer 239 User Guide Clearance Requirements Clearance Requirements for WorkCentre 7220 7225 Multifunction Printer Clearance Requirements for Configuration with Office Finis...

Страница 240: ...de Environmental Specifications Temperature Operating 10 32 C 50 90 F Optimum print quality 15 28 C 59 82 F Relative Humidity Operating 15 85 non condensing Optimum print quality 20 70 Elevation For o...

Страница 241: ...ipment The ENERGY STAR and ENERGY STAR mark are registered United States trademarks The ENERGY STAR Imaging Equipment Program is a team effort between United States European Union and Japanese governm...

Страница 242: ...rint speed Paper orientation For faster print speeds load paper long edge feed Loading paper short edge feed reduces print speeds Paper size Letter 8 5 x 11 in and A4 210 x 297 mm sizes share the fast...

Страница 243: ...ronment Health and Safety in relation to this Xerox product and supplies contact the following customer help lines United States 1 800 828 6571 Canada 1 800 828 6571 Europe 44 1707 353 434 For product...

Страница 244: ......

Страница 245: ...ntre 7220 7225 Multifunction Printer 245 User Guide This appendix includes Basic Regulations 246 Fax Regulations 253 Product Safety Certification 257 Material Safety Data Sheets 258 B Regulatory Infor...

Страница 246: ...ent in a residential area is likely to cause harmful interference in which case the user will be required to correct the interference at his her own expense If this equipment does cause harmful interf...

Страница 247: ...rs and has been issued in relation to the European Union EU Energy Related Products Directive specifically the Lot 4 study on Imaging Equipment This requires manufacturers to improve environmental per...

Страница 248: ...switches to Ready Mode In this mode it can print again immediately if required If the product is not used for a period of time the device switches to a Power Saver Mode In these modes only essential f...

Страница 249: ...the following two conditions 1 this device may not cause harmful interference and 2 this device must accept any interference received including interference that may cause undesired operation Changes...

Страница 250: ...be done provided the reproduction of the document is performed for lawful purposes Postage Stamps canceled or uncanceled For philatelic purposes Postage Stamps may be photographed provided the reprod...

Страница 251: ...orney For more information about these provisions contact the Copyright Office Library of Congress Washington D C 20559 Ask for Circular R21 Canada Parliament by stature has forbidden the reproduction...

Страница 252: ...owner This list is provided for your convenience and assistance but it is not all inclusive and no liability is assumed for its completeness or accuracy In case of doubt consult your solicitor Other C...

Страница 253: ...to the Telephone Company A plug and jack used to connect this equipment to the premises wiring and telephone network must comply with the applicable FCC Part 68 rules and requirements adopted by the...

Страница 254: ...ephone network the Telephone Company may request you to disconnect the equipment until the problem is resolved Only a Xerox Service Representative or an authorized Xerox Service provider are authorize...

Страница 255: ...the country code Note Although this product can use either loop disconnect pulse or DTMF tone signaling we recommend that you set it to use DTMF signaling for more reliable and faster call setup Modif...

Страница 256: ...d for compliance with Telecom Telepermit requirements are dependent on the equipment computer associated with this device The associated equipment shall be set to operate within the following limits f...

Страница 257: ...kCentre 7220 7225 Multifunction Printer 257 User Guide Product Safety Certification This product is certified by various NRTLs NCBs to the following safety standards UL60950 1 CSA22 2 No 60950 1 USA C...

Страница 258: ...ser Guide Material Safety Data Sheets For Material Safety Data information regarding your printer go to North America www xerox com msds European Union www xerox com environment_europe For the Custome...

Страница 259: ...WorkCentre 7220 7225 Multifunction Printer 259 User Guide This appendix includes All Countries 260 North America 261 European Union 262 Other Countries 264 C Recycling and Disposal...

Страница 260: ...may be regulated due to environmental considerations The presence of these materials is fully consistent with global regulations applicable at the time that the product was placed on the market For re...

Страница 261: ...quipment take back and reuse recycle program Contact your Xerox representative 1 800 ASK XEROX to determine if this Xerox product is part of the program For more information about Xerox environmental...

Страница 262: ...electrical and electronic equipment to designated collection facilities free of charge Please contact your local disposal authority for information In some member states when you purchase new equipme...

Страница 263: ...ndling For more information about collection and recycling of old products and batteries please contact your local municipality your waste disposal service or the point of sale where you purchased the...

Страница 264: ...Recycling and Disposal 264 WorkCentre 7220 7225 Multifunction Printer User Guide Other Countries Please contact your local waste management authority to request disposal guidance...

Отзывы: