background image

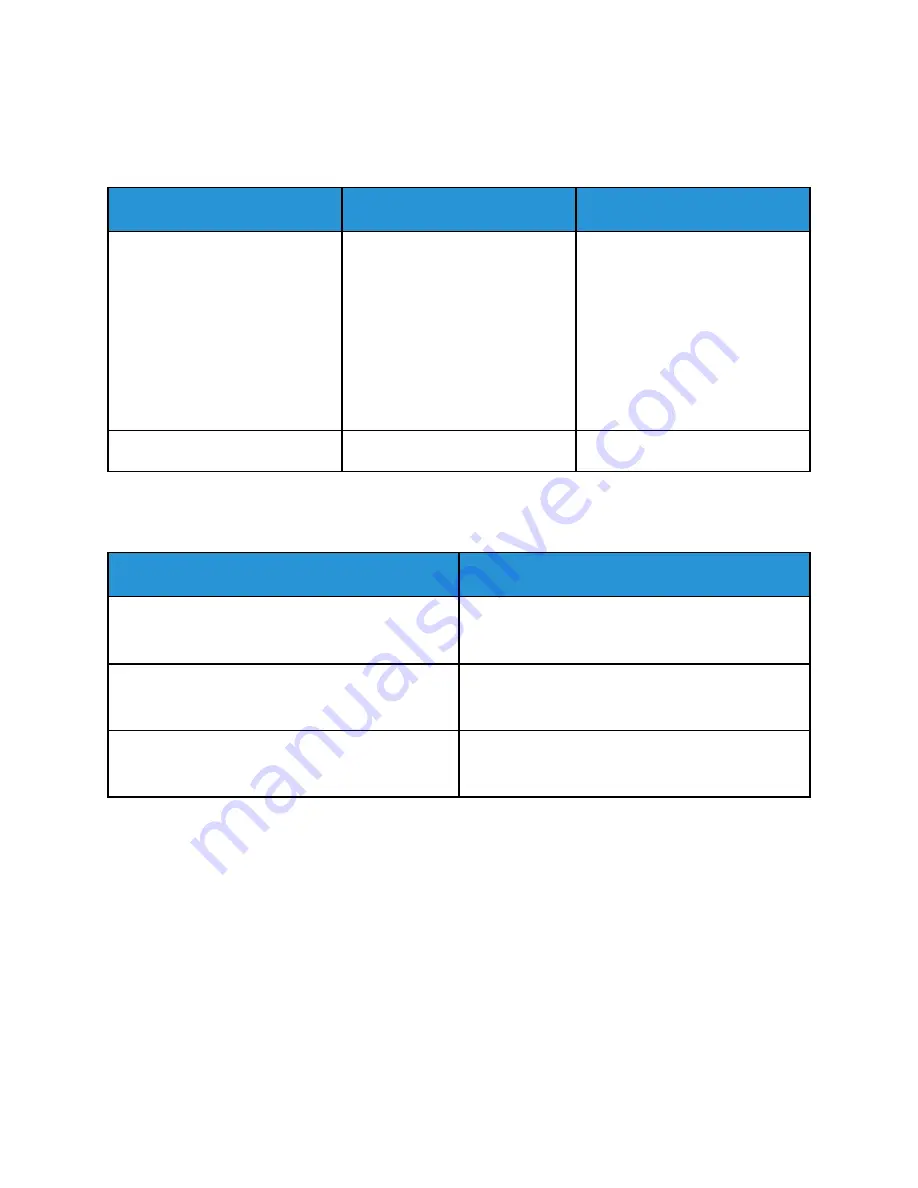
SSuuppppoorrtteedd PPaappeerr TTyyppeess aanndd W

Weeiigghhttss ffoorr A

Auuttoom

maattiicc 22--

SSiiddeedd PPrriinnttiinngg

Trays

Paper Types

Weights

Trays 1–4 of all configurations,
Bypass Tray, Tray 6

Bond

Hole-Punched

Letterhead

Plain

Pre-Printed

Recycled

Custom

60–105 g/m²

Lightweight Cardstock

106–169 g/m²

SSuuppppoorrtteedd C

Cuussttoom

m PPaappeerr SSiizzeess

Tray Number

Paper Sizes

Trays 1 and 2 in all configurations

Trays 3 and 4 in the 3-Tray Module

Minimum: 139.7 x 182 mm (5.5 x 8.3 in.)

Maximum: 297 x 432 mm (11.7 x 17 in.)

Bypass Tray

Minimum: 105 x 135 mm (4.25 x 5.3 in.)

Maximum: 297 x 432 mm (11.7 x 17 in.)

Envelope Tray

Minimum: 148 x 98 mm (5.8 x 3.9 in.)

Maximum: 241 x 162 mm (9.5 x 6.4 in.)

Note:

Trays 3 and 4 in the Tandem Tray Module and Tray 6 do not support custom paper sizes.

152

Xerox

®

VersaLink

®

B70XX Multifunction Printer

User Guide

Paper and Media

Содержание VersaLink B70 Series

Страница 1: ...VERSION 3 0 JUNE 2018 702P06051 Xerox VersaLink B70XX Multifunction Printer User Guide...

Страница 2: ...ited States and or other countries Microsoft Windows Vista Windows OneDrive and Windows Server are registered trademarks of Microsoft Corporation in the United States and other countries The ENERGY ST...

Страница 3: ...r 20 Internal Parts 22 Rear View 22 Configurations 23 Control Panel 23 Power Options 26 Powering On the Printer 26 Powering Off the Printer 27 Entering and Exiting Sleep Mode and Low Power Mode 27 Pow...

Страница 4: ...ded Web Server 56 Creating and Using 1 Touch Apps 57 Creating a 1 Touch App 57 Creating a Personal 1 Touch App 57 Deleting or Hiding a 1 Touch App 58 Using a 1 Touch App 59 4 Xerox Apps 61 Xerox App G...

Страница 5: ...ilding Jobs 105 Fax 107 Fax Overview 107 Sending a Fax 107 Fax Workflows 109 USB 116 USB Overview 116 Scanning to a USB Flash Drive 116 Printing From a USB Flash Drive 117 5 Printing 119 Printing Over...

Страница 6: ...ay Settings 153 Configuring Tray Settings 153 Configuring Trays 3 and 4 of the Tandem Tray Module 153 Configuring Tray 6 154 Loading Paper 157 Loading Paper in Trays 1 4 157 Loading Paper in Trays 3 a...

Страница 7: ...ms 216 Clearing Finisher Jams 219 Print Quality Problems 227 Controlling Print Quality 227 Paper and Media 227 Solving Print Quality Problems 228 Copy and Scan Problems 232 Fax Problems 233 Problems S...

Страница 8: ...a 2 4 GHz Wireless Network Adapter 257 European Union Lot 4 Imaging Equipment Agreement Environmental Information 257 Copy Regulations 262 United States 262 Canada 263 Other Countries 264 Fax Regulati...

Страница 9: ...11 Operational Safety 13 Maintenance Safety 15 Printer Symbols 16 Environmental Health and Safety Contact Information 18 Your printer and the recommended supplies have been designed and tested to mee...

Страница 10: ...luation and certification and compliance with electromagnetic regulations and established environmental standards The safety and environment testing and performance of this product have been verified...

Страница 11: ...llable options there are no parts that you can maintain or service behind these covers The following are hazards to your safety The power cord is damaged or frayed Liquid is spilled into the printer T...

Страница 12: ...le can step on the power cord Do not place objects on the power cord Do not plug or unplug the power cord while the power switch is in the On position If the power cord becomes frayed or worn replace...

Страница 13: ...mechanical interlock devices Do not attempt to remove paper that is jammed deeply inside the printer Switch off the printer promptly and contact your local Xerox representative WARNING The metallic su...

Страница 14: ...nt te er r S Su up pp plliie es s Use the supplies designed for your printer The use of unsuitable materials can cause poor performance and a possible safety hazard Follow all warnings and instruction...

Страница 15: ...erox supplies recycling programs go to www xerox com gwa WARNING Do not use aerosol cleaners Aerosol cleaners can cause explosions or fires when used on electromechanical equipment When installing the...

Страница 16: ...caution Caution Indicates a mandatory action to take in order to avoid damage to the property Caution To avoid damage to the property be careful not to spill toner when handling the waste cartridge D...

Страница 17: ...Do not use transparencies or overhead projector sheets Do not reload paper previously printed on or used Do not copy money revenue stamps or postage stamps For details about all the printer symbols th...

Страница 18: ...d supplies contact United States and Canada 1 800 ASK XEROX 1 800 275 9376 Europe EHS Europe xerox com For product safety information in the United States and Canada go to www xerox com environment Fo...

Страница 19: ...er User Guide 19 2 Getting Started This chapter contains Parts of the Printer 20 Power Options 26 Accessing the Printer 29 Introduction to Apps 31 Information Pages 32 The Embedded Web Server 34 Insta...

Страница 20: ...ys Configurations vary from 1 to 4 trays Tandem Tray shown on bottom right 6 Bypass Tray 7 USB Port 8 Control Panel D Du up plle ex x A Au ut to om ma at tiic c D Do oc cu um me en nt t F Fe ee ed de...

Страница 21: ...the paper guides so that they fit against the original documents Insert paper in the duplex automatic document feeder only when ink on the paper is dry Do not load original documents above the MAX fi...

Страница 22: ...ser 3 Toner Cartridge 4 Drum Cartridge R Re ea ar r V Viie ew w 1 USB Host Port 2 USB Device Port 3 Wi Fi Connectivity Port 4 Ethernet Port 5 Foreign Device Interface 6 Power Connection 22 Xerox Versa...

Страница 23: ...functions available on the printer The control panel Displays the current operating status of the printer Provides access to print copy and scan features Provides access to reference materials Provid...

Страница 24: ...owly the printer is in low power mode or Sleep mode When the light blinks rapidly the printer is powering down or exiting a low power mode 2 Touch Screen Display The screen displays information and pr...

Страница 25: ...f toner condition a paper jam or out of paper for the current job It also blinks amber to indicate a system error which typically is associated with an error code 6 Notification Banner Notifications a...

Страница 26: ...it sleep mode Enter or exit low power mode The Power Wake button also flashes when the printer is in low power mode P Po ow we er riin ng g O On n t th he e P Pr riin nt te er r To power on the printe...

Страница 27: ...Mo od de e a an nd d L Lo ow w P Po ow we er r M Mo od de e After the printer is powered on but is in Sleep Mode or Low Power Mode The touch screen appears blank and unresponsive The printer exits Low...

Страница 28: ...ter shifts from Ready mode to Low Power mode to reduce standby power consumption Sleep Timeout The printer shifts from Low Power mode to Sleep mode for a greater reduction in power consumption 28 Xero...

Страница 29: ...ome button 2 Touch Log In 3 Type the User Name using the keypad then touch Enter 4 If prompted enter the password then touch Enter Note For more information on logging in as system administrator refer...

Страница 30: ...ation about configuring a Common Access Card system on your device refer to the Xerox VersaLink Common Access Card System Configuration Guide 30 Xerox VersaLink B70XX Multifunction Printer User Guide...

Страница 31: ...een Some Apps are installed as standard but hidden the first time you use the device When you log in the Apps configured for your personal account appear on the control panel You can download more App...

Страница 32: ...nts that are available on the printer PCL Font List The PCL Font List provides a printout of all PCL fonts that are available on the printer Demonstration Print Demonstration Print provides a demonstr...

Страница 33: ...p tray information and more P Pr riin nt tiin ng g t th he e C Co on nf fiig gu ur ra at tiio on n R Re ep po or rt t 1 At the printer control panel press the Home button 2 Touch Device About Informat...

Страница 34: ...Web Server You can view the IP address of your printer on the control panel or on the Configuration Report Note To view the TCP IP address on the control panel wait until the printer has been on for 2...

Страница 35: ...iance information To download a copy of the Configuration Report from the Embedded Web Server 1 At your computer open a Web browser In the address field type the IP address of the printer then press E...

Страница 36: ...iio on n f fo or r t th he e P Pr riin nt te er r 1 Select a dust free area with temperatures from 10 32 C 50 90 F and relative humidity 10 85 Note Sudden temperature fluctuations can affect print qua...

Страница 37: ...u direct access to the settings of the printer using the Embedded Web Server Wireless Network If your environment includes a wireless router or wireless access point you can connect the printer to the...

Страница 38: ...elle es ss s N Ne et tw wo or rk k A wireless local area network WLAN provides the means to connect 2 or more devices in a LAN without a physical connection The printer can connect to a wireless LAN...

Страница 39: ...ing on the adapter can cause damage After the adapter is installed remove it only as needed and as directed in the Wireless Network Adapter removal instructions For details refer to Removing the Wirel...

Страница 40: ...el press the Power Wake button then touch Power Off b Wait for the printer to complete a power off procedure When complete the touch screen appears blank 40 Xerox VersaLink B70XX Multifunction Printer...

Страница 41: ...pter from the connection panel on the side of the printer gently grasp the adapter and push the release lever to the side Carefully pull the adapter away from the printer Caution Do not use force to p...

Страница 42: ...r Wake button Note If the printer was installed previously in a wireless network environment it could retain setup and configuration information from that environment To prevent the printer from attem...

Страница 43: ...e printer 5 Enable and configure the Fax functions I In niit tiia all P Pr riin nt te er r S Se et tu up p Before installing the printer software verify that the printer is set up correctly Setup incl...

Страница 44: ...w the IP address for your printer refer to Finding the IP Address of Your Printer 2 In the Embedded Web Server click Home Connectivity Note If this feature does not appear log in as a system administr...

Страница 45: ...After the printer is registered a confirmation status window appears 11 To access the Google Cloud Print feature in your Google account click Manage Your Printer Note The default printer name appears...

Страница 46: ...ss of the printer refer to Finding the IP Address of Your Printer 7 Click Next 8 If needed you can name your printer by typing a name in the Queue Name field 9 If installing a print driver make a prin...

Страница 47: ...t the printer is powered on and that the Ethernet or USB cable is connected properly 11 To accept the print queue message click OK 12 Select or clear the Set Printer as Default and Print a Test Page c...

Страница 48: ...t Devices and Printers 2 To launch the Add Device Wizard click Add a Device 3 In the list of available devices select the one you want to use then click Next Note If the printer you want to use does n...

Страница 49: ...ur printer including online technical support Online Support Assistant and print driver downloads www xerox com office VLB70XXsupport Information Pages Print from the control panel For details refer t...

Страница 50: ......

Страница 51: ...Printer User Guide 51 3 Customize and Personalize This chapter contains Customize and Personalize Overview 52 Customizing or Personalizing the Home Screen 53 Customizing or Personalizing the Apps 54...

Страница 52: ...on the device you can personalize the device to meet specific user needs You can configure your personal Home page to hide or show only the apps you use You can tailor each feature list to your job re...

Страница 53: ...l c Touch Done 4 To hide an installed app a For the app touch X b Touch Done 5 Verify that only the selected apps appear on the Home screen R Re ea ar rr ra an ng giin ng g A Ap pp ps s o on n t th he...

Страница 54: ...signify a feature is visible the Eye icon appears with no line across it 6 To reorder the menu features touch and drag the features into the appropriate order 7 To save the current configuration touc...

Страница 55: ...set feature D De elle et tiin ng g a a S Sa av ve ed d P Pr re es se et t To delete a saved preset 1 At the printer control panel press the Home button 2 Touch the app required 3 Scroll to the bottom...

Страница 56: ...s from your User Account To remove all personalizations from your User Account 1 At your computer open a Web browser In the address field type the IP address of the printer then press Enter or Return...

Страница 57: ...iew Before Start Use this option to review the job settings in the 1 Touch App For copy jobs you can change the copy quantity for each job Start Immediately Use this option to start the job without re...

Страница 58: ...this option to allow users to view and update the quantity Show Settings Use this option to display a summary of the features programmed for the 1 Touch App 13 Touch Next 14 Touch the option required...

Страница 59: ...ch App required 5 Do one of the following If the Review Before Start option was selected during 1 Touch App setup review the settings If the quantity is displayed for Copy jobs update the number of co...

Страница 60: ......

Страница 61: ...apps already installed and displayed on the Homescreen There are also apps that are installed as standard but are hidden when your device is used for the first time For more information about customi...

Страница 62: ...y App Gallery user logs in to the Xerox App Gallery from the control panel the Xerox App Gallery software updates If you already have a Xerox App Gallery Account to log in to the software and initiate...

Страница 63: ...using the touch screen keypad then touch Enter 4 Touch Log In The Xerox App Gallery opens The App Gallery software updates A Ac cc ce es ss siin ng g t th he e X Xe er ro ox x A Ap pp p G Ga alllle e...

Страница 64: ...URL link provided to access the create account page Click Agree 7 Review and accept the Terms of Use To continue creating an account click Agree 8 Enter the information required into the appropriate...

Страница 65: ...on process begins If the app does not install successfully to attempt the installation process again touch Install 6 To exit the app touch X U Up pd da at tiin ng g a an n A Ap pp p f fr ro om m t th...

Страница 66: ...t o of f y yo ou ur r A Ap pp p G Ga alllle er ry y A Ac cc co ou un nt t To log out of your Xerox App Gallery account 1 Touch the Person icon 2 Touch Logout 66 Xerox VersaLink B70XX Multifunction Pr...

Страница 67: ...re Update Use this option to check for software updates and configure update settings Notifications Use the Notifications option to see details of current alerts or faults on the device A History butt...

Страница 68: ...printer supplies near their replacement time warning alerts appear on the control panel You can customize the alerts that appear on the control panel and configure email alert notifications To check t...

Страница 69: ...ouch OK 4 Add more email addresses if necessary 5 To customize the alerts for each supply item or to enable or disable an alert touch the toggle button 6 To exit the menu touch OK 7 To return to the D...

Страница 70: ...e et t t to o F Fa ac ct to or ry y D De ef fa au ullt ts s The non volatile memory NVRAM stores printer settings even after the power is turned off The Reset to Factory Defaults feature erases all se...

Страница 71: ...Adding Contacts in the Address Book at the Control Panel 1 At the printer control panel press the Home button 2 Touch Address Book 3 Touch the Plus icon then select Add Contact 4 To enter a name touch...

Страница 72: ...roup Name then enter a name using the touch screen keypad Touch Enter 5 To add group members touch Add Member 6 To add a contact name from the Favorites or Contacts menu select a contact 7 To add more...

Страница 73: ...ck the Network SMB Plus icon then enter the SMB details Click OK To add an FTP scan location click the FTP Plus icon then enter the FTP details Click OK 6 To mark the email address or fax number as a...

Страница 74: ...t your computer open a Web browser In the address field type the IP address of the printer then press Enter or Return 2 In the Embedded Web Server click Address Book 3 Within the address book select a...

Страница 75: ...e contact a Global Favorite for the contact name touch the Star icon 4 To mark a contact as a Favorite for email fax or a scan to destination a For each desired feature touch the Star icon b To save c...

Страница 76: ...Note When you reach the limit of 25 Personal Favorites within an app you are required to delete a Personal Favorite before you can add a new one Only an address registered in the Address Book for a pa...

Страница 77: ...ination details touch the Personal Favorite required Repeat the procedure to add more recipients or destinations 7 If you are scanning from 2 sided original documents touch 2 Sided Scanning then selec...

Страница 78: ...he IP address of the printer then press Enter or Return 2 In the Embedded Web Server click Log In then click on your user account If required enter your password and click Log In 3 To access your User...

Страница 79: ...o Printing Special Job Types P Pa au us siin ng g t th he e P Pr riin nt t J Jo ob b w wiit th h t th he e O Op pt tiio on n t to o D De elle et te e I It t 1 At the printer control panel press the Ho...

Страница 80: ...ired resources are available If the job does not print automatically touch Resume To delete the print job touch Delete At the prompt touch Delete 5 To return to the Home screen press the Home button M...

Страница 81: ...nel To print a Secure Print job refer to To Print using Secure Print Printing a Secure Print Job 1 In your software application access the print settings For most software applications press CTRL P fo...

Страница 82: ...l Print job You can print all jobs in the list at once delete an individual job or delete all jobs in the list After a Personal Print job is printed it is deleted automatically To print a Personal Pri...

Страница 83: ...copies After a Sample Set job is printed it is deleted automatically To print a Sample Set refer to To Print using Sample Set Printing a Sample Set 1 In your software application access the print set...

Страница 84: ...er open a Web browser In the address field type the IP address of the printer then press Enter or Return 2 In the Embedded Web Server click Jobs 3 Click the job name 4 Do one of the following To pause...

Страница 85: ...or future jobs The list of features can be customized and some features could be hidden from view when the app is installed To view all available features and to find out more about customizing the Co...

Страница 86: ...button then enter the required quantity 5 If scanning from 2 sided original documents touch 2 Sided then select an option 6 Adjust copy settings as needed For details about available features refer to...

Страница 87: ...the images across the page row by row Down then Right This option prints the images down the page column by column Note The Image Order option is only available when the selected number of pages per...

Страница 88: ...4 Touch Mode then select the typical page reading order for the document if needed Off is the default setting 5 Touch Pages then select the pages that you want to copy Note Available options vary base...

Страница 89: ...u to position the images on Side 1 and Side 2 independently of each other Touch the appropriate fields To adjust the image shift move the slider 5 To specify the orientation of the original document t...

Страница 90: ...ro on nt t C Co ov ve er r You can print the first page of your copy job on different paper such as colored or heavyweight paper The printer selects the special paper from a different tray The cover c...

Страница 91: ...OK P Pr riin nt tiin ng g a a S Sa am mp plle e C Co op py y Sample Copy allows you to print a test copy of a job to inspect before printing multiple copies This feature is useful for complex or high...

Страница 92: ...uired option d Touch OK Note To create a prefix touch the edit icon for Not in Use Enter the required text then touch OK 6 To insert the current date a Select the required page location then touch Dat...

Страница 93: ...djust the settings as required then touch OK 9 Touch OK 10 If necessary to remove all entered annotations touch Delete All Note Not all annotations are available in all page locations Xerox VersaLink...

Страница 94: ...ist For information about all the app features and available settings refer to Apps Features C Co op py yiin ng g a an n I ID D C Ca ar rd d To copy an ID card 1 At the printer control panel press the...

Страница 95: ...s for future jobs The list of features can be customized and some features could be hidden from view when the app is installed To view all available features and to find out more about customizing the...

Страница 96: ...ouch Email 5 Enter recipients To enter the email address manually into the To field type the address using the touch screen keypad Touch Enter To select a contact or group from the Address Book touch...

Страница 97: ...s If you are using Preview to build a job divide your job into segments of 50 or fewer pages After all the segments are scanned and previewed the job is processed and sent as a single job Note If Prev...

Страница 98: ...the next original on the document glass or load the next segment into the automatic document feeder Scroll to the end of the preview images then touch the Plus icon Continue this procedure until you...

Страница 99: ...ing and creating Favorites and Personal Favorites refer to Address Book You can adjust various settings for individual Scan To jobs and save settings as Presets for future jobs You can customize the f...

Страница 100: ...ine from Email Features touch Subject then enter a new subject line using the touch screen keypad Touch Enter 9 To change the email body message from Email Features touch Message then enter a new mess...

Страница 101: ...ns as needed 10 To begin the scan press Scan If you are scanning from the document glass when prompted to finish touch Done or to scan another page touch Add Page Note If you are scanning a document f...

Страница 102: ...ow ws s C Co om mp pu ut te er r 1 Open Windows Explorer 2 Right click the folder you want to share then select Properties 3 Click the Sharing tab then click Advanced Sharing 4 Select Share this fold...

Страница 103: ...The option selected forType determines which option displays in this field Enter the IP address of your computer then enter the default port number Share Enter a name for the directory or folder For...

Страница 104: ...g I Im ma ag ge es s iin nt to o a an n A Ap pp plliic ca at tiio on n o on n a a C Co on nn ne ec ct te ed d C Co om mp pu ut te er r You can import images directly from the scanner into a folder on...

Страница 105: ...d the job is processed and sent as a single job Note If Preview is hidden from view refer to Customize and Personalize 1 At the printer control panel press the Home button 2 To clear previous App sett...

Страница 106: ...segment into the automatic document feeder Scroll to the end of the preview images then touch the Plus icon Continue this procedure until you have scanned all the original documents To process the job...

Страница 107: ...optional features that you can use to configure the printer for faxing Note Not all options listed are supported on all printers Some options apply only to a specific printer model configuration oper...

Страница 108: ...o enter longer pauses touch Dial Pause multiple times You can also enter special characters for Wait Mask Pulse to Tone and Password To select a contact or group from the Address Book touch the Addres...

Страница 109: ...contact from the Address Book touch the Address Book icon 4 Load original documents into the printer then adjust the settings as needed For details refer to Sending a Fax 5 Touch Delay Send 6 Touch S...

Страница 110: ...e comment 6 Enter up to 18 characters of text then touch OK 7 To return to the Home screen press the Home button F Fo or rw wa ar rd diin ng g a a F Fa ax x t to o a an n E Em ma aiill A Ad dd dr re e...

Страница 111: ...ouch Restart Now P Pr riin nt tiin ng g a a S Se ec cu ur re e F Fa ax x When the Fax Secure Receive option is enabled all faxes that the device receives are held in the Job list until you enter a pas...

Страница 112: ...n ng g a a R Re em mo ot te e F Fa ax x M Ma ac ch hiin ne e Fax Polling allows the printer to retrieve a fax stored on another fax machine that supports fax polling Note This feature is hidden from v...

Страница 113: ...names from the list or search for a contact using the search bar d To add the selected contacts to the Fax Recipients list click the Down Arrow e Click OK f To add more recipients repeat this procedur...

Страница 114: ...the original document face down in the upper left corner of the document glass For single multiple or 2 sided pages use the duplex automatic document feeder Remove any staples and paper clips from the...

Страница 115: ...To discard the job touch X then touch Delete and Close 10 To return to the Home screen press the Home button Xerox VersaLink B70XX Multifunction Printer User Guide 115 Xerox Apps...

Страница 116: ...an to a USB Flash drive 1 Load the original document on the document glass or in the duplex automatic document feeder 2 At the printer control panel press the Home button 3 Insert your USB Flash drive...

Страница 117: ...sh drives formatted to the typical FAT32 file system are supported 1 Insert the USB Flash drive into the USB memory port on the printer 2 At the USB Drive has been detected screen touch Print from USB...

Страница 118: ......

Страница 119: ...VersaLink B70XX Multifunction Printer User Guide 119 5 Printing This chapter contains Printing Overview 120 Selecting Printing Options 121 Print Jobs 129 Printing Features 134 Using Custom Paper Size...

Страница 120: ...driver provide the widest range of features To send a job to the printer 1 Select the appropriate paper 2 Load paper in the appropriate tray At the printer control panel specify the paper size color a...

Страница 121: ...Printing Preferences window Click the Help button in the bottom left corner of the Printing Preferences window to see the Help Information about Printing Preferences appears in the Help window From th...

Страница 122: ...r software application access the print settings For most software applications click File Print or press CTRL P 2 Select your printer and click the Properties or Preferences button to open the Printi...

Страница 123: ...ters Scanners Scroll down in the window then under Related settings click Devices and printers Note If the Control Panel icon does not appear on the desktop right click the desktop then select Persona...

Страница 124: ...tput Destination click the arrow then select an option Automatic Use this option to have the printer determine the output destination based on the number of sets and the stapling option selected The p...

Страница 125: ...iew supplies status at any time Provide a common look and feel across the many different suppliers of UNIX and Linux operating systems Installing the Xerox Printer Manager Before you begin Ensure that...

Страница 126: ...riin nt tiin ng g f fr ro om m a a L Liin nu ux x W Wo or rk ks st ta at tiio on n To print from a Linux workstation install either a Xerox print driver for Linux or a CUPS print driver You do not nee...

Страница 127: ...tablet computer or smartphone using Wi Fi Direct For details refer to Connecting to Wi Fi Direct For details on using Wi Fi Direct refer to the documentation provided with your mobile device Note Depe...

Страница 128: ...can obtain a free download from the Google Play Store Wireless devices must join the same wireless network as the printer The name and location of your printer appears in a list of MOPRIA enabled pri...

Страница 129: ...Resume To delete the print job touch Delete At the prompt touch Delete Note If you do not make a selection within 60 seconds the job resumes automatically 4 To return to the Home screen press the Home...

Страница 130: ...your application the title of the button can vary For Macintosh in the Print window click Print Options then select Xerox Features 3 For Job Type select Saved Job 4 Type a job name or select a name fr...

Страница 131: ...2 Touch Jobs 3 To view Secure Print jobs touch Personal Secure Jobs 4 Touch your folder 5 Enter the passcode number then touch OK 6 Select an option To print a Secure Print job touch the job To print...

Страница 132: ...ons then click OK 5 To send the job to the printer click Print To Release a Personal Print Job 1 At the printer control panel press the Home button 2 Touch Jobs 3 To view Personal Print jobs touch Per...

Страница 133: ...Depending on your application the title of the button varies For Macintosh in the Print window click Preview then select Xerox Features 3 For Job Type select Sample Set 4 Select any other required pri...

Страница 134: ...appears in the percentage box If the original size is larger than the output size the page image is cropped If the original size is smaller than the output size extra space appears around the page im...

Страница 135: ...g Default Printing Options for Windows P Pr riin nt t Q Qu ua alliit ty y Print quality modes Standard print quality mode 600 x 600 dpi Enhanced print quality mode 1200 x 1200 dpi I Im ma ag ge e O Op...

Страница 136: ...ch page image and prints four page images per sheet of paper two page images on each side The pages are printed in the correct order so that you can fold and staple the pages to create the booklet For...

Страница 137: ...ame tray Front and Back Different prints the front and back cover pages from different trays After making a selection for printing the cover pages you can select the paper for the front and back cover...

Страница 138: ...und on the long edge of the pages 2 Sided Print Flip on Short Edge prints the exception pages on both sides of the paper and flips the pages on the short edge The job then can be bound on the short ed...

Страница 139: ...t Blend This option combines the watermark with the text and graphics in the document A blended watermark is translucent so you can see both the watermark and the document content Print in Foreground...

Страница 140: ...You can print the job identification on a separate banner page or on the pages of your document The following options are available Disable Job ID This option directs the printer not to print a banner...

Страница 141: ...completion notification from the Advanced tab 1 Click Notifications 2 Click Notify for Completed Jobs then select an option Enabled This option turns on notifications Disabled This option turns off th...

Страница 142: ...ications For more information on supported paper sizes for each tray refer to Supported Custom Paper Sizes Creating and Saving Custom Sizes for Windows 1 In the print driver click the Printing Options...

Страница 143: ...Sizesfeature in Printer Properties to define the custom size For more information refer to Defining Custom Paper Sizes P Pr riin nt tiin ng g o on n C Cu us st to om m P Pa ap pe er r S Siiz ze e f fr...

Страница 144: ......

Страница 145: ...aLink B70XX Multifunction Printer User Guide 145 6 Paper and Media This chapter contains Paper and Media Overview 146 Supported Paper 147 Paper Tray Settings 153 Loading Paper 157 Printing on Special...

Страница 146: ...y trays that can hold A4 Letter and Executive size paper The Bypass Tray is designed for loading small amounts of special paper Note The optional Envelope Tray can replace Tray 1 Tray 6 is an optional...

Страница 147: ...it in the paper tray If excessive jams occur use paper or other approved media from a new package Do not print on label media after a label has been removed from a sheet Use only paper envelopes Print...

Страница 148: ...storing paper in attics kitchens garages or basements These spaces are more likely to collect moisture Store paper flat either on pallets cartons shelves or in cabinets Avoid food or drinks in the ar...

Страница 149: ...rdstock 106 169 g m Cardstock 170 216 g m Labels 106 216 g m Envelopes 75 90 g m Tray 6 Bond Hole Punched Letterhead Plain Plain Reloaded Pre Printed Recycled Custom 60 105 g m Lightweight Cardstock 1...

Страница 150: ...mm 4 1 x 5 8 in A5 148 x 210 mm 5 8 x 8 3 in A4 210 x 297 mm 8 3 x 11 7 in A4 Oversized 223 x 297 mm 8 8 x 11 7 in 215 x 315 215 x 315 mm 8 5 x 12 4 in A3 297 x 420 mm 11 7 x 16 5 in B6 125 x 176 mm 4...

Страница 151: ...t to om ma at tiic c 2 2 S Siid de ed d P Pr riin nt tiin ng g European Standard Sizes North American Standard Sizes A5 148 x 210 mm 5 8 x 8 3 in A4 210 x 297 mm 8 3 x 11 7 in A4 Oversized 223 x 297 m...

Страница 152: ...pp po or rt te ed d C Cu us st to om m P Pa ap pe er r S Siiz ze es s Tray Number Paper Sizes Trays 1 and 2 in all configurations Trays 3 and 4 in the 3 Tray Module Minimum 139 7 x 182 mm 5 5 x 8 3 i...

Страница 153: ...uses paper from the Priority 1 tray first If that tray is empty the printer uses paper from the Priority 2 tray 3 Touch OK 4 To return to the home screen press the Home button C Co on nf fiig gu ur ri...

Страница 154: ...adjustments compare the paper size to the current Tray 6 configuration If the paper size matches the tray configuration no tray adjustment is needed 1 Remove the screw that holds the spacer plate at t...

Страница 155: ...he tray into the matching hole in the plate 5 Install the screw to secure the spacer plate 6 Repeat these steps for the spacer plate at the front of Tray 6 7 On the top of the side gate locate the pin...

Страница 156: ...8 Lift the pin then guide it to the desired paper size in the slot 9 Release the pin to lock the side gate into place 156 Xerox VersaLink B70XX Multifunction Printer User Guide Paper and Media...

Страница 157: ...firm or change the media settings The tray guides automatically detect the size of paper that is loaded When trays are configured as Dedicated the control panel displays the media settings for the tra...

Страница 158: ...s and misfeeds do not remove paper from its packaging until you are ready to use it 5 Load paper in the tray Do one of the following For long edge feed Insert letterhead and pre printed paper face up...

Страница 159: ...can cause paper jams 6 To adjust the length and width guides to fit the paper pinch the guide locks then slide the paper guides in until they touch the paper 7 Slide the tray back into the printer Xer...

Страница 160: ...he tray is in short supply or when a tray is empty To change the paper size in Trays 3 and 4 refer to Configuring Trays 3 and 4 of the Tandem Tray Module To load paper in Trays 3 and 4 of the Tandem T...

Страница 161: ...d paper at the control panel select the correct options for paper type and color 6 To confirm the settings touch OK To change the paper settings when the tray is set to Dedicated mode refer to Configu...

Страница 162: ...ges of the tray 4 Flex the sheets back and forth and fan them then align the edges of the stack on a level surface This procedure separates any sheets that are stuck together and reduces the possibili...

Страница 163: ...Load hole punched paper with the holes to the left For short edge feed For 1 sided printing load letterhead or pre printed paper face down with the top edge to the right Load hole punched paper with...

Страница 164: ...e settings to match the loaded paper at the control panel select the correct options for paper size type and color 8 To confirm the settings touch OK L Lo oa ad diin ng g P Pa ap pe er r iin n T Tr ra...

Страница 165: ...orrect paper type into the tray Note Do not load custom size paper into Tray 6 4 Fan the edges of the paper before loading it into the paper trays This procedure separates any sheets of paper that are...

Страница 166: ...of the tray Place hole punched paper with the holes toward the left side of the tray Note Do not load paper above the maximum fill line Overfilling can cause paper jams 6 Close the side gate Close Tr...

Страница 167: ...n of the envelopes If you do not get the desired results try another envelope brand Maintain constant temperatures and relative humidity Store unused envelopes in their packaging to avoid excess moist...

Страница 168: ...en the bypass tray 2 Move the width guides to the edges of the tray Note If you do not load envelopes in the bypass tray right after they have been removed from the packaging they can bulge To avoid j...

Страница 169: ...ice Paper Trays c In the Paper Trays menu touch the bypass tray icon To select an envelope size touch the current size setting then select the required size To select an envelope color touch the curre...

Страница 170: ...the envelopes Ensure that the maximum fill line is visible or that there are no more than 50 envelopes loaded in the tray For C5 envelopes with the flap on a short edge Load envelopes face down with...

Страница 171: ...used labels flat in their original packaging Leave the label sheets inside the original packaging until ready to use Return any unused label sheets to the original packaging and reseal it Do not store...

Страница 172: ...des are set in the correct position for the size labels you are loading 3 Remove any paper that is a different size or type 4 To move out the length or width paper guide release the guide lock then sl...

Страница 173: ...edge feed insert labels face up with the top edge to the left Note Do not load paper above the maximum fill line Overfilling the tray can cause paper jams 6 Adjust the length and width guides to fit...

Страница 174: ...lower and stop Note Ensure that labels are the correct size for the tray Do not load custom size paper into Trays 3 or 4 2 To load labels in the tray insert labels face up with the top edge toward th...

Страница 175: ...y 1 Open the bypass tray then for larger sizes of paper pull out the extension tray Remove any paper that is a different size or type 2 Move the width guides to the edges of the tray 3 Load labels in...

Страница 176: ...to jam 4 Adjust the width guides until they touch the edges of the paper 5 At the control panel select the correct paper size type and color Ensure that the paper type is set to Labels Note To change...

Страница 177: ...ward the back Stack the labels against the right side of the tray as shown Note Do not load paper above the maximum fill line Overfilling the tray can cause paper jams 4 Close the tray door 5 At the c...

Страница 178: ......

Страница 179: ...ltifunction Printer User Guide 179 7 Maintenance This chapter contains General Precautions 180 Cleaning the Printer 181 Supplies 185 Adjustments and Maintenance Procedures 196 Managing the Printer 199...

Страница 180: ...in the documentation supplied with your printer Caution When cleaning your printer do not use organic or strong chemical solvents or aerosol cleaners Do not pour fluids directly into any area Use supp...

Страница 181: ...r or mild detergent C Clle ea an niin ng g t th he e S Sc ca an nn ne er r To ensure optimum print quality clean the document glass regularly Cleaning helps avoid output with streaks smears and other...

Страница 182: ...er cartridge inspect inside the printer before closing the printer covers and doors Remove any remaining pieces of paper or debris For details refer to Clearing Paper Jams Remove any dust or stains wi...

Страница 183: ...uctions that area included with the new drum cartridge 2 Open the front door of the printer 3 Remove the print head LED lens cleaning rod from inside the front door 4 Slowly push the cleaning rod into...

Страница 184: ...5 Return the cleaning rod to its original location 6 Close the printer front cover 184 Xerox VersaLink B70XX Multifunction Printer User Guide Maintenance...

Страница 185: ...etermined point Caution Use of toner other than genuine Xerox Toner can affect print quality and printer reliability Xerox Toner is the only toner designed and manufactured under strict quality contro...

Страница 186: ...s Printer Status Message Cause and Solution Reorder Drum Cartridge The drum cartridge is nearing the end of its life Order a new drum cartridge Replace Drum Cartridge The drum cartridge has reached th...

Страница 187: ...artridge 5 Insert the front side of the new staple pack into the staple cartridge then push the rear side into the cartridge 6 Grasp the new staple cartridge by the orange handle then insert the cartr...

Страница 188: ...Push the stapler assembly to the right as shown 4 To remove the staple cartridge grasp the orange handle then pull it firmly toward you 5 Check inside the finisher for any loose staples and remove th...

Страница 189: ...push the rear side into the cartridge 8 Grasp the staple cartridge by the orange handle then insert it into the stapler assembly Push the staple cartridge in until it clicks 9 Close the finisher fron...

Страница 190: ...1 Open the finisher side cover 2 If the staple cartridges are not visible grasp the vertical panels on each side of the opening and slide the staple cartridges to the center 3 Hold the tabs on both s...

Страница 191: ...aple cartridges Booklet stapling requires that both staple cartridges contain staples 5 Repeat the procedure for the other staple cartridge 6 Close the finisher side cover E Em mp pt ty yiin ng g t th...

Страница 192: ...cover then open the front transport cover 2 Pull out the hole punch waste container 3 Empty the container 4 Insert the container then slide it all the way into the finisher 5 Close the finisher front...

Страница 193: ...ver When printer supplies near their replacement time warning alerts appear on the control panel You can customize the alerts that appear on the control panel and configure email alert notifications T...

Страница 194: ...Supplies Usage Report 1 At the printer control panel press the Home button 2 Touch Device About Information Pages 3 Touch Supplies Usage Report 4 To return to the Home screen press the Home button T...

Страница 195: ...tions Printer Status Message Cause and Solution Reorder Toner The toner cartridge is low Order a new toner cartridge Out of Toner The toner cartridge is empty Replace the toner cartridge with a new on...

Страница 196: ...www xerox com office VLB70XXdocs 3 Touch Device Support Image Position 4 Select the source paper tray for the registration print a Touch Paper Supply b Touch the desired tray 5 If your printer has au...

Страница 197: ...administrator For details refer to the System Administrator Guide at www xerox com office VLB70XXdocs 3 Touch Device Support Image Position 4 To adjust registration select the source paper tray a Touc...

Страница 198: ...press the Home button A Ad dj ju us st tiin ng g t th he e A Allt tiit tu ud de e Use Adjust Altitude to adjust the altitude to match that of the location where the printer is installed If the altitu...

Страница 199: ...ation refer to the System Administrator Guide at www xerox com office VLB70XXdocs To view the billing information for your printer 1 At the printer control panel press the Home button 2 Touch Device B...

Страница 200: ...When moving the printer over a long distance remove the drum cartridge and toner cartridges to prevent toner from spilling Pack the printer inside a box Caution Do not expose the drum cartridge to dir...

Страница 201: ...B70XX Multifunction Printer User Guide 201 8 Troubleshooting This chapter contains General Troubleshooting 202 Paper Jams 207 Print Quality Problems 227 Copy and Scan Problems 232 Fax Problems 233 Ge...

Страница 202: ...nter Plug another electrical appliance into the outlet and check if it operates properly Try a different outlet The printer is connected to an outlet with a voltage or frequency that does not match th...

Страница 203: ...ner cartridge is empty Replace the empty toner cartridge The drum cartridge has reached end of life Note In some cases it is possible for the printer to continue printing temporarily with the Drum Car...

Страница 204: ...erify that the Wireless Network Adapter is installed and properly configured For details refer to Connecting to a Wireless Network P Pr riin nt tiin ng g T Ta ak ke es s T To oo o L Lo on ng g Probabl...

Страница 205: ...e tray selected in the print driver or set the paper source to Automatically Select 4 Check that you have the latest print driver installed For details go to www xerox com office VLB70XXsupport Note T...

Страница 206: ...ox representative C Co on nd de en ns sa at tiio on n h ha as s F Fo or rm me ed d I In ns siid de e t th he e P Pr riin nt te er r Moisture can condense inside a printer where the humidity is above 8...

Страница 207: ...cool Try to remove the jam after the printer has cooled If the error persists contact your Xerox representative Caution Do not attempt to clear any paper jams using tools or instruments This can perma...

Страница 208: ...n moist creased or folded To separate the sheets before loading into the tray fan the paper Do not load paper above the maximum fill line After loading paper in the trays adjust the paper guides in al...

Страница 209: ...ginal document is clear of the automatic document feeder entry pull it straight out in the direction shown 3 If the control panel message instructs you to open the inner cover lift the green tabbed le...

Страница 210: ...ing the pages already scanned The printer automatically skips the scanned pages and scans the remaining pages Caution Torn wrinkled or folded original documents can cause jams and damage the printer T...

Страница 211: ...lect a new setting When finished touch OK 7 To return to the Home screen press the Home button C Clle ea ar riin ng g P Pa ap pe er r J Ja am ms s f fr ro om m t th he e B By yp pa as ss s T Tr ra ay...

Страница 212: ...n select a new setting When finished touch OK 6 To return to the Home screen press the Home button C Clle ea ar riin ng g P Pa ap pe er r J Ja am ms s a at t D Do oo or rs s A A B B a an nd d C C To r...

Страница 213: ...traight out in the direction shown Note Toner can adhere to the transfer roller This does not affect print quality 4 If paper is jammed in the Fuser remove the paper from areas A1 and A2 as shown Note...

Страница 214: ...Remove the jammed paper from the paper tray feed area Note If the paper is torn remove all torn pieces from the printer 3 For paper jammed in the upper position look inside the printer locate the pap...

Страница 215: ...ss Tray lift the release lever then open Door A WARNING The area around the Fuser can be hot Use caution to avoid injury Caution Do not touch the transfer roller Touching the roller can reduce image q...

Страница 216: ...he ee et ts s P Pu ulllle ed d T To og ge et th he er r Probable Causes Solutions The paper tray is too full Remove some of the paper Do not load paper past fill line The edges of the paper are not ev...

Страница 217: ...l Remove some of the paper Do not load paper past the fill line The paper guides are not correctly adjusted to the paper size Adjust the paper guides in the tray to match the size of the paper The tra...

Страница 218: ...re wrinkling The heat and pressure of the laser printing process can cause wrinkling Use supported envelopes For details refer to Guidelines for Printing Envelopes Note When you load envelopes long ed...

Страница 219: ...Load the tray with only one type and size of paper C Clle ea ar riin ng g F Fiin niis sh he er r J Ja am ms s C Clle ea ar riin ng g J Ja am ms s iin n t th he e I In nt te eg gr ra at te ed d O Of f...

Страница 220: ...ange handle then pull it firmly toward you 3 Check inside the finisher for any loose staples and remove them 4 Pinch both sides of the staple pack and remove the staple pack from the cartridge 5 Remov...

Страница 221: ...er front door C Clle ea ar riin ng g J Ja am ms s iin n t th he e O Of ff fiic ce e F Fiin niis sh he er r L LX X Clearing Jams Under the Office Finisher LX Top Cover 1 Pull up the lever on the top co...

Страница 222: ...her Clearing Jams in the Office Finisher LX Transport 1 To open the transport cover on the center tray lift the handle straight up 2 Remove the jammed paper Note If the paper is torn remove all torn p...

Страница 223: ...o the right as shown 4 To remove the staple cartridge grasp the orange handle then pull it firmly toward you 5 Check inside the finisher for any loose staples and remove them 6 Pinch both sides of the...

Страница 224: ...bly Push the staple cartridge in until it clicks 10 Close the finisher front door Clearing Booklet Staple Jams in the Office Finisher LX The booklet maker uses two staple cartridges Booklet stapling r...

Страница 225: ...isible grasp the vertical panels on each side of the opening then slide the staple cartridges to the center 3 Hold the tabs on both sides of the staple cartridge then pull the cartridge out of the fin...

Страница 226: ...taples 6 Repeat the procedure for the other staple cartridge 7 Close the finisher side cover Clearing Hole Punch Jams in Office Finisher LX If the printer stops printing and reports a hole punch jam e...

Страница 227: ...y use paper designed for your printer and set the paper type correctly Follow the guidelines in this section to maintain optimum print quality from your printer Temperature and humidity affect the qua...

Страница 228: ...the following table and refer to the corresponding solution to correct the problem You can print a Demonstration Print page to more precisely determine the print quality problem For details refer to P...

Страница 229: ...mple change Plain to Lightweight Cardstock In the print driver Printing Options tab select Paper then change the Other Type setting Verify that the paper is the correct size type and weight If not cha...

Страница 230: ...in the printed output Verify that the paper is the correct size type and weight If not change the paper settings Change the Paper Type settings in the print driver In the print driver Printing Options...

Страница 231: ...pes are loaded properly in the bypass tray For details see Loading Envelopes in the Bypass Tray Follow the guidelines for printing on envelopes For details see Guidelines for Printing Envelopes If the...

Страница 232: ...over the debris on the glass surfaces resulting in lines and streaks Clean all glass surfaces with a lint free cloth For more information refer to Cleaning the Scanner Spots present in copies made fr...

Страница 233: ...cument correctly The document glass is dirty Clean the document glass The text in the document is too light Adjust the resolution There is a problem with the telephone connection Verify that the telep...

Страница 234: ...e existing job to complete This increases available memory The received fax size is reduced The paper supply in the printer does not match the document size sent Confirm the original size of the docum...

Страница 235: ...anel U Us siin ng g t th he e I In nt te eg gr ra at te ed d T Tr ro ou ub blle es sh ho oo ot tiin ng g T To oo olls s Your printer has a set of reports that you can print These reports include the D...

Страница 236: ...se sources Resource Location Installation Guide Packaged with the printer Other documentation for your printer www xerox com office VLB70XXdocs Technical support information for your printer including...

Страница 237: ...ction Printer User Guide 237 A Specifications This appendix contains Printer Configurations and Options 238 Physical Specifications 242 Environmental Specifications 251 Electrical Specifications 252 P...

Страница 238: ...m Legal 8 5 x 14 in 216 x 356 mm 11 x 17 in A3 297 x 420 mm 35 ppm maximum 14 ppm maximum 13 ppm maximum Print Resolution Standard Mode 600 x 600 dpi Enhanced Mode 1200 x 1200 dpi Paper Capacity Bypas...

Страница 239: ...of Paper for 2 Sided Printing 169 g m Copy Speed 1 Sided Letter 8 5 x 11 in A4 210 x 297 mm A3 297 x 420 mm 35 cpm maximum 19 cpm maximum Copy Speed 2 Sided Letter 8 5 x 11 in A4 210 x 297 mm A3 297 x...

Страница 240: ...inch LCD touch screen with Home and Power Wake buttons Connectivity Ethernet 10 100 1000Base T High speed USB 3 0 Wi Fi 801 11n and Wi Fi Direct with optional Wi Fi Kit concurrent wired and wireless...

Страница 241: ...ne or 3 line Fax Kit Wi Fi Kit Hard Disk Drive Xerox Common Access Card Enablement Kit Note The Center Tray and Hard Disk Drive are optional for the Base Model only They are standard features for all...

Страница 242: ...idth 59 0 cm 23 2 in Depth 67 1 cm 26 4 in Height 76 8 cm 30 2 in Weight 51 3 kg 113 1 lbs Base Model with Single Tray and Stand Width 61 6 cm 24 2 in Depth 67 1 cm 26 4 in Height 111 9 cm 44 0 in Wei...

Страница 243: ...eight 111 9 cm 44 0 in Weight 87 2 kg 192 2 lbs Base Model with High Capacity Tandem Tray Module and Integrated Office Finisher Width 67 5 cm 26 6 in Depth 67 1 cm 26 4 in Height 111 9 cm 44 1 in Weig...

Страница 244: ...ght 111 9 cm 44 0 in Weight 115 2 kg 253 9 lbs Base Model with High Capacity Tandem Tray Module Office Finisher LX Booklet Maker and High Capacity Feeder Width 151 cm 59 5 in Depth 67 1 cm 26 4 in Hei...

Страница 245: ...c ce e R Re eq qu uiir re em me en nt ts s Clearance Requirements for Base Model Width 108 6 cm 42 8 in Depth 156 7 cm 61 7 in Height 113 3 cm 44 6 in Xerox VersaLink B70XX Multifunction Printer User...

Страница 246: ...Clearance Requirements with Single Tray and Stand Module Width 111 5 cm 43 9 in Depth 166 6 cm 65 6 in Height 148 4 cm 58 4 in 246 Xerox VersaLink B70XX Multifunction Printer User Guide Specifications...

Страница 247: ...earance Requirements with High Capacity Tandem Tray Module Width 111 5 cm 43 9 in Depth 166 6 cm 65 6 in Height 148 4 cm 58 4 in Xerox VersaLink B70XX Multifunction Printer User Guide 247 Specificatio...

Страница 248: ...ents with High Capacity Tandem Tray Module and Integrated Office Finisher Width 118 4 cm 46 6 in Depth 166 6 cm 65 6 in Height 148 4 cm 58 4 in 248 Xerox VersaLink B70XX Multifunction Printer User Gui...

Страница 249: ...s with High Capacity Tandem Tray Module Office Finisher LX and Booklet Maker Width 169 2 cm 66 6 in Depth 166 6 cm 65 6 in Height 148 4 cm 58 4 in Xerox VersaLink B70XX Multifunction Printer User Guid...

Страница 250: ...h Capacity Tandem Tray Module Office Finisher LX Booklet Maker and High Capacity Feeder Width 195 8 cm 77 0 in Depth 166 6 cm 65 6 in Height 148 4 cm 58 4 in 250 Xerox VersaLink B70XX Multifunction Pr...

Страница 251: ...Humidity Range 10 85 Optimal Humidity Range 20 70 relative humidity at 28 C 82 F Note Under extreme environmental conditions such as 10 C and 85 relative humidity printing defects can occur due to co...

Страница 252: ...G GY Y S ST TA AR R Q Qu ua alliif fiie ed d P Pr ro od du uc ct t This product is ENERGY STAR qualified under the ENERGY STAR Program Requirements for Imaging Equipment The ENERGY STAR and ENERGY STA...

Страница 253: ...this device the Blue Angel Environmental Label This label distinguishes it as a device that satisfies Blue Angel criteria for environmental acceptability in terms of device design manufacture and ope...

Страница 254: ...in prints slightly faster than A4 210 x 297 mm Larger paper sizes reduce print speeds Paper type and weights For faster printing use paper weights of 105 g m or less Maximum Print Speeds Black and Wh...

Страница 255: ...nk B70XX Multifunction Printer User Guide 255 B Regulatory Information This appendix contains Basic Regulations 256 Copy Regulations 262 Fax Regulations 265 Safety Certification 269 Material Safety Da...

Страница 256: ...t off and on the user is encouraged to try to correct the interference by one or more of the following measures Reorient or relocate the receiving antenna Increase the separation between the equipment...

Страница 257: ...is subject to the following two conditions 1 this device may not cause harmful interference and 2 this device must accept any interference received including interference that may cause undesired ope...

Страница 258: ...odels qualified to ENERGY STAR can be found at the following website www energystar gov The ENERGY STAR and ENERGY STAR mark are registered United States trademarks The ENERGY STAR Imaging Equipment P...

Страница 259: ...w Power mode can be set up to 60 minutes The default value is 1 minutes The transition time from Low Power mode to Sleep mode can be set up to 60 minutes The default value is set at 1 minute The total...

Страница 260: ...s Deutschland T Tu ur rk ke ey y R Ro oH HS S R Re eg gu ulla at tiio on n In compliance with Article 7 d we hereby certify it is in compliance with the EEE regulation EEE y netmeli ine uygundur E Eu...

Страница 261: ...his equipment O Oz zo on ne e R Re elle ea as se e This printer produces ozone during normal operation The amount of ozone produced is dependent on copy volume Ozone is heavier than air and is not pro...

Страница 262: ...his may be done provided the reproduction of the document is performed for lawful purposes Postage Stamps canceled or uncanceled For philatelic purposes Postage Stamps may be photographed provided the...

Страница 263: ...n D C 20559 Ask for Circular R21 C Ca an na ad da a This product meets the applicable Innovation Science and Economic Development Canada technical specifications A representative designated by the sup...

Страница 264: ...t th he er r C Co ou un nt tr riie es s Please contact your local waste management authority to request disposal guidance 264 Xerox VersaLink B70XX Multifunction Printer User Guide Regulatory Informat...

Страница 265: ...A plug and jack used to connect this equipment to the premises wiring and telephone network must comply with the applicable FCC Part 68 rules and requirements adopted by the ACTA A compliant telephon...

Страница 266: ...ranty period If unauthorized repair is performed the remainder of the warranty period is null and void This equipment must not be used on party lines Connection to party line service is subject to sta...

Страница 267: ...zech Republic Italy Romania Denmark Latvia Slovakia Estonia Liechtenstein Slovenia Finland Lithuania Spain France Luxembourg Sweden Germany Malta United Kingdom If you have problems with your product...

Страница 268: ...cause a false answer condition If you encounter such problems do not contact the Telecom Faults Service 6 DTMF tones dialing is the preferred method because it is faster than pulse decadic dialing an...

Страница 269: ...Underwriters Laboratories Inc US Canada UL 60950 1 2nd Edition 2014 10 14 CAN CSA C22 2 No 60950 1 07 2nd Edition 2014 10 Underwriters Laboratories Inc Europe IEC 60950 1 2005 A1 2009 A2 2013 EN 6095...

Страница 270: ...ng your printer go to North America www xerox com msds European Union www xerox com environment_europe For the Customer Support Center phone numbers go to www xerox com office worldcontacts 270 Xerox...

Страница 271: ...Xerox VersaLink B70XX Multifunction Printer User Guide 271 C Recycling and Disposal This appendix contains All Countries 272 North America 273 European Union 274 Other Countries 276...

Страница 272: ...lly consistent with global regulations applicable at the time that the product was placed on the market For recycling and disposal information contact your local authorities Perchlorate Material This...

Страница 273: ...800 ASK XEROX to determine if this Xerox product is part of the program For more information about Xerox environmental programs visit www xerox com environment or for recycling and disposal informatio...

Страница 274: ...for information In some member states when you purchase new equipment your local retailer may be required to take back your old equipment free of charge Please ask your retailer for information P Pr...

Страница 275: ...ur waste disposal service or the point of sale where you purchased the items Penalties may be applicable for incorrect disposal of this waste in accordance with national legislation B Bu us siin ne es...

Страница 276: ...Other Countries Please contact your local waste management authority to request disposal guidance 276 Xerox VersaLink B70XX Multifunction Printer User Guide Recycling and Disposal...

Страница 277: ...Xerox VersaLink B70XX Multifunction Printer User Guide 277 D Apps Features This appendix contains...

Страница 278: ...et the device to scan one or both sides of an original document For Copy jobs you can specify 1 Sided or 2 Sided output Paper Supply Use Paper Supply to specify the size type and color of the paper re...

Страница 279: ...ntation You can use the Original Orientation option to specify the layout of the original images The printer uses the information to determine if images require rotation to produce the required output...

Страница 280: ...ank or printed Annotations You can add Annotations such as page numbers and the date to your copies Booklet Creation The Booklet Creation feature prints two pages on each side of the paper The pages a...

Страница 281: ...ed in dots per inch dpi Contrast You can use the Contrast feature to adjust the variation between light and dark areas of the image Remove Blank Pages Remove Blank Pages configures the printer to igno...

Страница 282: ...r choose to combine multiple images into a single file File Already Exists Use the File Already Exists option to define what action the device takes when the file name is used already File Name Use th...

Страница 283: ...e and time of the transmission is included on all faxes Delay Send You can set a time in the future for the printer to send your fax job You can delay the send of your fax job for up to 24 hours Prior...

Страница 284: ......

Страница 285: ......

Отзывы: