background image

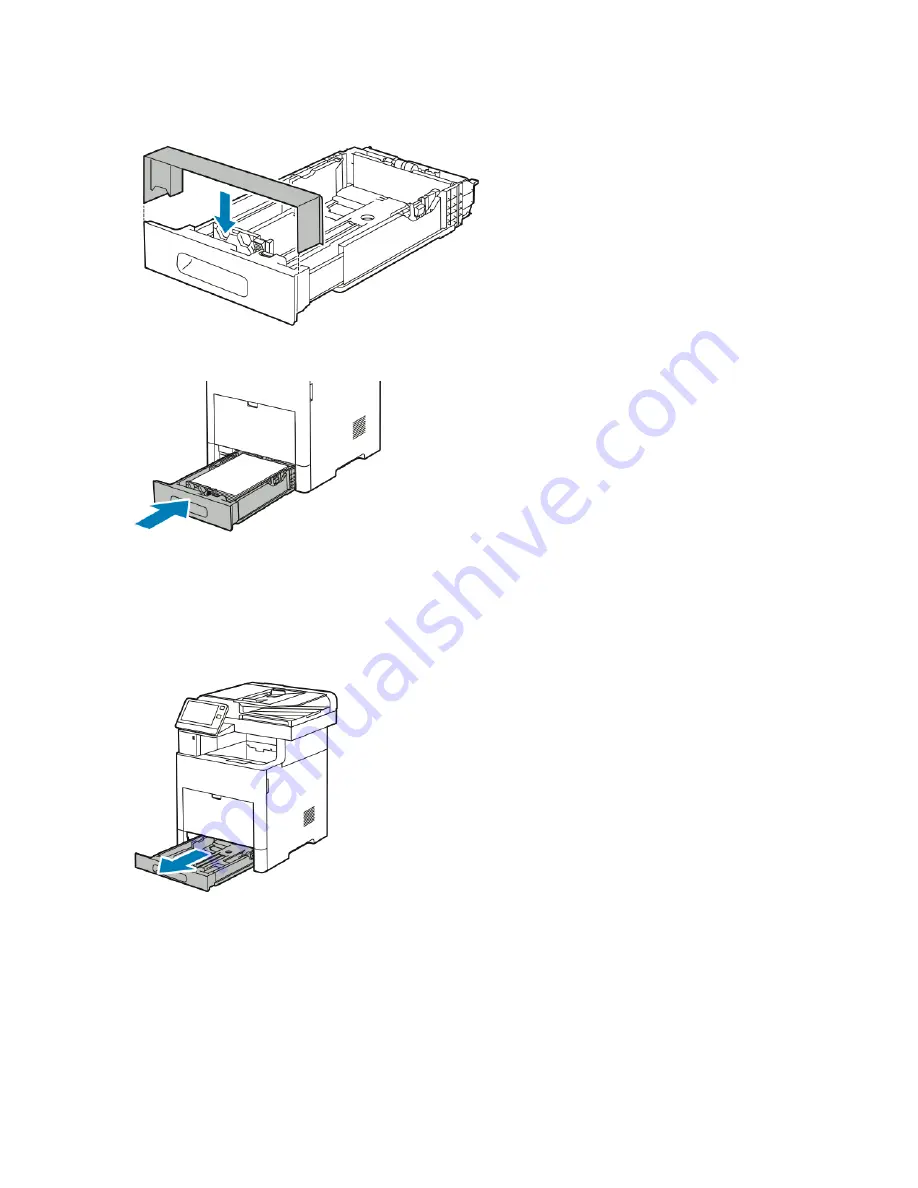
5. To protect the paper when the tray is extended, place the tray cover over the extended section of

the paper tray.

6. Load paper into the tray before inserting it back into the printer.

Loading Paper in Trays 1–5

To load paper in Tray 1 and optional Trays 2–5:
1. To remove the tray from the printer, pull out the tray until it stops. Lift the front of the tray slightly

and then pull out the tray completely.

Xerox

®

VersaLink

®

B605/B615 Multifunction Printer

6-10

User Guide

Paper and Media

Содержание VersaLink B615

Страница 1: ...Xerox VersaLink B605 B615 Multifunction Printer User Guide Version 1 0 May 2017 702P05550...

Страница 2: ...gistered trademarks of International Business Machines Corporation in the United States and or other countries Microsoft Windows Vista Windows and Windows Server are registered trademarks of Microsoft...

Страница 3: ...1 Parts of the Printer 2 1 Front View 2 1 Duplex Automatic Document Feeder 2 2 Document Feeder Guidelines 2 2 Document Glass Guidelines 2 2 Internal Parts 2 3 Rear View 2 3 Options 2 3 Control Panel...

Страница 4: ...ted Setup 2 17 Connecting to a Wireless Network Manually 2 20 Connecting to Wi Fi Direct 2 21 Connecting to a Telephone Line 2 21 Initial Printer Setup 2 21 Configuring AirPrint 2 22 Configuring Googl...

Страница 5: ...Account 4 2 Installing or Updating an App from the Xerox App Gallery 4 3 Installing an App from the App Gallery 4 3 Updating an App from the App Gallery 4 3 Device 4 4 Device Overview 4 4 Device Opti...

Страница 6: ...4 14 Managing Jobs Using the Embedded Web Server 4 15 Submitting Jobs for Printing Using the Embedded Web Server 4 15 Copy 4 15 Copy Overview 4 15 Making a Copy 4 16 Stapling a Copied Document 4 17 Co...

Страница 7: ...nel 4 31 Fax 4 31 Fax Overview 4 31 Sending a Fax 4 32 Fax Workflows 4 33 Sending a Delayed Fax 4 33 Sending a Cover Sheet with a Fax 4 34 Forwarding a Fax to an Email Address 4 35 Printing a Secure F...

Страница 8: ...rinting a Saved Job 5 8 Printing a Secure Print Job 5 8 Printing a Personal Print Job 5 8 Printing a Sample Set 5 9 Selecting Paper Options for Printing 5 9 Scaling 5 9 Printing on Both Sides of the P...

Страница 9: ...pported Standard Paper Sizes 6 3 Supported Standard Paper Sizes for Automatic 2 Sided Printing 6 4 Supported Paper Types and Weights for Automatic 2 Sided Printing 6 4 Supported Custom Paper Sizes 6 5...

Страница 10: ...r 7 13 Adjusting the Altitude 7 14 Performing a Developer and Transfer Roller Cleaning Procedure 7 14 Supplies 7 14 Consumables 7 14 Routine Maintenance Items 7 15 Ordering Supplies 7 15 When to Order...

Страница 11: ...ubleshooting Paper Jams 8 18 Multiple Sheets Pulled Together 8 18 Paper Misfeeds 8 18 Label and Envelope Misfeeds 8 19 Paper Jam Message Stays On 8 19 Jams During Automatic 2 Sided Printing 8 19 Print...

Страница 12: ...Specifications A 8 Temperature A 8 Relative Humidity A 8 Elevation A 8 Electrical Specifications A 9 Power Supply Voltage and Frequency A 9 Power Consumption A 9 Performance Specifications A 9 Print...

Страница 13: ...lecommunications Terminal Equipment Directive B 11 New Zealand B 12 South Africa B 13 Safety Certification B 13 Material Safety Data Sheets B 13 C Recycling and Disposal C 1 All Countries C 1 North Am...

Страница 14: ...Xerox VersaLink B605 B615 Multifunction Printer xii User Guide Table of Contents...

Страница 15: ...been verified using Xerox materials only Note Unauthorized alterations which can include the addition of new functions or connection of external devices can affect the product certification For more...

Страница 16: ...re and electrical codes regarding length of cord conductor size grounding and protection Do not use a ground adapter plug to connect the printer to an electrical outlet that does not have a ground con...

Страница 17: ...ed rollers Covers which require tools for removal protect the hazard areas within the printer Do not remove the protective covers Do not override any electrical or mechanical interlock devices Do not...

Страница 18: ...pplied with the product options and supplies Store all consumables in accordance with the instructions given on the package or container Keep all consumables away from the reach of children Never thro...

Страница 19: ...n Symbol Warning Indicates a hazard that can result in death or serious injury if not avoided Hot Warning Hot surface on or in the printer Use caution to avoid personal injury Warning Wait for the pri...

Страница 20: ...ED Printhead Cleaner Storage Location Environmental Health and Safety Contact Information For more information on Environment Health and Safety in relation to this Xerox product and supplies contact t...

Страница 21: ...Power Wake Button Tray 2 Optional 550 Sheet Feeder 2 7 Tray 1 Touch Screen 8 3 Duplex Automatic Document Feed Bypass Tray 4 9 Front Door Output Tray 10 5 Output Tray Extension USB Memory Port 2 1 Xero...

Страница 22: ...eder first Place only loose sheets of undamaged paper in the duplex automatic document feeder Adjust the paper guides so that they fit against the original documents Insert paper in the duplex automat...

Страница 23: ...sfer Roller 2 8 Fuser USB Port Type B 9 3 Ethernet Connection Rear Door 4 10 Wireless Network Adapter Port Cover FDI Port 11 5 Left Side Panel Access to optional Productivity Kit Phone Connector 6 Fax...

Страница 24: ...nd clear jams Displays errors and warnings Provides the Power Wake button used for powering on or powering off the printer This button also supports the power saver modes and blinks to indicate the po...

Страница 25: ...he NFC area to obtain a network interface or to establish a TCP IP connection between your device and the printer NFC Area 5 This light blinks blue or amber to indicate printer status Status LED 6 Blu...

Страница 26: ...lly when it receives data from a connected device When in Low Power mode or Sleep mode the touch screen is powered off and unresponsive To wake the printer manually press the Power Wake button Caution...

Страница 27: ...ccess printer features you log in with your user credentials Logging In at the Control Panel 1 At the printer control panel press the Home button 2 Touch Log In 3 Type the User Name using the keypad t...

Страница 28: ...ort The PostScript Font List provides a printout of all PostScript fonts that are available on the printer PostScript Font List The PCL Font List provides a printout of all PCL fonts that are availabl...

Страница 29: ...In the address field type the IP address of the printer then press Enter or Return Finding the IP Address of Your Printer To install the print driver for a network connected printer you need the IP ad...

Страница 30: ...B cables are not included with your printer and must be purchased separately Xerox recommends an Ethernet connection because it is typically faster than a USB connection and it provides access to the...

Страница 31: ...k hubs network switches modems Ethernet cables and USB cables are not included with your printer and must be purchased separately USB If you connect the printer to one computer and do not have a netwo...

Страница 32: ...e USB port on the computer 3 If the Windows Found New Hardware Wizard appears press Cancel 4 Install the print driver Connecting to a Wired Network 1 Ensure that the printer is powered off 2 Attach a...

Страница 33: ...adapter is able to connect to a wireless network To install the Wireless Network Adapter 1 Power off the printer 2 To remove the Wireless Network Adapter Port Cover press down on the latch then pull t...

Страница 34: ...efer to Removing the Wireless Network Adapter 5 Power on the printer 6 Configure the Wi Fi settings from the front panel or the embedded web server if connected via ethernet For more information refer...

Страница 35: ...nter and push the release lever toward the front of the printer Hold the release lever in this position and gently pull the Wireless Network Adapter away from the printer Note Do not use force to pull...

Страница 36: ...of the printer until it latches into place 6 Place the left side cover into place then slide it toward the front of the printer 7 To latch the cover swing the handle toward the front of the printer th...

Страница 37: ...a Network with a Wi Fi Protected Setup Wi Fi Protected Setup WPS is a network standard for setting up a wireless network The WPS protocols enable you to set up devices in a secure wireless network wit...

Страница 38: ...On touch the Wi Fi toggle button b To activate your Wi Fi setting changes press the Home button c At the prompt touch Restart Now d After the printer restarts touch Device Connectivity Wi Fi 4 Touch...

Страница 39: ...with the wireless router to resolve setup and configuration information When the printer has the correct information it connects to the router and restarts with the proper setup and configuration inf...

Страница 40: ...ction attempt stops 11 After the printer restarts wait 20 seconds then to get the network information that includes the IP address print a Configuration Report For more information refer to Printing t...

Страница 41: ...tions provided with your mobile device Connecting to a Telephone Line Warning To reduce the risk of fire use only No 26 American Wire Gauge AWG or larger telecommunication line cord 1 Ensure that the...

Страница 42: ...rint enabled printers work with all models of iPad iPhone 3GS or later and iPod touch third generation or later running the latest version of iOS 1 At your computer open a Web browser In the address f...

Страница 43: ...obile Printing click Google Cloud Print 8 Click Printer Registration 9 Click Register A printer registration page prints 10 To register the printer in your Web browser type the URL provided or use you...

Страница 44: ...inter does not appear in the list click the IP Address or DNS Name button In the IP Address or DNS Name field type the IP address of your printer then click Search to locate and select your printer If...

Страница 45: ...ct your printer then click Next 9 If your printer does not appear in the list of discovered printers a Click the Network Printer Icon b Type the IP address of your printer then click Continue c Select...

Страница 46: ...the appropriate installer file for your operating system 4 Open the Scan Installer package file 5 To acknowledge the warning and introductory messages click Continue 6 To accept the license agreement...

Страница 47: ...ll a WSD printer using the Add Device Wizard 1 At your computer click Start then select Devices and Printers 2 To launch the Add Device Wizard click Add a Device 3 In the list of available devices sel...

Страница 48: ...ort Technical support information for your printer including online technical support Online Support Assistant and print driver downloads Print from the control panel For details refer to Inform ation...

Страница 49: ...e device to meet specific user needs You can configure your personal Home page to hide or show only the apps you use Each of the feature lists can be tailored to your job requirements Default settings...

Страница 50: ...tors a window appears that asks you to confirm if the changes are for a Guest or for you 5 Touch the particular option To hide a feature for the required feature touch the Eye icon To signify that the...

Страница 51: ...ch Enter Preset Name then to enter a preset name use the keypad 7 Touch Next 8 Select an icon that best suits the preset that you are creating 9 Touch Done Note The preset is stored within the Preset...

Страница 52: ...ontrol panel press the Home button 2 Touch the App required 3 Configure the required default settings 4 Touch Save 5 Touch Save Defaults The new settings override the previous default settings Xerox V...

Страница 53: ...capabilities for your device The Xerox App Gallery provides direct access to Apps that can improve your pro ductivity simplify workflows and enhance your user experience The Xerox App Gallery enables...

Страница 54: ...p Gallery User Guide available at www xerox com XeroxAppGalleryDocumentation 4 Touch the Enter your email address Enter a valid email address using the touch screen keypad then touch Enter 5 Touch OK...

Страница 55: ...er your Password using the touch screen keypad then touch Enter 5 Touch Log In The Xerox App Gallery appears 6 Touch the app required then touch Install The License Agreement screen appears Note If th...

Страница 56: ...re updates and configure update settings Software Update Use the Notifications option to see details of current alerts or faults on the device A History button displays fault codes and the date that t...

Страница 57: ...r on the control panel and configure email alert notifications To check the supplies status and set up alerts using the Embedded Web Server refer to the System Administrator Guide at www xerox com off...

Страница 58: ...sion Counters This option provides the number of impressions made by the printer The number of impressions cannot equal the number of sheets counted depending on the printer setup If your printer is s...

Страница 59: ...ivity Kit If the Create New Contact button is unavailable the address book has reached capacity Before you can use this feature the System Administrator must enable users to view and manage the Device...

Страница 60: ...rol panel press the Home button then touch Address Book 2 Touch the Plus icon then select Add Group 3 Select the group type enter a name for the group then touch Enter 4 To add group members touch Add...

Страница 61: ...1 At your computer open a Web browser In the address field type the IP address of the printer then press Enter or Return 2 In the Embedded Web Server click Address Book 3 From the Address Book select...

Страница 62: ...rectory service For details about the Advanced options refer to the System Administrator Guide at www xerox com office VLB605_VLB615docs Managing Favorites You can mark contacts as Favorites A star ne...

Страница 63: ...for a selected job From the Jobs window in the Embedded Web Server you can view a list of active and completed print jobs For more information refer to Managing Jobs Using the Embedded Web Server A pr...

Страница 64: ...a job touch the job 5 To return to the Home screen press the Home button Printing a Job Held for Resources 1 At the printer control panel press the Home button 2 Touch Jobs 3 From the jobs list touch...

Страница 65: ...h the Trash icon then at the prompt touch Delete To delete all the jobs in the folder touch Delete All Note After a Secure Print job is printed it is deleted automatically 7 To return to the Home scre...

Страница 66: ...tures A Sample Set job appears in a folder named after the user ID associated with the print job A Sample Set job does not use a passcode Any user can print or delete a Sample Set job A Sample Set pri...

Страница 67: ...d Web Server 1 At your computer open a Web browser In the address field type the IP address of the printer then press Enter or Return 2 In the Embedded Web Server click Home 3 In the Quick Links area...

Страница 68: ...riginal documents face up in the document feeder with the top of the page entering the feeder first Adjust the paper guides so that they fit against the original documents 4 Touch Copy then enter the...

Страница 69: ...ation between light and dark areas of your copy using the Contrast feature You can reduce the sensitivity of the printer to variations in light background colors using Auto Background Suppression To a...

Страница 70: ...om books magazines or other bound documents use the document glass only Do not place bound original documents in the document feeder To set up book copying 1 At the printer control panel press the Hom...

Страница 71: ...rdingly Touch the appropriate fields To adjust the image shift move the slider Independent Sides This option allows you to position the images on Side 1 and Side 2 independently of each other Touch th...

Страница 72: ...t the printer control panel press the Home button 2 Touch Copy 3 Touch Front Cover 4 Touch the Front Cover toggle button Note If Paper Supply is set to Auto Select a notification appears confirming th...

Страница 73: ...py you can choose to print or cancel the remaining copies To print a sample copy of your job 1 At the printer control panel press the Home button 2 Touch Copy 3 Adjust the copy settings as needed 4 En...

Страница 74: ...date format c To adjust which pages contain the selected annotation touch Apply To then select the required option d Touch OK 7 To insert a Bates Stamp a Select the required page location then touch B...

Страница 75: ...ttings touch Reset 3 Lift the automatic document feeder then place the original document in the upper left corner of the document glass 4 Touch ID Card Copy 5 Adjust the settings as required 6 Touch S...

Страница 76: ...ocuments For single pages or paper that cannot be fed using the single pass duplex automatic document feeder use the document glass Lift the automatic document feeder then place the original documents...

Страница 77: ...m the automatic document feeder a prompt does not appear 10 To return to the Home screen press the Home button Scan To Scan To Overview The Scan To feature provides several methods for scanning and st...

Страница 78: ...le feature 7 Adjust scanning options as needed 8 To change the subject line from Email Features touch Subject then enter a new subject line using the touch screen keypad Touch Enter 9 To change the em...

Страница 79: ...glass when prompted to finish touch Done or to scan another page touch Add Page Note If you are scanning a document from the automatic document feeder a prompt does not appear 11 To return to the Hom...

Страница 80: ...e Home button Scan to Desktop Before you begin Before scanning ensure that your computer and the printer are plugged in powered on and connected to an active network On your computer ensure that you h...

Страница 81: ...ess menu select Sharing 3 From the Service menu select File Sharing 4 Under Shared Folders click the Plus icon 5 Browse to the folder that you want to share on the network then click Add 6 To modify a...

Страница 82: ...ter control panel touch the Homebutton 2 Touch Address Book 3 Touch the plus icon then select Add Contact 4 Enter the name to appear in the address book 5 Touch Add SMB then navigate to the desired fo...

Страница 83: ...scan click Scan The printer scans the document and places the image in your application Scanning from Windows Control Panel 1 Load the original document on the document glass or in the duplex automati...

Страница 84: ...s Presets for future jobs The list of features can be customized and some features could be hidden from view when the App is installed To view all available features and to find out more about customi...

Страница 85: ...e To scan another page load a new original document on the document glass then touch Add Page To delete the scan and return to the Fax app touch Cancel then touch Delete Note If you are scanning a doc...

Страница 86: ...r Sheet with a Fax You can send a cover sheet with your fax The cover sheet lists recipient information from the fax address book and sender information from the Company Name Fax Line setting To send...

Страница 87: ...hen select a new format Note The default file format is pdf 9 To save the settings touch OK 10 For the new settings to take effect press the Home button then at the prompt touch Restart Now Printing a...

Страница 88: ...Machine Fax Polling allows the printer to retrieve a fax stored on another fax machine that supports fax polling Note This feature is hidden from view when the Fax App is installed For more informatio...

Страница 89: ...eet Options list select Print a Cover Sheet Enter the details as needed then click OK 8 On the Options tab select the required options then click OK 9 To save your settings and return to the main prin...

Страница 90: ...drive into the USB memory port on the printer 2 At the USB Drive has been detected screen touch Print from USB Note If this feature does not appear enable the feature or contact the system administrat...

Страница 91: ...5docs 3 Add files using the Browse USB screen To print a group of print ready files for the USB drive or folder touch the Select All icon Verify that the files are selected To print a specific file br...

Страница 92: ...Xerox VersaLink B605 B615 Multifunction Printer 4 40 User Guide Xerox Apps...

Страница 93: ...gs as necessary then click OK 7 To send the job to the printer click Print Selecting Printing Options Printing options also called print driver software options are specified as Printing preferences i...

Страница 94: ...ces window click OK 5 To send the job to the printer click Print Setting Default Printing Options for Windows When you print from any software application the printer uses the print job settings speci...

Страница 95: ...ptions for Windows You can define and save a set of options so that you can apply them to future print jobs In Xerox App Gallery you can save an app as default so you can have app by app default setti...

Страница 96: ...ger is an application that allows you to manage and print to multiple printers in UNIX and Linux environments Xerox Printer Manager allows you to Configure and check the status of network connected pr...

Страница 97: ...om a terminal window type xosdprtmgr then press Enter or Return For Linux type sudo xeroxprtmgr then press Enter or Return Printing with xeroxprint Xerox has its own print command You can use the foll...

Страница 98: ...onfiguring Google Cloud Print Printing with Wi Fi Direct You can connect to your printer from a Wi Fi mobile device such as a tablet computer or smartphone using Wi Fi Direct For details refer to Conn...

Страница 99: ...e Option to Delete It 1 At the printer control panel press the Home button 2 Touch Jobs then touch the name of the print job 3 Do one of the following To pause the print job touch Pause To resume the...

Страница 100: ...ox Features 3 For Job Type select Saved Job 4 Type a job name or select a name from the list then click OK 5 Select any other required printing options For Windows click OK then click Print For Macint...

Страница 101: ...For Windows paper options are in the Paper field on the Printing Options tab For Macintosh in the Print window in Xerox Features paper options are in the Paper field for Paper Output Scaling Scaling r...

Страница 102: ...edia Use this option when printing on envelopes labels or other media that cannot be printed on both sides 2 Sided Print This option prints the job on both sides of the paper to allow binding on the l...

Страница 103: ...n of the image on the page You can shift the printed image along the X and Y axes of each sheet of paper Printing Mirror Images If the PostScript driver is installed you can print pages as a mirror im...

Страница 104: ...to 1 point Creep Gutter Selecting Finisher Options With the optional finisher option installed on the printer you can request stapled documents right from your desktop computer The stapler can staple...

Страница 105: ...ns provides the options to place an insert After Page X where X is the specified page or Before Page 1 Insert Quantity specifies the number of pages to insert at each location Pages Specifies the page...

Страница 106: ...n all printers Some options apply only to a specific printer model configuration operating system or print driver type Watermarks are not supported for some print drivers when booklet is selected or w...

Страница 107: ...at the page prints For Windows the Orientation tab is on the Document Options tab Note The orientation setting in your application print dialog box may override the orientation options in the print dr...

Страница 108: ...r Sizes Printing on Custom Paper Sizes Note Before printing on a custom paper size use the Custom Paper Sizes feature in Printer Properties to define the custom size For more information refer to Defi...

Страница 109: ...surements button then select Inches or Millimeters 5 To save in the Name field type a title for the new size then click OK Creating and Saving Custom Sizes for Macintosh 1 In the application click Fil...

Страница 110: ...Xerox VersaLink B605 B615 Multifunction Printer 5 18 User Guide Printing...

Страница 111: ...ing If you have the same size paper loaded in more than one tray ensure that the proper tray is selected in the print driver Store your paper and other media properly for optimum print quality For det...

Страница 112: ...r wrinkled Paper with cutouts or perforations Stapled paper Envelopes with windows metal clasps side seams or adhesives with release strips Padded envelopes Plastic media Transparencies Caution The Xe...

Страница 113: ...ready to use it Keep unused media in the bag and reseal it for protection Supported Paper Types and Weights Weights Paper Types Trays 60 80 g m Recycled Tray 1 and Trays 2 5 Bypass Tray 60 90 g m Pla...

Страница 114: ...A5 148 x 210 mm 5 8 x 8 3 in A4 210 x 297 mm 8 3 x 11 7 in B5 ISO 176 x 250 mm 6 9 x 9 8 in Tray 1 and Trays 2 5 Letter 216 x 279 mm 8 5 x 11 in A4 210 x 297 mm 8 3 x 11 7 in High Capacity Feeder HCF...

Страница 115: ...ay settings The following options are available Fully Adjustable If you select this paper setting you can change the paper size type and color when you load paper into the tray Dedicated If you select...

Страница 116: ...ype 2 For larger paper sizes pull out then open the Bypass Tray extension 3 Move the width guides to the edges of the tray 4 Flex the sheets back and forth and fan them then align the edges of the sta...

Страница 117: ...t load paper above the maximum fill line on the width guides Overfilling the tray can cause the printer to jam Load hole punched paper with the holes to the left For 1 sided printing load letterhead o...

Страница 118: ...are correct touch OK b If the paper type size or color are incorrect change the settings To select a paper type touch the current paper type then from the list select the type To select a sheet size...

Страница 119: ...until it stops Lift the front of the tray slightly then pull it out 2 Remove all paper from the tray 3 To compress the tray for shorter paper hold the back of the tray with one hand With the other ha...

Страница 120: ...before inserting it back into the printer Loading Paper in Trays 1 5 To load paper in Tray 1 and optional Trays 2 5 1 To remove the tray from the printer pull out the tray until it stops Lift the fron...

Страница 121: ...y of jams 5 Load paper into the tray with the print side face up Load hole punched paper with the holes to the left Load label sheets in the tray face up For 1 sided printing load letterhead paper fac...

Страница 122: ...do not remove the paper cover while printing is in progress 8 If the tray is extended for Legal size paper the tray protrudes when it is fully inserted into the printer You can place a cover over the...

Страница 123: ...Touch Device Paper Trays c Touch the appropriate tray d To dedicate the tray for a paper size type or color touch Tray Mode then touch Dedicated To select a paper size touch the current size setting t...

Страница 124: ...e size and color are correct touch OK b If the paper type size or color are incorrect change the settings To select a paper type touch the current paper type then from the list select the type To sele...

Страница 125: ...h OK 7 To return to the Home screen press the Home button Configuring the Tray Mode for Trays 1 5 1 At the printer control panel press the Home button 2 Touch Device Paper Trays 3 Touch the desired tr...

Страница 126: ...nt quality and cause wrinkling Excessive moisture can cause the envelopes to seal before or during printing Remove air bubbles from the envelopes before loading them into the tray by setting a heavy b...

Страница 127: ...an cause a jam or misfeed Load envelopes up to 16 5 mm 65 in in height This is approximately 10 20 envelopes depending on brand size and texture If you do not load envelopes in the Bypass Tray right a...

Страница 128: ...n and down and the bottom of the envelope going into the printer Load envelopes with the print side up flaps closed and down and flaps going into the printer For C5 envelopes perform one of the follow...

Страница 129: ...paper type size and color are correct touch OK b If the paper type size or color are incorrect change the settings To select a paper type touch the current paper type then from the list select Envelo...

Страница 130: ...p to 45 mm 1 8 in in height 5 Adjust the width guides until they touch the edges of the envelopes 6 Slide the tray all the way into the printer 7 If the Tray Mode is set to Fully Adjustable the printe...

Страница 131: ...n once Do not use dry gum labels Print only on one side of the sheet of labels Use full sheet labels only Store unused labels flat in their original packaging Leave the label sheets inside the origina...

Страница 132: ...tray 2 For larger paper sizes pull out then open the Bypass Tray extension 3 Move the width guides to the edges of the tray 4 Load sheet labels in the Bypass Tray face up with the top edge of the page...

Страница 133: ...elect Labels To select a size touch the current size setting then from the list select a size To select the color touch the current paper color then from the list select a color c To save the settings...

Страница 134: ...ize type and color are correct touch OK b If the paper size type or color are incorrect change the settings To select a sheet size touch the current size setting then from the list select the size To...

Страница 135: ...crews You cannot maintain or service any parts that are behind these covers and guards Do not attempt any maintenance procedure that is not described in the documentation supplied with your printer Wa...

Страница 136: ...could enter the printer through a gap and cause problems Never use cleaning agents other than water or mild detergent Cleaning the Scanner Clean the scanner about once a month when anything is spilled...

Страница 137: ...s and streaks 5 Clean the CVT glass Note For best results use Xerox Glass Cleaner to remove marks and streaks 6 Wipe the white underside of the document cover until it is clean and dry 7 3 Xerox Versa...

Страница 138: ...trip and the rollers If dirt is difficult to remove moisten a soft cloth with a small amount of neutral detergent then wipe the printer parts dry with a soft cloth Note To prevent damage to the film a...

Страница 139: ...with a dry soft lint free cloth until they are clean Note If the feed rollers get stained with toner or debris they can cause stains on the documents To remove the stains use a soft lint free cloth d...

Страница 140: ...that can deteriorate print quality clean the interior of the printer regularly Clean the printer interior whenever you replace the drum cartridge After clearing paper jams or replacing a toner cartrid...

Страница 141: ...rect sunlight or strong indoor fluorescent lighting Do not touch or scratch the green surface of the Drum Cartridge To remove the Drum Cartridge grip the orange handle then pull the Drum Cartridge str...

Страница 142: ...placement Kit 6 In necessary install a new cleaning pad onto the cleaning tool 7 To remove any debris or toner dust set the cleaning tool on the LED Lens Block Slide the cleaning tool until it stops a...

Страница 143: ...s storage location inside the Front Door 9 Slide the Drum Cartridge into the printer until it stops 10 Slide the Toner Cartridge into the printer until it stops 7 9 Xerox VersaLink B605 B615 Multifunc...

Страница 144: ...trator For details refer to the System Administrator Guide at www xerox com office VLB605_VLB615docs 3 Touch Device Support Image Position 4 Select the source paper tray for the registration print a T...

Страница 145: ...e Home button 2 Log in as administrator For details refer to the System Administrator Guide at www xerox com office VLB605_VLB615docs 3 Touch Device Support Image Position 4 To adjust registration sel...

Страница 146: ...o save your setting touch OK 5 To return to the Home screen press the Home button Scan Color Consistency Use the Scan Color Consistency procedure to adjust scanned colors that appear incorrect or for...

Страница 147: ...r the paper you are using If the printed image is mottled or blotchy looking decrease the voltage for the paper you are using To adjust the transfer voltage 1 At the printer control panel press the Ho...

Страница 148: ...edure 1 At the printer control panel press the Home button 2 Touch Device Support Developer Transfer Roller Cleaning 3 To perform a Developer and Transfer Roller Cleaning procedure touch Start 4 At th...

Страница 149: ...s is not recommended The Xerox Warranty Service Agreement and Total Satisfaction Guarantee do not cover damage malfunction or degradation of performance caused by use of non Xerox supplies or the use...

Страница 150: ...an catch fire and cause burn injuries or an explosion Replacing a Toner Cartridge A message appears on the control panel when a toner cartridge must be replaced Note Each toner cartridge includes inst...

Страница 151: ...Home button 2 Touch Device About Information Pages 3 Touch Billing Summary Report 4 To return to the Home screen press the Home button Moving the Printer Warning To lift the printer always use at lea...

Страница 152: ...2 Remove any paper from the Bypass Tray 3 Close the Bypass Tray 4 Remove any paper or other media from the Output Tray Xerox VersaLink B605 B615 Multifunction Printer 7 18 User Guide Maintenance...

Страница 153: ...rom Tray 1 then close the tray 7 Keep the paper wrapped and stored away from humidity and dirt 8 If the optional 550 Sheet Feeder is installed unlock then uninstall it before you move the printer 7 19...

Страница 154: ...ilure to repackage the printer properly for shipment can result in damage not covered by the Xerox Warranty Service Agreement or Total Satisfaction Guarantee The Xerox Warranty Service Agreement or To...

Страница 155: ...d securely into the outlet The power cord is not plugged into the outlet correctly Power off the printer then unplug the power cord and wait 30 seconds Plug the power cord into the outlet se curely th...

Страница 156: ...power Printer Does Not Print Solutions Probable Causes On the control panel press the Power Wake button The printer is in Power Saver mode If the Status LED is blinking amber follow the instruc tions...

Страница 157: ...guration Report For more in formation refer to Printing the Configuration Re port 4 If the TCP IP address is 0 0 0 0 the printer needs more time to acquire an IP address from the DHCP server Wait 2 mi...

Страница 158: ...he print driver 2 Access the page setup or printer settings of the application from which you are printing 3 Set the paper source to match the tray selected in the print driver or set the paper source...

Страница 159: ...ted If the paper lift plate at the back of the tray is not locked down replace the tray Condensation Has Formed Inside the Printer Moisture can condense in the printer when room humidity exceeds 85 or...

Страница 160: ...can permanently damage the printer The following illustration shows where paper jams can occur along the paper path 4 1 Bypass Tray Tray 2 2 5 Optional Mailbox or Finisher Tray 1 3 Fuser Minimizing Pa...

Страница 161: ...se poor print quality misfeeds skewed prints and printer damage After loading paper in the trays at the control panel select the correct paper type and size Before printing select the correct type and...

Страница 162: ...uplex Automatic Document Feeder 1 Open the Top Cover and remove any paper 2 If paper is jammed in the Single Pass Duplex Automatic Document Feeder open the Document Cover Xerox VersaLink B605 B615 Mul...

Страница 163: ...then reload the document in the Duplex Automatic Document Feeder To prevent paper jams Do not load original documents above the MAX fill line Adjust the paper guides so that they fit against the origi...

Страница 164: ...l panel you must clear all paper from the paper path 1 Remove any paper from the Bypass Tray 2 Grasp both sides of the Bypass Tray then pull it straight out of the printer 3 Remove Tray 1 from the pri...

Страница 165: ...tray protrudes when it is inserted into the printer If removed in a previous step replace the tray cover 6 Insert the Bypass Tray completely into the printer 7 When paper trays are set to Fully Adjust...

Страница 166: ...menu press the Home button Clearing Paper Jams from the Tray 1 Area To resolve the error displayed on the control panel you must clear all paper from the paper path 1 Remove any paper from the Bypass...

Страница 167: ...he tray protrudes when it is inserted into the printer If removed in a previous step replace the tray cover 6 Insert the Bypass Tray completely into the printer 7 When paper trays are set to Fully Adj...

Страница 168: ...the error displayed on the control panel clear all paper from the paper path 1 For the tray reported on the Touch Screen Display pull out the tray until it stops 2 To remove the tray lift the front of...

Страница 169: ...ray cover 6 When paper trays are set to Fully Adjustable you are prompted to verify or change the paper settings a To confirm the same paper size type or color touch OK b To select a new paper size ty...

Страница 170: ...de on the top of the fuser lift the paper guide tab 3 Remove any jammed paper from the back of the printer 4 Close the paper guide on the fuser Xerox VersaLink B605 B615 Multifunction Printer 8 16 Use...

Страница 171: ...clear any remaining errors follow the instructions on the control panel Clearing Paper Jams from the Mailbox To resolve the error displayed on the control panel clear all paper from the paper path 1 A...

Страница 172: ...positioned in the tray Remove the misfed paper and reposition it properly in the tray Adjust the paper guides in the tray to match the size of the paper Remove some of the paper Do not load paper pas...

Страница 173: ...Note When you load envelopes long edge feed ensure that you specify landscape orientation in the print driver Paper Jam Message Stays On Note Check for and remove torn pieces of paper in the paper pa...

Страница 174: ...or many devices are designed to cease functioning at a predetermined point Controlling Print Quality Various factors can affect the quality of the output of your printer For consistent and optimum pri...

Страница 175: ...can also print a Demonstration Print page to more precisely determine the print quality problem For more information refer to Information Pages If the print quality does not improve after performing...

Страница 176: ...per in the tray Verify that the printer is plugged into an outlet that is providing the correct voltage and power Review the electrical specification of the printer with an electrician if necessary Fo...

Страница 177: ...y Choose a different paper type at the control panel in the application and in the print driver Replace the paper Ghosting appears in the printed output Verify that the paper is the correct size type...

Страница 178: ...printing as expected Your printer is not faulty If the crease is more than the supported measure ment do the following steps 1 Ensure that envelopes are loaded properly in the Bypass Tray For more inf...

Страница 179: ...ce the matching component Copy and Scan Problems If the copy or scan quality is poor refer to the following table If the problem persists for online support information go to www xerox com office VLB6...

Страница 180: ...ment feeder guides are not adjusted to the width of the docu ment The document is scanned at an angle Position the document correctly The document is positioned incor rectly The fax received by the re...

Страница 181: ...he fax again There is a problem with the tele phone connection or with the fax machine of the caller The received fax is blank Contact the sender The sender loaded the pages incor rectly If the job co...

Страница 182: ...t require your attention If more than one warning condition occurs only one warning message appears on the control panel at a time Viewing Current Errors on the Control Panel When an error condition o...

Страница 183: ...ration pages and more For more information refer to Information Pages Support Pages To assist with troubleshooting your printer has a set of Support Pages that you can print These pages include Ghosti...

Страница 184: ...Xerox VersaLink B605 B615 Multifunction Printer 8 30 User Guide Troubleshooting...

Страница 185: ...roll down the page and select Multifunction All In One Printers 3 From the Multifunction All In One Printers page scroll down the page to find your device 4 From your device listing select the PDF dow...

Страница 186: ...els B605S B605X and B615X Optional 550 Sheet Feeder 550 sheets up to 4 trays Optional High Capacity Feeder 2000 sheets Optional Finisher 500 sheets Optional Mailbox 400 sheets Maximum Print Size Legal...

Страница 187: ...ported Scanning Scan to Desktop WSD Scan to SMB Scan to FTP Scan to Email Scan to USB Flash drive Control Panel 7 inch LCD touch screen with Home and Power Wake buttons Connectivity 3 USB 2 0 Type A P...

Страница 188: ...2 4 GHz and 5 GHz frequencies 550 Sheet Feeder depending on configuration up to 4 feeders 2000 Sheet High Capacity Feeder with Casters Finisher available for all models except B605S B605X and B615X 4...

Страница 189: ...47 0 cm 18 5 in Depth 50 3 cm 19 8 in Height 64 4 cm 25 4 in Weight 30 5 kg 67 2 lb Base Configuration Tall Model Width 47 0 cm 18 5 in Depth 50 3 cm 19 8 in Height 84 4 cm 33 2 in Weight 32 5 kg 71...

Страница 190: ...Clearance Requirements Clearance Requirements for Short Model Clearance Requirements for Tall Model Xerox VersaLink B605 B615 Multifunction Printer A 6 User Guide Specifications...

Страница 191: ...tional 550 Sheet Feeder Clearance Requirements for Optional Cabinet with Casters Clearance Requirements for Optional High Capacity Feeder with Casters A 7 Xerox VersaLink B605 B615 Multifunction Print...

Страница 192: ...85 Optimal Humidity Range 20 70 relative humidity at 28 C 82 F Note Under extreme environmental conditions such as 10 C and 85 relative humidity printing defects can occur due to condensation inside t...

Страница 193: ...er warm up time Print Speed Depending on the model print speeds for continuous printing are up to 65 ppm Several factors affect print speed Print mode The fastest print modes are Standard and Enhanced...

Страница 194: ...Envelopes is 17 ppm Xerox VersaLink B605 B615 Multifunction Printer A 10 User Guide Specifications...

Страница 195: ...ng Equipment Program is a team effort between United States European Union Japanese governments and the office equipment industry to promote energy efficient copiers printers fax multifunction printer...

Страница 196: ...Guide at www xerox com office VLB605_VLB615docs For further assistance contact your System Administrator or refer to the System Administrator Guide To enable Auto Power Off mode contact your System Ad...

Страница 197: ...Canada RSS 210 and European Council Directive 2014 53 EU Radio Frequency RF output power of this device will not exceed 20 dBm in either frequency band Operation of this device is subject to the follo...

Страница 198: ...radio TV technician for help Changes or modifications to this equipment not approved by Xerox can void the authority of the user to operate this equipment Warning To ensure compliance with Part 15 an...

Страница 199: ...VersaLink B605 B615 is in compliance with Directive 2014 53 EU The full text of the EU declaration of conformity can found at the following internet address www xerox com environment_europe This print...

Страница 200: ...Bildschirmarbeitsplatz vorgesehen Um st rende Reflexionen am Bildschirmarbeitsplatz zu vermeiden darf dieses Produkt nicht im unmittelbaren Gesichtsfeld platziert werden L rmemission Maschinenl rminfo...

Страница 201: ...amps canceled or uncanceled For philatelic purposes Postage Stamps may be photographed provided the reproduction is in black and white and is less than 75 or more than 150 of the linear dimensions of...

Страница 202: ...f fine or imprisonment may be imposed on those guilty of making such reproductions Current bank notes or current paper money Obligations or securities of a government or bank Exchequer bill paper or r...

Страница 203: ...or on the first page of the transmission the date and time it is sent and an identification of the business or other entity or other individual sending the message and the telephone number of the sen...

Страница 204: ...ected If advance notice is not practical the Telephone Company notifies you of the disconnection as soon as possible If the Telephone Company interrupts your service they can advise you of your right...

Страница 205: ...authority or electrician to make the ground connection The Ringer Equivalence Number REN indicates the maximum number of devices allowed to be connected to a telephone interface The termination of an...

Страница 206: ...itted equipment of a different make or model The equipment may not be capable of correct operation at the higher data speeds designated 33 6kbps and 56kbps connections are likely to be restricted to l...

Страница 207: ...one call attempt and the beginning of another 9 For correct operation total of the RNs of all devices connected to a single line at any time should not exceed five South Africa This modem must be used...

Страница 208: ...Xerox VersaLink B605 B615 Multifunction Printer B 14 User Guide Regulatory Information...

Страница 209: ...rchlorate North America Xerox operates an equipment take back and reuse recycle program Contact your Xerox representative 1 800 ASK XEROX to determine if this Xerox product is part of the program For...

Страница 210: ...d batteries please take them to applicable collection points in accordance with your national legislation and the Directive 2002 96 EC and 2006 66 EC By disposing of these products and batteries corre...

Страница 211: ...e replaced by a manufacturer approved service facility Other Countries Please contact your local waste management authority to request disposal guidance C 3 Xerox VersaLink B605 B615 Multifunction Pri...

Страница 212: ...Xerox VersaLink B605 B615 Multifunction Printer C 4 User Guide Recycling and Disposal...

Страница 213: ...to adjust the color strength and the amount of gray in the color Saturation X X X X You can use the 2 Sided options to set the device to scan one or both sides of an origin al document You can specif...

Страница 214: ...print lighter or darker Lighten Darken X X X X Use this option to sharpen the output image or print For best results sharpen text images and soften photos Sharpness X X X You can use the Original Ori...

Страница 215: ...n be blank or printed Note This function is only available on printers with an optional Productivity Kit installed Front Cover X You can add Annotations such as page numbers and the date to your copie...

Страница 216: ...iew X X X Resolution determines how fine or grainy graphic images appear Image resolution is measured in dots per inch dpi Resolution X X You can use the Contrast feature to adjust the variation betwe...

Страница 217: ...ormat although it cannot be disabled through the Customization menu File Format X Use the File Already Exists option to define what action the device takes when the file name is used already File Alre...

Страница 218: ...send your fax job You can delay the sending of your fax job for up to 24 hours Delay Send X Use Priority Send to identify urgent faxes Priority faxes are sent first Priority Send X You can use the Ma...

Страница 219: ......

Страница 220: ......

Отзывы: