2/99
REPAIRS/ADJUSTMENTS
DocuPrint C55/C55mp/[NC60]
4-69
ADJ 11.1
6. Close then open the Transfer Assembly.
This will transfer the Cyan image to the
paper.
7. Repeat steps 2 through 6 until you have
three transfers from three different areas
of the transfer drum.
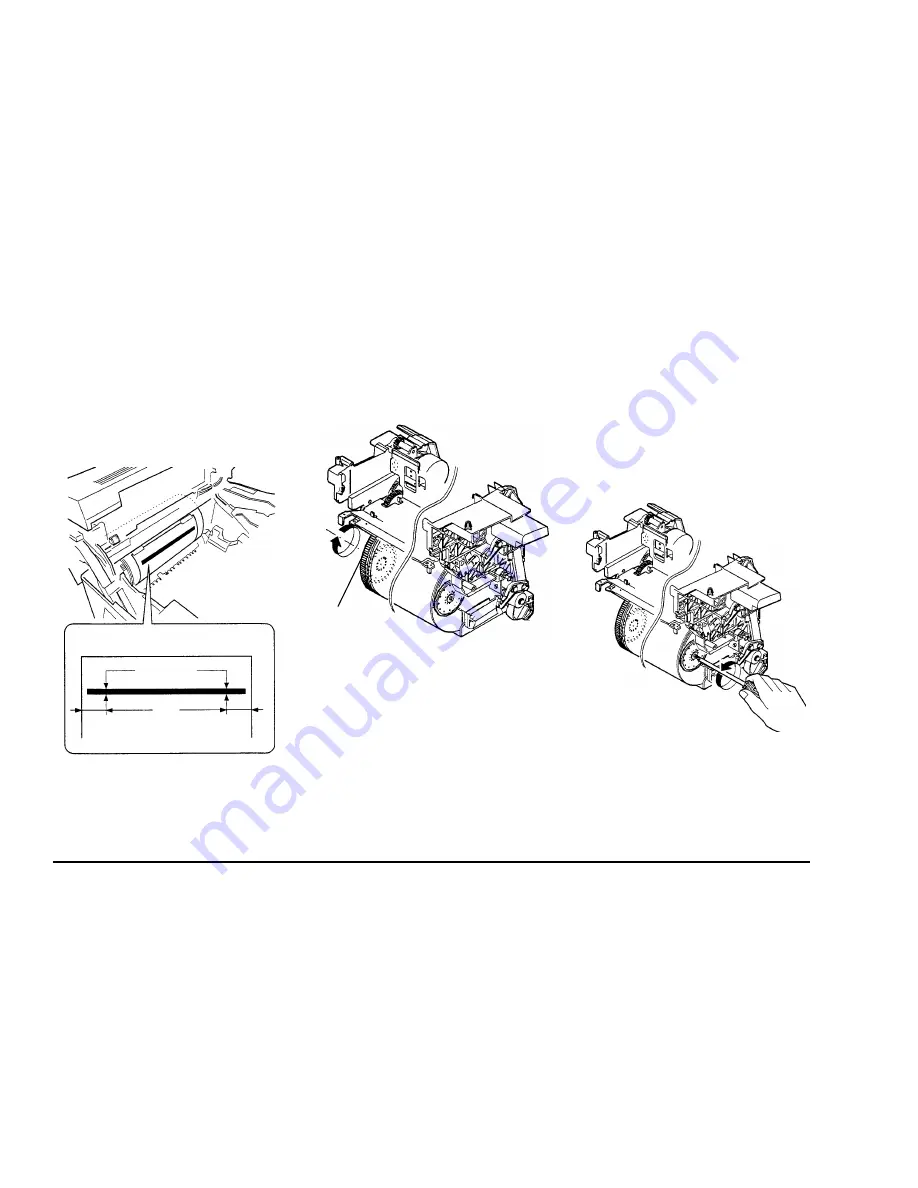
8. (Figure 3): Remove the paper and
measure the width (Nip) of the Image on
the paper. Make the measurement 35 MM
from the edge of the paper.
Figure 3. Measuring the Nip
9. The Nip should be 2
±
.5 MM.
10. If the Nip is not within specification,
perform the adjustment.
ADJUSTMENT
1. (Figure 4): Locate the two adjustment
cams on the left and right side of the
Transfer Drum. You will need to rotate the
Transfer Drum Gear until the adjustment
screw and cam are visible through the
cutout on the right side.
Figure 4. Rotating the Gear
2. (Figure 5): Note the number of the flat
that is close to the Print Drum. Then
loosen the two screws securing the left
and right adjustment plates
3. A higher number will decrease the Nip. A
lower number will increase the Nip.
4. Move the plate as required.
5. Repeat the check.
NOTE: You may be able to re-use the Cyan
image on the Print Drum by rotating it slightly.
If not, create another image.
Figure 5. Adjusting the Nip
TD05
Nip
35 MM
35 MM
Gear
TD06A
TD06
Содержание DocuPrint C55
Страница 14: ...SERVICE CALL PROCEDURES 2 99 NOTES 1 6 DocuPrint C55 C55mp NC60 Notes ...
Страница 56: ...OTHER FAULTS RAPs 2 99 NOTES 2 42 DocuPrint C55 C55mp NC60 NOTES ...
Страница 76: ...IMAGE QUALITY SPECIFICATIONS 2 99 NOTES 3 20 DocuPrint C55 C55mp NC60 NOTES ...
Страница 130: ...REPAIRS ADJUSTMENTS 2 99 NOTES 4 42 DocuPrint C55 C55mp NC60 NOTES ...
Страница 216: ...GENERAL PROCEDURES 2 99 NOTES 6 18 DocuPrint C55 C55mp NC60 Notes ...
Страница 252: ...GENERAL PROCEDURES 2 99 NOTES 6 54 DocuPrint C55 C55mp NC60 NOTES ...
Страница 272: ...GENERAL PROCEDURES 2 99 NOTES 6 74 DocuPrint C55 C55mp NOTES ...
Страница 274: ...GENERAL PROCEDURES 2 99 NOTES 6 76 DocuPrint NC60 NOTES ...


