background image

Troubleshooting

181

7

7.5

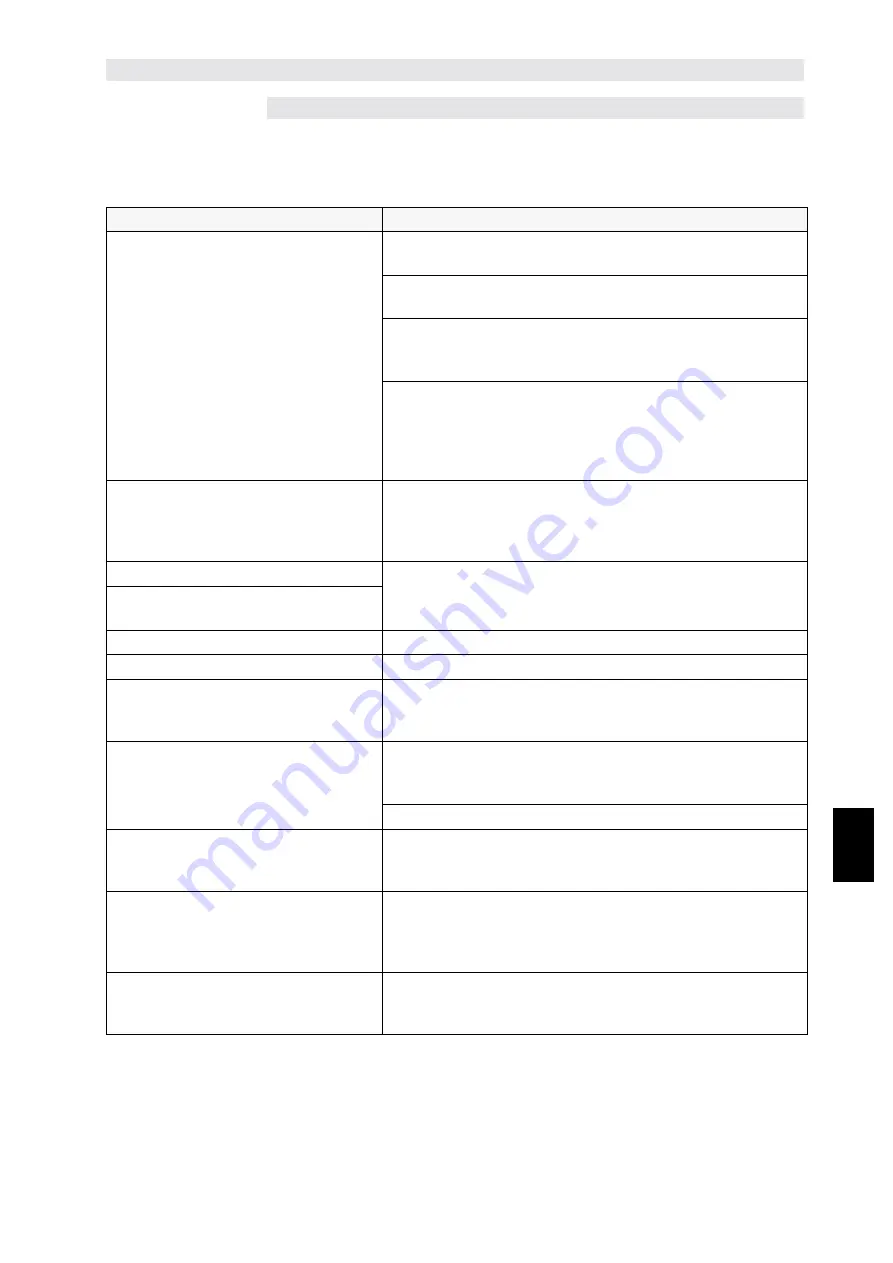
Using CentreWare Internet 

Services

Cause

Treatment

Cannot be connected to CentreWare 
Internet Services.

Is the printer working properly?
Check if the power of the printer is switched on.

Is CentreWare Internet Services activated?
Print out the Printer Settings List to check.

Is the internet address correctly entered?
Check the internet address again. If cannot be connected, 
enter the IP address to connect again.

Is the proxy server used?
Depending on the proxy server, connections might not be 
made. Without using the proxy server, either change the 
browser setting or the address to which you want to connect 
to one without using the proxy server.

The "Please wait" message is 
displayed throughout.

Wait for awhile as instructed.
If nothing happens, try clicking the Refresh button. And even 
then, if nothing happens, check if the printer is working 
properly.

The Refresh button is not working.

Are you using the target OS and browser?
By referring to " ", check if the OS and browser you are 
using can be used.

Selecting the left frame menu does not 
change the right frame settings.

The screen display is distorted.

Change the window size of the browser.

The latest information is not displayed. Click the Refresh button.

The new settings are not reflected by 
clicking the Apply New Settings 
button.

Is the value entered correct?
If the value entered is not within the correct range, it will be 
changed to a value within the correct range automatically.

Clicking the Apply New Settings button 
prompts messages like no data or the 
server has returned ineffective or 
unrecognizable response.

Is the password correct?
The entry for Confirm Password is not similar to Password. 
Enter the correct password.

Reboot the printer.

Even if the job you want to delete is 
checked, the selection is unchecked 
later.

Is the Auto Refresh set?
Either set Auto Refresh Interval of Internet Services 
Settings on the Properties tab to Void or to a higher value.

The job cannot be deleted.

Wait for awhile, and then click the Refresh button. Even if 
jobs are detected from LPD of Job List, they might not be 
deleted from system. When this happens, delete the job 
from system again.

When LPD or SMB is selected, a 
message will appear to say that it is 
not spool mode.

After the present page is displayed, the printer might be 
rebooted. Click the Refresh button. If nothing happens, try 
changing from the browser.

Содержание document centre285 series

Страница 1: ...Document Centre 285 235 Series User Guide Printer This PDF file is best viewed using Acrobat Reader 5...

Страница 2: ...holders Permission has been obtained from Microsoft Corporation for use of software screen shots Xerox is a registered trademark The Document Company and Ethernet are trademarks which may be registere...

Страница 3: ...Voluntary Control Council for Interference from Information Technology Equipment VCCI If the machine is used near a radio or television receiver in a domestic environment it may cause radio interfere...

Страница 4: ...able after December 2001 User Guide Printer You can find this manual in the optional printer kit package or models installed with a printer feature This manual describes all the ncessary steps for pri...

Страница 5: ...apter 4 Installing Configuring the Printer Drivers This chapter explains how to install printer drivers set the printer properties print and fax from an application in different OS environments Chapte...

Страница 6: ...de Instructions or important information for preventing equipment damage For your information This indicates additional information on procedures of operations and features Indicates sources of refere...

Страница 7: ...3 Connecting by Ethernet interface 21 2 2 4 Connecting by Token Ring interface 22 2 3 Using Quick Setup Menu 23 2 4 Flow of Setting Different Printer Environments 26 2 5 Setting IP Address 27 2 5 1 F...

Страница 8: ...box 71 4 3 2 Setting the printer properties 73 Chapter 5 Mode Menu and Common Menu 5 1 Menus 98 5 1 1 About menu 98 5 1 2 Mode menu 99 5 1 3 Common menu 100 5 2 Mode Menu Items 102 5 2 1 List of Mode...

Страница 9: ...essages about error codes 174 7 4 Using TCP IP 178 7 4 1 When using Windows 95 Windows 98 Windows Me 178 7 4 2 When using Windows NT 4 0 179 7 5 Using CentreWare Internet Services 181 Appendix A Speci...

Страница 10: ...es close attention Read and follow instructions carefully to ensure the task is accomplished safely This symbol is used to alert operators to a specific operating procedure that must not be performed...

Страница 11: ...uction on display and output it Otherwise output the list of stored document and check the contents When the power is switched off print data remaining in the printer kit and information spooled in th...

Страница 12: ...This page is intentionally left blank...

Страница 13: ...12Overview of the Printer 1 1 Getting Ready to Print 2 1 2 Special Features of the Printer 4 1 3 Main Components and Their Functions 5...

Страница 14: ...ck that the printer is switched off before handling it to prevent electric shock Connect the cable and allocate memory Chapter 2 Setting Up When connecting to the host device directly and setting to t...

Страница 15: ...printer control panel When the printer is used via a network it is necessary to make settings on When connecting to network Network Print Environment User Guide Network pdf in the PCL Driver Network...

Страница 16: ...without any notches equivalent to 2 400 dpi Besides the parallel and USB interfaces it can be used in network multi protocol environment through the installation of interface card for Ethernet or Toke...

Страница 17: ...tions When necessary it will also indicate that the machine is being used for printer functions 4 Switch For switching machine on off 5 Side output tray For outputting printed copies facing up When th...

Страница 18: ...llation of the kit by our customer engineers 1 Parallel interface connector For connecting this printer to a computer by a centronics IEEE 1284 compliant interface cable 2 USB interface connector For...

Страница 19: ...ons Press to navigate the menu menu item item and candidate value In this manual these four buttons will be displayed as 5 Mode button Press to enter to the mode menu In this manual it will be display...

Страница 20: ...icates the printer status as well as the ongoing data processing As an example the following message will be shown on the display when data has been received from the parallel port and is to be printe...

Страница 21: ...en press As an example the screen to set Port Setting is displayed as follows 5 3 Common Menu Items for details on the Common menu screen Mode menu screen The screen to fix setting for emulation proce...

Страница 22: ...e heater area is kept low and the motor is left idle Sleep mode The main power is switched off the mode which can save the most power When the machine is in Low power mode or Sleep mode the touch pane...

Страница 23: ...ter Environments 12 2 2 Connecting Cable 18 2 3 Using Quick Setup Menu 23 2 4 Flow of Setting Different Printer Environments 26 2 5 Setting IP Address 27 2 6 Setting Port 32 2 7 Other Printer Settings...

Страница 24: ...rinter As this printer supports multi protocol it can be shared among users from different network environments 2 1 1 As a local printer Using parallel interface Connects the printer to a computer by...

Страница 25: ...Windows 95 Windows 98 Windows Me Windows NT 4 0 and Windows 2000 operating system OS You can use NetBEUI and TCP IP as the transport protocol for SMB TCP IP Direct Print Utility Windows 95 Windows 98...

Страница 26: ...ndows NT 4 0 Windows 2000 computer And once the printer registered on the Windows NT 4 0 Windows 2000 computer is shared you can also print from Windows 95 Windows 98 Windows Me computer through this...

Страница 27: ...S this printer supports Novell NetWare version 3 12 3 2 4 11 4 2 5 5 1 as well as the print server PServer mode only using bindery and NDS version 4 11 and above In the PServer mode the printer will b...

Страница 28: ...er supports Internet Printing Protocol IPP As Windows 2000 is installed with the client software needed to output to IPP printer you can specify the printer to support IPP using the Add Printer Wizard...

Страница 29: ...th the optional interface board for Token Ring you can use the printer in a network environment with NetWare or TCP IP existing alone or together Whe the interface board for Token Ring is installed th...

Страница 30: ...an optional product For details consult our Customer Support Center Procedure Insert the interface cable connector to the parallel interface connector and secure it by the wire clips on both sides Co...

Страница 31: ...ect by the USB interface USB is supported by Windows 2000 only Insert the USB cable connector to the USB interface connector Connect the other end of the interface cable connector to the computer Swit...

Страница 32: ...rk Port USB 5 3 Common Menu Items for details on the individual item and the setting method For normal use there is no need to change the factory settings of all the items Print Mode PJL Adobe Protoco...

Страница 33: ...e following procedure explains how to connect by the Ethernet interface Procedure Insert the Ethernet interface cable connector to the interface connector Use only interface cable suitable for the net...

Страница 34: ...e port is installed the MAC address will be changed When using gateway in Token Ring environment set Source Routing to On Procedure Insert the Token Ring interface cable connector to the interface con...

Страница 35: ...ck displays the date and time in the following formats YYYY MM DD year month date for years between 2000 2099 only HH MM hour minute The date and time set here will be printed in lists and reports Set...

Страница 36: ...edure below to set essential settings using the printer control panel When using the Quick Setup Menu to change settings select Y for Save Settings to save settings and reboot before printing the Prin...

Страница 37: ...2 3 Using Quick Setup Menu 25 Setting Up 2...

Страница 38: ...u can install the printer driver from the attached CD ROM or download it automatically Refer to the Network Print Environment User Guide Network pdf in the PCL Driver Network Utility Windows CD ROM 2...

Страница 39: ...sing the BOOTP or RARP server select the following on the printer control panel Network Port followed by TCP IP Settings Get IP Address and then BOOTP or RARP Check with your system administrator if y...

Страница 40: ...ned There is no DHCP server and WINS server Set the IP address by referring to 2 5 2 Setting Address When the address in TCP IP is obtained but not in WINS There is no WINS server Do not use the DHCP...

Страница 41: ...Depending on the network used you may need to set the subnet mask and gateway address Consult your system administrator before setting the essential items Take note that the initial display of the IP...

Страница 42: ...2 5 Setting IP Address 30 Setting Up 2 Setting Subnet Mask and Gateway Address...

Страница 43: ...2 5 Setting IP Address 31 Setting Up 2...

Страница 44: ...1 Activating port for details on activating LPD port When using internet printing IPP Port Status factory setting Disable 2 6 1 Activating port for details on activating IPP port When using SMB SMB P...

Страница 45: ...6 1 Activating port As an example the following procedure explains how to activate the LPD port factory setting Enable using the printer control panel Follow the same procedure if you are activating t...

Страница 46: ...le the following procedure explains how to activate the SNMP port factory setting Enable and transport protocol to IPX and or UDP factory setting UDP Follow the same procedure if you want to activate...

Страница 47: ...2 6 Setting Port 35 Setting Up 2...

Страница 48: ...g Disable Allocate Memory Buffer Size SMB Spool factory setting Off 256K Set the following items by using CentreWare Internet Services or changing the config txt file of the printer via a Windows comp...

Страница 49: ...factory setting Auto PJL factory setting Enable TBCP Filter factory setting Disable Access Control factory setting Disable DNS factory setting Enable Add Port No factory setting 80 Connect Time Out f...

Страница 50: ...l panel 5 5 CentreWare Internet Services for details on using CentreWare Internet Services 2 8 2 Suggested values System Area used by the printer system with the capacity remaining unchanged Receive b...

Страница 51: ...ffer capacity If the page buffer is too small it will affect the performance and two sided printing may be rejected PCL memory use Area for the use of PCL This memory is to store the interim data for...

Страница 52: ...This page is intentionally left blank...

Страница 53: ...s 3 1 Flow of Printing 42 3 2 Printing vs Copying 43 3 3 Printing Features 45 3 4 Canceling Printing 48 3 5 Outputting 51 3 6 Printing Data Combined Using Overlays 53 3 7 Printing Secure Print and Sam...

Страница 54: ...ts operation If necessary If necessary Activate application program used by the computer Specify printing from application etc Operate menu Before sending print data from the computer check the follow...

Страница 55: ...feature will usually be activated when Auto has been selected for Paper Source on the Paper Output tab of the printer properties dialog box This feature is independent of the copying function setting...

Страница 56: ...panel Setting of this time is done on the control panel See the User Guide Copier for details When transmitting Printing instruction specified from the computer will be printed according to the order...

Страница 57: ...s on using the Online Help refer to 3 3 2 Online Help Hardware options installed on the printer must be set on the Printer tab of the printer driver If not they may not be usable and may be dimmed on...

Страница 58: ...owed by Printers The Printers window appears Double click the icon of your printer model and then select Properties from the File menu to display the properties dialog box To find out more about a pri...

Страница 59: ...Useful Operations 3 when you click Help The Driver Help with the page containing the explanation on the tab shown will be displayed Click on Contents on the top left of the screen if you want to displ...

Страница 60: ...following procedure explains how to cancel printing from Windows Procedure Click Start select Settings followed by Printers The Printers window appears Double click the icon of your printer model In...

Страница 61: ...age will display Ready to print Canceling all jobs in the printer The procedure to cancel all jobs that have been received by the printer is as follows By this procedure you can stop the receiving of...

Страница 62: ...of print instruction Using Windows The procedure to check job status from Windows is as follows Procedure Click Start select Settings followed by Printers The Printers window appears Double click the...

Страница 63: ...nt Auto Eject Time has passed and Data wait will be shown on the display To forcibly print data in the printer without waiting for the Auto Eject Time to pass in such an instance is known as forced ou...

Страница 64: ...printer will automatically be unable to receive data Press The printing begins When all the jobs have been executed and printed Printer paused will be shown For parallel interface data might be recei...

Страница 65: ...an overlay for a blank form and store it in the printer Later you can send the data for the form to the printer for printing out the data with the form Here we will explain the process by printing fro...

Страница 66: ...rinter properties dialog box appears Click the Overlays tab Click Create Overlay The Create Overlay dialog box appears Enter a name for the overlay in the File name box If you wish select another dire...

Страница 67: ...ate the data for the form From the File menu select Print Check that this printer is selected at the Name list box and then click Properties The printer properties dialog box appears Click the Overlay...

Страница 68: ...re Print You can attach a password to a piece of data on the computer send it to the printer for storing and then print out the data later using the control panel This feature is known as Secure Print...

Страница 69: ...r icon and select Properties from the File menu to display the properties dialog box Click the Paper Output tab From the Job Type list box select Secure Print or Sample Print The Secure Print Settings...

Страница 70: ...is is optional The password specified will be displayed by one for each number entered After Password is entered Confirm Password will be enabled for you to re enter the password for confirmation Clic...

Страница 71: ...ed Procedure From the File menu of the application program select Print Check that the printer to be used is the printer where you have set your User ID and password and then click Properties For Samp...

Страница 72: ...he button Job Status Stop on the control panel The Job Status screen is displayed Select the tab Secure Sample Job Select Secure Print or Sample Print Here we will select Secure Print as an illustrati...

Страница 73: ...obs all at once To stop printing select the jobs that you want to stop printing and then select Delete Select an option after printing Select Print and Delete if you want to delete the job after print...

Страница 74: ...This page is intentionally left blank...

Страница 75: ...4Installing Configuring the Printer Drivers 4 1 About the Printer Drivers 64 4 2 Installing Uninstalling the Printer Drivers 65 4 3 Configuring the Printer Drivers 71...

Страница 76: ...r two different printer drivers provided PCL 6 printer driver for Windows 95 Windows 98 Windows Me PCL 6 printer driver for Windows NT 4 0 Windows 2000 4 1 2 Installation configuration methods The met...

Страница 77: ...o a printer that is directly connected to your computer Procedure Start Windows 95 Windows 98 Windows Me Windows NT 4 0 or Windows 2000 For this example we will install the DC285 PCL 6 printer driver...

Страница 78: ...er model and then click Next The following Printer Installation dialog box appears Determine the printer name and then click Next The Ready to Start Copying dialog box appears Click Finish to continue...

Страница 79: ...he printer properties 4 3 Configuring the Printer Drivers for details on how to configure the printer driver You must restart Windows in order for the driver to work properly You may run the Setup exe...

Страница 80: ...User Guide Network pdf in the PCL Driver Network Utility Windows CD ROM Procedure Follow Steps to of 4 2 1 For a local printer to display the Printer Installation dialog box Click Add Network Port Th...

Страница 81: ...t and select Run In the Run dialog box displayed click Browse For this example we will uninstall the DC 285 PCL 6 driver on the Windows 98 OS Insert in the PCL Driver Network Utility Windows CD ROM an...

Страница 82: ...ing Uninstalling the Printer Drivers 70 Installing Configuring the Printer Drivers 4 When the uninstallation is completed click Restart Windows Now to ensure that the driver is completely removed from...

Страница 83: ...Paper Output You will need to select appropriate options on the Printer tab first before the other tabs If not the other tabs may not show options appropriate to your machine For Windows NT 4 0 Windo...

Страница 84: ...aults printing preferences dialog box Follow Steps and of the procedure for Windows 95 Windows 98 Windows Me to select the icon of your printer model Select Document Defaults for Windows NT 4 0 or Pri...

Страница 85: ...evice Halftone Paper Output This property controls several aspects of how the printer works with paper and how it handles a print job Settings include Job Type i e Print Secure Print Sample Print Pape...

Страница 86: ...nal paper source that can be attached to your printer other than the standard tray The printer image on the Paper Output tab will be changed accordingly Bypass Tray default off Select this if your pri...

Страница 87: ...er size will be used if a bigger size is not available Display Message A message prompting for paper to be loaded in tray will be displayed on the printer control panel Bypass Feed Orientation Select...

Страница 88: ...s dialog box to define the job owner name which is required by the printer to generate the print volume report The name can be entered in 1 to 31 characters If you do not specify the name the printer...

Страница 89: ...Searching Method dialog box will appear Select Network Printer Address if you can specify exactly the network printer address and proceed to Step Otherwise select Broadcast and proceed to Step When Br...

Страница 90: ...r numbers 0 9 or letters a f case insensitive The options installed to your printer will be detected through the network and the check boxes of the installed options will be selected The network print...

Страница 91: ...ections Job Type Specify the type of job you want to output Options include Print default Select this for the usual print job Secure Print Select this when you want to keep the job in the printer The...

Страница 92: ...the Printer tab You can define your own paper size by clicking Custom Paper Size Custom Paper Size Click to display the Custom Paper Size dialog box for defining the non standard size of the print med...

Страница 93: ...Source Options on the Printer tab The paper sizes available for each paper source are as follows supported not supported not supported if Fit To Output Size or Change Output Size No Zoom has been sele...

Страница 94: ...the sides Landscape Landscape means the page is printed with the width of the image greater than the height Whe you view a page that is printed with a landscape orientation you hold it with the short...

Страница 95: ...Offset Per Set Offsets each set within a print job This will only apply when two or more sets have been selected The two job offset options are available only if either one of the following conditions...

Страница 96: ...t tab The finisher can staple up to a maximum of 30 sheets Document Options Enables special output document options for print jobs Options include None default The print job is output normally First S...

Страница 97: ...Tray When this is selected a drop down list Feed Separators from will become available for you to choose your paper source for the separators Options include Use Printer Settings default Auto Tray 1...

Страница 98: ...sing this mode If the printed graphic images do not appear the same way as they did on your screen select Raster and reprint your graphic Halftone Halftone refers to a type of pattern that is applied...

Страница 99: ...nt Mode Select how the Windows TrueType fonts are to be processed Options include Download as TrueType default The complete character set of the TrueType font contained on the page is sent to the prin...

Страница 100: ...e file from an external source as an overlay click this button to inform the overlay manager of the file and its location If you source an external file from a floppy disk and then remove the disk fro...

Страница 101: ...mmand is sent to the printer If this option is off the selected page overlay file will be sent directly to the printer This option is not active if No Overlay is selected or if the currently selected...

Страница 102: ...hange Output Size No Zoom Poster Selecting each of the features will display one of the following corresponding options 1 Multi Up available when Multi Up has been selected for Layout Mode The Multi U...

Страница 103: ...oklet and the pages will appear in the correct order When this feature is chosen in Layout Mode the following dialog box will be displayed if Flip on Short Edge has not been selected for 2 Sided Print...

Страница 104: ...d on a smaller or larger paper Fit to Output Size default A4 210 297 mm Lists the possible paper sizes that can be used The options available for the paper size are similar to the settings of Paper Si...

Страница 105: ...cument page 6 Poster available when Poster has been selected for Layout Mode This feature allows you to enlarge proportionally and print the image of each document across multiple pages Depending on t...

Страница 106: ...egular italic bold and bold italic size ranges from 6 900 Select Color to display the Color dialog box and specify create the required colour Specify the position and angle of the text by adjusting th...

Страница 107: ...rints the watermark underneath the primary texts and graphics in the document Otherwise the watermark will be printed on top of all images in the document Disabled if As Outline Only has been selected...

Страница 108: ...This page is intentionally left blank...

Страница 109: ...5Mode Menu and Common Menu 5 1 Menus 98 5 2 Mode Menu Items 102 5 3 Common Menu Items 109 5 4 Outputting Reports Lists 129 5 5 CentreWare Internet Services 149...

Страница 110: ...bout menu There are two types of menus mode menu and common menu Press Press Printing Menu Quick Setup Menu Report List Menu System Settings PCL Settings Paper Tray Ready to print Common Menu Mode Men...

Страница 111: ...nu and Common Menu 5 5 1 2 Mode menu The mode menu consists of the PCL settings It is made up of the following levels mode menu candidate value The above diagram shows only a portion of the PCL Settin...

Страница 112: ...rinter Settings It is a screen to set items common to all print modes Common menu is made up of the following levels Common menu Menu item Item Candidate value The above diagram shows only a portion o...

Страница 113: ...ock etc 5 3 1 List of common menu items Network Port Sets the interface type to connect to computer and the essential settings for transmission You cannot select other settings for a port that has bee...

Страница 114: ...will be in the order of Tray 1 Tray 2 Tray 3 and then Tray 4 The values set are changeable by commands The setting takes on default value when the NVM is initialized When Tray 1 to Tray 4 are selecte...

Страница 115: ...en the NVM is initialized Paper supply from the bypass try cannot be used for two sided printing Also even if Bypass Tray is set for Paper Tray when two sided printing is specified the printing will b...

Страница 116: ...ngdings 45 Line Printer 46 Times Roman 47 Times It 48 Times Bd 49 Times BdIt 50 Helvetica 51 Helvetica Ob 52 Helvetica Bd 53 Helvetica BdOb 54 CourierPS 55 CourierPS Ob 56 CourierPS Bd 57 CourierPS Bd...

Страница 117: ...ISO L1 ISO L2 ISO L5 ISO L6 PC 8 PC 8 DN PC 775 PC 850 PC 852 PC 1004 PC 8 TK WIN L1 WIN L2 WIN L5 DESKTOP PS TEXT MC TEXT MS PUB MATH 8 PS MATH PI FONT LEGAL ISO 4 ISO 6 ISO 11 ISO 15 ISO 17 ISO 21 I...

Страница 118: ...ets the page length printing area of one page The range of setting is between 5 128 lines with 1 line per unit Default is 64 The values set are changeable by commands The setting takes on default valu...

Страница 119: ...is used for troubleshooting HexDump is supported in the Parallel LPD and Netware interfaces Draft Mode Turns the Draft Mode on and off The candidate values are Off default On Draft mode causes the pr...

Страница 120: ...5 2 Mode Menu Items 108 Mode Menu and Common Menu 5 5 2 2 Setting a mode menu The procedure to set a mode menu PCL Settings which generally has two levels mode menu candidate value is as follows...

Страница 121: ...e press and hold on to the button to run the displays continuously When both of these buttons are pressed together the value will be reset to the factory setting When On has been selected and a passwo...

Страница 122: ...g Auto Job History Sets whether to automatically print the Job History which contains information on print jobs processed The candidate values are Do not print default Print When Print is selected the...

Страница 123: ...L PS available only when PostScript Kit is installed When the value is set to Auto and if the printer language used cannot be found by the automatic printer language detection feature or it is not the...

Страница 124: ...efault Disable LPD The following items are to be set when using LPD Port Status Sets the port status of the LPD interface when the power is switched on The candidate values are Enable default Disable...

Страница 125: ...esses are registered as 000 000 000 000 this setting will not be in effect even if it is set to On IP List Registers the IP address and mask of the IP address receiving printing when the IP Filter is...

Страница 126: ...e automatic printer language detection feature or it is not the selected printer language the data may be erased PJL Sets whether to enable the PJL commands sent from the computer The candidate values...

Страница 127: ...I To use TCP IP you will need to set the IP address on both the computer and printer Print Mode Sets the printer language The candidate values are Auto default The language to be used will be determin...

Страница 128: ...guage to be used will be determined automatically PCL PS available only when PostScript Kit is installed When the value is set to Auto and if the printer language used cannot be found by the automatic...

Страница 129: ...the USB port when the power is switched on The candidate values are Enable Disable default If the memory is not enough when the Port Status is set to Enable it may be set to Disable automatically Whe...

Страница 130: ...in the time set here after the last data has been received it will be deemed as end of job When you are pressing or to change the candidate value press and hold on to the button to run the displays co...

Страница 131: ...mission is disrupted The range of setting is between 2 65535 seconds Default is 60 seconds When you are pressing or to change the candidate value press and hold on to the button to run the displays co...

Страница 132: ...ate values are Enable default Disable If the memory is not enough when the Port Status is set to Enable it may be set to Disable automatically When this happens either set the Port Status of other por...

Страница 133: ...DHCP or BOOTP to Manually you will need to set the IP address manually on the screen displayed for setting IP address IP Address Subnet Mask Gateway Address These items will be available whether you...

Страница 134: ...too If a wrong IP Address is set the whole network might be badly affected When you are pressing or to change the candidate value press and hold on to the button to run the displays continuously When...

Страница 135: ...X for use 10BASE T Select this when you want to fix the value at 10BASE T for use Token Ring The following items will be displayed when the interface board for Token Ring has been installed Transmit R...

Страница 136: ...the memory capacity that can be set changes according to the free memory capacity PS Sets the capacity of the memory for use by PostScript Available only when the PostScript Kit is installed The range...

Страница 137: ...ool processing will be done For the receive buffer used for spool processing memory is used When this candidate value is selected the memory capacity of the receive buffer used for spool processing is...

Страница 138: ...the NV memory NV memory is the non volatile memory that maintains the printer settings even after the power has been switched off Once the NV memory has been initialized the candidate value of all the...

Страница 139: ...ction when there is no paper in the tray selected The paper size will be set as well if the paper is to be substituted The candidate values are Off default No paper tray will be substituted Displays a...

Страница 140: ...n Menu 5 5 3 2 Setting a common menu The procedure to set a common menu System Settings Network Port Allocate Memory Initialize Delete Data Printer Settings which generally has four levels common menu...

Страница 141: ...lso equipped to print the following reports lists PCL Settings List Printer Settings List Error History Report Job History Report Printer Meter Report PCL Fonts List The following report list is avail...

Страница 142: ...on on the PCL settings on the printer Print result The following items will be included Paper Tray Output Size Paper Size Bypass Tray Output Destination Orientation 2 Sided Print Font Symbol Set Font...

Страница 143: ...5 4 Outputting Reports Lists 131 Mode Menu and Common Menu 5...

Страница 144: ...Common Menu 5 Printer Settings List About Printer Settings List Prints information in the system menu Print result The following items will be included System Settings Printer Settings Communcation Se...

Страница 145: ...ommon Menu 5 Printer Settings List About Printer Settings List Prints information in the system menu Print result The following items will be included System Settings Printer Settings Communication Se...

Страница 146: ...and Common Menu 5 Error History Report About Error History Report Prints information on the error history of the printer Print result The following items will be included Date Time Error Code Error Ty...

Страница 147: ...5 4 Outputting Reports Lists 135 Mode Menu and Common Menu 5...

Страница 148: ...5 Job History Report About Job History Report Prints information on the job history Print result The following items will be included Date Time Input Data Output Destination Job Info Page Info Pages...

Страница 149: ...5 4 Outputting Reports Lists 137 Mode Menu and Common Menu 5...

Страница 150: ...Menu and Common Menu 5 Print Meter Report About Print Meter Report Prints information on the usage of the printer by users Print result The following items will be included Job Owner Pages Sheets A p...

Страница 151: ...5 4 Outputting Reports Lists 139 Mode Menu and Common Menu 5...

Страница 152: ...enu and Common Menu 5 PCL Fonts List About PCL Fonts List Prints a list of PCL fonts that can be used by the printer Print result The following items will be included Fonts applicable to PCL Example A...

Страница 153: ...5 4 Outputting Reports Lists 141 Mode Menu and Common Menu 5...

Страница 154: ...on the mailbox size Secure Print and Sample Print jobs Print result The following items will be included Mailbox Size Size Used Free Space Secure Print Doc No User ID Document Name Document Size Stor...

Страница 155: ...5 4 Outputting Reports Lists 143 Mode Menu and Common Menu 5...

Страница 156: ...u and Common Menu 5 PostScript Fonts List About PostScript Fonts List Prints a list of PostScript fonts that can be used by the printer Print result The following items will be included Fonts Example...

Страница 157: ...5 4 Outputting Reports Lists 145 Mode Menu and Common Menu 5...

Страница 158: ...enu 5 PostScript Logical Printer List About PostScript Logical Printer List Prints a list of PostScript logical printers Print result The following items will be included Printer Number Format Option...

Страница 159: ...5 4 Outputting Reports Lists 147 Mode Menu and Common Menu 5...

Страница 160: ...5 4 Outputting Reports Lists 148 Mode Menu and Common Menu 5 5 4 2 Printing reports lists The following procedure shows how to print the reports list...

Страница 161: ...or the various network port settings Depending on the items some settings become effective only after rebooting i e after switching on off the printer or after defining the system settings using the...

Страница 162: ...are in the middle of the window The contents in these frames will change according to the items selected in the category 5 5 2 System environment To use CentreWare Internet Services you will need to...

Страница 163: ...dvanced Click Cache under Advanced Select Once per session or Every time for Document in cache is compared to document on network Click OK The dialog box is closed For Internet Explorer Procedure Sele...

Страница 164: ...nge the setting to a direct connection at the browser For details on how to define these settings refer to the manuals of the browser that you are using Port number setting The factory setting of the...

Страница 165: ...the printer Follow the process below to activate the CentreWare Internet Services at the printer control panel if it is not set to Enable You will have to set the IP address after the CentreWare Inter...

Страница 166: ...r and activate the browser At the address column of the browser enter the IP address or internet address of the printer and then press Enter on the keyboard Example of specifying an IP address Example...

Страница 167: ...5 5 CentreWare Internet Services 155 Mode Menu and Common Menu 5 The screen of the CentreWare Internet Services is displayed...

Страница 168: ...This page is intentionally left blank...

Страница 169: ...6Precautions and Limitations 6 1 In General 158 6 2 On Using TCP IP 160...

Страница 170: ...ard disk as a storing location for print data from LPD SMB IPP Data erased by the initialization of the hard disk include added fonts and SMB folder Secure Print Sample Print documents and the respect...

Страница 171: ...use the sorter electric sorting feature and Secure Print Sample Print The optional PostScript Kit has to be installed in order to use the printer for supporting PostScript The additional SDRAM module...

Страница 172: ...e data may not be received Setting up at the computer workstation Be very careful in setting IP addresses which are controlled as an entire system Consult your network administrator before defining an...

Страница 173: ...e printer Some client computers may re send immediately when the print data has exceeded the receiving capacity When this happens the client computer appears as if it has crashed To rectify this situa...

Страница 174: ...This page is intentionally left blank...

Страница 175: ...7Troubleshooting 7 1 When Problems Occur 164 7 2 When the Print Quality is Poor 167 7 3 Messages 171 7 4 Using TCP IP 178 7 5 Using CentreWare Internet Services 181...

Страница 176: ...or modify any parts as it may cause fire or smoke Condition Cause Treatment No power Are the printer breaker switch and power switch turned on Turn on the printer breaker switch and power switch Is t...

Страница 177: ...ouptut an image across multiple sheets of paper Depending on the paper size to be used and the image size to be output you may not be able to carry out printing When this happens reduce either the pap...

Страница 178: ...or print quality There might be an image error Refer to 7 2 When the Print Quality is Poor and treat accordingly The correct characters are not printed printing garbage The printer is printing with no...

Страница 179: ...Printing is not clear faded not sharp The paper has excessive moisture Replace with new paper User Guide Copier The drum toner cartridge is defective or damaged Replace with a new drum toner cartridge...

Страница 180: ...drum toner cartridge is defective or damaged Replace with a new drum toner cartridge User Guide Copier Smudges when scrubbed with fingers The paper has moisture Replace with new paper User Guide Copie...

Страница 181: ...er in the drum toner cartridge has been used up Replace with a new drum toner cartridge User Guide Copier The drum toner cartridge is defective or damaged Replace with a new drum toner cartridge User...

Страница 182: ...rum toner cartridge is not correctly set Adjust and set it correctly User Guide Copier The seal is not completely pulled out Replace with a new drum toner cartridge User Guide Copier The drum toner ca...

Страница 183: ...ause Treatment Status The printer is ready to receive data from the computer Status The printer system is being diagnosed or initialized This message is displayed when the power is on or when the syst...

Страница 184: ...er cartridge has to be replaced now or soon Treatment If the light of the Error indicator on the printer control panel is on it is time to replace the drum toner cartridge If the light is off get read...

Страница 185: ...and switch it on again after the printer control panel display has been turned off If the error code appears again check the error code to treat it 7 3 2 Messages about error codes Cause There is an...

Страница 186: ...Paper Source Treatment Check the print parameters For the above instance select Bypass Tray 012 281 012 282 012 283 012 284 012 261 012 262 Cause Breakdown of the stapler finisher Treatment Contact ou...

Страница 187: ...Send data again If the same error code appears check PCL data 016 721 Cause Error in print processing Treatment Send printing again If the same error code appears contact our Customer Support Center 0...

Страница 188: ...red in the DNS 016 745 Cause Cannot obtain the IP address of the Job Template pool server Treatment Set the DNS address correctly Or enter the IP address as the Job Template pool server address 016 74...

Страница 189: ...s machine using the printer control panel 016 775 Cause Cannot process image replacement due to insufficient hard disk space Treatment Increase the hard disk space by deleting unnecessary data in the...

Страница 190: ...ification Action Ask the system administrator of the network to check the network for errors The IP address of the printer is entered wrongly Status Display Unable to print Network Error Verification...

Страница 191: ...spool is set to memory the print data sent by the user in a single print instruction has exceeded the upper limit of the receiving capacity set up on the printer control panel Check the upper limit of...

Страница 192: ...nguage as that of the print data If it is running in Windows the printer driver for this printer has not been used a printer driver from another company has been used Check that the printer driver whi...

Страница 193: ...gs The screen display is distorted Change the window size of the browser The latest information is not displayed Click the Refresh button The new settings are not reflected by clicking the Apply New S...

Страница 194: ...This page is intentionally left blank...

Страница 195: ...8Appendix A Specifications 184 A 1 Product specifications 184 A 2 Printing area 185 A 3 Parallel interface 186 A 4 Interface Board for Token Ring 188 B Glossary 189...

Страница 196: ...r A4 Tray 2 Tray 4 B5 B5 8 5 11 8 5 11 A4 A4 8 5 13 8 5 14 B4 A3 11 17 8K Bypass Tray Maximum 297 432 mm Minimum B6 Paper Type Tray 1 Plain Postcard Tray 2 Tray 4 Plain Bypass Tray Plain Transparency...

Страница 197: ...tracting 4 mm from all edges of the paper The actual printing area may differ according to the printer language used Interface Standard Ethernet 100Base TX 10Base T Bi directional Parallel IEEE1284 B...

Страница 198: ...not a signal When bi directional is Enable the connection adheres to the IEEE1284 B connector standard Pin No Signal Name I O Pin No Signal Name I O 1 nStrobe I 19 Signal Ground 2 Data1 I 20 Signal Gr...

Страница 199: ...ndicates that there is no more paper Select Pin No 13 A HIGH active signal which indicates that it is possible to receive data nAutoFd Pin No 14 The signal when the bi directional is Enable Chassis Gn...

Страница 200: ...ptional interface board for Token Ring Shape of the connector Pin arrangement STP connector specifications Pin No Name Pin No Name 1 RX A 6 RX B 2 N C 7 N C 3 N C 8 N C 4 N C 9 TX A 5 TX B UTP connect...

Страница 201: ...e change of line Cut paper Standard types of paper like A4 B5 etc DPI Stands for Dot Per Inch which is the number of dots that can be printed within a width of 1 inch Used as the unit for resolution D...

Страница 202: ...of whether the data sent is being received Plotter coordinates The coordinates of the plotter PostScript Page description language of Adobe Systems Incorporated Power Saver The feature which saves th...

Страница 203: ...nity R 120 Community R W 120 Community Trap 120 Connect Time Out IPP 117 LPD 113 Port9100 119 control panel 5 43 Copies 79 Custom Paper Size 80 D Device Halftone 76 Direct Print Utility 13 Display Mes...

Страница 204: ...ol 125 160 LPR 14 M Max Packet Size 123 mode menu 9 98 99 102 108 Multi Up 90 N NetBEUI 13 NetWare 15 17 113 network printer 17 NetWork Port 111 Network Port menu 101 No Rotation on Same Sheet 91 No o...

Страница 205: ...ings List 28 129 133 Printer Settings menu 101 127 Printer tab 73 74 Q Quick Setup menu 23 101 R RARP 23 Raster 86 Receive buffer 38 Report List menu 101 S Sample Print 56 79 SDRAM module 158 Secondar...

Страница 206: ...19 117 Use Booklet Paper Size 91 Use Larger Size No Zoom 75 Use Printer Settings 75 Use Printer TrueType Fonts 87 UTP 22 188 V Vector 86 W Watermarks tab 73 94 Windows Internet Name Service WINS 27 W...

Страница 207: ...age stamp Thank you for your cooperation Fuji Xerox Co Ltd KSP R D 2D7 3 2 1 Sakado Takatsu ku Kawasaki shi Kanagawan ken JAPAN 213 0012 Daily Weekly Monthly Infrequently Doing a usual operation Using...

Страница 208: ...This page is intentionally left blank...

Страница 209: ...Document Centre 285 235 Series User Guide Printer Human Interface Design Development Document Products Company Fuji Xerox Co Ltd September 2001 Coypyright 2001 by Fuji Xerox Co Ltd...

Отзывы: