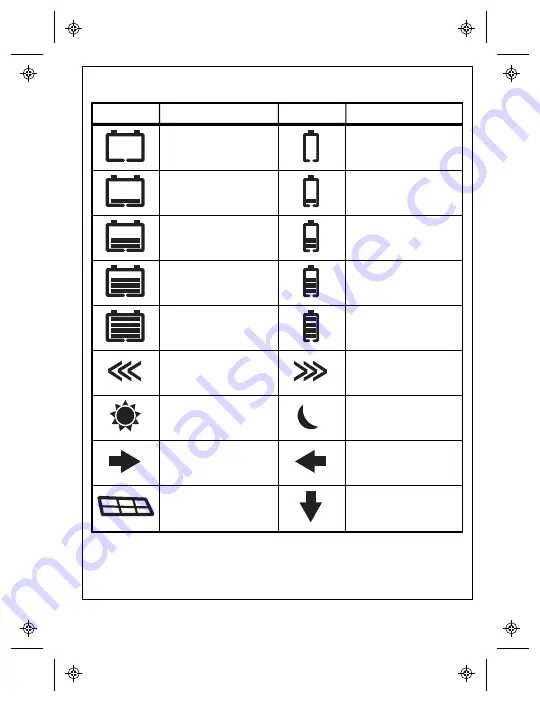
background image

Status Icons

Icon

Description

Icon

Description

BAT1 SOC
0~12%

BAT2 SOC
0~12%

BAT1 SOC
13~35%

BAT2 SOC
13~35%

BAT1 SOC
36~61%

BAT2 SOC
36~61%

BAT1 SOC
62~86%

BAT2 SOC
62~86%

BAT1 SOC
87~100%

BAT2 SOC
87~100%

BAT1 Charging

BAT2 Charging

Daytime

Nighttime

Display BAT1 parameters

Display BAT2 parameters

PV Panel

Display PV parameters

975-1013-01-01 Rev A

Oct 2019

15

Содержание 710-0010

Страница 1: ...Owner s Guide Solar MPPT Remote Panel 710 0010...

Страница 2: ...F THE USE OF SUCH INFORMATION THE USE OF ANY SUCH INFORMATION WILL BE ENTIRELY AT THE USER S RISK AND C REMINDS YOU THAT IF THIS MANUAL IS IN ANY LANGUAGE OTHER THAN ENGLISH ALTHOUGH STEPS HAVE BEEN T...

Страница 3: ...ition of either symbol to a Danger or Warning safety label indicates that an electrical hazard exists which will result in personal injury if the instructions are not followed This is the safety alert...

Страница 4: ...wiring 5 Do not operate the remote panel if it has been damaged in any way 6 This remote panel does not have any user serviceable parts Do not disassemble the remote panel except where noted for conne...

Страница 5: ...ived with the product Ensure you are familiar with that information before proceeding Failure to follow these instructions will result in death or serious injury DANGER ELECTRICAL SHOCK AND FIRE HAZAR...

Страница 6: ...TION EQUIPMENT DAMAGE Do not integrate this remote panel with a residential electrical system Failure to follow these instructions can result in injury or equipment damage 6 975 1013 01 01 Rev A Oct 2...

Страница 7: ...al regulations Many of the electrical components used in the Xantrex SOLAR MPPT Remote Panel are made of recyclable material like steel copper aluminum and other alloys These materials can be auctione...

Страница 8: ...7 Materials List 9 Basic Installation Steps 9 Unit Features 12 Remote Panel LCD Display and Function Buttons 13 Status Icons 15 Event Indicators 17 Operation Using the Remote Panel 18 Automatic Status...

Страница 9: ...ews 1 2 3 4 Menu Up Set Power NOTE If any of the items are missing contact Xantrex or any authorized Xantrex dealer for replacement See Contact Information on page 1 Basic Installation Steps 1 Prepare...

Страница 10: ...m diameter of 3 76 2mm and a maximum of 3 5 88 9mm and with the center hole marker cut a circular hole on the wall Insert the back of the remote panel through the hole Menu Up Set Power Menu Up Set Po...

Страница 11: ...Neg PV cable 12 Battery temperature sensor BTS cable 2 Install the power system IMPORTANT Follow the installation instructions for each component in the power system 3 Mount the remote panel near oth...

Страница 12: ...Unit Features 1 2 4 5 6 3 Menu Up Set Power 1 LCD display 2 MENU button 3 UP SET button 4 Power Standby button 5 Remote port 6 Mounting holes 12 975 1013 01 01 Rev A Oct 2019...

Страница 13: ...nd Function Buttons Button Action Description Menu Short press Allows you to l browse devices such as BAT1 PV and BAT2 l browse settings for each device l show automatic status display setting 975 101...

Страница 14: ...wse BAT1 settings l browse BAT2 settings Long press 5 sec l configure the temperature unit l configure the battery type l en disable automatic status display Power Short press Turn on the Remote panel...

Страница 15: ...T1 SOC 13 35 BAT2 SOC 13 35 BAT1 SOC 36 61 BAT2 SOC 36 61 BAT1 SOC 62 86 BAT2 SOC 62 86 BAT1 SOC 87 100 BAT2 SOC 87 100 BAT1 Charging BAT2 Charging Daytime Nighttime Display BAT1 parameters Display BA...

Страница 16: ...Icon Description Icon Description BAT1 temperature Battery type Settings Parameters Minimum voltage Auto screen cycle Maximum voltage Event 16 975 1013 01 01 Rev A Oct 2019...

Страница 17: ...ash LCD Icon s Event Description Over charging event on BAT1 Over charging event on BAT2 BAT1 discharged BAT2 discharged Over temperature event on BAT1 BAT1 charging voltage outside of range BAT2 char...

Страница 18: ...y to display each device screen 3 Short press Power to turn off the panel screen NOTE Pressing this button does not turn off the solar charger unit only the display panel screen LCD Icon Device Auto R...

Страница 19: ...o 3 Press and hold Up Set for 5 seconds until appears After 2 seconds each device setting will be displayed in sequence every 2 seconds See Automatic Status Display Screens on page 23 NOTE Pressing Me...

Страница 20: ...reen is displayed 3 Press Up Set repeatedly until the temperature the icon and the icon are displayed 4 Press and hold Up Set for 5 seconds until the temperature value changes and flashes to degC or d...

Страница 21: ...d 3 Press Up Set repeatedly until the current battery type the icon and the icon are displayed 4 Press and hold Up Set for 5 seconds until the current battery type flashes 5 Press Menu to browse the d...

Страница 22: ...ess Menu repeatedly until the PV device screen is displayed 3 Press Up Set repeatedly until the cumulative PV Harvest status screen is displayed 4 Simultaneously press and hold Menu Up Set buttons for...

Страница 23: ...rvest in watt hours Shows battery 1 BAT1 voltage Shows BAT1 current Shows BAT1 maximum voltage Shows BAT1 minimum voltage Shows BAT1 battery temperature Shows BAT1 Battery type Shows battery 2 BAT2 vo...

Страница 24: ...ar MPPT Remote Panel Part number 710 0010 Power consumption 10mA 5VDC Minimum power consumption 3mA Operating temperature 20 70 C 4 158 F Storage temperature 20 70 C 4 158 F IP protection IP20 Unit we...

Страница 25: ...e 3 5 88 9mm 3 76 2mm NOTE Markthe positionsof the centerhole and the mounting holeson the wallwhere you plan to mount the remote panel Use a hole saw with a minimum diameterof 3 76 2mm and a maximum...

Страница 26: ......

Страница 27: ...This page has no content...

Страница 28: ...1 800 670 0707 1 408 987 6030 customerservice xantrex com http www xantrex com power products support http www xantrex com 975 1013 01 01 Rev A Oct 2019 Printed in...

Отзывы: