


Model MAC1
Page 9
© 2002 Xantech Corporation
Editing Sequences
1. The Command List can be edited by dragging and dropping any command on the list to any position on the
list. Left click and drag the command to be moved. As you drag upward and you want the command between
two existing commands, drop it on the lower one. As you drag downward, drop it on the upper one.
2. You can delete any command on the list by Right Clicking on the command.
Timed Delays
1. Timed delays can be placed in a sequence. Click the left < and right > arrows under “DELAY” in the
Command List window for the number of seconds you want (i.e. 2 = 2 seconds).
2. Double Click within the “Delay” outline. This will place the delay at the end of the Command List and the delay
time appears on the list (e.g., Delay 2 Sec).
3. Left Click and Drag the “Delay 2 Sec” line and drop it between any two commands you have placed on the
Command List.
4.
From the File menu, select Base Unit Transfer. The project should be transferred to the MAC1. If project does
not transfer, check connections,
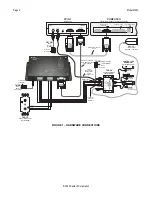
Figure 1
, and Com Port connection in ‘Prefrences’. Try Base Unit Transfer
again. Project should transfer.
Testing Commands and Sequences
From Dragon Drop-IR
1. With the PC connected to a PCIR, a connecting block and components as shown in
Figure 1
, select the
“TEST” button in the virtual MAC1 window. It will be highlighted in red.
2. In the virtual MAC1 window, click the button for the IR command to be used to trigger the IR sequence in the
MAC1.
3. The IR command or sequence shown in the Command List for that button will be sent out the PCIR IR output
to the components to be controlled.
4. Make any changes to the sequence as needed.
From The MAC1
1. With the MAC1 connected to a typical system as shown in
Figure 1
, send the RC68+ IR trigger command to
the MAC1 via a keypad or IR receiver.
2. The MAC1 should output the proper IR commands to the components.
3. Make changes to the sequences as needed in Dragon and transfer the project again.
4. Repeat steps 1-3 until all controls are proper.
TEACHING RC68+ COMMANDS TO A HAND-HELD CONTROLLER OR KEYPAD
From an RC68+
1. Using an RC68+ Programmer, set the code group switches on the back of the programmer to “80”.
2. Place overlay ‘J’ over the RC68+ keys.
3. Teach the appropriate IR commands to the remote, keypad or controller to be used to control the MAC1.
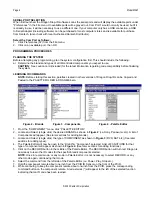
From Dragon Drop-IR
When using DRAG460 with a PCIR, RC68+ commands can be generated from Dragon. (The following cannot be
done in IRS232 or MAC1 project windows.)
1. Open a project in Dragon. e.g. 590-10.
2. From the Palette Menu, choose ‘SELECT RC68+ COMMAND PALETTE” a virtual RC68+ will appear.
3. Select a switch location on the virtual 590-10. It will outline in blue.
4. Click the appropriate button on the RC68+. The command will appear in the Command List. Repeat for all IR
codes needed.
5. Press the “TEST” button on the virtual 590-10. It will outline in red. Stay in TEST mode for steps 6-7.
6. With an IR emitter connected to “IR OUTPUT” on the PCIR and attached to the learning eye of the device to
be programmed, one by one click on the switches of the 590-10. The PCIR will output the RC68+ IR codes.
7. Teach the appropriate IR commands to the remote, keypad or controller to be used to control the IRS232.
Содержание MAC1
Страница 11: ...Model MAC1 Page 11 2002 Xantech Corporation...


