


Page 4
Model MAC1
© 2002 Xantech Corporation
SERIAL PORT SELECTION
When first launched, the Dragon Drop-IR software scans the serial ports and will display the available ports under
"Preferences" in the File menu. Unavailable ports will be grayed out. Com Port 1 would normally be used, but if it
is already in use, it will be necessary to use a different one. If your computer only has a USB connection, a USB
to Serial Adapter (including software) can be purchased at most computer stores and is available for purchase
from Xantech. (Also check with local Authorized Xantech Distributor).
Select the Com Port as follows:
1. Click Preferences (F2) from the File menu.
2. Click on an available port, then OK.
PROGRAMMING PROCEDURES
PLANNING THE SYSTEM
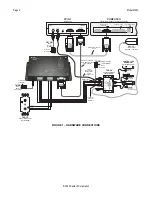
Before attempting any programming, plan the system configuration first. This should include the following:
a) Determine the brands and types of all IR-controlled components you expect to use.
CAUTION
: See caution card (included) for the latest information regarding code compatibility before finalizing
the system.
LEARNING IR COMMANDS
NOTE:
Before starting this section, palettes created in other versions of Dragon Drop-IR can be Copied and
Pasted to the PALETTE FOLDER in DRAG460 beta.
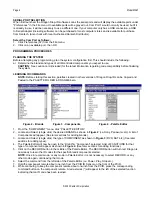
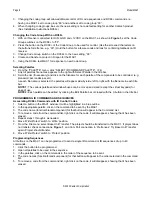
Figure 2 - Brands
Figure 3 - Components
Figure 4 - Palette Editor
1. From the “COMPONENT” menu, click “PALLETTE EDITOR”.
2. Locate and Select (single click) the desired BRAND as shown in
Figure 2
(i.e. Sony, Panasonic etc). A list of
Components will appear. (See later sections for adding brands.)
3. Locate and Select (single click) the type of COMPONENT as shown in
Figure 3
(DVD, SAT etc) (See later
sections for adding types).
4. The Palette Editor will now be open to the “Brand” & “Component” selected. A list of FUNCTIONS for that
type of component will appear as shown in
Figure 4
. (See later sections for adding functions).
5. Click on the RECORD button in the middle of the Palette Editor. The RECORD button will turn red. Dragon is
now ready to learn the IR codes for the specific brand/component selected.
NOTE
: Once in record mode, or any mode in Palette Editor, it is not necessary to select RECORD, or any
other mode again, until leaving that mode.
6. Select the command from the left side of the Palette Editor (i.e. Power, Play, Stop etc.).
7. Hold the component remote about one inch from the PCIR IR Sensor on the front of the PCIR.
8. While continuing to keep the component remote about one-inch from the PCIR, press the corresponding
command button on the component remote. A red asterisk (*) will appear to the left of the selected function
indicating that an IR code has been learned.
Содержание MAC1
Страница 11: ...Model MAC1 Page 11 2002 Xantech Corporation...


