Sawmill Alignment
Blade Guide Arm Alignment
7
7-23
WMdoc072619
Sawmill Alignment
2.
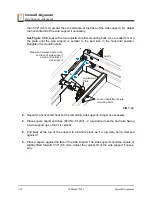
Adjust the blade guide arm in all the way toward the other blade guide.
3.
Use the outside top and bottom screws to adjust the arm up until the slide pad touches
the saw head brace tube. Tighten the jam nuts.
NOTE:
When adjusting the blade guide arm screws, be careful not to
tighten the screws too much or put the arm in a bind. Operate the
blade guide arm to ensure the arm moves easily in and out.
See Figure 7-23.
With the blade guide arm still all the way in toward the other blade
guide, tighten all the side screws until they touch the arm. Back the screws off 1/4 turn
and tighten the jam nuts.
4.
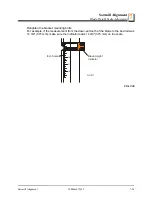
Measure the distance between the blade guide arm and back edge of the blade. Adjust
the appropriate side screws on the blade guide arm housing so the arm is measures the
same distance from the blade at both ends of the arm.
5.
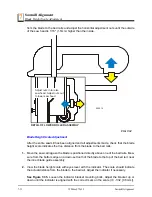
To move the blade guide end of the arm toward the front of the sawmill, loosen jam nuts
on the front inside screw and the rear outside screw. Turn the screws counterclockwise
one full turn and tighten the jam nuts. Loosen the jam nuts on the front outside screw and
the rear inside screw. Turn the screws clockwise until they touch the arm, back off 1/4”
turn, and tighten the jam nuts.
6.
To move the blade guide end of the arm toward the rear of the sawmill, loosen jam nuts
on the front outside screw and the rear inside screw. Turn the screws counterclockwise
one full turn and tighten the jam nuts. Loosen the jam nuts on the front inside screw and
the rear outside screw. Turn the screws clockwise until they touch the arm, back off 1/4”
turn, and tighten the jam nuts.
FIG. 7-23
150036B
Blade Guide Arm Parallel to Blade
Adjust side screws to
change arm angle
Содержание LT35
Страница 127: ...Electrical Information Engine Harness Wiring D24 Electrical Information 35doc072619 9 5 9 3H1220 2 ...
Страница 128: ...Electrical Information Engine Harness Wiring D24 9 9 6 35doc072619 Electrical Information 3H1220 3 ...
Страница 129: ...Electrical Information Engine Harness Wiring D24 Electrical Information 35doc072619 9 7 9 3H1220 4 ...


