background image

18

Target

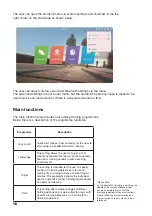
TARGET SETTINGS: Access the Target mode interface by clicking on the Target icon. The 
training options below will be shown in the menu:  

Select the desired training programme and specify your target values. You can select between 
three countdown functions: 

Type

Option

Description

Mileage
(Mileage)

2/4/6/8/mini Marathon/ 
half Marathon / Marathon / 
User-adjusted 

Specify the distance you 
want to complete. Once the 
run is underway, the distance 
will be reduced by the 
number of kilometres moved. 
When you hit 0, the running 
programme will stop. 

Time
(Time)

15/30/45/60/90/120/150/
user-adjusted minutes

Specify the time you want to 
complete your run on. Once 
the run has begun, the timer 
will start its countdown. 
When you hit 0, the running 
programme will stop. 

Calorie
(Calorie) 

100/200/300/400/500/1000/
1500/user-adjusted

Specify the target for your 
desired burning of calories. 
Once the run has begun, the 
number of calories will grad-
ually begin ticking down. 
When you hit 0, the running 
programme will stop. 

Содержание SPORT Smart Run

Страница 1: ...1 User guide EN 2 36 Witt Smart Run...

Страница 2: ...E TREADMILL 30 CLEANING AND MAINTENANCE 32 WARRANTY AND SERVICE 36 Technical specifications 1 Input voltage 220V 15 50Hz or 60Hz 2 Motor strength 2 5 HP max 5 0 6 0 HP 3 Surrounding temperature 0 40 C...

Страница 3: ...t can be caught up in one of the treadmill s components Wear appropriate clothing and shoes It is strictly forbidden to use the treadmill barefoot 10 Place your feet on the edges before powering on th...

Страница 4: ...nuts and bolts are tightened If some parts are damaged do not use the treadmill and have an authorized service centre or the retailer replace the damaged parts 27 Never pull on the cord and never use...

Страница 5: ...onnecter piece for the display 13 Right bar tube 1 14 Left bar tube 1 15 Front cover 1 16 The machine s platform 1 17 Main frame 1 18 Washer 4 0 1 19 Power communication cord bottom section 1 20 Power...

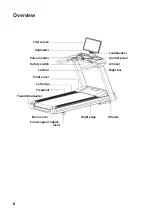
Страница 6: ...w LCD screen Cupholder Pulse monitor Safety switch Left bar Front cover Left edge Treadmill Treadmill adjuster Back cover Food support adjust ment Right edge Wheels Right bar Armrest Control panel Lou...

Страница 7: ...treadmill from the box and place it on the floor Installation guide Step 1 Step 1 Step 2 Step 2 Remove the front cover 15 from the platform 16 The front cover and plat form are joined together with V...

Страница 8: ...to fasten the left bar 14 and the right bar 13 so that they are locked tight As shown on Figure C and D 3 3 As shown on Figures E and F use 2 x screws with interior hexagon M10 25 5 2 locking washers...

Страница 9: ...he right bar 13 to pull the bottom section of the power communication cord 19 through the small hole A at the bottom of the right bar 13 Pull the cord unit out from the top of the bar 19 Power communi...

Страница 10: ...exagon M8 20 1 2 x locking washers 8 9 2 x washers 8 16 T1 5 2 Fasten the inward facing side as shown on Figures A B 5 3 Use a wrench 28 to fasten the armrest on top with 1 x screw with interior hexag...

Страница 11: ...alent screws shown with arrows in Figures A B 6 2 Above the main frame s top panel 17 use a hex key with a cross L6 25 to tighten the four screws as shown in Figure A 6 3 Under the front panel of the...

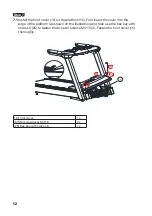
Страница 12: ...insert the cover into the edge of the platform as shown on the illustration and then use the hex key with cross L6 25 to fasten the two star screws M4 16 3 Fasten the front cover 15 thoroughly 15 Fron...

Страница 13: ...7 3 x plastic nuts M8 10 2 x curved washers 8 19 T1 5 4 and 1 x washer 8 16 T1 5 2 to fasten the display panel 12 to the armrest 11 use the washer for the middle screw Use the curved washers for the s...

Страница 14: ...ewdriver M4 16 3 and 1 x washer 4 0 18 to fasten the back cover of the display 24 to the display 12 Step 9 Step 9 24 Back cover for the display 1 x 3 Star screwdriver M4 16 1 x 18 Washer 4 0 1 x 25 He...

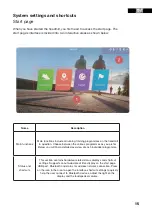
Страница 15: ...between the various programmes as you prefer Below you will find a detailed overview of each individual programme Status and shortcuts This section contains hardware related status displays and short...

Страница 16: ...is setting allows the user to select a real world environment for the run so that one feels like one is running outside in some exciting environments Target This setting is intended for the user to sp...

Страница 17: ...amme as desired The four pre set programmes determine the length of the run and divides the entire running process into ten steps where speed and incline are defined in advance for each step so that i...

Страница 18: ...mplete Once the run is underway the distance will be reduced by the number of kilometres moved When you hit 0 the running programme will stop Time Time 15 30 45 60 90 120 150 user adjusted minutes Spe...

Страница 19: ...t in an authentic beach environment as shown below The user is free to adjust the speed settings via the settings area on the right side of the display The changes in speed that are made on the displa...

Страница 20: ...20 Quick start QUICK START Access the Quick Start interface and start the countdown function by clicking on the Quick Start icon as illustrated below The interface is divided into three parts...

Страница 21: ...d settings You can specify the four specific speeds of 3 6 9 12 or you can make adjustments using the up and down arrows on the right side The adjustments are made at intervals of 0 5 Running data dis...

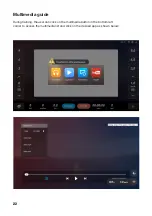
Страница 22: ...22 Multimedia guide During training the user can click on the multimedia button in the bottom left corner to access the multimedia list and click on the desired app as shown below...

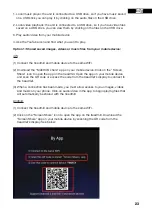
Страница 23: ...nd mobile device to the same WiFi 2 Download the MAXHUB share app on your mobile device Click on the Screen Share icon to open the app on the treadmill Open the app on your mobile device and scan the...

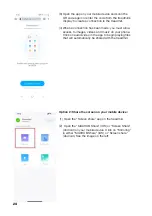
Страница 24: ...o images videos and music on your phone Click on audio video in the app to begin playing files that will automatically be shared with the treadmill Option 2 Share the screen on your mobile device 1 Op...

Страница 25: ...device with the treadmill s display Swipe away from this page and open a media video app on your mobile device and play it The screen will be shared with the treadmill Please note Some video apps do n...

Страница 26: ...elect Screen Mirroring see the image below 4 Select Threadmill793 to connect to the treadmill Then the screen on your mobile device will be shared with the screen on the treadmill 5 Go into a streamin...

Страница 27: ...mat in the folder and the images must be named according to the following specifications 1 Standby Screen Saver Page SCREEN_SAVER png Resolution 1920 1082 2 Run Prepare Page RUN_PREPARE png Resolution...

Страница 28: ...28 As illustrated above the system will show the importing of your images one by one EXAMPLES OF IMAGES 4 images in total Run Prepare Page example 1...

Страница 29: ...29 EN EN Quick run Page example 2 Training Mode Page example 3...

Страница 30: ...images from the treadmill You need to open the USBAD folder on your USB stick and then you need to select a random picture among those uploaded to the treadmill and change the name of the image to CL...

Страница 31: ...31 EN EN Insert the USB stick and wait until the uploading process is completed Verify that all images have been removed...

Страница 32: ...high levels of moisture or direct sunlight Cleaning Dust the treadmill off regularly Make sure to clean the edges on each side of the treadmill This prevents dust and dirty from accumulating under the...

Страница 33: ...k the treadmill from moving forward so that the treadmill stops running while the forward cylinder is still going If the treadmill keeps going the activity indicates that the treadmill band is too loo...

Страница 34: ...pulls to the left then adjust the left adjustment bolt either clockwise or counter clockwise to adjust the right side If the treadmill pulls to the right adjust the right adjustment bolt either clock...

Страница 35: ...ame screws Inspect Is the plug inserted correctly into the socket Inspect Panel Safety switch Inspect Pulse sensor Inspect Treadmill band Damaged Inspect Tight band Inspect Wrench Uneven band Inspect...

Страница 36: ...and tear Outside the following countries Denmark Norway Sweden and Finland Damage during transport If the product is damaged during transport and this is discovered when the retailer delivers the prod...

Отзывы: