12/16
ProphyCair & Pro
Version: 01
ENGLISH
Unpacking and Inspection
Before accepting and signing for your shipment, please inspect the box or boxes for external and internal damage.
Verify that the number of boxes listed on the packing list matches the number of boxes received. Verify that no com-
ponents in your shipment are damaged or missing. Report any missing boxes, components and or damage to the
transportation carrier immediately.
Matrress System Set-up
NOTE
Make sure that the hose end of the mattress is towards the foot of the bed.
NOTE
When installing the LINET mattress system, do not exceed the manufacturers rated weight of the
mattress or the bed frame. See the bed manufacturer’s manual for bed frame weight rating.
NOTE
Care should be taken such that the air inlet vent on the control unit is not covered, and the control unit is
not placed on the floor in such a manner that it is a hazard to caregivers, patients or the public or lowering of bed frame.
NOTE
Before using the ProphyCair Mattress System, please remove current mattress, mattress replacement systems or over-
lay systems from the bed.
CAUTION
Ensure that the mattress is fully inflated in MAX inflate mode before placing the patient into bed.
Replacement Mattress System
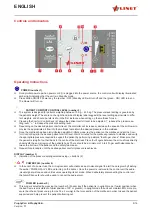
When using the replacement mattress system, the mattress is placed directly on the bed frame and remove any
existing mattress.
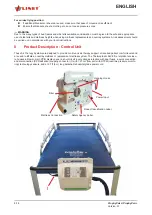
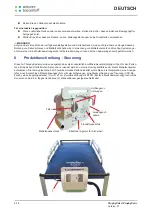
Unroll the Replacement Mattress and place it on the bed frame (
BF
).
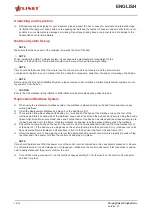
There are ten fixing black straps with buckles (
G
), two straps at the head of the mattress, two on the foot of the
mattress, and three on each side of the mattress. Loop each strap around the bed deck and secure using the buckle
(trident clip). Note: Make sure Head, Knee and Foot sections of the bed can be raised and the straps are secured to
the bed deck and not to the frame. Once the mattress is strapped, tuck the exposed straps under the mattress.
Pull out the hanging hooks on the back of the control unit (
H
) and suspend the control unit from the footboard (
FB
)
of the bed (
BF
). If the bed you are using does not have a footboard, place the control unit (
H
) on its base (not on its
back where the filter is located) on a flat surface in front of the bed near the foot of the bed frame (
BF
).
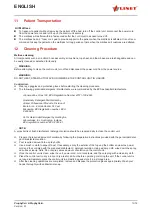
Uncoil the power cord (
I
) and plug the cord into the appropriate AC power source, which is properly grounded. Plug
the other end of the power cord into the control unit and press it in place.
NOTE
Care should be taken such that the power cord of the control unit is not pinched, or has any objects placed on it. Ensure
it is not located where it can be stepped on or tripped over. Make sure the control units power inlet connection is positio-
ned to easily disconnect the power cord from the unit.
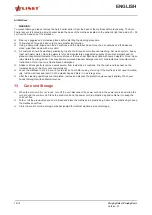
Connect the mating connector (
F
) on the mattress hose assembly (
E
) into the insert on the control unit connector
and lock it in place.


