background image

2

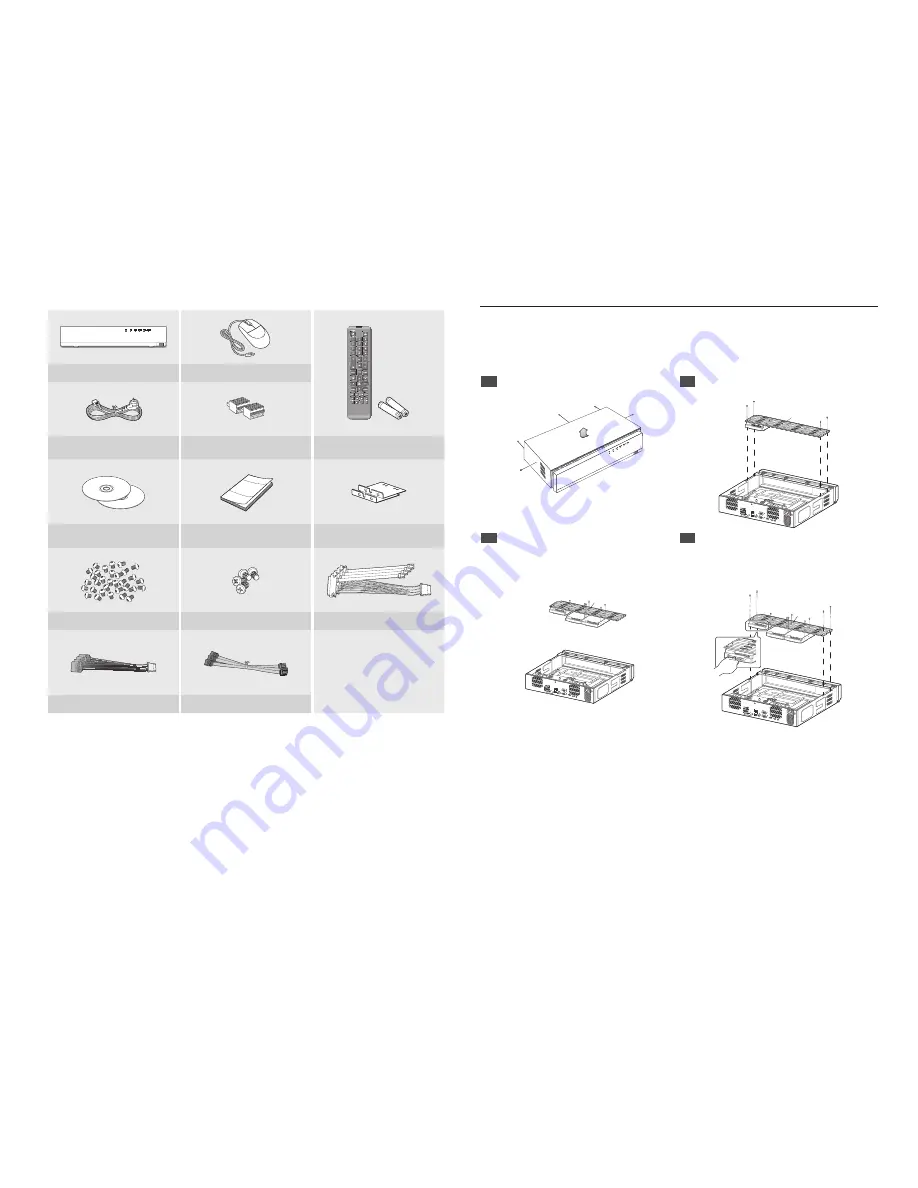
XRN-1610/1610S/1610A/1610SA

USB

NETWORK VIDEO RECORDER

NVR

Mouse

Power Cable

Terminal block

Remote Control / 

Remote Control Battery (AAA)

Network Viewer Software /  

User Manual CD

User Manual or Quick Manual

Bracket Rack

HDD Fixing Screw

Bracket Fixing Screw

HDD SATA/Power cable (XRN-1610/1610A)

SATA Power Cable (XRN-1610S/1610SA)

SATA Data Cable (XRN-1610S/1610SA)

HDD Installation


J


`

If you are adding a new or previously used HDD to this product in addition to the HDD(s) originally installed, format the new 

HDD manually in the set before use.  

To learn how to format, see “

Device/Format

” in the Wisenet NVR User Manual.

XRN-2010/2010A/3010/3010A/1610/1610A/1610S/1610SA

Remove the screws located on the left/right side 

and on the back side first, then remove the cover.

Remove the screws on the left/right side (4 screws) 

and remove the bracket.

USB

HDMI

USB

eSATA

VGA OUT

RS-232C

AUDIO OUT

NETWORK

 2

NETWORK

 1

CONSOLE

1 2 3 4 5 6

7 8

NO

COM COM

COM COM

NC NO NO

NO

1

2

3

4

ALARM

 IN

ALARM OUT

G

G

ALARM

RESET

Bracket

Mount HDDs to the bracket and fix it with screws.

Connect the cable to the HDD by matching the HDD 

SATA/power cable number to the HDD position 

number on the bracket.


`

For the HDD location number on the bracket, please refer to 

the figure below.

HDMI

USB

eSATA

VGA OUT

RS-232C

AUDIO OUT

NETWORK

 2

NETWORK 1

CONSOLE

1 2 3 4 5 6

7 8

NO

COM COM

COM COM

NC NO NO

NO

1

2

3

4

ALARM IN

ALARM OUT

G

G

ALARM

RESET

Bracket

HDMI

USB

eSATA

VGA OUT

RS-232C

AUDIO OUT

NETWORK

 2

NETWORK

 1

CONSOLE

1 2 3 4 5 6

7 8

NO

COM COM

COM COM

NC NO NO

NO

1

2

3

4

ALARM IN

ALARM OUT

G

G

ALARM

RESET

Bracket

Содержание XRN-1610

Страница 1: ...NETWORK VIDEO RECORDER Quick Manual XRN 2010 2011 2010A 2011A XRN 3010 3010A XRN 1610 1610S 1610A 1610SA ...

Страница 2: ...k from the hard disk It also provides remote monitoring environment for video and audio over the network using a remote computer User friendly UI Supports a range of 4K camera resolutions 3840X2160 4096X2160 4000X3000 Outputs a 4K high definition image using HDMI Record and play video Record and play audio Supports ONVIF Profile S standard and RTP RTSP protocols Display the HDD operation status by...

Страница 3: ...the left right side and on the back side first then remove the cover 2 Remove the screws on the left right side 4 screws and remove the bracket USB HDMI USB eSATA VGA OUT RS 232C AUDIO OUT NETWORK 2 NETWORK 1 CONSOLE 1 2 3 4 5 6 7 8 NO COM COM COM COM NC NO NO NO 1 2 3 4 ALARM IN ALARM OUT G G ALARM RESET Bracket 3 Mount HDDs to the bracket and fix it with screws 4 Connect the cable to the HDD by ...

Страница 4: ... the HDD 2 Open the other bracket wide and remove it from the holder M M The procedure after HDD exchange is the same as the procedure for Installing the HDD 5 Mount the bracket on which an additional HDD is mounted on the NVR secure it with screws and connect the SATA power cable to the connector on the main board by matching the number For the connector numbers please refer to the figure below H...

Страница 5: ...red automatically on each channel in the order of the port number This works only when camera is in factory reset state Manual Setup Mode Automatically scans and registers camera connected to the product s PoE and camera with separate switch 4 Set Date Time Set the time and date and click the Finish button and the installation will be completed 5 Camera Registration When the installation wizard fi...

Страница 6: ...ign the IP manually Configuring the Recording This section outlines how to configure and view the recording settings for each channel a b c FULL NO SCSI Recording Restriction Record data size exceeded limitation Only key frames are recorded Please check the record settings Do not show this message again OK Record Status d a Shows the standard and event recording method for each channel FULL Record...

Страница 7: ...hannel Bitrate Control You can change the bitrate of the selected channel Setting Up a Channel From the channel setup menu you can change the camera name shown in live mode Menu Device Camera Channel setup Parking lot Configure and run layout You can use the same layout set on the live screen for the Search Time function in order to perform a search using the channel sequence and combination confi...

Страница 8: ...lick on the live screen and select Backup a Select a layout b Select a channel c Set the time device and format to back up d Click the Check capacity button to check if backup is possible e Click the Start button to proceed with the backup Use the basic guide Show shortcut menu Right click on the live screen and you can access various functions that NVR provides Hover over an icon and a brief defi...

Страница 9: ...o the NVR products supporting each feature in the Wisenet NVR manual When using P2P service NVR can be used by connecting to mobile web viewer a When Enable P2P is checked the connection test runs to check if it can be remotely connected from the current NVR b When the connection is successful search for WiseNet Mobile from the smart phone and then install and run it When Add a device QR code is s...

Страница 10: ...e in the European Union and other European countries with separate battery return systems This marking on the battery manual or packaging indicates that the batteries in this product should not be disposed of with other household waste at the end of their working life Where marked the chemical symbols Hg Cd or Pb indicate that the battery contains mercury cadmium or lead above the reference levels...

Страница 11: ... 373 0124 www hanwhasecurity com Hanwha Techwin Europe Heriot House Heriot Road Chertsey Surrey KT16 9DT United Kingdom Tel 44 1932 57 8100 Fax 44 1932 57 8101 www hanwha security eu Hanwha Techwin Tianjin Co Ltd No 11 Weiliu Rd Micro Electronic Industrial Park Jingang Road Tianjin 300385 China Tel 86 22 2388 7788 www hanwha security cn Hanwha Techwin Middle East FZE JAFZA View 18 20th floor offic...

Отзывы: