


3
XRN-2011/2011A
1
Open the front cover and check the HDD installation
bracket.
J
`
Release the USB connection before opening the front
cover to prevent damage to the USB port.
2
Push the latch to the right and remove the HDD
bracket.
J
`
Take care not to scratch your hands when removing
the HDD bracket.
3
Align and insert HDD into the bracket home. After
inserting one side, push and insert the other side
slightly.
4
Align the bracket with the HDD installed with the
enclosure latch, and push the bracket in the
direction of the board.
J
`
Push it until you hear the latch lock sound. If the HDD
is not completely connected, it may be detected.
5
Push the front cover upwards and close it.
How to exchange an installed HDD
1
Open a bracket wide in the direction of the arrow and
remove the holder from the HDD.
2
Open the other bracket wide and remove it from the
holder.
M
`
The procedure after HDD exchange is the same as
the procedure for “
Installing the HDD
”.
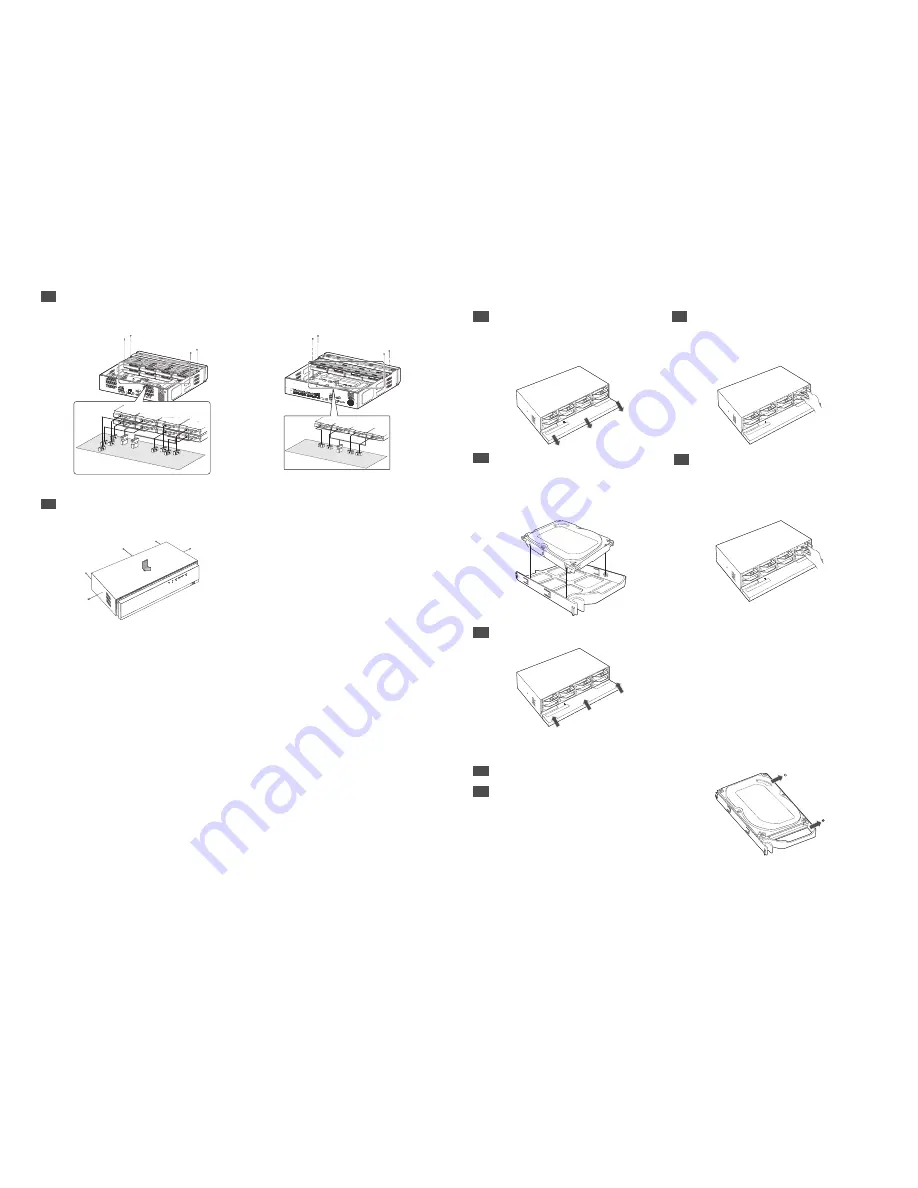
5
Mount the bracket on which an additional HDD is mounted on the NVR, secure it with screws and connect the
SATA/power cable to the connector on the main board by matching the number.
`
For the connector numbers, please refer to the figure below.
HDMI
USB
eSATA
RS-232C
VGA OUT
AUDIO OUT
NETWORK 2
NETWORK 1
CONSOLE
1 2 3 4 5 6
7 8
NO
COM COM CO
M COM
NC NO NO
NO
1
2
3
4
ALARM
IN
ALARM OUT
G
G
ALARM
RESET
8
4
3
2
1
7
6
5
1
2
3
4
5
6
7
8
1
2
3
4
5
6
7
8
9
10
11
12
13
14
15
16
PoE
CAMERA
CONSOLE
USB
HDMI
VGA OUT
1 2 3 4 5 6
7 8
NO
COM COM
COM COM
NC NO NO
NO
1
2
3
4
ALARM IN
ALARM O
UT
G
G
ALARM
RESET
AUDIO OUT
eSATA
eSATA
NETWORK 2
NETWORK 1
2
1
4
1
2
3
4
2
3
<XRN-2010/2010A/3010/3010A/1610/1610A>
<XRN-1610S/1610SA>
6
Check for any problems in the connection terminal
and the wiring in the product, close the cover and fix
it with screws.
USB