background image

7

Record Setup

You can set resolution, IPS, and quality of recordings by channel, and by recording type of standard / event.
You can check frame rates and data transfer amount of Full Frame and Key Frame recordings for each channel, and 

set the transfer limit for recordings.

Menu > Record > Record Setup


• CH : Click < 

 > to display the channel information table. 


• Apply to CH : If you select <

Apply to CH

>, the "

Apply to CH

" confirmation window will appear.

After selecting channels that the settings will be applied to, click on <

OK

> to apply them to the selected channels. 


• Standard, Event : Configures Standard recording and Event recording.

 - FULL : Records all frames fed by the camera. 
 - I-frame : Records only key frames fed by the camera.

Actual recording rate may differ from camera settings. In general, 1 to 2 frames per second are recorded.

 - OFF : No recording is made.


• Frame

 - FULL : Shows the amount of data for all the scene recordings.
 - I-frame : Shows the amount of data for the main scene recordings.


• Limit : Set the amount of data allowed for input for each channel.


• Event : When an event occurs, you can set which point you will start or stop recording.

 - Pre : When an event occurs, recording will be started regardless of the time set.

If you set it to five seconds, recording will start at five seconds before an event occurs.

 - Post : When an event occurs, recording will continue after the time set.

If you set it to five seconds, recording will continue for a further five seconds after an event is finished.


• Audio : Specify whether to record the sound received from the camera or not.


`

If a channel's data transfer exceeds defined allowed limit, then it may affect to other channels, and may force switching to <

I-frame

recording even when the channel is configured to <

FULL

> recording mode. For Key Frame recording channels, the icon for limited 

recording appears on the live screen's top side.

But if the sum of the limits is below the max limit, you can still receive the entire frames despite exceeding the permitted bitrates for 

each channel.


`

A channel displayed in yellow indicates that the recorded data is not being transferred from the camera and that the recording is being 

performed temporarily using another profile on the camera.

Check the channel information to see the applied profile to the channel listed in yellow.

A channel displayed in orange indicates that the amount of inputted data is greater than the permitted data amount. In this case, it is 

impossible to record all of the incoming frames. 

Instead, only part of the frames (1 or 2 frames per second) can be recorded. To resolve this issue, you must set the permitted data 

amount to be greater than the amount of inputted data.

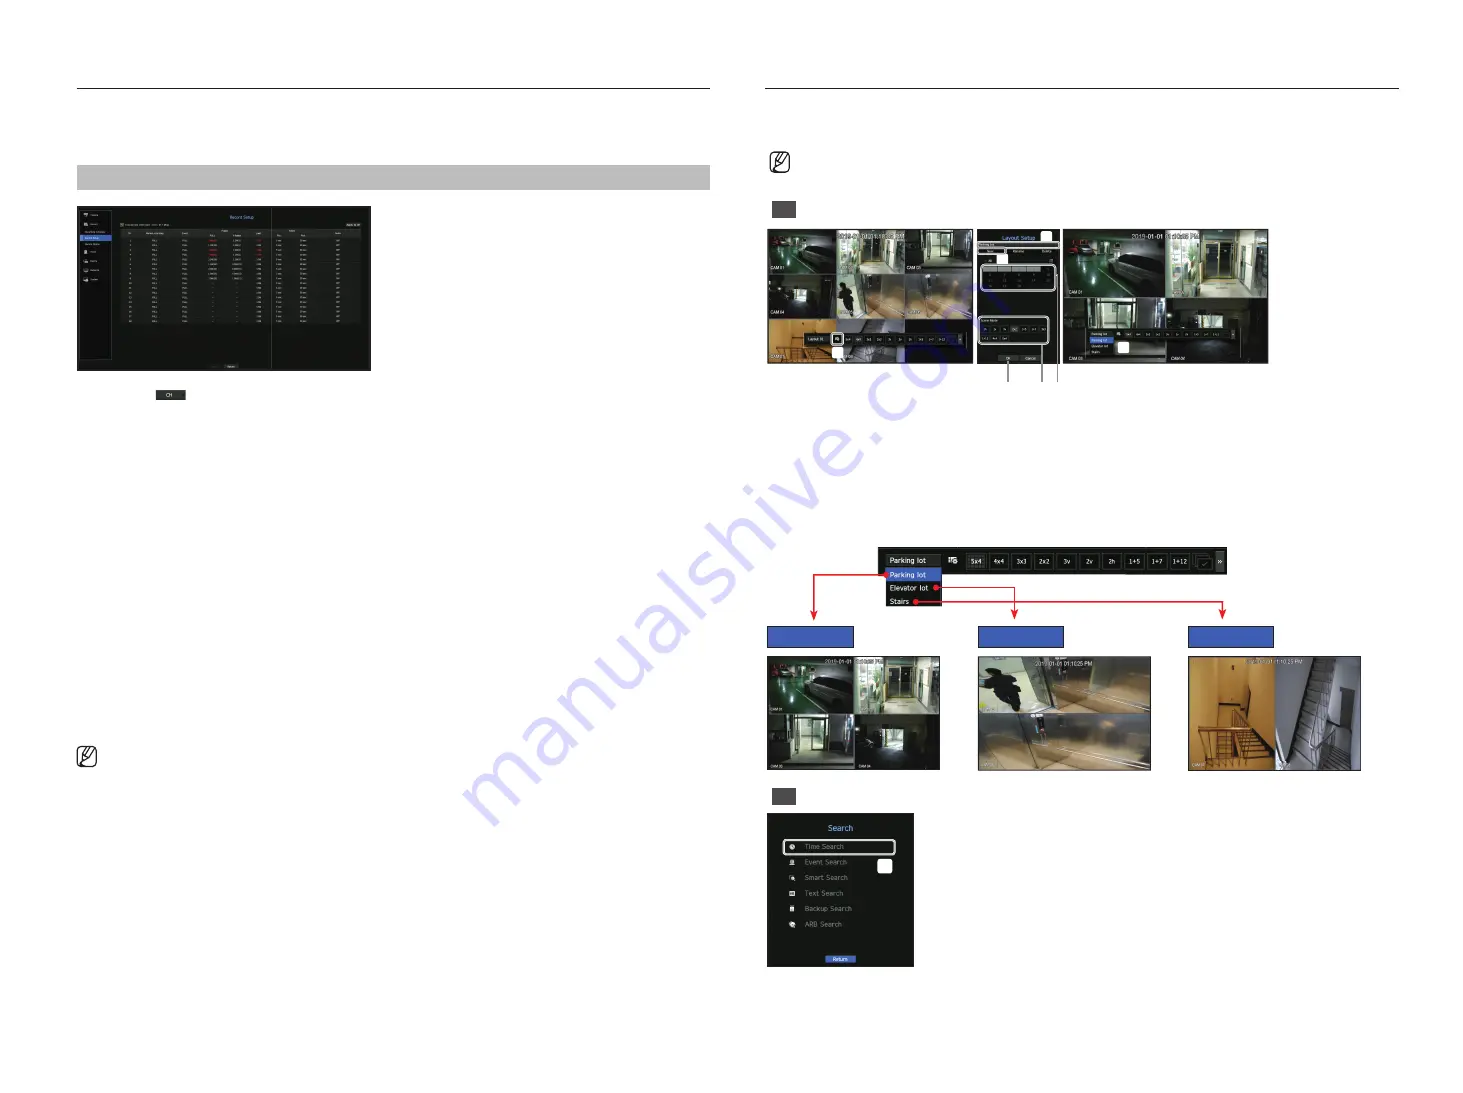
Set up and run the layout

The layout set on the live screen can also be used for time search and can be searched and played according to the 

channel order and channel combination set by the user.


`

For more information on how to set each step, refer to the “

User Manual

.”

1

Live channel layout Setup

c

b

  Open the channel layout setup page.

b

  Click <

New

>.

c

  Specify the layout name of the selected channel (ex. Parking lot).

  Select the channels you want to add to the layout (ex. 1, 2, 3, 4, etc.).

  Decide the split mode to apply (ex. 4-split).

  Click <

OK

>.

  Select the layout you want to move, and it will be moved immediately (ex. It moves to Parking lot.).

Parking lot

Elevator lot

Stairs

Search/Play

  In live mode, right-click and select <

Search

>.

Select <

Time Search

>.

Содержание HRX-1620

Страница 1: ...DIGITAL VIDEO RECORDER Quick Manual HRX 1621 HRX 1620 HRX 821 HRX 820 HRX 421 HRX 420 ...

Страница 2: ...o a hard disk and enables playback from the hard disk It also provides remote monitoring environment for video and audio over the network using a remote computer User friendly UI Supports a range of 4K analog network camera resolutions Outputs a 4K high definition image using HDMI Record and play video Record and play audio Supports ONVIF Profile S standard and RTP RTSP protocols Display the HDD o...

Страница 3: ... in the set before use To learn how to format see Device Format in the Wisenet Recorder User Manual HRX 1621 HRX 821 The images below are based on the HRX 1621 model 1 Loosen the screws on the left right sides and back and slide the cover back to remove it 2 Loosen the left right screws and remove the bracket Bracket 3 Install 8 HDDs to the bracket and fix them with screws For the HRX 821 install ...

Страница 4: ... recorder with screws 4 Check if there is any problem with the connection terminal and wiring inside the product 5 Close the cover and secure it with screws 5 Connect the SATA power cable of the HDD to the connector on the motherboard Refer to the figure below for the location connector number of the HDD 6 After making sure that there is no problem with the connection terminal and wiring inside th...

Страница 5: ...secure it with screws Install Wizard Setup 1 Select the language Select your preferred language 2 Network Settings DHCP server If the DHCP server is set to On an IP is automatically assigned to the camera Network 1 All It is the port for network camera and external client connection For detailed network settings instructions refer to the product user manual To use a simple intranet click the Next ...

Страница 6: ...plete the Install Wizard 4 Camera ID PW Setup 4 1 Set a camera password in factory reset The initial password for the camera must be entered 4 2 If ID PW is already set in the camera register the ID PW and click Next 4 1 4 2 Click to view the basic guide for setting a password Refer to the password setup rules When the password is in factory reset it can be changed and managed in a batch Up to 3 s...

Страница 7: ...d limit then it may affect to other channels and may force switching to I frame recording even when the channel is configured to FULL recording mode For Key Frame recording channels the icon for limited recording appears on the live screen s top side But if the sum of the limits is below the max limit you can still receive the entire frames despite exceeding the permitted bitrates for each channel...

Страница 8: ... operate during split mode and other plays 3 Backup Right click the live screen and select Backup b c Select a layout b Select a channel c Set the time device and format for backup Click the Capacity check button to see if you can back up Click the Start button to proceed with the backup Using the basic guide View shortcut menu By right clicking the live screen you can use various functions provid...

Страница 9: ...connection to see if the current recorder can be connected remotely b If the connection is successful search for WiseNet mobile on your smartphone and install and run it You can scan the QR code on the recorder by selecting Add device QR code c If you scan the QR code the device ID shown in the recorder is automatically reflected as the mobile viewer ID You can use the mobile viewer immediately by...

Страница 10: ...quirements The following lists the minimum suggested hardware and operating system requirements needed to run the Web Viewer Recommended browser Chrome Supported browsers Chrome Edge and Safari Supported OS Works on all of the Windows Linux and OS X environments given the platform independent nature of the web Tested environments Tested and certified to run on Windows 10 with Google Chrome version...

Страница 11: ... 1621 5 6 4 TEST 7 After registration your product will appear in the list HRX 1621 7 Connect using DDNS address Go to DDNS in the recorder Network setup menu 1 Select ddns hanwha security com 2 Enter the Manufacturer ID Enter the Product ID created on the Wisenet DDNS website in Manufacturer ID 3 When the DDNS setup is finished select OK ex Recorder screen 1 2 4 Connect to ddns hanwha security co...

Страница 12: ...ronic accessories should not be mixed with other commercial wastes for disposal Correct disposal of batteries in this product Applicable in the European Union and other European countries with separate battery return systems This marking on the battery manual or packaging indicates that the batteries in this product should not be disposed of with other household waste at the end of their working l...

Страница 13: ... www hanwha security com Hanwha Techwin America 500 Frank W Burr Blvd Suite 43 Teaneck NJ 07666 Toll Free 1 877 213 1222 Direct 1 201 325 6920 Fax 1 201 373 0124 www hanwhasecurity com Hanwha Techwin Europe Heriot House Heriot Road Chertsey Surrey KT16 9DT United Kingdom Tel 44 1932 57 8100 Fax 44 1932 57 8101 www hanwha security eu ...

Отзывы: