background image

77

WPS-300-DVR-9CH & 16CH Installation and Users Manual


9.2.6.3 SEARCH BY PC VIDEO

        Search the local PC for stored video files.  Once the files have been selected, click on Open.   

        Use the Playback Panel icons to control the video.  To exit playback, select the LIVE icon at the  

        bottom of the screen.  

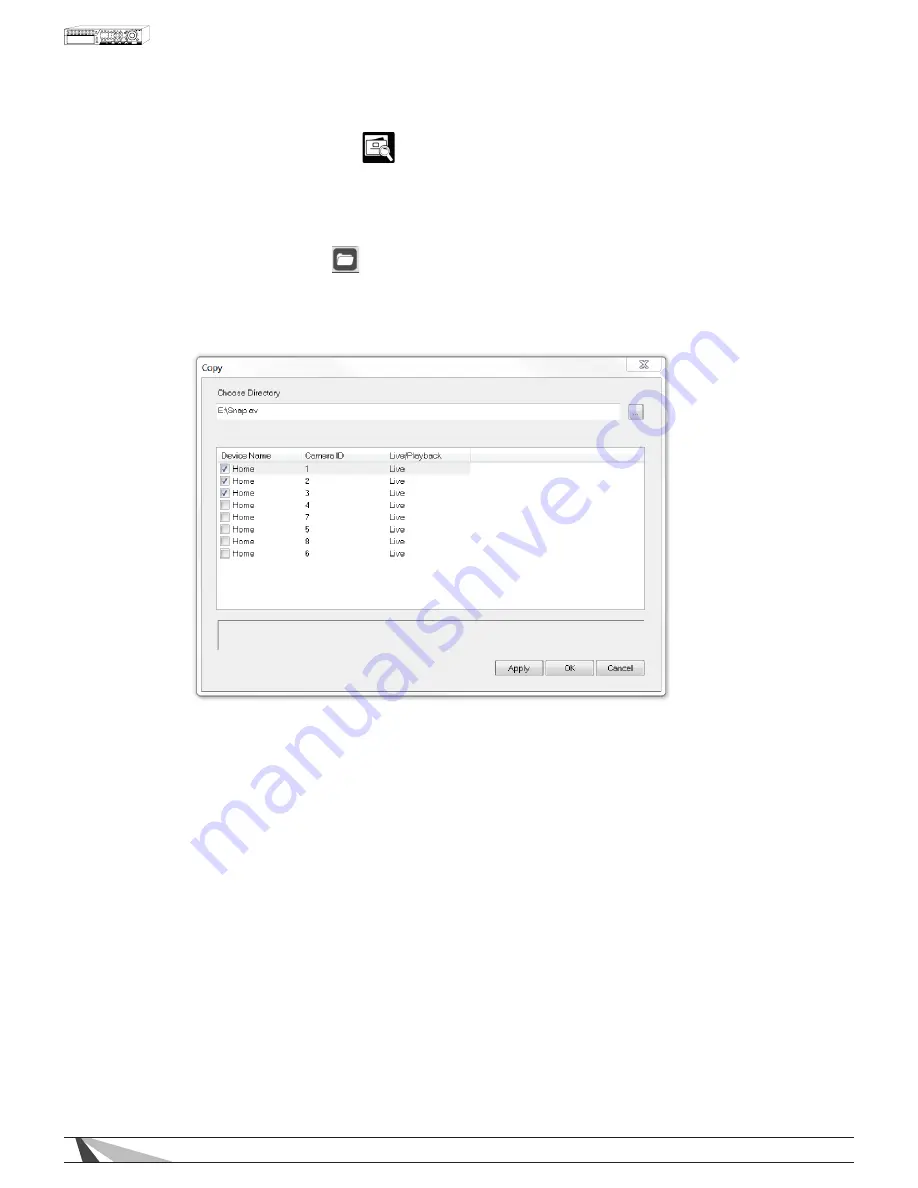
        9.2.6.4 COPY FUNCTION

        Use the Copy function to record live video from the DVR onto the local PC. The performance of  

        this feature is based on bandwidth capacity of the network and the number and size of the files  

        being copied.   

        Camera options will populate the Copy menu based on what is being viewed in the split window view.   

        Therefore if only one camera is being viewed, only that camera will be displayed in the Copy menu as an  

        option to record.   
        To enable the Copy feature, first choose a directory to store the video.  Next, depending on the  

        split-window view, check each camera to be recorded to the local PC and select Apply.  Live video  

        for the selected camera(s) will begin to copy to the chosen directory on the local PC.  
        To stop the Copy feature, uncheck the appropriate cameras and select the Apply button.  

Содержание WPS-300-DVR

Страница 1: ...WPS 300 DVR DVR 9 16 CHANNEL INSTALLATION AND USERS MANUAL Review manual thoroughly before installation Retain for future reference...

Страница 2: ...1 Status Display 19 5 2 Volume Control 20 5 3 Video Adjustment 21 5 4 Display 22 5 5 Backup Device 23 5 6 Software Upgrade 25 5 7 System Shutdown 26 6 SETUP MENU 27 6 1 Pre Camera Setup 28 6 2 Camera...

Страница 3: ...arch by Event 75 9 2 6 3 Search by PC Video 77 9 2 6 4 Copy Function 77 9 2 7 PTZ Control Panel 78 9 2 8 Device Config 78 9 2 8 1 Modify 79 9 2 9 Software Upgrade 80 9 3 PC Configuration of Device Pro...

Страница 4: ...this device even if it is to simply reposition it on a shelf or in a rack If servicing or exchanging the hard drive protect it from static electricity Use a grounded static wrist guard and matt to pro...

Страница 5: ...o 240 FPS CIF up to 270 FPS 9CH and 480 FPS 16CH HDMI Output Dual Streaming support Real time live display 30 FPS for each channel Playback search by time or event alarm motion video loss Smart search...

Страница 6: ...DIP switches to ON unless the corresponding video output terminal is connected DIP Switches for setting the 75 termination of the camera inputs for looping No Loop to Output ON Up Loop Output OFF Down...

Страница 7: ...A Connector Main monitor display for connection to VGA monitor for setup control and monitoring of cameras and system 16 Alarm Out RS 485 Connector 1 Alarm Output Connectors ALARM OUT 1 4 Connect to 2...

Страница 8: ...de 8 MENU ESC Button Displays or exits the main menu during normal operation During playback press to take a snapshot of the current display 9 Up BS Button BS Press this button to move the cursor or f...

Страница 9: ...E NEXT Button Mutes audio during normal operation and moves to the next miscellaneous control during PTZ operation 23 DVR ID Switch Used to set the DVR ID 1 4 of this unit for one I R remote controlle...

Страница 10: ...ontrol 6 Buttons by the symbol Split Window Control 7 ENTER Button 8 MENU ESC Button 9 BS Up BS Button 10 PTZ 11 Left Right Buttons 13 FWD REV on the jog shuttle dial 14 Copy Button 15 II Play Pause B...

Страница 11: ...ng or any similar material Do not install the DVR near a source of heat or in an extremely humid or wet location If your installation lacks good air flow such as solid cabinet doors or wall mounted ra...

Страница 12: ...tion this can cause the composite output BNC to over scan and cut off the edges of the image 3 The HDMI connection must be connected prior to turning DVR on in order to sync with display 123 POWER Con...

Страница 13: ...repath Surveillance cameras Different PTZ cameras can coexist in a system only if they support the same protocol and baud rate Make sure to set unique PTZ IDs to the cameras the DVR and any other PTZ...

Страница 14: ...nformation SEQ display SEQ icon shown for SEQ display ON Backup state Backup icon shown for backup Manual record REC icon shown for ON Zoom states X2 or X4 Mute state Speaker icon visible when not mut...

Страница 15: ...rol to press a number key 1 9 0 repeatedly until the character you want appears 1 for 1 or space 2 for 2 a A b B or c C etc 5 Press mark found on the remote control to display a list of punctuation ma...

Страница 16: ...re entered press to highlight and select the Login option Press ENTER to login the system To logout of the system first display the Login Logout menu and the press to highlight and select Logout optio...

Страница 17: ...elect this icon SEARCH is only available to an Administrator or Supervisor REC Press this button on the front of the DVR or the remote control to force manual recording To stop manual recording press...

Страница 18: ...ternatively use the mouse to click on this icon ALARM RESET Use the button on the remote control to cancel an alarm Alternatively use the mouse to select this icon This will reset the alarm outputs an...

Страница 19: ...these buttons on the front of the DVR or remote control to change the highlighted item Alternatively use the mouse to navigate ENTER Press this button on the front of the DVR or remote control to ent...

Страница 20: ...ustment of the gain volume for the AUDIO IN jacks The master audio out volume can be controlled from the CONTROL BAR Once in the main Menu display press on the front panel of the DVR or remote control...

Страница 21: ...main Menu display press on the front panel of the DVR or remote control to select Video Adjustment and then press ENTER to display the menu as shown Alternatively use the mouse to click on the Video...

Страница 22: ...to the VGA output of the DVR Once in the Main Menu display press on the front panel of the DVR or remote control to select VGA Display and then press ENTER to display the menu as shown Alternatively...

Страница 23: ...riety of USB 2 0 storage devices including thumb drives and DVD drives Once in the main Menu display press on the front panel of the DVR or remote control to select Backup Device and then press ENTER...

Страница 24: ...0 Pretec i Disk Wave 512M Black Kingston DataTraveler USB Flash Driver DTI 512FE Kingston DataTraveler DT100 8GB SanDisk Cruzer micro USB Flash Driver Sandisk Cruzer Titanium 4GB Cruzer Contour 4GB So...

Страница 25: ...ain Menu display Alternatively use the mouse to exit the sub menu by clicking on the X If the contents in this menu have been modified a Save dialog box will be displayed requesting the user to save t...

Страница 26: ...procedure may cause damage to the Hard Disk Drives 1 Access the menu by pressing the MENU ESC button on the front panel or IR remote Alternatively the mouse can be used by right clicking to open the...

Страница 27: ...trol to change the highlighted item Alternatively use the mouse to navigate ENTER Press this button on the front of the DVR or remote control to enter the detailed display of the highlighted option Al...

Страница 28: ...ghest resolution 720x480 Half D1 for medium resolution 720x240 or CIF for lower resolution 360x240 Note While higher resolution offers more detail it does require more storage space and higher network...

Страница 29: ...amera to all of the cameras ESC Press the ESC button on the front panel of the DVR or remote control to escape from this menu and return to the main menu Alternatively use the mouse to exit the sub me...

Страница 30: ...ecord after the event triggers recording Please refer to Section 6 2 2 and Section 6 3 for Post record time Press buttons to select a value from 0 30 Warning The total Event Record FPS should not exce...

Страница 31: ...the DVR or remote control to escape from this menu and return to the main menu Alternatively use the mouse to exit the sub menu by clicking on the X If the contents in this menu have been modified a S...

Страница 32: ...d to sound when video loss for the camera is detected Highlight this setting and press ENTER or to enable or disable this item Alternatively use the mouse to left click on this item LOG By default the...

Страница 33: ...panel of the DVR or remote control to change the camera Alternatively use the mouse to select the desired camera COPY Press the COPY button on the front panel of the DVR or remote control to copy the...

Страница 34: ...his recording Press buttons on the front panel of the DVR or on the remote control to adjust the value from 0 to 60 minutes Alternatively use the mouse to adjust this setting ALARM OUT Define which Al...

Страница 35: ...mended to enable the entire area if the Smart Search feature may be used The following is a brief description for each item in the sub menu and its specific operations NUMERIC Press these buttons on t...

Страница 36: ...in color to red Press this button again to exit testing Alternatively use the mouse to select this icon to enter and exit testing mode ESC Press the ESC button on the front panel of the DVR or remote...

Страница 37: ...ideo loss is detected for this camera The Buzzer and Alarm Out relay will reset immediately once video signal is restored Press buttons to adjust the value from 3 seconds to 60 minutes or for indefini...

Страница 38: ...ress ENTER or to enable or disable this item Alternatively use the mouse to left click on this item The default setting is disabled See Section 6 10 1 for more information on e mail FTP This DVR can s...

Страница 39: ...he available list Alternatively use the mouse to select the appropriate number DWELL TIME Set the Dwell Time how long this page will be displayed before transitioning to the next page from 3 to 60 sec...

Страница 40: ...records up to 16 time segments Conditional 1 Conditional 16 are available for each day of the week In the Setup Menu display press on the front panel of the DVR or on the remote to change the highlig...

Страница 41: ...ely use the mouse to adjust these options MOTION Define if Motion events are recorded Options include V for Video only AV for Audio and Video NO for No Recording and OFF for recording but no event not...

Страница 42: ...lick and then drag the mouse to select the appropriate grids ESC Press the ESC button on the front panel of the DVR or remote control to escape from this menu and return to the Scheduled Record Setup...

Страница 43: ...the sub menu and its specific operations Size GB The total hard drive storage capacity in GB gigabytes for the Alarm Record partition and Normal Record partition respectively Refer to Section 6 6 1 fo...

Страница 44: ...k on this item E mail Send an email message to a predefined email address when corresponding hard drive partition is full Highlight this setting and press ENTER or on the front panel of the DVR or the...

Страница 45: ...a brief description for each item in this menu and its specific operations SIZE GB The total hard drive storage capacity in GBs gigabytes for the Alarm Record partition and Normal Record partition res...

Страница 46: ...ault the internal buzzer is enabled to sound after the hard drive failure is detected Highlight this setting and press ENTER or on the front panel of the DVR or the remote control to enable or disable...

Страница 47: ...LOGIN NAME IS user THE PASSWORD IS 1234 To navigate and operate this menu Press these buttons on the front panel of the DVR or remote control to select an item Alternatively use the mouse to select an...

Страница 48: ...natively use the mouse to set this feature WARNING This feature could allow unwarranted access to the DVR Caution is strongly advised when enabling this feature AUTO LOGOUT If there is no user operati...

Страница 49: ...the DVR or on the remote control to check or uncheck each item Alternatively use the mouse to enable or disable each item Monitor Channel 1 8 Select Channels cameras the user can monitor X2 Allows the...

Страница 50: ...mote to change the highlighted option to System and then press ENTER to display System Setup as shown To navigate and operate this menu Press these buttons on the front panel of the DVR or remote cont...

Страница 51: ...play the system time in the System Status Bar Press buttons on the front panel of the DVR or on the remote control to change the format Alternatively use the mouse to select the format LANGUAGE Press...

Страница 52: ...f the PTZ Keyboard is selected for Device Type the Keyboard model is always Control Protocol and the other settings Baud Rate Data Bit Stop Bit and Parity are the same as the PTZ Model selected In add...

Страница 53: ...isplayed requesting the user to save the changes Press ENTER on the front panel of the DVR or remote control to exit and save ESC to exit without saving Another method to escape is to use the mouse to...

Страница 54: ...is used DDNS PASSWORD Enter the DDNS Password if DDNS is used E MAIL Press ENTER on the front panel of the DVR or on the remote to display the E mail Setup menu Alternatively use the mouse to enter t...

Страница 55: ...25 AUTHENTICATION Press ENTER or on the front panel of the DVR or on the remote control to enable or disable this item depending on whether the SMTP mail server requires authentication Alternatively u...

Страница 56: ...ave the changes Press ENTER on the front panel of the DVR or remote control to exit and save ESC to exit without saving Another method to escape is to use the mouse to right click and exit the sub men...

Страница 57: ...tab on the product page for more information on Router Setup and how it relates to these settings CONTROL PORT Enter the Control Port for remote access The default value is 67 DATA PORT Enter the Data...

Страница 58: ...on the front panel of the DVR or on the remote control to change the highlighted option to Factory Default and then press ENTER Alternatively use the mouse to select Factory Default Once selected a co...

Страница 59: ...l of the DVR or on the remote control to tilt the camera up or down Alternatively left click the mouse in the top of the video window to tilt the camera up or left click the mouse in the bottom of the...

Страница 60: ...he camera will go to preset position 0 9 or 1 10 sequentially Use the and the Number buttons to change dwell time Press the ENTER button to start stop SEQ mode An asterisk will be shown if SEQ mode is...

Страница 61: ...cellaneous function specific operations are described in the following table IRIS Change the Mode of the Zoom function to Iris control Alternatively use the mouse to select the Zoom icon Press the but...

Страница 62: ...ntrol Bar To navigate and operate this menu Press these buttons on the front panel of the DVR or remote control to select an item Alternatively use the mouse to select an item ENTER Press the ENTER bu...

Страница 63: ...ront panel of the DVR or on the remote control to backup copy the selected type of recorded video beginning from the Search Time to the connected backup device The Backup menu described in the Archive...

Страница 64: ...utton on the front panel of the DVR or on the remote control to scroll the Event Log Page Up Alternatively use the mouse to select the Page Up option CALL Use the CALL button on the front panel of the...

Страница 65: ...selected in this manner Alternatively use the mouse to select or deselect events 2 Press Play II button on the front panel of the DVR or on the remote control to playback all the selected events Alter...

Страница 66: ...box Copy Select the COPY button from the front panel of the DVR or on the remote control to backup copy the selected type of recorded video beginning from the Search Time to the connected backup devic...

Страница 67: ...t be part of the defined area for Motion Detection see Section 6 2 2 Only files with motion covering all of the defined motion area will be displayed as matching results Therefore based on the search...

Страница 68: ...pecific operations BACKUP DEVICE Press ENTER on the front panel of the DVR or on the remote control to connect to the backup device and display the files on the device Alternatively use the mouse to c...

Страница 69: ...ack in a full window view STOP Press this button on the front panel of the DVR or on the remote control to stop playback of the recorded video and audio and return to Live video FAST FORWARD ON REMOTE...

Страница 70: ...from the Status Bar Alternatively use the mouse to select the stop function ESC Press the ESC button on the front panel of the DVR or remote control to escape from this menu and return to the Smart S...

Страница 71: ...ll be generated as well as the backup h264 files A directory titled SelfPlayer will also be generated if it s not already existing on the backup storage device thumb drive local PC etc The user can us...

Страница 72: ...e htm is the extension for the DVR and must be included at the end of the DVR Alternatively use the DDNS domain name address if this feature has been enabled and properly setup Note Up to 6 users can...

Страница 73: ...ow FREEZE Freeze the Video PRINT Print a picture of the current video window SEQ MODE Enable Sequence mode SNAPSHOT Take a Snapshot of the video and save it to the local PC FULL VIDEO Expand the curre...

Страница 74: ...his box Change the connected DVR or connect to multiple DVRs simultaneously to mix and match camera views 9 2 3 SPLIT WINDOW PANEL Use these icons to select the number of cameras viewed on the display...

Страница 75: ...ll recorded video beginning at that time Audio will only be played back if in a single window view of a camera that has an associated audio input Use the Playback Panel icons to control the video To e...

Страница 76: ...m events include Login Logout e mail errors hard drive failures etc SOURCE ID Select the camera ID number s to search PRINT Print the event log to a printer PRINT TO FILE Export the event log to a txt...

Страница 77: ...ty of the network and the number and size of the files being copied Camera options will populate the Copy menu based on what is being viewed in the split window view Therefore if only one camera is be...

Страница 78: ...ation To hide the menu click on the PTZ Panel icon again 9 2 8 DEVICE CONFIG The Internet Explorer user interface has the ability to connect to multiple DVRs DVRs must first be added to the Device Lis...

Страница 79: ...ing main stream Or set the Video Stream to Extra for extra network stream for Dual Streaming Dual Streaming is helpful when viewing a remote DVR over a slow network connection This allows the DVR to c...

Страница 80: ...he upgrade process may take several minutes and will require the DVR to reboot to complete the process Preferably use a hardwire connection on the LAN not over the internet for the upgrade procedure B...

Страница 81: ...Synchronization is enabled select a Time Synchronization Protocol TSP server The DVR will synchronize with the specified TSP server Date System date Time System time Display Format Select the format u...

Страница 82: ...levels an administrator can also set Customized levels of access as described in the following ADV section The factory preset administrator level login name is user the password is 1234 The following...

Страница 83: ...8 Select Channels cameras the user can monitor X2 Allow the user to Zoom live and playback video PTZ Allow the user to access PTZ features if supported by the camera Volume Allow the user to change v...

Страница 84: ...y other IP address on the LAN NET MASK Enter the Net Mask for the IP address GATEWAY Enter the Gateway IP address for the system DNS If using DNS enter the Domain Name Server address for the system US...

Страница 85: ...solution sent to these devices will speed up the delivery of the video To enable Dual Streaming select one of the four levels of QCIF Fair is the lowest quality while Superfine is the highest quality...

Страница 86: ...will alert the user with a message upon playback The default setting is enabled MAX ID Select the maximum number of cameras connected to the DVR COMPRESSION This DVR uses the latest compression format...

Страница 87: ...ents occur for this camera the main display VGA or BNC will switch to the video of this camera for a specified period of time dwell Options are Off Motion Alarm Both Motion Alarm DWELL TIME Used in co...

Страница 88: ...lt in choppy video during playback As a reference live video equals 30 FPS In surveillance 15 FPS is recognized as very good quality video while 7 FPS is typically sufficient for most cases PRE RECORD...

Страница 89: ...ll record before motion is detected The Pre Record FPS set in Section 9 3 5 determines the frame rate of this recording Note Actual pre record time may be shorter than the value set if the total size...

Страница 90: ...used in a system that includes PTZ cameras since the Camera to Go must be a PTZ camera GOTO PRESET This feature works in conjunction with the Camera to Go setting above and defines the preset position...

Страница 91: ...e actions if it is triggered Up to sixteen alarm inputs such as motion detectors or door contacts that can be connected to the DVR The following is a brief description for each item in this menu and i...

Страница 92: ...ill record after the alarm input is triggered The Post Record FPS set in Section 9 3 5 determines the frame rate of this recording ALARM OUT Define which Alarm Output will be triggered when the alarm...

Страница 93: ...t the desired amount of windows to display based on the following options WPS 300 DVR 9CH 1 Window 4 Window 7 Window 9 Window WPS 300 DVR 16CH 1 Window 4 Window 7 Window 9 Window 10 Window 13 Window 1...

Страница 94: ...k The following is a brief description for each item in this menu and its specific operations START Set the start time of this time segment conditional in increments of 30 minutes in military time for...

Страница 95: ...eo loss for the camera is detected 9 3 11 E MAIL When an event occurs and e mail is enabled as a corresponding action an e mail will be sent based on the parameters set in this menu Consultation with...

Страница 96: ...nd not noticeable in h264 live or recorded playback video 9 3 12 RS232 485 The RS 232 485 Setup allows the administrator to setup the RS232 DSUB connection for control via an Home Automation System an...

Страница 97: ...e the mouse to select the appropriate setting Wirepath 500 700 set to PTZ Home Automation System set to Keyboard All others refer to the devices owners manual for proper setting BAUD RATE Set the appr...

Страница 98: ...HDD Alarm triggered video and audio is typically more important than non even normal video and audio recording in surveillance applications The DVR is designed to allow the hard drive to be partitione...

Страница 99: ...artition is full 9 4 DUAL STREAMING This DVR offers two simultaneous video and audio streams to allow the DVR to record at a higher resolution while streaming the video to remote devices at a lower re...

Страница 100: ...ce bandwidth consumption and speed video delivery to the remote PC In the Network tab select one of the four QCIF options listed in Video Stream See 9 3 3 for more information on the Video Stream sett...

Страница 101: ...at the DVR is connected to By default these numbers are 67 and 68 respectively 5 Enter the User Name and Password for the DVR By default these settings are user and 1234 respectively 6 Select Extra to...

Страница 102: ...for 16 cameras Select any camera to switch to the full window display for that camera GRID Select 1 4 9 or 16 split window view of the DVR The 4 split window view offers views in groups of four AUDIO...

Страница 103: ...her refined by ALARM MOTION VIDEO LOSS and SYSTEM LOG events shown by these four icons Events of these types can be hidden from view by toggling the associated icon and selecting the REFRESH button Al...

Страница 104: ...htm added to the end If the HTTP has been changed from the default port 80 the correct port should also be added to the address EX http 192 168 1 89 800 wap htm if the HTTP port has been changed to 8...

Страница 105: ...defective in material or workmanship under normal conditions of use This warranty shall not apply to products which have been abused modified disassembled or improperly installed Products to be repai...

Страница 106: ...earch Smart search Date time Camera Alarm Motion Video Loss Storage SATA HDD 1 500gb 9ch 1 1TB 16ch with expansion for up to 4 total if DVD and ESATA connec tors used USB Ports 2 Alarm Input Output 16...

Страница 107: ...TUP ADMINISTRATOR 5 6 SOFTWARE UPGRADE ADMINISTRATOR 5 7 SYSTEM SHUTDOWN ADMINISTRATOR 6 1 PRE CAMERA SETUP 6 2 CAMERA SETUP 6 3 ALARM SETUP 6 4 SEQ DISPLAY SETUP 6 5 SCHEDULED RECORD SETUP 6 6 HDD SE...

Страница 108: ...5 21 0 5 3 4 6 9 13 8 28 4 4 3 8 5 17 1 34 3 6 3 12 5 25 50 2 8 6 17 2 34 69 1 13 4 27 54 107 720x240 Half D1 9 1 7 2 3 3 5 6 9 13 9 28 8 2 0 2 6 3 9 7 8 15 7 31 7 2 3 3 1 4 6 9 2 18 4 37 6 2 6 3 5 5...

Страница 109: ...5 2 7 8 15 7 31 4 63 7 4 6 6 1 9 2 18 4 36 7 73 6 5 2 7 0 10 5 21 0 41 9 84 5 6 9 9 2 13 8 27 6 55 110 4 8 5 11 3 16 9 33 8 68 135 3 12 4 16 5 24 7 49 99 198 2 17 2 23 0 34 4 69 138 276 1 26 8 35 7 5...

Страница 110: ...r DVD ROM drive in the PC and copy the AVI_Converter exe file to the desktop Double click the AVI Converter icon to open the utility 2 Select the source files h264 files archived from the DVR to be co...

Страница 111: ...111027 2011 Wirepath Surveillance...

Отзывы: