background image

29

2. 

Press the green 

 SET MArk 


 key to add a bookmark at this point.

Note: You can set up to 20 bookmarks per recorded file.

go to Bookmark

1. 

During playback, press the 

 InFO 

 key to display the progress bar.

2. 

Press the yellow 

 PLAy MArk 


 key to jump to the next bookmark on the progress bar. Press the 

PLAY MARK key again to jump through the available bookmarks (identified by the 

 icon).

delete Bookmark

1. 

During playback, press the 

 InFO 

 key to display the progress bar.

2. 

Press the 

PLAy MArk 


 key to jump to the desired bookmark.

3. 

Press the green 

 SET MArk 


 key to remove the bookmark.

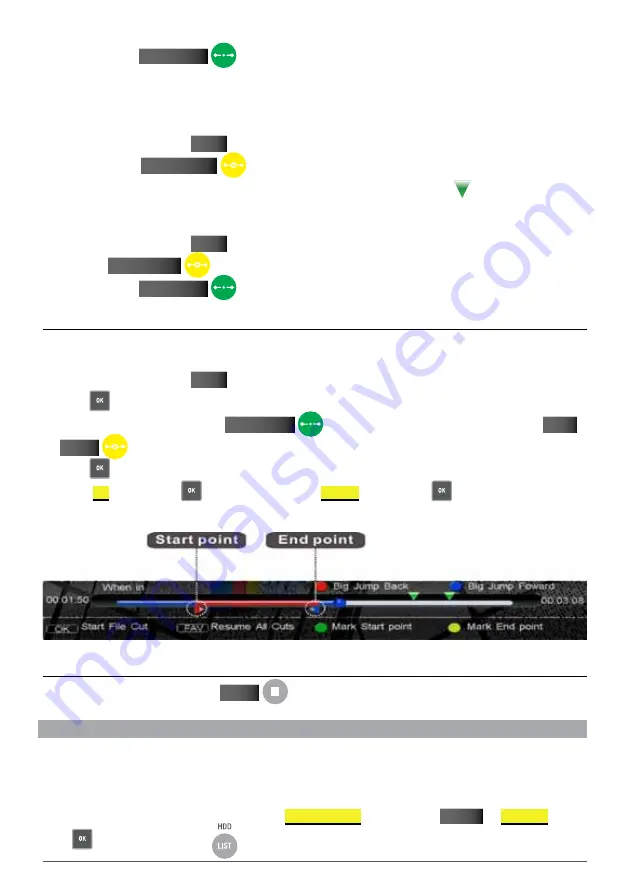
4.7.7 fIle edItIng (fIle cut)

You can cut out certain parts of your pre-recorded files. This is an ideal solution to get rid of ads, or to cut out 
unwanted sections in a recording.

1. 

During playback, press the 

 InFO 

 key to display the progress bar.

2. 

Press 

 to enter file cut mode.

3. 

Mark a start point by pressing the 

 SET MArk 


 key and mark your end point by pressing the 

PLAy 

MArk 


 key.

4. 

Press 

 to complete the operation. A message box pops up for confirmation.

5. 

Select 

 ok 

 and press the 

 key to confirm or select 

 CANCEL 

 and press the 

 key to cancel.

4.7.8 StoP PlayBack

To manually stop playback press the 

 STOP 


 key.

4.8 fIle oPeratIonS

You can perform various operations on pre-recorded files such as 


Play


Copy


Delete


Lock


Group


Rename

To bring up the file operation menu, first enter the 

 RECoRdEd FILES 

 list by pressing 

 MEnu 


 REC FILES 

 and 

press 

. Alternatively press the  

  key on your remote.

Содержание PVR10

Страница 1: ...USER MANUAL v1 0...

Страница 2: ...ewspaper table cloth curtain etc Don t put heavy objects on this receiver Unplug power adapter of this receiver from wall outlet before cleaning To reduce damage clean this unit with dry cloth Do not...

Страница 3: ...tute risk to person This symbol reminds user of presence of important operation and maintenance instructions in literature accompanying this receiver Part 2 Other MarkS This mark appears on front pane...

Страница 4: ...ls 17 3 2 Volume Control 17 3 3 Channel Information Bar 18 3 4 Channel List 18 3 4 1 Favourite Channel List 19 3 5 Audio Setting 19 3 6 TELETEXT 19 3 7 CloseD Captions 20 3 8 Picture In Picture PIP 20...

Страница 5: ...Copy File 32 4 9 TIME SHIFT 32 5 USB PLAYBACK 33 5 1 MP3 PLAYBACK 33 5 2 Digital Photos 33 6 Storage Device Management 34 6 1 Format storage device 34 6 2 Unmount USB Device 35 7 TV GUIDE Electronic...

Страница 6: ...upported Dolby 5 1 supported PIP supported MP3 playing and photo browse Teletext Closed Caption supported EPG supported Favourite channel groups Support automatic and manual search Powerful channel ed...

Страница 7: ...omposite video OUTPUT 10 11 L R Stereo Left and Right audio output 12 S VIDEO Y C S VHS video signal Output 13 14 15 INPUT 1 Composite Audio Video signal input from external source 16 17 18 INPUT 2 Co...

Страница 8: ...eviously viewed channel INFO Displays the channel information bar CH Switch channel up move cursor up CH Switch channel down move cursor down VOL Lower volume move cursor left VOL Increase volume move...

Страница 9: ...d file list FIRST Skip backwards during playback SET MARK Set a bookmark during playback PLAY MARK Play and jump to next bookmark during playback END Skip forward during playback PLAY Start playback R...

Страница 10: ...control at the receiving window of the PVR10HD remote and press the corresponding key on your TV remote such as TV POWER key to learn The indicator status changes from flashing to always bright which...

Страница 11: ...to connect the PVR10HD to your TV 2 1 1 TV CONNECTION HDMI HDMI offers the best quality connection between your TV and PVR using a single digital cable to transmit audio and video RF CABLE HDMI CABLE...

Страница 12: ...nt lead connect the green Y the blue Pb and the red Pr connectors to the corresponding ports on your PVR10HD and TV For audio using a 2x RCA lead connect the left channel audio WHITE and the right cha...

Страница 13: ...e S VIDEO output on your PVR10HD and the other end to the S VIDEO input on your TV For audio using a 2x RCA lead connect the left channel audio WHITE and the right channel audio RED connectors to the...

Страница 14: ...R10HD For video connect the yellow end of the Composite AV lead to the CVBS input on the back of your PVR10HD and to the VIDEO input on your TV For audio connect the left channel audio WHITE and the r...

Страница 15: ...V source such as another set top box DVD player Blu ray player etc You can view your external video sources directly from the channel list and choose to record to the internal hard drive or an externa...

Страница 16: ...VR10HD as future proof as possible MHEG 5 provides interactive hybrid services beyond broadcast TV and also allows for EPG data to be transmitted via the internet USB Port The PVR10HD accepts USB flas...

Страница 17: ...yed automatically with the channel number and if available channel name displayed on the front panel 3 Basic Operation This section explains the basic operation and various features of your PVR10HD 3...

Страница 18: ...of current program 2 Channel number and name 3 Current and next program information 4 Current audio mode 5 Audio decoding standard 6 Current time 7 Standard High Definition mode icon 3 4 Channel List...

Страница 19: ...ion dialogue 2 Press the and keys to select an audio language and press key to confirm 3 Press or to select left right or stereo mode 4 Press the EXIT key to save and exit Note The currently streaming...

Страница 20: ...nfirmation 4 Select OK and press the key to confirm and a reboot prompt pops up on screen 5 Select OK and press key to reboot or select EXIT and press OK key to cancel the operation Notes This functio...

Страница 21: ...atures an on screen keyboard that you will wish to use from time to time when renaming files groups etc Use the following guide to familiarise yourself with the keyboard 1 To select characters use the...

Страница 22: ...storage device to store your recordings Press the Menu key and navigate to SETTINGS Storage Device and press key to enter 1 Press the and keys to select a storage device 2 Press the key to pop up a d...

Страница 23: ...are ALWAYS 5s 10s 30s 60 seconds If Always is selected the PVR icon is displayed on screen all through the recording 4 3 4 Manual Recording Duration Set the default recording duration for the one touc...

Страница 24: ...top playback To stop recording press the STOP key again 4 5 Schedule Recording You can schedule to record future programs and at the set date and time your PVR10HD will start recording automatically Y...

Страница 25: ...to confirm 3 Move cursor to OK and press to save the new schedule 4 5 2 Modify Schedule 1 To modify an existing scheduled recording make sure you are in the Schedule List menu and use the and keys to...

Страница 26: ...e recording mode Schedule or Quick indicating whether it s a pre scheduled recording or a one touch recording Channel Name Displays the channel name that is currently being recorded File Name You can...

Страница 27: ...a This operation is not available message Note You must stop at least one recording if you wish to watch another channel from a different transponder 4 6 3 Playback Current Program You can start play...

Страница 28: ...l playback time 4 7 5 SKIP BACK SKIP FORWARD This feature allows you to easily skip through a long recording in a very short amount of time 1 Press the INFO key to display the progress bar 2 Press the...

Страница 29: ...parts of your pre recorded files This is an ideal solution to get rid of ads or to cut out unwanted sections in a recording 1 During playback press the INFO key to display the progress bar 2 Press to...

Страница 30: ...up feature you will have to create a group 1 In the recorded files list use the and keys to choose your file 2 Press to bring up a pop up dialogue box 3 Select GroupMgr from the list and press 4 Press...

Страница 31: ...ress to bring up the on screen keyboard Refer to the instructions in section 3 9 Using the On screen Keyboard on page 21 for more information on how to use the on screen keyboard 4 When done renaming...

Страница 32: ...cel and press the key to cancel the copy operation 4 9 TIME SHIFT Your PVR10HD features a very handy time shift function And depending on your settings time shift records in the background and allows...

Страница 33: ...key 1 Use the and keys to choose your file 2 Press to start music playback You can pause and resume playback using the key Notes Press the FAV key to switch between Single Play Sequence Play Random P...

Страница 34: ...vice highlighted press or the key to pop up a drop down list of available storage devices that can be formatted 2 Use the and keys to select the storage device you wish to format and press 3 Use to ke...

Страница 35: ...OK and press 3 A confirmation window will pop up choose OK to confirm or EXIT to cancel the operation Alternatively you can also select Menu SETUP STORAGE DEVICE and press the key 1 Enter the local p...

Страница 36: ...in non menu mode 7 1 View EPG Information The EPG window 1 Channel list 2 Preview window 3 Current time 4 Date table 5 Program list 6 Operation help info Press the EPG key to toggle between the channe...

Страница 37: ...VR10HD may remind you prior to recording or switching to the chosen scheduled program See section 4 3 2 REMIND BEFORE SCHEDULE START on page 23 8 Channel Search IMPORTANT Do not switch off your PVR10H...

Страница 38: ...e Manual Search window Select Menu CHANNEL MANUAL Search and press the key 1 Use the key to move down to the Frequency KHz field and input the numbers using the numeric keypad on the remote 2 When don...

Страница 39: ...ock from the edit menu you can now mark multiple channels using the key 4 Press again if you want to cancel the lock operation 5 Press the EXIT key twice to exit out of the channel edit menu and press...

Страница 40: ...an for channels that have been deleted Refer to 8 2 Auto Search on page 38 for more information on how to automatically scan channels If you wish to delete all channels before you run a auto scan you...

Страница 41: ...ait for 10 seconds without pressing any buttons and your PVR10HD will revert to the previous working resolution Time Zone Set 1 VIC 2 NSW ACT 3 QLD 4 SA 5 WA 6 TAS 7 NT Closed Caption Closed captions...

Страница 42: ...sword Again 10 3 PG LOCK Parental Guidance Menu SETTINGS PG Lock and press the key Parental controls allow you to restrict programming based on their classification The default setting has Parental Gu...

Страница 43: ...setting will automatically configure your PVR10HD based on your existing network settings However if required you may choose STATIC and enter the necessary information 10 5 Factory Reset WARNING Facto...

Страница 44: ...n upgrade your PVR10HD via the front or back USB ports or via the RS 232 port For USB upgrades make sure you have downloaded the firmware file to the root of your flash drive Press OK to initiate the...

Страница 45: ...in on page 41 No picture 1 Video cable is disconnected or incorrectly connected See 2 1 Connecting to your TV on page 11 2 The receiver is in radio mode Switch to TV mode if you need 3 Your TV is not...

Страница 46: ...C 13818 3 Decoding MPEG 1 MPEG 2 layer I and II AC3 Audio Mode Left Right and Stereo Video Decoding Standard ISO IEC 13818 2 MPEG 2 MP ML MPEG 4 AVC H 264 HP L4 Aspect Ratio 4 3 16 9 Resolution 1920 1...

Страница 47: ...or associated with transit If warranty service is required you should Telephone the Customer Care Centre on 1300 662 946 Provide a copy of your purchase receipt that shows retailers identity and date...

Страница 48: ...WINTAL PVR10HD USER MANUAL...

Отзывы: