background image

All information, illustrations and specifications in this manual are based on the latest information  

available at the time of publication. We reserve the right to make changes at any time without notice.


34 

6.0. Before Using 

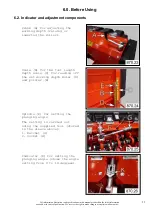
6.5. Adjusting the angular position 

5.


Attach a ratchet (C) with a 
matching socket (D) to the 
spindle (E). 
 
Adjust by turning: 
 

clockwise for 0 to 18 
 
counterclockwise for 18 to 0 


6.


The setting can be read off 
on the indicator (F) 


7.


We recommend the following 
angles: 
for 

hollow tines  position   0 

for 

solid tines   position     6-12


 Position     0 

 Position     6 

 Position   12 

 Position   18


8.


The final position of the 
spindle (E) depends on the 
flap (B), which is pivoted 
up to fix the setting in 
place. 

9.


Secure the folding plug (A) 
to the spindle (E). 


Содержание Terra Spike SL 6

Страница 1: ...Translation of original operating instructions Deep Aerator Terra Spike SL 6 870 000 From machine ID no Version June 2015 870 99 09...

Страница 2: ...ll information illustrations and specifications in this manual are based on the latest information available at the time of publication We reserve the right to make changes at any time without notice...

Страница 3: ...ll information illustrations and specifications in this manual are based on the latest information available at the time of publication We reserve the right to make changes at any time without notice...

Страница 4: ...commercial use and customary use on 1 sand based greens or 2 lawns constructed according to guidelines or standards such as tees or sports fields but with restrictions in the working depth to loosen s...

Страница 5: ...ent components 29 6 3 Mounting the tines 30 31 6 4 Adjusting the TERRA SPIKE 32 33 6 5 Installing drive 33 34 6 6 Raising the rear roller 35 7 0 Operation 36 39 7 1 General 36 7 2 Correct sequence for...

Страница 6: ...SAFETY INSTRUCTIONS Carefully read all safety messages in this manual and warning signs on your machine Keep warning signs in good condition Replace missing or damaged warning signs Make sure that new...

Страница 7: ...th the machine Prolonged exposure to loud noise can cause impairment or loss of hearing Wear a suitable hearing protective device such as earplugs to protect against objectionable or uncomfortably lou...

Страница 8: ...before making adjustments connections or cleaning out PTO driven equipment Avoid high pressure fluids High pressure fluids which leak under high pressure can penetrate the skin and cause serious inju...

Страница 9: ...ion in traffic Use headlights flashing warning lights and turn signals day and night Follow local regulations for equipment lighting and marking Always keep the safety devices in good condition Replac...

Страница 10: ...tially toxic fumes and dust Hazardous fumes can be generated when paint is heated by welding soldering or using a torch Do all work outside or in a well ventilated area Dispose of paint and solvent pr...

Страница 11: ...hine to indicate potential danger The hazard is identified by an exclamation point in a warning triangle An adjacent symbol shows information on how to avoid personal injury These safety signs their p...

Страница 12: ...e time of publication We reserve the right to make changes at any time without notice 12 1 0 Safety Measures 1 1 Safety Decals Parking position Before parking fix rear roller with ring pins and secure...

Страница 13: ...We reserve the right to make changes at any time without notice 13 1 0 Safety Measures 1 1 Safety Decals Tines Be careful to avoid injury to foot Service Before performing service or repair work turn...

Страница 14: ...chutzschilder und richtig platzierte und funktionsf hige Sicherheitsvorrichtungen betreiben c Die Maschine nicht betreiben wenn Kinder oder andere in der N he sind d Lassen Sie nicht zu da die Maschin...

Страница 15: ...lic highways the relevant traffic regulations must be observed Before moving off ensure that the immediate area of the machine is clear e g no children nearby Ensure that your visibility is not impair...

Страница 16: ...quipment PSA such as gloves goggles ear protectors ATTENTION DANGER Be careful when cutting through the tension straps There is a risk of being injured when the straps are cut 2 2 Unpacking and settin...

Страница 17: ...ides of the Terra Spike These parts have been installed only for shipping 5 Raise the Terra Spike until the pin F can be inserted in the rear hole G in order to secure the rear roller The pin F is sec...

Страница 18: ...nversion work when mounted Lower the Terra Spike on the fully lowered front roller Switch off the tractor and secure it against unintentional starting To remove the roller and to attach the swather ra...

Страница 19: ...s at any time without notice 19 2 0 Assembly 2 3 Mounting the swather Park the swather behind the Terra Spike 5 With one hand grasp the transverse frame of the swather and lift between the arm bracket...

Страница 20: ...is delivered fastened to a pallet Only use a forklift with sufficient load carrying capacity Keep well clear of hoisted loads If the load falls it may cause fatal injuries Improper transport and moun...

Страница 21: ...ERRA SPIKE is still fastened to the pallet move the forks into the shipping frame note direction of approach carefully raise the shipping frame unload the TERRA SPIKE from the carrier vehicle when bal...

Страница 22: ...y time without notice 22 3 0 Transport 3 2 Transporting the TERRA SPIKE 3 2 3 Hitching point for transport on a trailer ATTENTION DANGER Note the description of removal in Section 5 2 RISK OF TIPPING...

Страница 23: ...tention to The load on the three point hitch Only attach the TERRA SPIKE if the following is true the engine turned off the PTO shaft disengaged with the rear roller fixed Use the TERRA SPIKE only wit...

Страница 24: ...n on the frame 2 Pin and secure the upper link with the upper link pin B in the correct hole pattern 3 Tighten the tension lock 5 of the stabilizing chain 4 Adjust the universal shaft refer to Chapter...

Страница 25: ...y time without notice 25 4 0 Attachment to tractor 4 3 Adjusting the pto shaft To adjust the length hold the two shaft parts side by side within the shortest operating position and mark them Cut off t...

Страница 26: ...SPIKE the engine turned off the PTO shaft disengaged with fixed rear roller Place the Terra Spike only if the front roller is fully lowered and the rear roller is fixed in place This provides for a s...

Страница 27: ...position 5 3 Parking TERRA SPIKE with rear roller Sequence 1 Park the towing vehicle 2 Set the parking brake to secure the tractor against rolling away 3 Lower the roller to the bottom position 4 Lowe...

Страница 28: ...ty equipment has been properly mounted It will be too late for this during operation Make sure that no one is in the danger zone of the implement and the turning PTO shaft before engaging the power ta...

Страница 29: ...or and adjustment components Crank A for adjusting the working depth raising or lowering the roller Scale B for the tool length Depth scale C for reading off the set working depth Ruler D and pointer...

Страница 30: ...lder you are working with upwards by pressing an upper tine holder 5 Plastic plugs are inserted into the cylindrical holders for protection These components prevent the supports that are not installed...

Страница 31: ...e protective cap A from the tool head B 2 Loosen nut C 3 Place 1 2 tine E or 5 16 tine F with bushing G as shown in illustration 4 Check that the tip of the tine is correctly positioned to the directi...

Страница 32: ...ro position Each time the device is adjusted tine length A must be measured The distance B represents the desired working depth Sequence when adjusting the TERRA SPIKE 1 Adjust working depth a By movi...

Страница 33: ...the upper link H 4 The setting can be checked with a bubble level K on a horizontal surface 6 5 Adjusting the angular position CAUTION Perform the work only when the parts are attached Switch off the...

Страница 34: ...a ratchet C with a matching socket D to the spindle E Adjust by turning clockwise for 0 to 18 counterclockwise for 18 to 0 6 The setting can be read off on the indicator F 7 We recommend the following...

Страница 35: ...a safety feature and must not be removed By being raised the rear roller acts as hoop guard for the danger zone behind the working tools For working with hollow tines we recommend setting the trailin...

Страница 36: ...of CHILDREN Do not drive backwards when the TERRA SPIKE is operating Avoid big changes in direction while using articulated tractors The power take off shaft never engage when the motor is switched of...

Страница 37: ...urf retainer Check the setting of the Terra Spike if necessary reduce the working depth Reduce angle of attack Reduce the power takeoff shaft speed Hood clamp fasteners are loose Re tighten clamp fast...

Страница 38: ...7 4 The guide roller turns only with great difficulty The retaining screws were not loosened Loosen the locking screws The bevel wheels were mounted without being left the required play Check the eng...

Страница 39: ...04 in from the roller Front roller Loosen hex nuts A In the attached recesses the scrapers are to be pushed with a screwdriver into the desired position Afterwards re tighten all the hex nuts A Rear r...

Страница 40: ...ntenance remove all parts not belonging to the TERRA SPIKE Then mount the cover See chapter Safety Equipment 1 2 Use original parts only parts from other manufacturers are often not of the required qu...

Страница 41: ...mage and cracks Visual inspection Built up dirt inside Clean Manual lubrication point see Chapter 8 3 1 Every 40 The gears couplings universal joint shaft etc Check for noises Drive shaft lubrication...

Страница 42: ...Clean up leaking grease Before starting the machine after a longer standstill lubricate and maintain the entire machine Lubricate frequently as required Until all lubrication points are sufficiently...

Страница 43: ...contact with aggressive liquids e g carbon tetrachloride tri benzene caustic solutions cids etc Soak up drops of oil with a binding agent and dispose of according to the regulations Eliminate the cau...

Страница 44: ...res it to be open To lock it as shown in the picture insert the spring clips into the cover 8 6 Checking or replacing rubber parts ATTENTION Carry out this maintenance work only with the equipment dem...

Страница 45: ...install the metal rail C the hex bolts A and D must be tightened to a torque of 120 Nm 88 5 lbf ft 5 To remove the defective rubber buffers E the countersunk screw F must be loosened 6 When installing...

Страница 46: ...ce work when the TERRA SPIKE is mounted Switch off the tractor and secure it against unintentional starting There is a risk of injury due to the tine tip 1 Place tine holder that is being worked on in...

Страница 47: ...he TERRA SPIKE is mounted Switch off the tractor and secure it against unintentional starting There is a risk of injury due to the tine tip 1 Place tine holder that is being worked on in up position b...

Страница 48: ...ve the right to make changes at any time without notice 48 8 0 Service 8 9 Checking and tensioning power transmission belt ATTENTION Only perform maintenance work when the TERRA SPIKE is mounted Switc...

Страница 49: ...ard A by uniformly loosening the hex bolts 2 The tensioner pulley lever with tensioner pulley B must be completely relieved of tension for the removal of the drive belt 3 Loosen and turn the upper loc...

Страница 50: ...he tapered tensioning bushing N of the V belt pulley onto the shaft M 13 Align the spring bushing N with the securing holes of the V belt pulley 14 The V belt pulley L is to be aligned to the other V...

Страница 51: ...time without notice 51 8 0 Service 8 10 Changing drive belt 18 Turn the hex nut F approx 20 mm upwards 19 Turn the hex nut E down a distance X 70 mm 2 76 in 20 Check the belt tension as specified in C...

Страница 52: ...A by uniformly loosening the hex bolts 2 The tensioner pulley lever with tensioner pulley B must be completely relieved of tension for the removal of the drive belt 3 Loosen and turn the upper locknut...

Страница 53: ...e tapered tensioning bushing N of the V belt pulley onto the shaft M 13 Align the spring bushing N with the securing holes of the V belt pulley 14 The V belt pulley L is to be aligned to the other V b...

Страница 54: ...y time without notice 54 8 0 Service 8 11 Installing drive 18 Turn the hex nut F approx 20 mm upwards 19 Turn the hex nut E down a distance X 70 mm 2 76 in 20 Check the belt tension as specified in Ch...

Страница 55: ...k and release from the Terra Spike Open hood and secure as specified in Chapter 8 5 Remove the folding plug A and swing the flap B down Loosen and remove the nut C Carefully loosen and remove the hex...

Страница 56: ...13 Checking or replacing rubber parts for the downholder carrier Lower the Terra Spike on the completely lowered front roller Loosen and remove all the hex nuts A Using the rear hydraulic system of t...

Страница 57: ...er Safety and Precautions and observe local safety regulations The following dangers exist Heavy parts might fall down after dismounting Sharp edges The machine might tilt and crush someone Disassembl...

Страница 58: ...hout notice 58 8 0 Service 8 15 Unauthorized modification and spare part manufacturing Modifications of the TERRA SPIKE are only authorized with the permission of the manufacturer Original spare parts...

Страница 59: ...to make changes at any time without notice 59 9 0 Equipment 9 1 Equipment supplied Terra Spike SL 6 in shipping frame or on shipping floor with drive for crankshaft speeds of 280 rpm or 360 rpm or 460...

Страница 60: ...10 mm Max working depth tines included 7 87 in 200 mm Max working depth hollow tines included 7 87 in 200 mm Min power required for tractor 25 HP 18 KW Max power of tractor at crank speed 280 rpm at c...

Страница 61: ...ecifications in this manual are based on the latest information available at the time of publication We reserve the right to make changes at any time without notice 61 10 0 Specifications 10 1 Technic...

Страница 62: ...1350 1000 M27 490 360 625 450 950 700 1200 875 1350 1000 1700 1250 1600 1150 2000 1500 M30 675 490 850 625 1300 950 1650 1200 1850 1350 2300 1700 2150 1600 2700 2000 M33 900 675 1150 850 1750 1300 22...

Страница 63: ...es at any time without notice 63 10 0 Specifications 10 3 Serial Number Record product identification No serial no in the space provided below Always quote this number when ordering spare parts or in...

Отзывы: